
Submitting a Flink OpenSource SQL Job to Query RDS for MySQL Data Using DLI
Scenario
DLI Flink jobs can use other cloud services as data sources and sink streams for real-time compute.
This example describes how to create and submit a Flink OpenSource SQL job that uses Kafka as the source stream and RDS as the sink stream.
Procedure
You need to create a Flink OpenSource SQL job that has a source stream and a sink stream. The source stream reads data from Kafka, and the sink stream writes data to RDS for MySQL. Procedure shows the process.
Complete the preparations in Preparations before performing the following operations.
|
Procedure |
Description |
|---|---|
|
In this example, a Kafka instance is created as the data source. |
|
|
In this example, an RDS for MySQL DB instance is created as the data destination. |
|
|
Create an OBS bucket to store checkpoints, job logs, and debugging test data for the Flink OpenSource SQL job. |
|
|
Step 4: Create an Elastic Resource Pool and Add Queues to the Pool |
Create compute resources required for submitting the Flink OpenSource SQL job. |
|
Step 5: Create an Enhanced Datasource Connection Between DLI and Kafka |
Create an enhanced datasource connection to connect the DLI elastic resource pool and the Kafka instance. |
|
Step 6: Create an Enhanced Datasource Connection Between DLI and RDS |
Create an enhanced datasource connection to connect the DLI elastic resource pool and the RDS for MySQL DB instance. |
|
Step 7: Use DEW to Manage Access Credentials and Create an Agency That Allows DLI to Access DEW |
In cross-source analysis scenarios, use DEW to manage access credentials of data sources and create an agency that allows DLI to access DEW. |
|
Once you have prepared a source stream and a sink stream, you can create a Flink OpenSource SQL job to analyze the data. |
Preparations
- Register a Huawei ID and enable Huawei Cloud services. Make sure your account is not in arrears or frozen.
- Configure an agency for DLI.
To use DLI, you need to access services such as Object Storage Service (OBS), Virtual Private Cloud (VPC), and Simple Message Notification (SMN). If it is your first time using DLI, you will need to configure an agency to allow access to these dependent services.
- Log in to the DLI management console using your account. In the navigation pane on the left, choose Global Configuration > Service Authorization.
- On the agency settings page, select the agency permissions under Basic Usage, Datasource, and O&M and click Update.
- View and understand the notes for updating the agency and click OK. The DLI agency permissions are updated.
Figure 1 Configuring an agency for DLI

- Once configured, you can check the agency dli_management_agency in the agency list on the IAM console.
- Configure a DLI job bucket.
Before using DLI to submit jobs, you need to configure a DLI job bucket. The bucket is used to store temporary data generated during DLI job running, such as job logs and results.
Configure a DLI job bucket on the Global Configuration > Project page of the DLI management console by referring to Configuring a DLI Job Bucket.
Step 1: Prepare a Source Stream
In this example, Kafka is the source stream.
Enable DIS to import Kafka data to DLI. For details, see Buying an Instance.
- Create the dependent Kafka resources.
Before creating a Kafka instance, ensure the availability of resources, including a virtual private cloud (VPC), subnet, security group, and security group rules.
- For how to create a VPC and subnet, see Creating a VPC and Subnet. For how to create and use a subnet in an existing VPC, see Creating a Subnet for the VPC.

- The created VPC and the Kafka instance you will create must be in the same region.
- Retain the default settings unless otherwise specified.
- For how to create a security group, see Creating a Security Group. For how to add rules to a security group, see Creating a Subnet for the VPC.
For details, see Kafka Network Connection Conditions.
- For how to create a VPC and subnet, see Creating a VPC and Subnet. For how to create and use a subnet in an existing VPC, see Creating a Subnet for the VPC.
- Create a Kafka premium instance as the job source stream.
- Log in to the DMS for Kafka management console.
- Select a region in the upper left corner.
- On the DMS for Kafka page, click Buy Instance in the upper right corner and set related parameters. The required instance information is as follows:
For how to set DMS for Kafka instance parameters, see Buying a Kafka Instance.
Table 2 Parameters for buying a DMS for Kafka instance Parameter
Description
Example Value
Region
DMS for Kafka instances in different regions cannot communicate with each other over an intranet. For lower network latency and quick resource access, select the region nearest to you.
CN East-Shanghai2
AZ
An AZ is a physical region where resources have independent power supplies and networks. AZs are physically isolated but interconnected through an internal network.
Select one AZ or a minimum of three AZs. The AZ setting is fixed once the instance is created.
AZ 1, AZ 2, and AZ 3
Version
Kafka version, which cannot be changed after the instance is created.
3.x
Specifications
The options are Cluster and Single-node.
Cluster
Broker Flavor
Select a broker flavor based on service requirements.
Maximum number of partitions per broker × Number of brokers = Maximum number of partitions of an instance. Creating a topic fails when the total number of partitions for all topics exceeds the instance partition limit.
kafka.2u4g.cluster.small
Brokers
Specify the broker quantity.
3
Storage Space per Broker
Select a disk type and specify the disk size. You cannot change the disk type once the instance is created.
Options for Type are High I/O, Ultra-high I/O, General Purpose SSD, and Extreme SSD.
High I/O | 100 GB
VPC
Select a created or shared VPC.
A VPC can create an isolated virtual network for your Kafka instances, where you can configure and manage networks independently. To check or create a VPC, click Manage VPCs on the right to access the VPC console.
The VPC you specify here cannot be changed once the Kafka instance is created.
Select the VPC created in 1.
Subnet
Select a created or shared subnet.
Once the instance is created, its subnet cannot be changed.
Select the subnet created in 1.
Security Group
Select a created security group.
Select the security group created in 1.
Access Mode
There are two modes:
- Plaintext Access: SASL authentication is not conducted when a client connects to the Kafka instance.
- Ciphertext Access: SASL authentication is conducted when a client connects to the Kafka instance.
Plaintext Access
Instance Name
Enter an instance name.
The name must start with a letter and consist of 4 to 64 characters. Only letters, digits, hyphens (-), and underscores (_) are allowed.
kafka-dliflink
Enterprise Project
An enterprise project organizes cloud resources into groups, allowing you to manage both resources and members by project. The default project is default.
default
- Click Buy.
- Confirm that the instance information is correct, read and agree to the HUAWEI CLOUD Customer Agreement, and click Submit. It takes about 10 to 15 minutes to create an instance.
- Create a Kafka topic.
- Click the name of the created Kafka instance. The basic information page of the instance is displayed.
- Choose Topics in the navigation pane on the left. On the displayed page, click Create Topic. Configure the following parameters:
- Topic Name: For this example, enter testkafkatopic.
- Partitions: Set the value to 1.
- Replicas: Set the value to 1.
Retain the default values for other parameters.
Step 2: Prepare a Sink Stream
Use RDS for MySQL as the data sink stream and create an RDS for MySQL DB instance.
- Log in to the RDS management console.
- Select a region in the upper left corner.
- Click Buy DB Instance in the upper right corner of the page and set related parameters. Retain the default values for other parameters.
For the parameters, see Buying an RDS for MySQL Instance.
Table 3 RDS for MySQL instance parameters Parameter
Description
Example Value
Billing Mode
Billing mode of the RDS for MySQL DB instance
- Yearly/monthly is a prepaid billing. You pay in advance for a subscription term, and in exchange, you get a discounted rate. The longer the subscription, the bigger the discount. This mode is a good option for long-term, stable services.
- Pay-per-use: A postpaid billing mode. You pay as you go and just pay for what you use. The DB instance usage is calculated by the second but billed every hour. This mode allows you to flexibly adjust resource usage. You do not need to provision resources in advance, or have excessive or insufficient resources preset.
Pay-per-use
Region
Select the region where DLI is.
Products in different regions cannot communicate with each other through a private network. After a DB instance is created, the region cannot be changed. Exercise caution when selecting a region.
CN East-Shanghai2
Instance Name
Instance name
The name can contain 4 to 64 characters and must start with a letter. Only letters (case-sensitive), digits, hyphens (-), and underscores (_) are allowed.
If you intend to create multiple DB instances and read replicas at a time, the allowed length for each instance name will change.
rds-dliflink
DB Engine
MySQL
MySQL
DB Engine Version
If you select MySQL for DB Engine, select an engine version that best suits your service needs. You are advised to select the latest available version for more stable performance, higher security, and greater reliability.
8.0
DB Instance Type
Primary/standby mode of the DB instance
- Primary/Standby: An HA architecture. In a primary/standby pair, each instance has the same instance class. When a primary instance is being created, a standby instance is provisioned along with it to provide data redundancy. The standby instance is invisible to you after being created.
- Single: A single-node architecture is less expensive than a primary/standby DB pair. It is recommended for development and testing of microsites, and small- and medium-sized enterprises, or for learning about RDS.
Primary/Standby
Storage Type
Determines the instance read/write speed. The higher the maximum throughput, the faster the read and write speeds.
Cloud SSD
AZ
For a single DB instance, you only need to select a single AZ.
Custom
Time Zone
Select a time zone based on the region you selected. You can change it after the DB instance is created.
Retain the default value.
Instance Class
vCPUs and memory. These instance classes support varying number of connections and maximum IOPS.
2 vCPUs | 4 GB
Storage Space
If the storage type is cloud SSD or extreme SSD, you can enable storage autoscaling. If the available storage drops to a specified threshold, autoscaling is triggered.
40 GB
Disk Encryption
Determine whether to enable disk encryption.
- Deselected: Encryption is not enabled.
- Selected: Selecting it enhances data security but may slightly impact database read and write performance.
For more details, see Buying an RDS for MySQL DB Instance.
Disabled
VPC and Subnet
Select an existing VPC and subnet.
For how to recreate a VPC and subnet, refer to .
NOTE:In datasource scenarios, the CIDR block of the data source cannot overlap that of the elastic resource pool.
Select the VPC and subnet created in 1.
Database Port
Port 3306 is used by default.
For RDS for MySQL instances, the value ranges from 1024 to 65535, excluding 12017, 33071, and 33062, which are reserved for RDS system use.
3306
Security Group
Enhances security by providing rules that control access to RDS from other services.
The security group where the data source is must allow access from the CIDR block of the DLI elastic resource pool.
Select the security group created in 1.
Password
Set a password for logging in to the DB instance.
-
Administrator
DB administrator. The default username is root.
root
Administrator Password
Administrator password
The password must consist of 8 to 32 characters and contain at least three types of the following characters: uppercase letters, lowercase letters, digits, and the following special characters: ~!@#$%^*-_=+?,()&.| Enter a strong password and change it regularly to enhance security and prevent risks like brute-force attacks.
If the password you provide is considered weak by the system, you will be prompted to provide a stronger password.
Keep this password secure. The system cannot retrieve it.
-
Parameter Template
A template of parameters for creating an instance. The template contains engine configuration values that are applied to one or more instances.
Default-MySQL-8.0
Enterprise Project
If the instance has been associated with an enterprise project, select the target project from the Enterprise Project drop-down list.
default
Quantity
Number of instances to buy
1
- Click Next and confirm the specifications.
- Click Submit. The RDS DB instance is created.
- Log in to the MySQL database and create table orders in database flink.
Log in to the MySQL instance, click the flink database. On the displayed page, click SQL Window. Enter the following table creation statement in the SQL editing pane to create a table.
CREATE TABLE `flink`.`orders` (
	`order_id` VARCHAR(32) NOT NULL,
	`order_channel` VARCHAR(32) NULL,
	`order_time` VARCHAR(32) NULL,
	`pay_amount` DOUBLE UNSIGNED NOT NULL,
	`real_pay` DOUBLE UNSIGNED NULL,
	`pay_time` VARCHAR(32) NULL,
	`user_id` VARCHAR(32) NULL,
	`user_name` VARCHAR(32) NULL,
	`area_id` VARCHAR(32) NULL,
	PRIMARY KEY (`order_id`)
)	ENGINE = InnoDB
	DEFAULT CHARACTER SET = utf8mb4
	COLLATE = utf8mb4_general_ci;
Step 3: Create an OBS Bucket to Store Output Data
In this example, you need to enable OBS for job JobSample to provide DLI Flink jobs with the functions of checkpointing, saving job logs, and commissioning test data.
For how to create a bucket, see Creating a Bucket.
- In the navigation pane on the OBS management console, choose Object Storage.
- In the upper right corner of the page, click Create Bucket and set bucket parameters.
Table 4 OBS bucket parameters Parameter
Description
Example Value
Region
Geographic area where a bucket resides. Select the region where DLI is.
CN East-Shanghai2
Bucket Name
Name of the bucket. The name must be unique across all regions and accounts. Once a bucket is created, its name cannot be changed.
obstest
Storage Class
Storage class of the bucket. You can choose a storage class that meets your needs for storage performance and costs.
Standard
Bucket Policies
Controls read and write permissions for a bucket.
If you select Private, only users granted permissions by the bucket ACL can access the bucket.
Private
Enterprise Project
You can add the bucket to an enterprise project for unified management.
default
- Click Create Now.
Step 4: Create an Elastic Resource Pool and Add Queues to the Pool
To create a Flink OpenSource SQL job, you must use your own queue as the existing default queue cannot be used. In this example, create an elastic resource pool named dli_resource_pool and a queue named dli_queue_01.
- Log in to the DLI management console.
- In the navigation pane on the left, choose Resources > Resource Pool.
- On the displayed page, click Buy Resource Pool in the upper right corner.
- On the displayed page, set the parameters.
In this example, we will buy the resource pool in the CN East-Shanghai2 region. Table 5 describes the parameters.
Table 5 Parameter descriptions Parameter
Description
Example Value
Region
Select a region where you want to buy the elastic resource pool.
CN East-Shanghai2
Project
Project uniquely preset by the system for each region
Default
Name
Name of the elastic resource pool
dli_resource_pool
Type
Specifications of the elastic resource pool
Standard
CU Range
The maximum and minimum CUs allowed for the elastic resource pool
64-64
CIDR Block
CIDR block the elastic resource pool belongs to. If you use an enhanced datasource connection, this CIDR block cannot overlap that of the data source. Once set, this CIDR block cannot be changed.
172.16.0.0/19
Enterprise Project
Select an enterprise project for the elastic resource pool.
default
- Click Buy.
- Click Submit.
- In the elastic resource pool list, locate the pool you just created and click Add Queue in the Operation column.
- Set the basic parameters listed below.
Table 6 Basic parameters for adding a queue Parameter
Description
Example Value
Name
Name of the queue to add
dli_queue_01
Type
Type of the queue
- To execute SQL jobs, select For SQL.
- To execute Flink or Spark jobs, select For general purpose.
For general purpose
Enterprise Project
Select an enterprise project for the elastic resource pool.
default
- Click Next and configure scaling policies for the queue.
Click Create to add a scaling policy with varying priority, period, minimum CUs, and maximum CUs.
Figure 2 shows the scaling policy configured in this example.Table 7 Scaling policy parameters Parameter
Description
Example Value
Priority
Priority of the scaling policy in the current elastic resource pool. A larger value indicates a higher priority. In this example, only one scaling policy is configured, so its priority is set to 1 by default.
1
Period
The first scaling policy is the default policy, and its Period parameter configuration cannot be deleted or modified.
The period for the scaling policy is from 00 to 24.
00-24
Min CU
Minimum number of CUs allowed by the scaling policy
16
Max CU
Maximum number of CUs allowed by the scaling policy
64
- Click OK.

Step 5: Create an Enhanced Datasource Connection Between DLI and Kafka
You need to create an enhanced datasource connection for the Flink OpenSource SQL job. For details, see "Datasource Connections" > "Creating an Enhanced Datasource Connection" in the Data Lake Insight User Guide.
- Enhanced datasource connections support only pay-per-use queues.
- The CIDR block of the DLI queue bound with a datasource connection cannot overlap with the CIDR block of the data source.
- Datasource connections cannot be created for the default queue.
- To access a table across data sources, you need to use a queue bound to a datasource connection.
- Create a Kafka security group rule to allow access from the CIDR block of the DLI queue.
- On the Kafka management console, click an instance name on the DMS for Kafka page. Basic information of the Kafka instance is displayed.
- In the Connection pane, obtain the Instance Address (Private Network). In the Network pane, obtain the VPC and subnet of the instance.
- Click the security group name in the Network pane. On the displayed page, click the Inbound Rules tab and add a rule to allow access from the DLI queue.
For example, if the CIDR block of the queue is 10.0.0.0/16, set Priority to 1, Action to Allow, Protocol to TCP, Type to IPv4, Source to 10.0.0.0/16, and click OK.
- Create an enhanced datasource connection to Kafka.
- Log in to the DLI management console. In the navigation pane on the left, choose Datasource Connections. On the displayed page, click Create in the Enhanced tab.
- In the displayed dialog box, set the following parameters: For details, see the following section:
- Connection Name: Name of the enhanced datasource connection For this example, enter dli_kafka.
- Resource Pool: Select the elastic resource pool created in Step 4: Create an Elastic Resource Pool and Add Queues to the Pool.
- VPC: Select the VPC of the Kafka instance.
- Subnet: Select the subnet of Kafka instance.
- Set other parameters as you need.
Click OK. Click the name of the created datasource connection to view its status. You can perform subsequent steps only after the connection status changes to Active.
- Choose Resources > Queue Management and locate the queue created in Step 4: Create an Elastic Resource Pool and Add Queues to the Pool. In the Operation column, click More and select Test Address Connectivity.
- In the displayed dialog box, enter Kafka instance address (private network):port in the Address box and click Test to check whether the instance is reachable. Note that multiple addresses must be tested separately.
Step 6: Create an Enhanced Datasource Connection Between DLI and RDS
- Create an RDS security group rule to allow access from CIDR block of the DLI queue.
If the RDS DB instance and Kafka instance are in the same security group of the same VPC, skip this step. Access from the DLI queue has been allowed in 1.
- Go to the RDS console, click the name of the target RDS for MySQL DB instance on the Instances page. Basic information of the instance is displayed.
- In the Connection Information pane, obtain the floating IP address, database port, VPC, and subnet.
- Click the security group name. On the displayed page, click the Inbound Rules tab and add a rule to allow access from the DLI queue. For example, if the CIDR block of the queue is 10.0.0.0/16, set Priority to 1, Action to Allow, Protocol to TCP, Type to IPv4, Source to 10.0.0.0/16, and click OK.
- Create an enhanced datasource connection to RDS.
If the RDS DB instance and Kafka instance are in the same VPC and subnet, skip this step. The enhanced datasource connection created in 2 has connected the subnet.
If the two instances are in different VPCs or subnets, perform the following steps to create an enhanced datasource connection:- Log in to the DLI management console. In the navigation pane on the left, choose Datasource Connections. On the displayed page, click Create in the Enhanced tab.
- In the displayed dialog box, set the following parameters: For details, see the following section:
- Connection Name: Name of the enhanced datasource connection For this example, enter dli_rds.
- Resource Pool: Select the name of the queue created in Step 4: Create an Elastic Resource Pool and Add Queues to the Pool.
- VPC: Select the VPC of the RDS DB instance.
- Subnet: Select the subnet of RDS DB instance.
- Set other parameters as you need.
Click OK. Click the name of the created datasource connection to view its status. You can perform subsequent steps only after the connection status changes to Active.
- Choose Resources > Queue Management and locate the queue created in Step 4: Create an Elastic Resource Pool and Add Queues to the Pool. In the Operation column, click More and select Test Address Connectivity.
- In the displayed dialog box, enter Floating IP address:Database port of the RDS for MySQL DB instance in the Address box and click Test to check if the instance is reachable.
Step 7: Use DEW to Manage Access Credentials and Create an Agency That Allows DLI to Access DEW
In cross-source analysis scenarios, you need to set attributes such as the username and password in the connector. However, information such as usernames and passwords is highly sensitive and needs to be encrypted to ensure user data privacy.
Flink 1.15 allows for the use of DEW to manage credentials. Before running a job, create a custom agency and configure agency information within the job.
Data Encryption Workshop (DEW) and Cloud Secret Management Service (CSMS) joint form a secure, reliable, and easy-to-use privacy data encryption and decryption solution. This example describes how a Flink OpenSource SQL job uses DEW to manage RDS access credentials.
- Create an agency for DLI to access DEW and complete authorization.
- Create a shared secret in DEW.
- Log in to the DEW management console.
- In the navigation pane on the left, choose Cloud Secret Management Service > Secrets.
- Click Create Secret. On the displayed page, configure basic secret information.
- Secret Name: Enter a secret name. In this example, the name is secretInfo.
- Secret Value: Enter the username and password for logging in to the RDS for MySQL DB instance.
- The key in the first line is MySQLUsername, and the value is the username for logging in to the DB instance.
- The key in the second line is MySQLPassword, and the value is the password for logging in to the DB instance.
Figure 3 Secret Value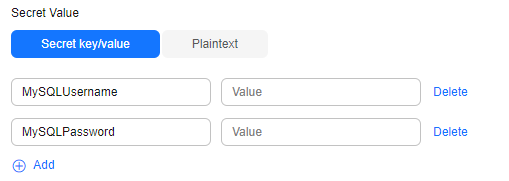
- Set other parameters as required and click OK.
Step 8: Create a Flink OpenSource SQL Job
After the source and sink streams are prepared, you can create a Flink OpenSource SQL job.
- In the left navigation pane of the DLI management console, choose > . The Flink Jobs page is displayed.
- In the upper right corner of the Flink Jobs page, click Create Job.
Table 8 describes the parameters required for this example. For other parameters, retain the default values.
For parameter details, see Creating a Flink OpenSource SQL Job.
Table 8 Job parameters Parameter
Description
Example Value
Type
Select Flink OpenSource SQL. This means you will need to start jobs by compiling SQL statements.
Flink OpenSource SQL
Name
Job name. The value can contain up to 57 characters. Only letters, digits, hyphens (-), and underscores (_) are allowed.
NOTE:The job name must be globally unique.
JobSample
- Click OK to enter the editing page.
- Set job running parameters.
Table 9 describes the mandatory parameters.
For parameter details, see Creating a Flink OpenSource SQL Job.
Table 9 Job running parameters Parameter
Description
Example Value
Queue
Select a queue to run the job.
dli_queue_01
Flink Version
Flink version used for job running. Flink versions have varying feature support.
For details about the syntax of Flink 1.12, see Flink OpenSource SQL 1.12 Syntax.
Flink 1.12
Resource Configuration Version
DLI offers various resource configuration templates based on different Flink engine versions.
Compared with the v1 template, the v2 template does not support the setting of the number of CUs. The v2 template supports the setting of Job Manager Memory and Task Manager Memory.
v1: applicable to Flink 1.12, 1.13, and 1.15.
v2: applicable to Flink 1.13, 1.15, and 1.17.
V1
- Click Save.
- Edit the Flink OpenSource SQL job.
In the SQL statement editing area, enter query and analysis statements as you need. The example statements are as follows. Note that the values of the parameters in bold must be changed according to the comments.
CREATE TABLE kafkaSource (
  order_id string,
  order_channel string,
  order_time string,
  pay_amount double,
  real_pay double,
  pay_time string,
  user_id string,
  user_name string,
  area_id string
) WITH (
  'connector' = 'kafka',
  'topic' = 'testkafkatopic',// Topic to be written to Kafka. Log in to the Kafka console, click the name of the created Kafka instance, and view the topic name on the Topic Management page.
  'properties.bootstrap.servers' = "192.168.0.237:9092,192.168.0.252:9092,192.168.0.137:9092", // Replace it with the internal network address and port number of Kafka.
  'properties.group.id' = 'GroupId',
  'scan.startup.mode' = 'latest-offset',
  'format' = 'json'
);

CREATE TABLE jdbcSink (
  order_id string,
  order_channel string,
  order_time string,
  pay_amount double,
  real_pay double,
  pay_time string,
  user_id string,
  user_name string,
  area_id string
) WITH (
  'connector' = 'jdbc',
  'url' = "jdbc:mysql://172.16.0.116:3306/rds-dliflink", //  testrdsdb indicates the name of the created RDS database. Replace the IP address and port number with those of the RDS for MySQL instance.
  'table-name' = 'orders',
  'pwd_auth_name'="xxxxx", // Name of the datasource authentication of the password type created on DLI. If datasource authentication is used, you do not need to set the username and password for the job.
  'sink.buffer-flush.max-rows' = '1'
);

insert into jdbcSink select * from kafkaSource;
- Click Check Semantics.
- Click Start. On the displayed Start Flink Job page, confirm the job specifications and the price, and click Start Now to start the job.
After the job is started, the system automatically switches to the page, and the created job is displayed in the job list. You can view the job status in the column. After a job is successfully submitted, Status of the job will change from to .
If Status of a job is or , the job fails to be submitted or fails to run. In this case, you can hover over the status icon to view the error details. You can click
 to copy these details. Rectify the fault based on the error information and resubmit the job.
 - Connect to the Kafka cluster and send the following test data to the Kafka topics:
For details about how Kafka creates and retrieves data, visit Connecting to an Instance Without SASL.
{"order_id":"202103241000000001", "order_channel":"webShop", "order_time":"2021-03-24 10:00:00", "pay_amount":"100.00", "real_pay":"100.00", "pay_time":"2021-03-24 10:02:03", "user_id":"0001", "user_name":"Alice", "area_id":"330106"} {"order_id":"202103241606060001", "order_channel":"appShop", "order_time":"2021-03-24 16:06:06", "pay_amount":"200.00", "real_pay":"180.00", "pay_time":"2021-03-24 16:10:06", "user_id":"0001", "user_name":"Alice", "area_id":"330106"} - Run the following SQL statement in the MySQL database to view data in the table:
select * from orders;
The following is an example of the execution result copied from the MySQL database:202103241000000001,webShop,2021-03-24 10:00:00,100.0,100.0,2021-03-24 10:02:03,0001,Alice,330106 202103241606060001,appShop,2021-03-24 16:06:06,200.0,180.0,2021-03-24 16:10:06,0001,Alice,330106
Feedback
Was this page helpful?
Provide feedbackThank you very much for your feedback. We will continue working to improve the documentation.See the reply and handling status in My Cloud VOC.
For any further questions, feel free to contact us through the chatbot.
Chatbot


