
How Do I Configure DNS for an ECS?
Scenarios
Configure a DNS server for resolving the domain name of an ECS. By default, the IP address of the DNS server is automatically configured when an ECS is created. No manual configuration is needed except when the resolution fails due to a change in the DNS server IP address.
For details about DNS server IP addresses, see What Are Huawei Cloud Private DNS Server Addresses?
You can configure DNS for an ECS as follows:
- (Recommended) Change the DNS server address of the subnet to which the ECS belongs.
- Change the DNS server address in the ECS OS.
Procedure (Linux)
This section uses CentOS 7.5 as an example.
- Log in to the ECS as user root.
- Run the vi /etc/resolv.conf command to edit the /etc/resolv.conf file. Add the DNS server IP address above the existing nameserver information. Figure 1 Configuring DNS
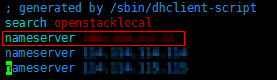 The format is as follows:
nameserver 100.125.1.250
- Press Esc, input :wq, and press Enter to save the changes and exit the vi editor.
- Run the following command to check whether the IP address is successfully added:
cat /etc/resolv.conf
- Run the following command to check whether an IP address can be resolved from the file system domain name:
nslookup File system domain name

Obtain the file system domain name from the file system mount point.
- (Optional) In a network environment that uses the DHCP server, edit the /etc/resolv.conf file to prevent the file from being automatically modified upon an ECS startup, and prevent the DNS server IP address added in 2 from being reset.
- Run the following command to lock the file:
- Run the following command to check whether the editing is successful:
If the information shown in Figure 2 is displayed, the file is locked.

Procedure (Windows)
This section uses Windows Server 2012 as an example.
- Go to the ECS console and log in to the ECS running Windows Server 2012.
- Click This PC in the lower left corner.
- On the page that is displayed, right-click Network and choose Properties from the drop-down list. The Network and Sharing Center page is displayed, as shown in Figure 3. Click Local Area Connection.
- In the Activity area, select Properties. See Figure 4.
- In the Local Area Connection Properties dialog box that is displayed, select Internet Protocol Version 4 (TCP/IPv4) and click Properties. See Figure 5.
- In the dialog box that is displayed, select Use the following DNS server addresses: and configure DNS, as shown in Figure 6. The DNS server IP address is 100.125.1.250. After completing the configuration, click OK.


Feedback
Was this page helpful?
Provide feedbackThank you very much for your feedback. We will continue working to improve the documentation.See the reply and handling status in My Cloud VOC.
For any further questions, feel free to contact us through the chatbot.
Chatbot


