Changing a VPC
Scenarios
This section describes how to change a VPC.
You can change the VPC of an individual ECS or use job management of Cloud Operations Center (COC) to batch change the VPCs of multiple ECSs.
Constraints
- Only running or stopped ECSs support VPC change.
- VPC change is only supported when the ECS has a single NIC attached.
- If you have reinstalled or changed the OS of an ECS before changing the VPC, log in to the ECS and check whether the password or key pair configured during the reinstallation or change is successfully injected.
- If the login is successful, the password or key pair is injected. Perform operations as required.
- Otherwise, the system is injecting the password or key pair. During this period, do not perform any operations on the ECS.
- During the VPC switchover, do not bind, unbind, or replace the EIP. Otherwise, a message indicating insufficient permissions will be displayed, but you do not need to take any action.
- If an ECS NIC has an IPv6 address, the VPC of the ECS cannot be changed.
- You can change the VPCs of a maximum of 50 ECSs in a batch.
Notes
- A VPC can be changed on a running ECS, but the ECS network connection will be interrupted during the change process.

If you intend to change the VPC for a running ECS, the VPC change may fail when traffic is routed to the ECS NIC. In this case, you are advised to try again later or stop the ECS first and then try to change the VPC.
- After the VPC is changed, the subnet, private IP address, MAC address, and OS NIC name of the ECS will change.
- After the VPC is changed, the source/destination check and virtual IP address must be configured again.
- After the VPC is changed, you are required to reconfigure network-related application software and services, such as ELB, VPN, NAT, traffic mirroring, and DNS.
Prerequisites
The target VPC, subnet, private IP address, and security group are available.
- Enable and authorize COC.
For IAM users, permissions for COC operations need to be granted. For details, see Configuring Custom Policies for ECS Self-Service O&M.
- Create an agency to grant ECS access to COC.
For details, see Creating an Agency to Grant ECS Access to COC.
Procedure
You can change the VPC of an individual ECS or batch change VPCs of multiple ECSs as needed.
- Log in to the management console.
- Click
 . Under Compute, click Elastic Cloud Server.
 - In the ECS list, locate the row that contains the target ECS and choose More > Change VPC in the Operation column.
The Change VPC dialog box is displayed.
Figure 1 Change VPC
- Specify the VPC, subnet, private IP address, and security group.
You can select multiple security groups. The access rules of all the selected security groups will apply to the ECS.

Using multiple security groups may deteriorate ECS network performance. You are suggested to select no more than five security groups.
- Click OK.
- Log in to the management console.
- Click
 . Under Compute, click Elastic Cloud Server.
 - In the ECS list, select the ECSs for which you want to change VPCs.
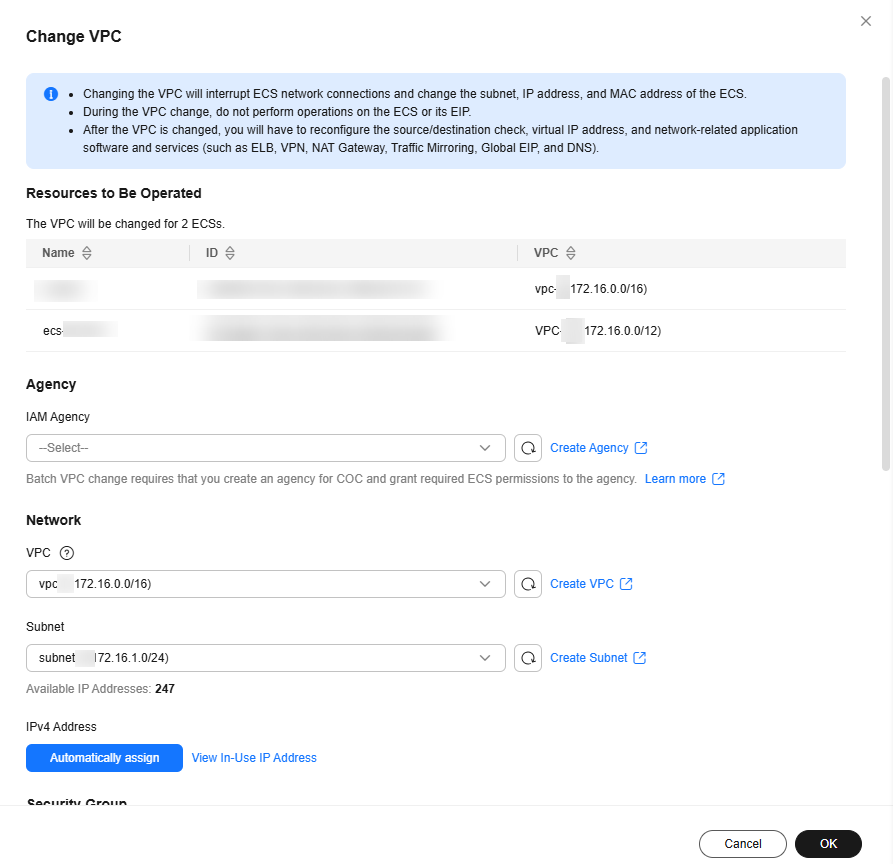
- Above the ECS list, choose More > Change VPC.
Figure 2 Changing VPCs

- In the displayed box, from the IAM Agency drop-down list, select an agency that has granted ECS access and related permissions to COC.
If no agency is available, create one by clicking Create Agency. For details, see Creating an Agency to Grant ECS Access to COC.
- Specify the VPC, subnet, private IP address, and security group.
You can select multiple security groups. The access rules of all the selected security groups will apply to the ECSs.

Using multiple security groups may deteriorate ECS network performance. You are advised to select no more than five security groups.
- Click OK.
The batch VPC change is requested. You can view the results on the Job Tickets tab of COC.
For more information about job management, see Executing Public Jobs.
Feedback
Was this page helpful?
Provide feedbackThank you very much for your feedback. We will continue working to improve the documentation.See the reply and handling status in My Cloud VOC.
For any further questions, feel free to contact us through the chatbot.
Chatbot


