Creating a Model Using a Custom Engine
When using a custom engine to create a model, you can select your image stored in SWR as the engine and specify a file directory in OBS as the model package. In this way, bring-your-own images can be used to meet your dedicated requirements.
Specifications for Using a Custom Engine to Create a Model
To use a custom engine to create a model, ensure the SWR image, OBS model package, and file size comply with the following requirements:
- SWR image specifications
- A common user named ma-user in group ma-group must be built in the SWR image. Additionally, the UID and GID of the user must be 1000 and 100, respectively. The following is the dockerfile command for the built-in user:
groupadd -g 100 ma-group && useradd -d /home/ma-user -m -u 1000 -g 100 -s /bin/bash ma-user
- Specify a command for starting the image. In the dockerfile, specify cmd. The following shows an example:
CMD sh /home/mind/run.sh
Customize the startup entry file run.sh. The following is an example.
#!/bin/bash

# User-defined script content
...

# run.sh calls app.py to start the server. For details about app.py, see "HTTPS Example".
python app.py

You can also customize the boot command for starting an image. Enter the customized command during model creation.
- The service can use the HTTPS/HTTP protocol and listening container port. The port and protocol can be set based on the site requirements. The default request protocol and port number provided by ModelArts are HTTPS and 8080, respectively. For details, see the HTTPS example.
- (Optional) The health check URL must be /health.
- A common user named ma-user in group ma-group must be built in the SWR image. Additionally, the UID and GID of the user must be 1000 and 100, respectively. The following is the dockerfile command for the built-in user:
- OBS model package specifications
The name of the model package must be model. For details about model package specifications, see Model Package Structure.
- File size specifications
When a public resource pool is used, the total size of the downloaded SWR image (not the compressed image displayed on the SWR page) and the OBS model package cannot exceed 30 GB.
HTTPS Example
Use Flask to start HTTPS. The following is an example of the web server code:
from flask import Flask, request
import json

app = Flask(__name__)

@app.route('/greet', methods=['POST'])
def say_hello_func():
    print("----------- in hello func ----------")
    data = json.loads(request.get_data(as_text=True))
    print(data)
    username = data['name']
    rsp_msg = 'Hello, {}!'.format(username)
    return json.dumps({"response":rsp_msg}, indent=4)

@app.route('/goodbye', methods=['GET'])
def say_goodbye_func():
    print("----------- in goodbye func ----------")
    return '\nGoodbye!\n'


@app.route('/', methods=['POST'])
def default_func():
    print("----------- in default func ----------")
    data = json.loads(request.get_data(as_text=True))
    return '\n called default func !\n {} \n'.format(str(data))

@app.route('/health', methods=['GET'])
def healthy():
    return "{\"status\": \"OK\"}"

# host must be "0.0.0.0", port must be 8080
if __name__ == '__main__':
    app.run(host="0.0.0.0", port=8080, ssl_context='adhoc')
Debugging on a Local Computer
Perform the following operations on a local computer with Docker installed to check whether a custom engine complies with specifications:
- Download the custom image, for example, custom_engine:v1 to the local computer.
- Copy the model package folder model to the local host.
- Run the following command in the same directory as the model package folder to start the service:
docker run --user 1000:100 -p 8080:8080 -v model:/home/mind/model custom_engine:v1

This command is used for simulation only because the directory mounted to -v is assigned the root permission. In the cloud environment, after the model file is downloaded from OBS to /home/mind/model, the file owner will be changed to ma-user.
- Start another terminal on the local computer and run the following command to obtain the expected inference result:
curl https://127.0.0.1:8080/${Request path to the inference service}
Deployment Example
The following section describes how to use a custom engine to create a model.
- Create a model and view model details.
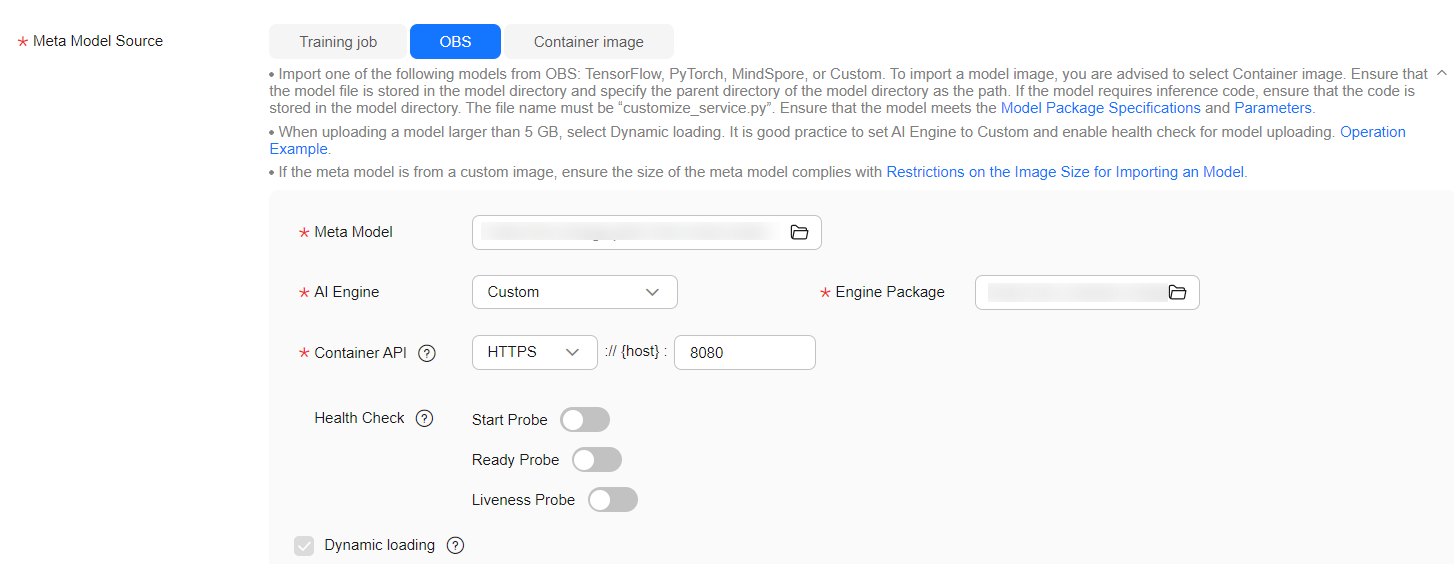
Log in to the ModelArts console. In the navigation pane on the left, choose Model Management. Then, click Create Model and configure the parameters as follows:
- Meta Model Source: Choose OBS.
- Meta Model: Select a model package selected from OBS
- AI Engine: Choose Custom.
- Engine Package: Select an SWR image.
- Container API: Set the port and protocol based on the actual image usage.
Retain the default settings for other parameters.
Click Create now. Wait until the model status changes to Normal.
Figure 1 Creating a model
Click the model name to access its details page.
- Deploy the AI application as a service and view service details.
On the model details page, choose Deploy > Real-Time Services in the upper right corner. On the Deploy page, select a proper instance flavor (for example, CPU: 2 vCPUs 8 GB), retain default settings for other parameters, and click Next. When the service status changes to Running, the service has been deployed.
Click the service name. On the page that is displayed, view the service details. Click the Logs tab to view the service logs.
Figure 2 Logs
- Use the service for prediction.
On the service details page, click the Prediction tab to use the service for prediction.
Figure 3 Prediction
Feedback
Was this page helpful?
Provide feedbackThank you very much for your feedback. We will continue working to improve the documentation.See the reply and handling status in My Cloud VOC.
For any further questions, feel free to contact us through the chatbot.
Chatbot


