Assigning the Required Permissions
Searching for an Instance
All created instances are displayed on the notebook page. To display a specific instance, search for it based on filter criteria.
- Grant the permission to the IAM user for viewing all notebook instances. Log in to the ModelArts management console. In the navigation pane on the left, choose Development Workspace > Notebook. On the displayed page, enable View all.
- Set search criteria, such as name, ID, status, image, flavor, description, and creation time.
Assigning the Required Permissions
Any IAM user granted with the listAllNotebooks and listUsers permissions can click View all on the notebook page to view the instances of all IAM users in the current IAM project. After the permission is granted, you can access OBS and SWR of IAM users in a notebook instance.
- Log in to the ModelArts management console as a tenant user, hover the cursor over your username in the upper right corner, and choose Identity and Access Management from the drop-down list to switch to the IAM management console.
- On the IAM console, choose Permissions > Policies/Roles from the navigation pane, click Create Custom Policy in the upper right corner, and create two policies.
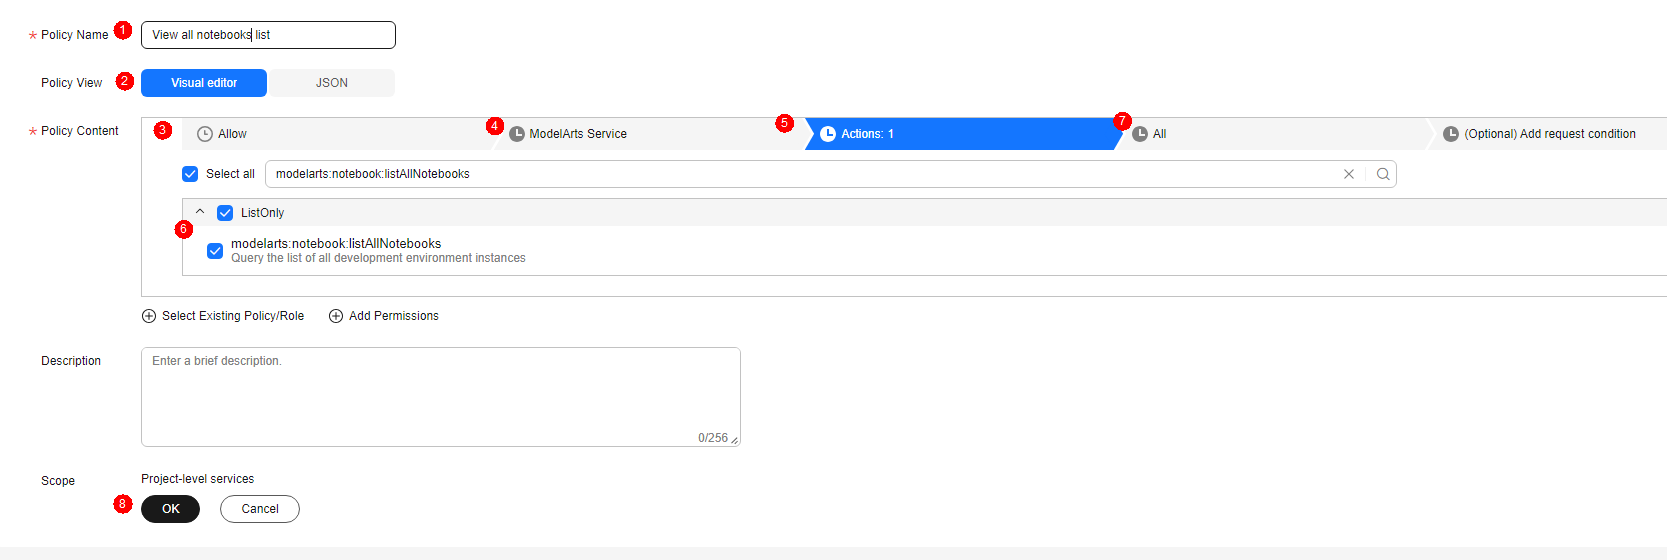
Policy 1: Create a policy that allows users to view all notebook instances of an IAM project, as shown in Figure 1.
- Policy Name: Enter a custom policy name, for example, Viewing all notebook instances.
- Policy View: Select Visual editor.
- Policy Content: Select Allow, ModelArts Service, modelarts:notebook:listAllNotebooks, and default resources.
Policy 2: Create a policy that allows users to view all users of an IAM project.
- Policy Name: Enter a custom policy name, for example, Viewing all users of the current IAM project.
- Policy View: Select Visual editor.
- Policy Content: Select Allow, Identity and Access Management, iam:users:listUsers, and default resources.
- In the navigation pane, choose User Groups. Then, click Authorize in the Operation column of the target user group. On the Authorize User Group page, select the custom policies created in 2, and click Next. Then, select the scope and click OK.
After the configuration, all users in the user group have the permission to view all notebook instances created by users in the user group.
If no user group is available, create a user group, add users using the user group management function, and configure authorization. If the target user is not in a user group, you can add the user to a user group through the user group management function.
Starting Notebook Instances of Other IAM Users
If an IAM user wants to access another IAM user's notebook instance through remote SSH, they need to update the SSH key pair to their own. Otherwise, error ModelArts.6786 will be reported. For details about how to update a key pair, see Modifying the SSH Configuration for a Notebook Instance. The error message is as follows: "ModelArts.6789: Failed to find SSH key pair xxx on the ECS key pair page. Update the key pair and try again later."
Feedback
Was this page helpful?
Provide feedbackThank you very much for your feedback. We will continue working to improve the documentation.See the reply and handling status in My Cloud VOC.
For any further questions, feel free to contact us through the chatbot.
Chatbot


