
Connecting to a Notebook Instance Through PyCharm Toolkit
AI developers use PyCharm to develop algorithms or models. ModelArts provides the PyCharm Toolkit plug-in to help AI developers quickly submit locally developed code to the ModelArts training environment. With PyCharm Toolkit, developers can quickly remotely access notebook instances, upload code, submit training jobs, and obtain training logs for local display so that they can better focus on local code development.
This section introduces how to connect to a notebook instance through PyCharm Toolkit.
Constraints
- Currently, only versions between 2019.2 and 2023.2 (including 2019.2 and 2023.2) are supported, including the community edition and professional edition.
- PyCharm of only the professional edition can be used to access notebook instances.
- You can use a community or professional edition of PyCharm Toolkit to submit training jobs. The latest version of PyCharm Toolkit can be used only to submit training jobs of the new version.
- PyCharm Toolkit supports only PyCharm of the Windows version.
Prerequisites
PyCharm professional edition of a version between 2019.2 and 2023.2 (including 2019.2 and 2023.2) has been installed on the local PC. Remote SSH applies only to the PyCharm professional edition. Download PyCharm and install it.
Step 1 Downloading and Installing PyCharm Toolkit
In PyCharm, choose File > Settings > Plugins, search for ModelArts in Marketplace, and click Install.
Step2 Creating a Notebook Instance
You have created a notebook instance with remote SSH. The instance must be in the Running state. For details, see Creating a Notebook Instance.
Step 3 Logging In to the PyCharm Toolkit
To use the AK/SK pair for login authentication, perform the following steps:
- Open PyCharm with Toolkit installed. Choose ModelArts > Edit Credential from the menu bar. Figure 1 Edit Credential


If ModelArts > Edit Credential is not displayed on the menu bar, the PyCharm version may be too high. PyCharm Toolkit is not adapted to PyCharm versions later than 2023.2. Download the PyCharm professional edition of a version between 2019.2 and 2023.2 (including 2019.2 and 2023.2).
- In the displayed dialog box, select the region where ModelArts is located, enter the AK and SK, and click OK. For details about how to obtain the AK/SK, see How Do I Obtain an Access Key?
- Region: Select a region from the drop-down list. It must be the same as the region of the ModelArts console.
- Project: After the region is selected, the project is automatically filled.
- Access Key ID: Enter the AK.
- Secret Access Key: Enter the SK.
Figure 2 Entering the region and access keys
- View the verification result.
In the Event Log area, if information similar to the following is displayed, the access key has been successfully added:
16:01Validate Credential Success: The HUAWEI CLOUDcredential is valid.
Step 4 Automatically Configuring PyCharm Toolkit
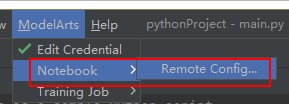
- In the local PyCharm development environment, choose ModelArts > Notebook > Remote Config..., and configure PyCharm Toolkit. Figure 3 Remotely connecting to PyCharm Toolkit
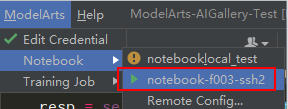
- Choose the target instance from the drop-down list, where all notebook instances with remote SSH enabled under the account are displayed. Figure 4 Notebook list

- KeyPair: Select the locally stored key pair of the notebook instance for authentication. The key pair created during the notebook instance creation is saved in your browser's default downloads folder.
- PathMappings: Synchronization directory for the local IDE project and notebook, which defaults to /home/ma-user/work/Project name and is adjustable.
- Click Apply. After the configuration is complete, restart the IDE for the configuration to take effect.
After the restart, it takes about 20 minutes to update the Python interpreter for the first time.
Step 5 Accessing a Notebook Instance Using PyCharm Toolkit
Click the notebook instance name and connect it to the local IDE as prompted. The connection is kept for 4 hours by default.

To interrupt the connection, click the notebook name and disconnect it from the local IDE as prompted.
Step 6 Uploading Local Files to a Notebook Instance
Code in a local file can be copied to the local IDE, which will automatically synchronize the code to the in-cloud development environment.
Initial synchronization
In the Project directory of the local IDE, right-click Deployment and choose Upload to Notebook name from the shortcut menu to upload the local project file to the specified notebook instance.

Follow-up synchronization
After modifying the code, press Ctrl+S to save it. The local IDE will automatically synchronize the modification to the specified notebook instance.
After PyCharm Toolkit is installed, Automatic Upload is automatically enabled in the local IDE for automatically uploading the files in the local directory to the target notebook instance. If Automatic Upload is not enabled, enable it by referring to the following figure.

Step 7 Remotely Debugging the Code
Click Interpreter in the lower right corner of the local IDE and select a notebook Python interpreter.

Run the code in the notebook instance. The logs are displayed locally.

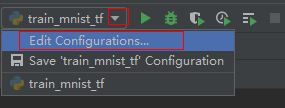
Click Run/Debug Configurations in the upper right corner of the local IDE to set runtime parameters.
Select the Python interpreter that remotely connects to the target notebook instance.

To debug code, set breakpoints and run the program in debug mode.

In debug mode, the code execution is suspended in the specified line, and you can obtain variable values.

Feedback
Was this page helpful?
Provide feedbackThank you very much for your feedback. We will continue working to improve the documentation.See the reply and handling status in My Cloud VOC.
For any further questions, feel free to contact us through the chatbot.
Chatbot


