
- What's New
- Function Overview
- Product Bulletin
-
Service Overview
- Infographics
- What Is ModelArts?
- Advantages
- Use Cases
- Functions
- AI Development Basics
- Security
- Notes and Constraints
- Permissions Management
- Billing Description
- Quotas
- ModelArts and Other Services
-
Billing
- Billing Modes
- Billing Item
- Billing Examples
- Changing the Billing Mode
- Renewal
- Bills
- About Arrears
- Stopping Billing
- Cost Management
-
Billing FAQs
- How Do I View the ModelArts Jobs Being Billed?
- How Do I View ModelArts Expenditure Details?
- How Do I Stop Billing If I Do Not Use ModelArts?
- Will I Be Charged for Uploading Datasets to ModelArts?
- What Should I Do to Avoid Unnecessary Billing After I Label Datasets and Exit?
- How Do I Stop Billing for a ModelArts ExeML Project?
- How Are Training Jobs Billed?
- Why Does Billing Continue After All Projects Are Deleted?
- Getting Started
-
ModelArts User Guide (Standard)
- ModelArts Standard Usage
- ModelArts Standard Preparations
-
ModelArts Standard Resource Management
- About ModelArts Standard Resource Pools
- Creating a Standard Dedicated Resource Pool
-
Managing Standard Dedicated Resource Pools
- Viewing Details About a Standard Dedicated Resource Pool
- Resizing a Standard Dedicated Resource Pool
- Upgrading the Standard Dedicated Resource Pool Driver
- Rectifying a Faulty Node in a Standard Dedicated Resource Pool
- Modifying the Job Types Supported by a Standard Dedicated Resource Pool
- Migrating Standard Dedicated Resource Pools and Networks to Other Workspaces
- Configuring the Standard Dedicated Resource Pool to Access the Internet
- Using TMS Tags to Manage Resources by Group
- Managing Free Nodes in a Standard Dedicated Resource Pool
- Releasing Standard Dedicated Resource Pools and Deleting the Network
- Using ExeML for Zero-Code AI Development
-
Using Workflows for Low-Code AI Development
- What Is Workflow?
- Managing a Workflow
- Workflow Development Command Reference
-
Development Environments
- Application Scenarios
- Creating a Notebook Instance
-
Using a Notebook Instance for AI Development Through JupyterLab
- Using JupyterLab to Develop and Debug Code Online
- Common Functions of JupyterLab
- Using Git to Clone the Code Repository in JupyterLab
- Creating a Scheduled Job in JupyterLab
- Uploading Files to JupyterLab
- Downloading a File from JupyterLab to a Local PC
- Using MindInsight Visualization Jobs in JupyterLab
- Using TensorBoard Visualization Jobs in JupyterLab
- Using Notebook Instances Remotely Through PyCharm
- Using Notebook Instances Remotely Through VS Code
- Using a Notebook Instance Remotely with SSH
- Managing Notebook Instances
- ModelArts CLI Command Reference
- Using Moxing Commands in a Notebook Instance
-
Data Management
- Introduction to Data Preparation
- Getting Started
- Creating a Dataset
- Importing Data
- Data Analysis and Preview
- Labeling Data
- Publishing Data
- Exporting Data
- Introduction to Data Labeling
- Manual Labeling
- Auto Labeling
- Team Labeling
-
Model Training
- Model Training Process
- Preparing Model Training Code
- Preparing a Model Training Image
- Creating a Debug Training Job
- Creating an Algorithm
- Creating a Production Training Job
- Distributed Model Training
- Incremental Model Training
- Automatic Model Tuning (AutoSearch)
- High Model Training Reliability
-
Managing Model Training Jobs
- Viewing Training Job Details
- Viewing the Resource Usage of a Training Job
- Viewing the Model Evaluation Result
- Viewing Training Job Events
- Viewing Training Job Logs
- Priority of a Training Job
- Using Cloud Shell to Debug a Production Training Job
- Rebuilding, Stopping, or Deleting a Training Job
- Managing Environment Variables of a Training Container
- Viewing Training Job Tags
-
Inference Deployment
- Overview
- Creating a Model
- Model Creation Specifications
- Deploying a Model as Real-Time Inference Jobs
- Deploying a Model as a Batch Inference Service
- Managing ModelArts Models
-
Managing a Synchronous Real-Time Service
- Viewing Details About a Real-Time Service
- Viewing Events of a Real-Time Service
- Managing the Lifecycle of a Real-Time Service
- Modifying a Real-Time Service
- Viewing Performance Metrics of a Real-Time Service on Cloud Eye
- Integrating a Real-Time Service API into the Production Environment
- Configuring Auto Restart upon a Real-Time Service Fault
- Managing Batch Inference Jobs
-
Image Management
- Application Scenarios of Custom Images
- Preset Images Supported by ModelArts
- Creating a Custom Image for a Notebook Instance
-
Creating a Custom Image for Model Training
- Creating a Custom Training Image
- Creating a Custom Training Image Using a Preset Image
- Migrating Existing Images to ModelArts
- Creating a Custom Training Image (PyTorch + Ascend)
- Creating a Custom Training Image (PyTorch + CPU/GPU)
- Creating a Custom Training Image (MPI + CPU/GPU)
- Creating a Custom Training Image (Tensorflow + GPU)
- Creating a Custom Training Image (MindSpore + Ascend)
- Creating a Custom Image for Inference
- Resource Monitoring
- Viewing Audit Logs
-
ModelArts User Guide (Lite Server)
- Before You Start
- Enabling Lite Server Resources
- Configuring Lite Server Resources
- Using Lite Server Resources
- Managing Lite Server Resources
-
ModelArts User Guide (Lite Cluster)
- Before You Start
- Enabling Lite Cluster Resources
- Configuring Lite Cluster Resources
- Using Lite Cluster Resources
-
Managing Lite Server Resources
- Managing Lite Cluster Resources
- Managing Lite Cluster Resource Pools
- Managing Lite Cluster Node Pools
- Managing Lite Cluster Nodes
- Resizing a Lite Cluster Resource Pool
- Upgrading the Lite Cluster Resource Pool Driver
- Upgrading the Driver of a Lite Cluster Resource Pool Node
- Managing Free Nodes in a Lite Cluster Resource Pool
- Monitoring Lite Cluster Resources
- Releasing Lite Cluster Resources
- ModelArts User Guide (AI Gallery)
-
Best Practices
- Official Samples
-
Permissions Management
- Basic Concepts
- Permission Management Mechanisms
-
Configuration Practices in Typical Scenarios
- Assigning Permissions to Individual Users for Using ModelArts
- Assigning Basic Permissions for Using ModelArts
- Separately Assigning Permissions to Administrators and Developers
- Viewing the Notebook Instances of All IAM Users Under One Tenant Account
- Logging In to a Training Container Using Cloud Shell
- Prohibiting a User from Using a Public Resource Pool
- Granting SFS Turbo Folder Access Permissions to IAM Users
- FAQ
- Notebook
-
Model Training
- Using a Custom Algorithm to Build a Handwritten Digit Recognition Model
- Example: Creating a Custom Image for Training (PyTorch + CPU/GPU)
- Example: Creating a Custom Image for Training (MPI + CPU/GPU)
- Example: Creating a Custom Image for Training (Horovod-PyTorch and GPUs)
- Example: Creating a Custom Image for Training (MindSpore and GPUs)
- Example: Creating a Custom Image for Training (TensorFlow and GPUs)
-
Model Inference
- Creating a Custom Image and Using It to Create an AI Application
- Enabling an Inference Service to Access the Internet
- End-to-End O&M of Inference Services
- Creating an AI Application Using a Custom Engine
- Using a Large Model to Create an AI Application and Deploying a Real-Time Service
- Migrating a Third-Party Inference Framework to a Custom Inference Engine
- High-Speed Access to Inference Services Through VPC Peering
- Full-Process Development of WebSocket Real-Time Services
-
API Reference
- Before You Start
- API Overview
- Calling APIs
-
Development Environment Management
- Creating a Notebook Instance
- Querying Notebook Instances
- Querying Details of a Notebook Instance
- Updating a Notebook Instance
- Deleting a Notebook Instance
- Saving a Running Instance as a Container Image
- Obtaining the Available Flavors
- Querying Flavors Available for a Notebook Instance
- Querying the Available Duration of a Running Notebook Instance
- Prolonging a Notebook Instance
- Starting a Notebook Instance
- Stopping a Notebook Instance
- Obtaining the Notebook Instances with OBS Storage Mounted
- OBS Storage Mounting
- Obtaining Details About a Notebook Instance with OBS Storage Mounted
- Unmounting OBS Storage from a Notebook Instance
- Querying Supported Images
- Registering a Custom Image
- Obtaining User Image Groups
- Obtaining Details of an Image
- Deleting an Image
-
Training Management
- Creating an Algorithm
- Querying the Algorithm List
- Querying Algorithm Details
- Modifying an Algorithm
- Deleting an Algorithm
- Creating a Training Job
- Querying the Details About a Training Job
- Modifying the Description of a Training Job
- Deleting a Training Job
- Terminating a Training Job
- Querying the Logs of a Specified Task in a Given Training Job (Preview)
- Querying the Logs of a Specified Task in a Training Job (OBS Link)
- Querying the Running Metrics of a Specified Task in a Training Job
- Querying a Training Job List
- Obtaining the General Specifications Supported by a Training Job
- Obtaining the Preset AI Frameworks Supported by a Training Job
- AI Application Management
-
App Authentication Management
- Obtaining the App List
- Creating Apps
- Obtaining App Details
- Deleting an App
- Adding an App Code
- Resetting an App Code
- Deleting an App Code
- Resetting an AppSecret
- Obtaining the List of APIs Bound to an App
- Registering an API and Authorizing the API to an App
- Deleting an API
- Authorizing an API to an App
- Updating API Authorization
- Canceling the Authorization of an API to an App
- Obtaining API Authorization Relationships
-
Service Management
- Updating the Service Through the Patch Operation
- Obtaining Service Monitoring
- Obtaining Services
- Deploying Services
- Obtaining Supported Service Deployment Specifications
- Obtaining Service Details
- Updating Service Configurations
- Deleting a Service
- Updating a Single Property of a Model Service
- Obtaining Service Event Logs
- Obtaining Service Update Logs
- Adding a Resource Tag
- Deleting Resource Tags
- Obtaining Inference Service Tags
- Obtaining an Inference VPC Access Channel
-
Resource Management
- Querying OS Configuration Parameters
- Querying a Plug-in Template
- Obtaining Nodes
- Deleting nodes in batches
- Querying a Trace List
- Creating Network Resources
- Obtaining Network Resources
- Obtaining a Network Resource
- Deleting a Network Resource
- Updating a Network Resource
- Querying the Real-Time Resource Usage
- Creating Resource Pools
- Obtaining Resource Pools
- Obtaining a Resource Pool
- Deleting a Resource Pool
- Updating a Resource Pool
- Monitoring a Resource Pool
- Resource Pool Statistics
- Obtaining Resource Specifications
- Querying the dedicated resource pool Job List
- Querying dedicated resource pool Job Statistics
- DevServer Management
- Authorization Management
- Managing DevEnviron Instances
- Use Cases
- Permissions Policies and Supported Actions
- Common Parameters
-
Historical APIs
-
Data Management (Old Version)
- Querying the Dataset List
- Creating a Dataset
- Querying Details About a Dataset
- Modifying a Dataset
- Deleting a Dataset
- Obtaining Dataset Statistics
- Querying the Monitoring Data of a Dataset
- Querying the Dataset Version List
- Creating a Dataset Labeling Version
- Querying Details About a Dataset Version
- Deleting a Dataset Labeling Version
- Obtaining a Sample List
- Adding Samples in Batches
- Deleting Samples in Batches
- Obtaining Details About a Sample
- Obtaining Sample Search Condition
- Obtaining a Sample List of a Team Labeling Task by Page
- Obtaining Details About a Team Labeling Sample
- Querying the Dataset Label List
- Creating a Dataset Label
- Modifying Labels in Batches
- Deleting Labels in Batches
- Updating a Label by Label Names
- Deleting a Label and the Files that Only Contain the Label
- Updating Sample Labels in Batches
- Querying the Team Labeling Task List of a Dataset
- Creating a Team Labeling Task
- Querying Details About a Team Labeling Task
- Starting a Team Labeling Task
- Updating a Team Labeling Task
- Deleting a Team Labeling Task
- Creating a Team Labeling Acceptance Task
- Querying the Report of a Team Labeling Acceptance Task
- Updating Status of a Team Labeling Acceptance Task
- Querying Details About Team Labeling Task Statistics
- Querying Details About the Progress of a Team Labeling Task Member
- Querying the Team Labeling Task List by a Team Member
- Submitting Sample Review Comments of an Acceptance Task
- Reviewing Team Labeling Results
- Updating Labels of Team Labeling Samples in Batches
- Querying the Labeling Team List
- Creating a Labeling Team
- Querying Details About a Labeling Team
- Updating a Labeling Team
- Deleting a Labeling Team
- Sending an Email to a Labeling Team Member
- Querying the List of All Labeling Team Members
- Querying the List of Labeling Team Members
- Creating a Labeling Team Member
- Deleting Labeling Team Members in Batches
- Querying Details About Labeling Team Members
- Updating a Labeling Team Member
- Deleting a Labeling Team Member
- Querying the Dataset Import Task List
- Creating an Import Task
- Querying Details About a Dataset Import Task
- Querying the Dataset Export Task List
- Creating a Dataset Export Task
- Querying the Status of a Dataset Export Task
- Synchronizing a Dataset
- Querying the Status of a Dataset Synchronization Task
- Obtaining an Auto Labeling Sample List
- Querying Details About an Auto Labeling Sample
- Obtaining an Auto Labeling Task List by Page
- Starting Intelligent Tasks
- Obtaining Details About an Auto Labeling Task
- Stopping an Intelligent Task
- Querying the List of a Processing Task
- Creating a Processing Task
- Querying Details About a Processing Task
- Updating a Processing Task
- Deleting a Processing Task
- DevEnviron (Old Version)
-
Training Management (Old Version)
-
Training Jobs
- Creating a Training Job
- Querying a Training Job List
- Querying the Details About a Training Job Version
- Deleting a Version of a Training Job
- Obtaining Training Job Versions
- Creating a Version of a Training Job
- Stopping a Training Job
- Modifying the Description of a Training Job
- Deleting a Training Job
- Obtaining the Name of a Training Job Log File
- Querying a Built-in Algorithm
- Querying Training Job Logs
- Training Job Parameter Configuration
- Visualization Jobs
- Resource and Engine Specifications
- Job Statuses
-
Training Jobs
-
Data Management (Old Version)
- Change History
-
SDK Reference
- Before You Start
- SDK Overview
- Getting Started
- (Optional) Installing the ModelArts SDK Locally
- Session Authentication
- OBS Management
- Data Management
-
Training Management (New Version)
- Training Jobs
- APIs for Resources and Engine Specifications
-
Training Management (Old Version)
- Training Jobs
- Training Job Versions
- Training Job Parameter Configuration
-
Visualization Jobs
- Creating a Visualization Job
- Querying the List of Visualization Job Objects
- Querying the List of Visualization Jobs
- Querying the Details About a Visualization Job
- Modifying the Description of a Visualization Job
- Stopping a Visualization Job
- Restarting a Visualization Job
- Deleting a Visualization Job
- Resource and Engine Specifications
- Job Statuses
- Model Management
-
Service Management
- Service Management Overview
- Deploying a Local Service for Debugging
- Deploying a Real-Time Service
- Obtaining Details About a Service
- Testing an Inference Service
- Obtaining Services
- Obtaining Service Objects
- Updating Service Configurations
- Obtaining Service Monitoring Information
- Obtaining Service Logs
- Delete a Service
- Change History
-
FAQs
-
General Issues
- What Is ModelArts?
- What Are the Relationships Between ModelArts and Other Services?
- What Are the Differences Between ModelArts and DLS?
- How Do I Purchase or Enable ModelArts?
- How Do I Obtain an Access Key?
- How Do I Upload Data to OBS?
- What Do I Do If the System Displays a Message Indicating that the AK/SK Pair Is Unavailable?
- What Do I Do If a Message Indicating Insufficient Permissions Is Displayed When I Use ModelArts?
- How Do I Use ModelArts to Train Models Based on Structured Data?
- What Are Regions and AZs?
- How Do I View All Files Stored in OBS on ModelArts?
- Where Are Datasets of ModelArts Stored in a Container?
- Which AI Frameworks Does ModelArts Support?
- What Are the Functions of ModelArts Training and Inference?
- How Do I View an Account ID and IAM User ID?
- Can AI-assisted Identification of ModelArts Identify a Specific Label?
- How Does ModelArts Use Tags to Manage Resources by Group?
- Why Is the Job Still Queued When Resources Are Sufficient?
-
Billing
- How Do I View the ModelArts Jobs Being Billed?
- How Do I View ModelArts Expenditure Details?
- Will I Be Charged for Uploading Datasets to ModelArts?
- What Should I Do to Avoid Unnecessary Billing After I Label Datasets and Exit?
- How Do I Stop Billing for a ModelArts ExeML Project?
- How Do I Stop Billing If I Do Not Use ModelArts?
- How Are Training Jobs Billed?
- Why Does Billing Continue After All Projects Are Deleted?
-
ExeML (Old Version)
- Functional Consulting
- Preparing Data
- Creating a Project
- Labeling Data
-
Training Models
- What Should I Do When the Train Button Is Unavailable After I Create an Image Classification Project and Label the Images?
- How Do I Perform Incremental Training in an ExeML Project?
- Can I Download a Model Trained Using ExeML?
- Why Does ExeML Training Fail?
- What Do I Do If an Image Error Occurred During Model Training Using ExeML?
- What Do I Do If Error ModelArts.0010 Occurred When I Use ExeML to Start Training as an IAM User?
- What Is the Training Speed of Each Parameter in ExeML Training Preference Settings?
- What Do I Do If ERROR:input key sound is not in model Occurred When I Use ExeML for Sound Classification Prediction?
- Deploying Models
-
Data Management (Old Version)
- Are There Size Limits for Images to be Uploaded?
- What Do I Do If Images in a Dataset Cannot Be Displayed?
- How Do I Integrate Multiple Object Detection Datasets into One Dataset?
- What Do I Do If Importing a Dataset Failed?
- Can a Table Dataset Be Labeled?
- What Do I Do to Import Locally Labeled Data to ModelArts?
- Why Does Data Fail to Be Imported Using the Manifest File?
- Where Are Labeling Results Stored?
- How Do I Download Labeling Results to a Local PC?
- Why Cannot Team Members Receive Emails for a Team Labeling Task?
- Can Two Accounts Concurrently Label One Dataset?
- How Data Is Distributed Between Team Members During Team Labeling?
- Can I Delete an Annotator from a Labeling Team with a Labeling Task Assigned? What Is the Impact on the Labeling Result After Deletion? If the Annotator Cannot Be Deleted, Can I Separate the Annotator's Labeling Result?
- How Do I Define a Hard Example in Data Labeling? Which Samples Are Identified as Hard Examples?
- Can I Add Multiple Labeling Boxes to an Object Detection Dataset Image?
- How Do I Merge Two Datasets?
- Does Auto Labeling Support Polygons?
- What Do the Options for Accepting a Team Labeling Task Mean?
- Why Are Images Displayed in Different Angles Under the Same Account?
- Do I Need to Train Data Again If New Data Is Added After Auto Labeling Is Complete?
- Why Does the System Display a Message Indicating My Label Fails to Save on ModelArts?
- Can One Label By Identified Among Multiple Labels?
- Why Are Newly Added Images Not Automatically Labeled After Data Amplification Is Enabled?
- Why Cannot Videos in a Video Dataset Be Displayed or Played?
- Why All the Labeled Samples Stored in an OBS Bucket Are Displayed as Unlabeled in ModelArts After the Data Source Is Synchronized?
- How Do I Use Soft-NMS to Reduce Bounding Box Overlapping?
- Why ModelArts Image Labels Are Lost?
- How Do I Add Images to a Validation or Training Dataset?
- Can I Customize Labels for an Object Detection Dataset?
- What ModelArts Data Management Can Be Used for?
- Will My Old-Version Datasets Be Cleared After the Old Version Is Discontinued? The existing datasets and the ones newly created in the old version will be retained after the old version is discontinued.
- Why Is My New Dataset Version Unavailable in Versions?
- How Do I View the Size of a Dataset?
- How Do I View Labeling Details of a New Dataset?
- How Do I Export Labeled Data?
- Why Cannot I Find My Newly Created Dataset?
- What Do I Do If the Database Quota Is Incorrect?
- How Do I Split a Dataset?
- How Do I Delete a Dataset Image?
- Why Is There No Sample in the ModelArts Dataset Downloaded from AI Gallery and Then an OBS Bucket?
-
Notebook (New Version)
- Constraints
-
Data Upload or Download
- How Do I Upload a File from a Notebook Instance to OBS or Download a File from OBS to a Notebook Instance?
- How Do I Upload Local Files to a Notebook Instance?
- How Do I Import Large Files to a Notebook Instance?
- Where Will the Data Be Uploaded to?
- How Do I Download Files from a Notebook Instance to a Local Computer?
- How Do I Copy Data from Development Environment Notebook A to Notebook B?
- What Can I Do If a File Fails to Be Uploaded to a Notebook Instance?
- Failed to View the Local Mount Point of a Dynamically Mounted OBS Parallel File System in JupyterLab of a Notebook Instance
-
Data Storage
- How Do I Rename an OBS File?
- Do Files in /cache Still Exist After a Notebook Instance is Stopped or Restarted? How Do I Avoid a Restart?
- How Do I Use the pandas Library to Process Data in OBS Buckets?
- How Do I Access the OBS Bucket of Another Account from a Notebook Instance?
- What Is the Default Working Directory on JupyterLab?
-
Environment Configurations
- How Do I Check the CUDA Version Used by a Notebook Instance?
- How Do I Enable the Terminal Function in DevEnviron of ModelArts?
- How Do I Install External Libraries in a Notebook Instance?
- How Do I Obtain the External IP Address of My Local PC?
- How Can I Resolve Abnormal Font Display on a ModelArts Notebook Accessed from iOS?
- Is There a Proxy for Notebook? How Do I Disable It?
- Adding a Custom IPython Kernel in a Notebook Instance
-
Notebook Instances
- What Do I Do If I Cannot Access My Notebook Instance?
- What Should I Do When the System Displays an Error Message Indicating that No Space Left After I Run the pip install Command?
- What Do I Do If "Read timed out" Is Displayed After I Run pip install?
- What Do I Do If the Code Can Be Run But Cannot Be Saved, and the Error Message "save error" Is Displayed?
- Why Is a Request Timeout Error Reported When I Click the Open Button of a Notebook Instance?
- When the SSH Tool Is Used to Connect to a Notebook Instance, Server Processes Are Cleared, but the GPU Usage Is Still 100%
-
Code Execution
- What Do I Do If a Notebook Instance Won't Run My Code?
- Why Does the Instance Break Down When dead kernel Is Displayed During Training Code Running?
- What Do I Do If cudaCheckError Occurs During Training?
- What Should I Do If DevEnviron Prompts Insufficient Space?
- Why Does the Notebook Instance Break Down When opencv.imshow Is Used?
- Why Cannot the Path of a Text File Generated in Windows OS Be Found In a Notebook Instance?
- What Do I Do If Files Fail to Be Saved in JupyterLab?
-
VS Code
- What Do I Do If Installing a Remote Plug-in Failed?
- What Do I Do If a Restarted Notebook Instance Can Be Connected Only After I Locally Delete known_hosts?
- What Do I Do If the Source Code Cannot Be Accessed When I Use VS Code for Debugging?
- What Do I Do If a Message Is Displayed Indicating an Incorrect Username or Email Address When I Use VS Code to Submit Code?
- How Can I View Remote Logs in VS Code?
- How Can I Open the VS Code Configuration File settings.json?
- How Can I Change the VS Code Background Color to Light Green?
- How Can I Set the Default Remote Plug-in in VS Code?
- How Can I Install a Local Plug-in on the Remote End or a Remote Plug-in on the Local End Through VS Code?
-
Failures to Access the Development Environment Through VS Code
- What Do I Do If the VS Code Window Is Not Displayed?
- What Do I Do If a Remote Connection Failed After VS Code Is Opened?
- Basic Problems Causing the Failures to Access the Development Environment Through VS Code
- What Do I Do If Error Message "Could not establish connection to xxx" Is Displayed During a Remote Connection?
- What Do I Do If the Connection to a Remote Development Environment Remains in "Setting up SSH Host xxx: Downloading VS Code Server locally" State for More Than 10 Minutes?
- What Do I Do If the Connection to a Remote Development Environment Remains in the State of "Setting up SSH Host xxx: Downloading VS Code Server locally" for More Than 10 Minutes?
- What Do I Do If the Connection to a Remote Development Environment Remains in the State of "ModelArts Remote Connect: Connecting to instance xxx..." for More Than 10 Minutes?
- What Do I Do If a Remote Connection Is in the Retry State?
- What Do I Do If Error Message "The VS Code Server failed to start" Is Displayed?
- What Do I Do If Error Message "Permissions for 'x:/xxx.pem' are too open" Is Displayed?
- What Do I Do If Error Message "Bad owner or permissions on C:\Users\Administrator/.ssh/config" or "Connection permission denied (publickey)" Is Displayed?
- What Do I Do If Error Message "ssh: connect to host xxx.pem port xxxxx: Connection refused" Is Displayed?
- What Do I Do If Error Message "ssh: connect to host ModelArts-xxx port xxx: Connection timed out" Is Displayed?
- What Do I Do If Error Message "Load key "C:/Users/xx/test1/xxx.pem": invalid format" Is Displayed?
- What Do I Do If Error Message "An SSH installation couldn't be found" or "Could not establish connection to instance xxx: 'ssh' ..." Is Displayed?
- What Do I Do If Error Message "no such identity: C:/Users/xx /test.pem: No such file or directory" Is Displayed?
- What Do I Do If Error Message "Host key verification failed" or "Port forwarding is disabled" Is Displayed?
- What Do I Do If Error Message "Failed to install the VS Code Server" or "tar: Error is not recoverable: exiting now" Is Displayed?
- What Do I Do If Error Message "XHR failed" Is Displayed When a Remote Notebook Instance Is Accessed Through VS Code?
- What Do I Do for an Automatically Disconnected VS Code Connection If No Operation Is Performed for a Long Time?
- What Do I Do If It Takes a Long Time to Set Up a Remote Connection After VS Code Is Automatically Upgraded?
- What Do I Do If Error Message "Connection reset" Is Displayed During an SSH Connection?
- What Can I Do If a Notebook Instance Is Frequently Disconnected or Stuck After I Use MobaXterm to Connect to the Notebook Instance in SSH Mode?
- Using Custom Images in Notebook
-
Others
- How Do I Use Multiple Ascend Cards for Debugging in a Notebook Instance?
- Why Is the Training Speed Similar When Different Notebook Flavors Are Used?
- How Do I Perform Incremental Training When Using MoXing?
- How Do I View GPU Usage on the Notebook?
- How Can I Obtain GPU Usage Through Code?
- Which Real-Time Performance Indicators of an Ascend Chip Can I View?
- Does the System Automatically Stop or Delete a Notebook Instance If I Do Not Enable Automatic Stop?
- What Are the Relationships Between Files Stored in JupyterLab, Terminal, and OBS?
- How Do I Use the Datasets Created on ModelArts in a Notebook Instance?
- pip and Common Commands
- What Are Sizes of the /cache Directories for Different Notebook Specifications in DevEnviron?
- How Do I Isolate IAM Users for Using Development Environments?
- What Is the Impact of Resource Overcommitment on Notebook Instances?
-
Training Jobs
-
Functional Consulting
- What Are the Format Requirements for Algorithms Imported from a Local Environment?
- What Are the Solutions to Underfitting?
- What Are the Precautions for Switching Training Jobs from the Old Version to the New Version?
- How Do I Obtain a Trained ModelArts Model?
- How Do I Set the Runtime Environment of the AI Engine Scikit_Learn 0.18.1?
- Must the Hyperparameters Optimized Using a TPE Algorithm Be Categorical?
- What Is TensorBoard Used for in Model Visualization Jobs?
- How Do I Obtain RANK_TABLE_FILE on ModelArts for Distributed Training?
- How Do I Obtain the CUDA and cuDNN Versions of a Custom Image?
- How Do I Obtain a MoXing Installation File?
- In a Multi-Node Training, the TensorFlow PS Node Functioning as a Server Will Be Continuously Suspended. How Does ModelArts Determine Whether the Training Is Complete? Which Node Is a Worker?
- How Do I Install MoXing for a Custom Image of a Training Job?
- An IAM User Cannot Select an Existing SFS Turbo File System When Using a Dedicated Resource Pool to Create a Training Job
- Reading Data During Training
-
Compiling the Training Code
- How Do I Create a Training Job When a Dependency Package Is Referenced by the Model to Be Trained?
- What Is the Common File Path for Training Jobs?
- How Do I Install a Library That C++ Depends on?
- How Do I Check Whether a Folder Copy Is Complete During Job Training?
- How Do I Load Some Well Trained Parameters During Job Training?
- How Do I Obtain Training Job Parameters from the Boot File of the Training Job?
- Why Can't I Use os.system ('cd xxx') to Access the Corresponding Folder During Job Training?
- How Do I Invoke a Shell Script in a Training Job to Execute the .sh File?
- How Do I Obtain the Dependency File Path to be Used in Training Code?
- What Is the File Path If a File in the model Directory Is Referenced in a Custom Python Package?
-
Creating a Training Job
- What Can I Do If the Message "Object directory size/quantity exceeds the limit" Is Displayed When I Create a Training Job?
- What Are Sizes of the /cache Directories for Different Resource Specifications in the Training Environment?
- Is the /cache Directory of a Training Job Secure?
- Why Is a Training Job Always Queuing?
- What Determines the Hyperparameter Directory (/work or /ma-user) When Creating a Training Job?
- Managing Training Job Versions
-
Viewing Job Details
- How Do I Check Resource Usage of a Training Job?
- How Do I Access the Background of a Training Job?
- Is There Any Conflict When Models of Two Training Jobs Are Saved in the Same Directory of a Container?
- Only Three Valid Digits Are Retained in a Training Output Log. Can the Value of loss Be Changed?
- Can a Trained Model Be Downloaded or Migrated to Another Account? How Do I Obtain the Download Path?
-
Functional Consulting
-
Service Deployment
-
Model Management
-
Importing Models
- How Do I Import the .h5 Model of Keras to ModelArts?
- How Do I Edit the Installation Package Dependency Parameters in a Model Configuration File When Importing a Model?
- How Do I Change the Default Port to Create a Real-Time Service Using a Custom Image?
- Does ModelArts Support Multi-Model Import?
- Restrictions on the Size of an Image for Importing an AI Application
-
Importing Models
-
Service Deployment
-
Functional Consulting
- What Types of Services Can Models Be Deployed as on ModelArts?
- What Are the Differences Between Real-Time Services and Batch Services?
- Why Cannot I Select Ascend 310 Resources?
- Can Models Trained on ModelArts Be Deployed Locally?
- What Is the Maximum Size of a Prediction Request Body?
- Can Real-Time Services Be Billed on a Yearly/Monthly Basis?
- How Do I Select Compute Node Specifications for Deploying a Service?
- What Is the CUDA Version for Deploying a Service on GPUs?
-
Real-Time Services
- What Do I Do If a Conflict Occurs in the Python Dependency Package of a Custom Prediction Script When I Deploy a Real-Time Service?
- How Do I Speed Up Real-Time Prediction?
- Can a New-Version AI Application Still Use the Original API?
- What Is the Format of a Real-Time Service API?
- How Do I Check Whether an Error Is Caused by a Model When a Real-Time Service Is Running But Prediction Failed?
- How Do I Fill in the Request Header and Request Body of an Inference Request When a Real-Time Service Is Running?
- Why Cannot I Access the Obtained Inference Request Address from the Initiator Client?
- What Do I Do If Error ModelArts.3520 Is Reported During Service Deployment?
- Why Did My Service Deployment Fail with Proper Deployment Timeout Configured?
-
Functional Consulting
-
Model Management
-
Resource Pools
- Can I Use ECSs to Create a Dedicated Resource Pool for ModelArts?
- Can I Deploy Multiple Services on One Dedicated Resource Pool Node?
- How Is a Node Newly Added to a Dedicated Resource Pool Billed?
- What Are the Differences Between a Public Resource Pool and a Dedicated Resource Pool?
- How Do I Log In to a Dedicated Resource Pool Node Through SSH?
- How Are Training Jobs Queued?
- What Do I Do If Resources Are Insufficient for Staring a New Real-Time Service After I Stop a Real-Time Service in a Dedicated Resource Pool?
- Can a Public Resource Pool Be Used for Network Connection Between ModelArts and the Authentication Service for Running Algorithms?
- Why Is a Dedicated Resource Pool That Fails to Be Created Still Displayed on the Console After It Is Deleted?
- How Do I Add a VPC Peering Connection Between a Dedicated Resource Pool and an SFS?
-
API/SDK
- Can ModelArts APIs or SDKs Be Used to Download Models to a Local PC?
- What Installation Environments Do ModelArts SDKs Support?
- Does ModelArts Use the OBS API to Access OBS Files over an Intranet or the Internet?
- How Do I Obtain a Job Resource Usage Curve After I Submit a Training Job by Calling an API?
- How Do I View the Old-Version Dedicated Resource Pool List Using the SDK?
-
Using PyCharm Toolkit
- What Should I Do If an Error Occurs During Toolkit Installation?
- What Should I Do If an Error Occurs When I Edit a Credential in PyCharm Toolkit?
- Why Cannot I Start Training?
- What Should I Do If Error "xxx isn't existed in train_version" Occurs When a Training Job Is Submitted?
- What Should I Do If Error "Invalid OBS path" Occurs When a Training Job Is Submitted?
- What Should I Do If Error "NoSuchKey" Occurs When PyCharm Toolkit Is Used to Submit a Training Job?
- What Should I Do If an Error Occurs During Service Deployment?
- How Do I View Error Logs of PyCharm Toolkit?
- How Do I Use PyCharm ToolKit to Create Multiple Jobs for Simultaneous Training?
- What Should I Do If "Error occurs when accessing to OBS" Is Displayed When PyCharm ToolKit Is Used?
-
General Issues
-
Troubleshooting
- General Issues
- ExeML
-
DevEnviron
-
Environment Configuration Faults
- Disk Space Used Up
- An Error Is Reported When Conda Is Used to Install Keras 2.3.1 in Notebook
- Error "HTTP error 404 while getting xxx" Is Reported During Dependency Installation in a Notebook
- The numba Library Has Been Installed in a Notebook Instance and Error "import numba ModuleNotFoundError: No module named 'numba'" Is Reported
- What Do I Do If Files Fail to Be Saved in JupyterLab?
- Instance Faults
- Code Running Failures
- JupyterLab Plug-in Faults
-
Failures to Access the Development Environment Through VS Code
- What Do I Do If the VS Code Window Is Not Displayed?
- What Do I Do If a Remote Connection Failed After VS Code Is Opened?
- What Do I Do If I Failed to Access the Development Environment Through VS Code?
- What Do I Do If Error Message "Could not establish connection to xxx" Is Displayed During a Remote Connection?
- What Do I Do If the Connection to a Remote Development Environment Remains in "Setting up SSH Host xxx: Downloading VS Code Server locally" State for More Than 10 Minutes?
- What Do I Do If the Connection to a Remote Development Environment Remains in the State of "Setting up SSH Host xxx: Downloading VS Code Server locally" for More Than 10 Minutes?
- What Do I Do If a Remote Connection Is in the Retry State?
- What Do I Do If Error Message "The VS Code Server failed to start" Is Displayed?
- What Do I Do If Error Message "Permissions for 'x:/xxx.pem' are too open" Is Displayed?
- Error Message "Bad owner or permissions on C:\Users\Administrator/.ssh/config" Is Displayed
- Error Message "Connection permission denied (publickey)" Is Displayed
- What Do I Do If Error Message "ssh: connect to host xxx.pem port xxxxx: Connection refused" Is Displayed?
- What Do I Do If Error Message "ssh: connect to host ModelArts-xxx port xxx: Connection timed out" Is Displayed?
- What Do I Do If Error Message "Load key "C:/Users/xx/test1/xxx.pem": invalid format" Is Displayed?
- What Do I Do If Error Message "An SSH installation couldn't be found" or "Could not establish connection to instance xxx: 'ssh' ..." Is Displayed?
- What Do I Do If Error Message "no such identity: C:/Users/xx /test.pem: No such file or directory" Is Displayed?
- What Do I Do If Error Message "Host key verification failed" or "Port forwarding is disabled" Is Displayed?
- What Do I Do If Error Message "Failed to install the VS Code Server" or "tar: Error is not recoverable: exiting now" Is Displayed?
- What Do I Do If Error Message "XHR failed" Is Displayed When a Remote Notebook Instance Is Accessed Through VS Code?
- What Do I Do for an Automatically Disconnected VS Code Connection If No Operation Is Performed for a Long Time?
- What Do I Do If It Takes a Long Time to Set Up a Remote Connection After VS Code Is Automatically Upgraded?
- What Do I Do If Error Message "Connection reset" Is Displayed During an SSH Connection?
- What Can I Do If a Notebook Instance Is Frequently Disconnected or Stuck After I Use MobaXterm to Connect to the Notebook Instance in SSH Mode?
- What Do I Do If Error Message "Missing GLIBC, Missing required dependencies" Is Displayed When I Access the Development Environment Through VS Code?
- What Do I Do If an Error Message Is Displayed Indicating That ms-vscode-remote.remot-sdh Is Uninstalled Due To a Reported Issue When Using VSCode-huawei?
- Instance Directory in VS Code Does Not Match That on the Cloud When VS Code Is Used to Connect to an Instance
-
Save an Image Failures
- Troubleshooting for Custom Images in Notebook Instances
- What If the Error Message "there are processes in 'D' status, please check process status using'ps -aux' and kill all the 'D' status processes" or "Buildimge,False,Error response from daemon,Cannot pause container xxx" Is Displayed When I Save an Image?
- What Do I Do If Error "container size %dG is greater than threshold %dG" Is Displayed When I Save an Image?
- What Do I Do If Error "too many layers in your image" Is Displayed When I Save an Image?
- What Do I Do If Error "The container size (xG) is greater than the threshold (25G)" Is Reported When I Save an Image?
- No Kernel Is Displayed After a Notebook Instance Created Using a Custom Image Is Started
- Some Extra Packages Are Found in the Conda Environment Built Using a Custom Image
- Failed to Create a Custom Image Using ma-cli and an Error Is Displayed Indicating that the File Does Not Exist
- Error Message "Unexpected error from cudaGetDeviceCount" Is Displayed When Torch Is Used
- Other Faults
-
Environment Configuration Faults
-
Training Jobs
-
OBS Operation Issues
- Error in File Reading
- Error Message Is Displayed Repeatedly When a TensorFlow-1.8 Job Is Connected to OBS
- TensorFlow Stops Writing TensorBoard to OBS When the Size of Written Data Reaches 5 GB
- Error "Unable to connect to endpoint" Error Occurs When a Model Is Saved
- Error Message "BrokenPipeError: Broken pipe" Displayed When OBS Data Is Copied
- Error Message "ValueError: Invalid endpoint: obs.xxxx.com" Displayed in Logs
- Error Message "errorMessage:The specified key does not exist" Displayed in Logs
-
In-Cloud Migration Adaptation Issues
- Failed to Import a Module
- Error Message "No module named .*" Displayed in Training Job Logs
- Failed to Install a Third-Party Package
- Failed to Download the Code Directory
- Error Message "No such file or directory" Displayed in Training Job Logs
- Failed to Find the .so File During Training
- ModelArts Training Job Failed to Parse Parameters and an Error Is Displayed in the Log
- Training Output Path Is Used by Another Job
- Error Message "RuntimeError: std::exception" Displayed for a PyTorch 1.0 Engine
- Error Message "retCode=0x91, [the model stream execute failed]" Displayed in MindSpore Logs
- Error Occurred When Pandas Reads Data from an OBS File If MoXing Is Used to Adapt to an OBS Path
- Error Message "Please upgrade numpy to >= xxx to use this pandas version" Displayed in Logs
- Reinstalled CUDA Version Does Not Match the One in the Target Image
- Error ModelArts.2763 Occurred During Training Job Creation
- Error Message "AttributeError: module '***' has no attribute '***'" Displayed Training Job Logs
- System Container Exits Unexpectedly
-
Hard Faults Due to Space Limit
- Downloading Files Timed Out or No Space Left for Reading Data
- Insufficient Container Space for Copying Data
- Error Message "No space left" Displayed When a TensorFlow Multi-node Job Downloads Data to /cache
- Size of the Log File Has Reached the Limit
- Error Message "write line error" Displayed in Logs
- Error Message "No space left on device" Displayed in Logs
- Training Job Failed Due to OOM
- Common Issues Related to Insufficient Disk Space and Solutions
- Internet Access Issues
- Permission Issues
-
GPU Issues
- Error Message "No CUDA-capable device is detected" Displayed in Logs
- Error Message "RuntimeError: connect() timed out" Displayed in Logs
- Error Message "cuda runtime error (10) : invalid device ordinal at xxx" Displayed in Logs
- Error Message "RuntimeError: Cannot re-initialize CUDA in forked subprocess" Displayed in Logs
- No GPU Is Found for a Training Job
-
Service Code Issues
- Error Message "pandas.errors.ParserError: Error tokenizing data. C error: Expected .* fields" Displayed in Logs
- Error Message "max_pool2d_with_indices_out_cuda_frame failed with error code 0" Displayed in Logs
- Training Job Failed with Error Code 139
- Debugging Training Code in the Cloud Environment If a Training Job Failed
- Error Message "'(slice(0, 13184, None), slice(None, None, None))' is an invalid key" Displayed in Logs
- Error Message "DataFrame.dtypes for data must be int, float or bool" Displayed in Logs
- Error Message "CUDNN_STATUS_NOT_SUPPORTED" Displayed in Logs
- Error Message "Out of bounds nanosecond timestamp" Displayed in Logs
- Error Message "Unexpected keyword argument passed to optimizer" Displayed in Logs
- Error Message "no socket interface found" Displayed in Logs
- Error Message "Runtimeerror: Dataloader worker (pid 46212) is killed by signal: Killed BP" Displayed in Logs
- Error Message "AttributeError: 'NoneType' object has no attribute 'dtype'" Displayed in Logs
- Error Message "No module name 'unidecode'" Displayed in Logs
- Distributed Tensorflow Cannot Use tf.variable
- When MXNet Creates kvstore, the Program Is Blocked and No Error Is Reported
- ECC Error Occurs in the Log, Causing Training Job Failure
- Training Job Failed Because the Maximum Recursion Depth Is Exceeded
- Training Using a Built-in Algorithm Failed Due to a bndbox Error
- Training Job Process Exits Unexpectedly
- Stopped Training Job Process
-
Running a Training Job Failed
- Troubleshooting a Training Job Failure
- An NCCL Error Occurs When a Training Job Fails to Be Executed
- Troubleshooting Process
- A Training Job Created Using a Custom Image Is Always in the Running State
- Failed to Find the Boot File When a Training Job Is Created Using a Custom Image
- Running a Job Failed Due to Persistently Rising Memory Usage
- Training Jobs Created in a Dedicated Resource Pool
- Training Performance Issues
-
OBS Operation Issues
-
Inference Deployment
-
Model Management
- Failed to Create a Model
- Suspended Account or Insufficient Permission to Import Models
- Failed to Build an Image or Import a File During Model Creation
- Obtaining the Directory Structure in the Target Image When Importing an AI Application Through OBS
- Failed to Obtain Certain Logs on the ModelArts Log Query Page
- Failed to Download a pip Package When an AI Application Is Created Using OBS
- Failed to Use a Custom Image to Create an AI application
- Insufficient Disk Space Is Displayed When a Service Is Deployed After an AI Application Is Imported
- Error Occurred When a Created AI Application Is Deployed as a Service
- Invalid Runtime Dependency Configured in an Imported Custom Image
- Garbled Characters Displayed in an AI Application Name Returned When AI Application Details Are Obtained Through an API
- The Model or Image Exceeded the Size Limit for AI Application Import
- A Single Model File to Be Imported Exceeds the Size Limit (5 GB)
- Creating a Model Failed Due to Image Building Timeout
-
Service Deployment
- Error Occurred When a Custom Image Model Is Deployed as a Real-Time Service
- Alarm Status of a Deployed Real-Time Service
- Failed to Start a Service
- Failed to Pull an Image When a Service Is Deployed, Started, Upgraded, or Modified
- Image Restarts Repeatedly When a Service Is Deployed, Started, Upgraded, or Modified
- Container Health Check Fails When a Service Is Deployed, Started, Upgraded, or Modified
- Resources Are Insufficient When a Service Is Deployed, Started, Upgraded, or Modified
- Error Occurred When a CV2 Model Package Is Used to Deploy a Real-Time Service
- Service Is Consistently Being Deployed
- A Started Service Is Intermittently in the Alarm State
- Failed to Deploy a Service and Error "No Module named XXX" Occurred
- Insufficient Permission to or Unavailable Input/Output OBS Path of a Batch Service
- Error "No CUDA runtime is found" Occurred When a Real-Time Service Is Deployed
- What Can I Do if the Memory Is Insufficient?
-
Service Prediction
- Service Prediction Failed
- Error "APIG.XXXX" Occurred in a Prediction Failure
- Error ModelArts.4206 Occurred in Real-Time Service Prediction
- Error ModelArts.4302 Occurred in Real-Time Service Prediction
- Error ModelArts.4503 Occurred in Real-Time Service Prediction
- Error MR.0105 Occurred in Real-Time Service Prediction
- Method Not Allowed
- Request Timed Out
- Error Occurred When an API Is Called for Deploying a Model Created Using a Custom Image
- Error "DL.0105" Occurred During Real-Time Inference
-
Model Management
-
MoXing
- Error Occurs When MoXing Is Used to Copy Data
- How Do I Disable the Warmup Function of the Mox?
- Pytorch Mox Logs Are Repeatedly Generated
- Failed to Perform Local Fine Tuning on the Checkpoint Generated by moxing.tensorflow
- Copying Data Using MoXing Is Slow and the Log Is Repeatedly Printed in a Training Job
- Failed to Access a Folder Using MoXing and Read the Folder Size Using get_size
- APIs or SDKs
- Videos
- Preparations (To Be Offline)
- User Guide (ExeML)
-
Workflows
- MLOps Overview
- What Is Workflow?
- How to Use a Workflow?
-
How to Develop a Workflow?
- Concepts
- Parameter Configuration
- Unified Storage
- Phase Type
- Branch Control
- Data Selection Among Multiple Inputs
- Creating a Workflow
- Debugging a Workflow
- Publishing a Workflow
- Advanced Capabilities
- FAQs
-
DevEnviron
- Introduction to DevEnviron
- Application Scenarios
-
Managing Notebook Instances
- Creating a Notebook Instance
- Accessing a Notebook Instance
- Searching for, Starting, Stopping, or Deleting a Notebook Instance
- Changing a Notebook Instance Image
- Changing the Flavor of a Notebook Instance
- Selecting Storage in DevEnviron
- Dynamically Mounting an OBS Parallel File System
- Dynamically Expanding EVS Disk Capacity
- Modifying the SSH Configuration for a Notebook Instance
- Viewing the Notebook Instances of All IAM Users Under One Tenant Account
- Viewing Notebook Events
- Notebook Cache Directory Alarm Reporting
-
JupyterLab
- Operation Process in JupyterLab
- JupyterLab Overview and Common Operations
- Code Parametrization Plug-in
- Using ModelArts SDK
- Using the Git Plug-in
- Visualized Model Training
- Uploading and Downloading Data in Notebook
-
Local IDE
- Operation Process in a Local IDE
- Local IDE (PyCharm)
- Local IDE (VS Code)
- Local IDE (Accessed Using SSH)
-
ModelArts CLI Command Reference
- ModelArts CLI Overview
- (Optional) Installing ma-cli Locally
- Autocompletion for ma-cli Commands
- ma-cli Authentication
-
ma-cli Image Building Command
- ma-cli Image Building Command
- Obtaining an Image Creation Template
- Loading an Image Creation Template
- Obtaining Registered ModelArts Images
- Creating an Image in ModelArts Notebook
- Obtaining Image Creation Caches in ModelArts Notebook
- Clearing Image Creation Caches in ModelArts Notebook
- Registering SWR Images with ModelArts Image Management
- Deregistering a Registered Image from ModelArts Image Management
- Debugging an SWR Image on an ECS
-
Using the ma-cli ma-job Command to Submit a ModelArts Training Job
- ma-cli ma-job Command Overview
- Obtaining ModelArts Training Jobs
- Submitting a ModelArts Training Job
- Obtaining ModelArts Training Job Logs
- Obtaining ModelArts Training Job Events
- Obtaining ModelArts AI Engines for Training
- Obtaining ModelArts Resource Specifications for Training
- Stopping a ModelArts Training Job
- Using the ma-cli dli-job Command to Submit a DLI Spark Job
- Using ma-cli to Copy OBS Data
-
Model Development (To Be Offline)
- Introduction to Model Development
- Preparing Data
- Preparing Algorithms
-
Performing a Training
- Creating a Training Job
- Viewing Training Job Details
- Viewing Training Job Events
- Training Job Logs
- Cloud Shell
- Viewing the Resource Usage of a Training Job
- Evaluation Results
- Viewing Training Tags
- Viewing Fault Recovery Details
- Viewing Environment Variables of a Training Container
- Stopping, Rebuilding, or Searching for a Training Job
- Releasing Training Job Resources
- Advanced Training Operations
- Distributed Training
- Automatic Model Tuning (AutoSearch)
-
Image Management
- Image Management
- Using a Preset Image
-
Using Custom Images in Notebook Instances
- Constraints on Custom Images in Notebook Instances
- Registering an Image in ModelArts
- Creating a Custom Image
- Saving a Notebook Instance as a Custom Image
- Creating and Using a Custom Image in Notebook
- Creating a Custom Image on an ECS and Using It in Notebook
- Troubleshooting for Custom Images in Notebook Instances
-
Using a Custom Image to Train Models (Model Training)
- Overview
-
Example: Creating a Custom Image for Training
- Example: Creating a Custom Image for Training (PyTorch + CPU/GPU)
- Example: Creating a Custom Image for Training (MPI + CPU/GPU)
- Example: Creating a Custom Image for Training (Horovod-PyTorch and GPUs)
- Example: Creating a Custom Image for Training (MindSpore and GPUs)
- Example: Creating a Custom Image for Training (TensorFlow and GPUs)
- Preparing a Training Image
- Creating an Algorithm Using a Custom Image
- Using a Custom Image to Create a CPU- or GPU-based Training Job
- Troubleshooting Process
- Using a Custom Image to Create AI applications for Inference Deployment
-
FAQs
- How Can I Log In to SWR and Upload Images to It?
- How Do I Configure Environment Variables for an Image?
- How Do I Use Docker to Start an Image Saved Using a Notebook Instance?
- How Do I Configure a Conda Source in a Notebook Development Environment?
- What Are Supported Software Versions for a Custom Image?
- Why Does an Error Occur When I Try to Save an Image That Is Reported as Larger Than 35 GB, Even Though It Is Only Displayed as 13 GB in SWR?
- How Do I Ensure That an Image Can be Saved Correctly Without Being Too Large?
- How Do I Reduce the Size of an Image Created Locally or on ECS?
- Will an Image Be Smaller If I Uninstall and Repackage It or Simply Delete Existing Datasets from the Image?
- What Do I Do If Error "ModelArts.6787" Is Reported When I Register an Image on ModelArts?
- Modification History
-
Model Inference (To Be Offline)
- Introduction to Inference
- Managing AI Applications
-
Deploying an AI Application as a Service
- Deploying AI Applications as Real-Time Services
- Deploying AI Applications as Batch Services
- Upgrading a Service
- Starting, Stopping, Deleting, or Restarting a Service
- Viewing Service Events
-
Inference Specifications
- Model Package Specifications
-
Model Templates
- Introduction to Model Templates
-
Templates
- TensorFlow-based Image Classification Template
- TensorFlow-py27 General Template
- TensorFlow-py36 General Template
- MXNet-py27 General Template
- MXNet-py36 General Template
- PyTorch-py27 General Template
- PyTorch-py36 General Template
- Caffe-CPU-py27 General Template
- Caffe-GPU-py27 General Template
- Caffe-CPU-py36 General Template
- Caffe-GPU-py36 General Template
- Arm-Ascend Template
- Input and Output Modes
- Examples of Custom Scripts
- ModelArts Monitoring on Cloud Eye
-
Resource Management
- Resource Pool
-
Elastic Cluster
- Comprehensive Upgrades to ModelArts Resource Pool Management Functions
- Creating a Resource Pool
- Viewing Details About a Resource Pool
- Resizing a Resource Pool
- Setting a Renewal Policy
- Modifying the Expiration Policy
- Migrating the Workspace
- Changing Job Types Supported by a Resource Pool
- Upgrading a Resource Pool Driver
- Deleting a Resource Pool
- Abnormal Status of a Dedicated Resource Pool
- ModelArts Network
- ModelArts Nodes
- Audit Logs
- Monitoring Resources
-
Data Preparation and Analytics
- Introduction to Data Preparation
- Getting Started
- Creating a Dataset
- Importing Data
- Data Analysis and Preview
- Labeling Data
- Publishing Data
- Exporting Data
- Data Labeling (To Be Offline)
-
User Guide for Senior AI Engineers (To Be Offline)
- Operation Guide
- Data Management (Old Version to Be Terminated)
- Training Management (Old Version )
- Resource Pools (Old Version to Be Terminated)
- Custom Images
- Permissions Management
- Audit Logs
- Change History
- General Reference
Copied.
Labeling Data
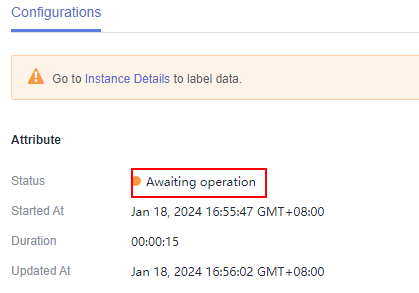
After a project is created, you will be redirected to the new-version ExeML and the project starts to run. When the data labeling phase changes to Awaiting operation, manually confirm data labeling in the dataset. You can also add or delete data in the dataset and modify labels.
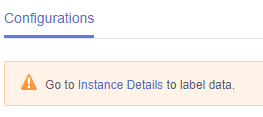
Double-click Label Data and click Instance Details. The data labeling page is displayed.
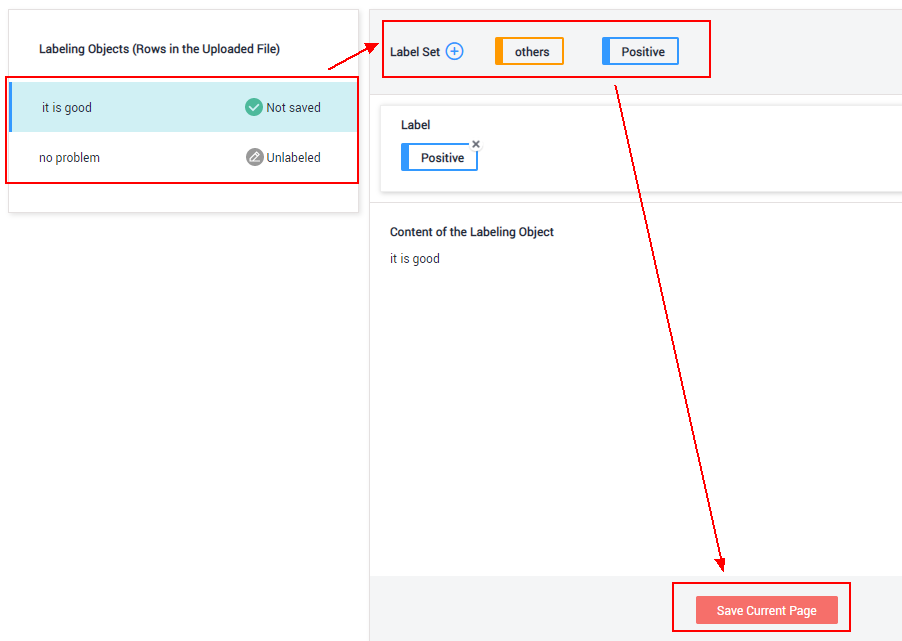
Data Labeling for Text Classification
- Select a text to be labeled in Labeling Objects and click different labels in the Label Set area to label the text.
You can add only one label for a text object.
- After confirming the file label, click Save Current Page in the lower right corner to save the labeling.
If a large number of objects are included in Labeling Objects, the page turning icon is displayed in the lower part of the area. After labeling objects on this page, click Save Current Page before you turn to the next page. If you turn pages before saving the labellings, the labeling information on the previous page will be lost. You need to re-label for text data.
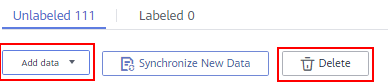
Adding or Deleting Data
In an ExeML project, the data source is the OBS directory corresponding to the input path of the dataset. If the data in the directory cannot meet your requirements, add or delete data on the ExeML page of ModelArts.
- Adding a file
On the Unlabeled tab, click Add data in the top left corner. In the dialog box that appears, select a local file and upload it.
The format of the file to be uploaded must meet requirement on datasets of the text classification type.
- Deleting a text object
On the Labeled or Unlabeled tab page, select a text object to be deleted and click Delete in the upper left corner. In the dialog box that is displayed, confirm the deletion information and click OK.
On the Labeled tab page, you can tick Select Current Page and click Delete to delete all text objects and their labeling information on the current page.
Modifying Labeled Data
For labeled text data, only labels of the text object can be deleted. To delete a label, go to the Labeled tab, locate the label name area, and click the cross icon next to the label. After the label is deleted, the text object is displayed on the Unlabeled tab page.

Modifying a Label
After an ExeML project for text classification is created, you can modify labels based on service changes, including label adding, modification, and deletion.
- Adding a label
On the Unlabeled tab, click the plus sign (+) on the right of Label Set. In the Add Label dialog box that appears, set Label Name and Label Color, and click OK.
- Modifying a label
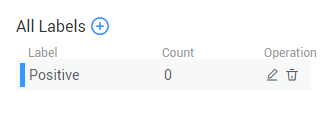
On the Labeled tab, locate the All Labels area, and click the edit button in the Operation column of the label you want to change. In the Modify Label dialog box, set Label Name and Label Color and click OK.
- Deleting a label
In the lower part of All labels on the Labeled tab page, select a label to be deleted and click the deletion icon in the Operation column. In the displayed Delete dialog box, select Delete label or Delete the label and objects with only the label, and click OK.
 NOTE:
NOTE:
The deleted labels cannot be recovered. Exercise caution when performing this operation.
Resuming Workflow Execution
After confirming data labeling, return back to the new-version ExeML. Click Next. Then, the workflow continues to run in sequence until all phases are executed.

Feedback
Was this page helpful?
Provide feedbackThank you very much for your feedback. We will continue working to improve the documentation.See the reply and handling status in My Cloud VOC.
For any further questions, feel free to contact us through the chatbot.
Chatbot


