
Manually Connecting to a Notebook Instance Through PyCharm
A local IDE supports PyCharm and VS Code. You can use PyCharm or VS Code to remotely connect the local IDE to the target notebook instance on ModelArts for running and debugging code.
This section describes how to use PyCharm to access a notebook instance.
Prerequisites
- PyCharm professional 2019.2 or later has been installed locally. The PyCharm professional edition is available because remote SSH applies only to the professional edition.
- A notebook instance has been created with remote SSH enabled. Ensure that the instance is running. For details, see Creating a Notebook Instance (Default Page).
- The address and port number of the development environment are available. To obtain this information, go to the notebook instance details page.
Figure 1 Instance details page

- The key pair is available.
A key pair is automatically downloaded after you create it. Securely store your key pair. If an existing key pair is lost, create a new one.
Step 1 Configure SSH
- In your local PyCharm development environment, choose File > Settings > Tools > SSH Configurations and click + to add an SSH configuration.
- Host: address for accessing the cloud development environment. Obtain the address on the page providing detailed information of the target notebook instance .
- Port: port number for accessing the cloud development environment. Obtain the port number on the page providing detailed information of the target notebook instance.
- User name: consistently set to ma-user.
- Authentication type: key pair
- Private key file: locally stored private key file of the cloud development environment. It is the key pair file automatically downloaded when you created the notebook instance.
- Click
 to rename the connection. Then, click OK.
 - After the configuration is complete, click Test Connection to test the connectivity.
- Select Yes. If "Successfully connected" is displayed, the network is accessible. Then, click OK.
- Click OK at the bottom to save the configuration.

Step 2 Obtain the Path to the Virtual Environment Built in the Development Environment
- Choose Tools > Start SSH Session to access the cloud development environment.
- Run the following command to view the Python virtual environments built in the current environment in the README file in /home/ma-user/:
cat /home/ma-user/README
- Run the source command to switch to a specific Python environment.
- Run which python to obtain the Python path and copy it for configuring the Python interpreter on the cloud.

Step 3 Configure a Python Interpreter
- Choose File > Settings > Project: Python project > Python Interpreter. Then, click
 and Add to add an interpreter.
 - Select Existing server configuration, choose the SSH configuration from the drop-down list, and click Next.
- Configure the Python interpreter.
- Interpreter: Enter the Python path copied in step 1, for example, /home/ma-user/anaconda3/envs/Pytorch-1.0.0/bin/python.
If the path is ~/anaconda3/envs/Pytorch-1.0.0/bin/python, replace ~ with /home/ma-user.
- Sync folders: Set this parameter to a directory in the cloud development environment for synchronizing local project directory files. A directory in /home/ma-user is recommended, for example, /home/ma-user/work/projects, because other directories may be prohibited from accessing.
- Interpreter: Enter the Python path copied in step 1, for example, /home/ma-user/anaconda3/envs/Pytorch-1.0.0/bin/python.
- Click ! on the right and select Automatically upload so that the locally modified file can be automatically uploaded to the container.
- Click Finish.
The local project file has been automatically uploaded to the cloud environment. Each time a local file is modified, the modification is automatically synchronized to the cloud environment.
In the lower right corner, the current interpreter is displayed as a remote interpreter.
Figure 4 Configuring a Python interpreter
Step 4 Install the Dependent Library for the Cloud Environment
After accessing the development environment, you can use different virtual environments, such as TensorFlow and PyTorch. However, in actual development, you need to install dependency packages. Then, you can access the environment through the terminal to perform operations.
Choose Tools > Start SSH Session and select the configured development environment. Run the pip install command to install the required dependency packages.

Step 5 Debug Code in the Development Environment
You have accessed the cloud development environment. Then, you can write, debug, and run the code in the local PyCharm. The code is actually executed in the cloud development environment, and the Ascend AI resources on the cloud are used. In this way, you compile and modify code locally and run the code in the cloud.
Run the code in the local IDE. The logs can be displayed locally.

Click Run/Debug Configurations in the upper right corner of the local IDE to set runtime parameters.

To debug code, set breakpoints and run the program in debug mode.


In debug mode, the code execution is suspended in the specified line, and you can obtain variable values.
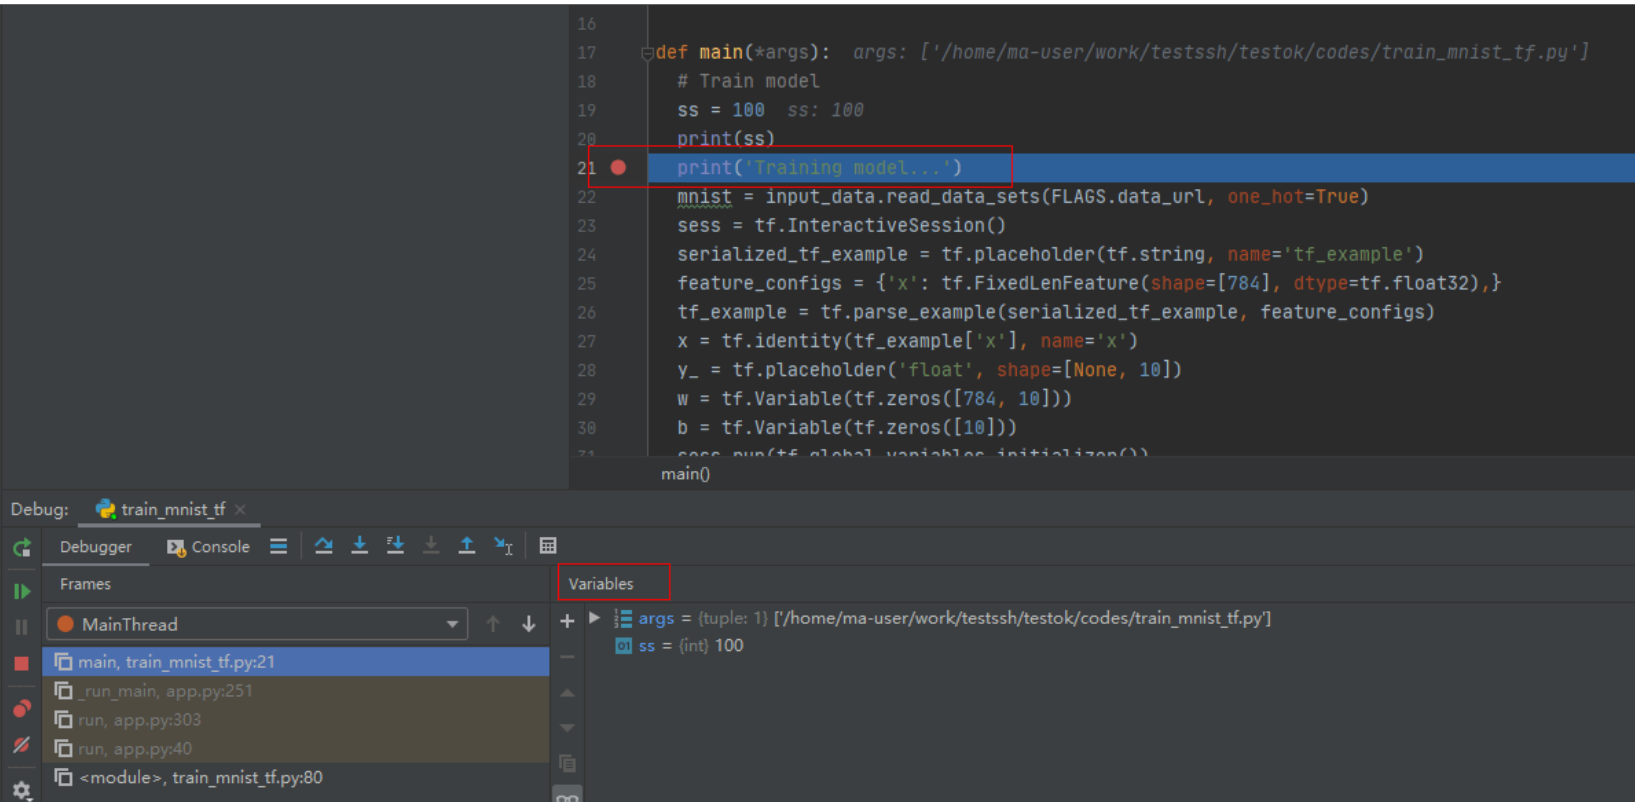
Before debugging code in debug mode, ensure that the local code is the same as the cloud code. If they are different, the line where a breakpoint is added locally may be different from the line of the cloud code, leading to errors.
When configuring a Python interpreter in the cloud development environment, select Automatically upload so that any local file modification can be automatically uploaded to the cloud. If you do not select Automatically upload, manually upload the directory or code after you modify the local code. For details, see Step 6 Uploading Local Files to a Notebook Instance.
Feedback
Was this page helpful?
Provide feedbackThank you very much for your feedback. We will continue working to improve the documentation.See the reply and handling status in My Cloud VOC.
For any further questions, feel free to contact us through the chatbot.
Chatbot


