
Minimizing User Permissions
Scenario and Objectives
- Excessive permissions of dependent services: is a platform service that depends on other services such as MRS and DWS. The DAYU User system role has the administrator permissions of these dependent services. If the DAYU User role is assigned to the IAM account of the data operations engineer, the IAM account also has the administrator permissions of the dependent services.
- Unnecessary operation permissions of other components: By default, the workspace developer role has the operation permissions on all components in the workspace. If the workspace developer role is assigned to the IAM account of the data operations engineer, the IAM account has the operation permissions of all other components apart from DataArts Quality.
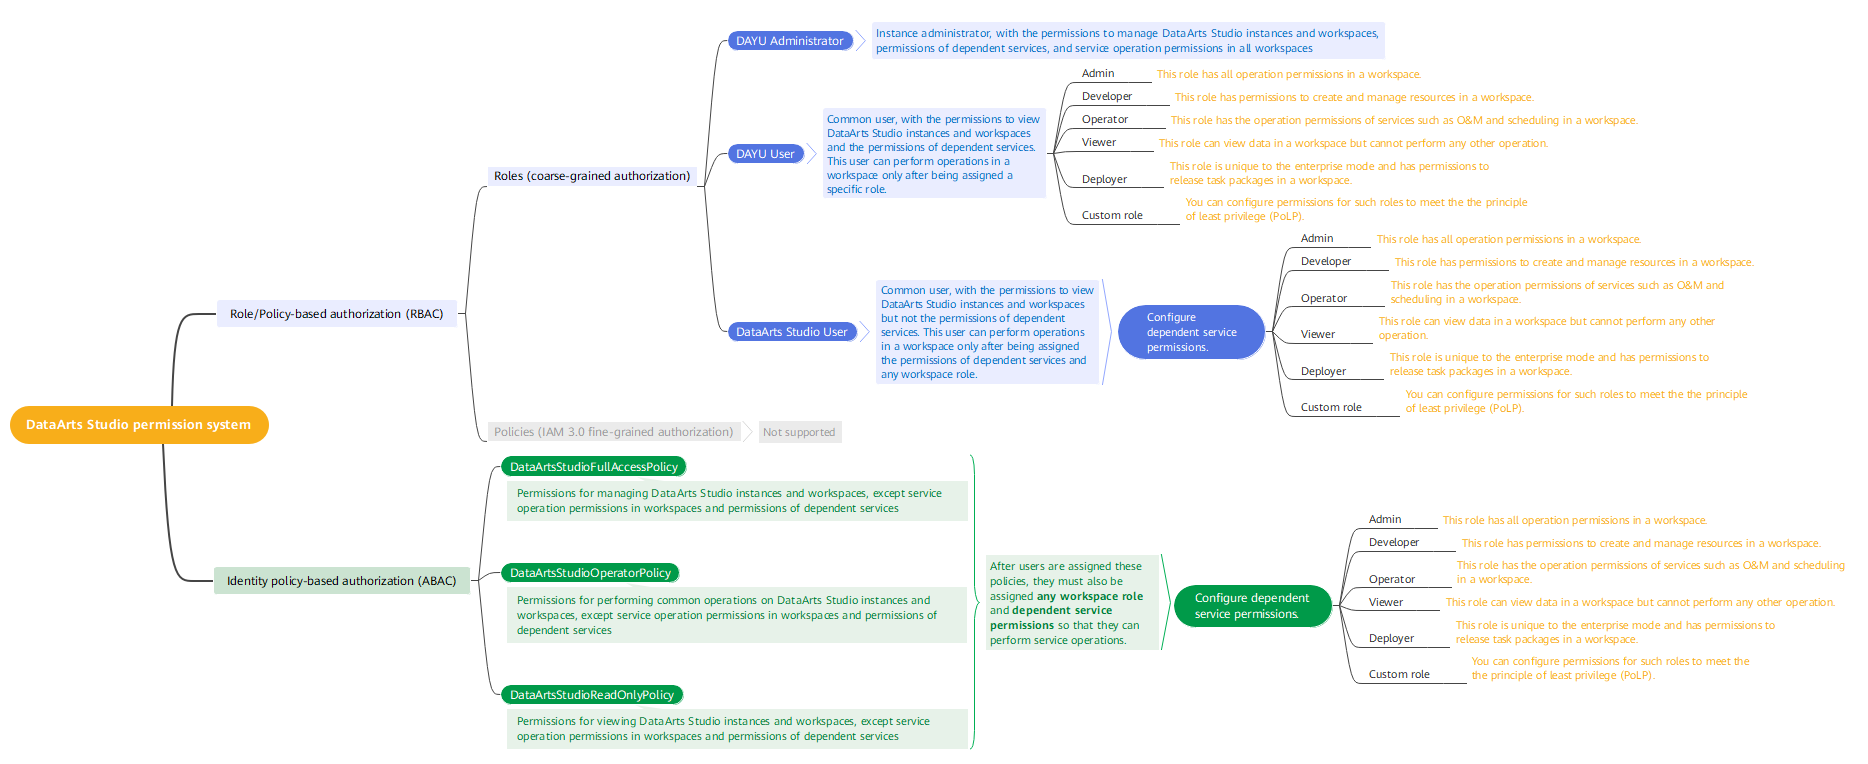
Figure 1 shows the permission system of . To resolve this problem, the project administrator can configure the least privilege which meets requirements while avoiding excessive permissions.
- Grant the DAYU User system role permissions to the IAM account of the data operations engineer, grant the minimum permissions of the dependent services, and then delete the preset permissions of dependent services from the IAM account.

You can use any of the following methods to grant the minimum IAM permissions of a common user to an IAM user:
A. Grant the DAYU User permissions to the IAM user, grant the minimum permissions of dependent services to the user, and then delete the preset permissions of dependent services from the user.
B. Grant the DataArts Studio User permissions to the IAM user, and then grant the minimum permissions of dependent services to the user.
C. Grant the DataArtsStudioOperatorPolicy permissions to the IAM user, and then grant the minimum permissions of dependent services to the user.
Method A is used as an example in this practice. It is the most complex method. You can choose any of them.
- In the service, create a custom role Developer_DQC that only has the operation permissions of DataArts Quality, add the IAM account of the data operations engineer to the workspace as a member, and assign the custom role to the IAM account.
Procedure
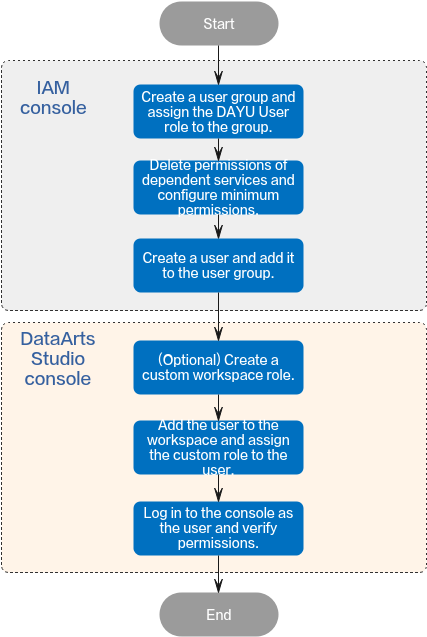
- Creating a User Group and Assigning the DAYU User Role to the Group: Create a user group for the IAM account of the data operations engineer and assign the DAYU User role to the user group.
- Configuring Minimum Permissions and Deleting Preset Dependent Service Permissions: Delete the default administrator permissions of dependent services from the user group and configure the minimum permissions.
- Creating an IAM User and Adding It to the User Group: Create an IAM user for the data operations engineer and add the user to the user group.
- Creating a Custom Workspace Role: On the Roles page, create a custom role and grant permissions of DataArts Quality to the role.
- Adding a Workspace Member and Assigning a Role: Add the created IAM user to the workspace and assign the role to the user.
- Logging In to the Console and Verifying Permissions: Log in to the console as the created user and check whether the permission configuration meets expectations. Figure 2 Process of configuring minimum permissions
Creating a User Group and Assigning the DAYU User Role to the Group
- Log in to the IAM console using the a Huawei account.
- In the navigation pane, choose User Groups. In the upper right corner of the User Groups page, click Create User Group. Figure 3 Creating a user group

- On the displayed page, enter the user group name DQC. Figure 4 Entering the user group name

- Click OK. The created user group is displayed in the user group list.
You can create a maximum of 20 user groups. If this quota does not meet your requirements, you can apply for a higher quota. For details, see How Do I Increase My Quota?
- In the user group list, click Authorize in the row that contains the newly created user group. Figure 5 Going to the user group authorization page

- Enter DAYU User in the search box, select the system role, and click Next. Figure 6 Assigning a role

Do not select the DAYU Administrator permission. It has all execution permissions of the DataArts Studio service and is not controlled by the workspace permissions.
- Select Region-specific projects for Scope and select projects. Then click OK.
DataArts Studio is a project-level service deployed in specific physical regions. If you select All resources for Scope, the permission takes effect in all projects of all regions. If you select Region-specific projects for Scope, the permission takes effect only for a specified project. When accessing DataArts Studio, the IAM user must switch to the region where they have been assigned the required permissions.
Figure 7 Setting the scope
Configuring Minimum Permissions and Deleting Preset Dependent Service Permissions
- On the homepage of the IAM console, choose Permissions > Policies/Roles. In the upper right corner of the displayed page, click Create Custom Policy. Figure 8 Creating a custom policy

- On the Create Custom Policy page, select JSON for Policy View and create custom policies DataArtsStudio_PermissionsOfDependentServices_global and DataArtsStudio_PermissionsOfDependentServices_region.
- You cannot create a custom policy for both a global dependent service and a regional dependent service. Instead, you must create two separate policies.
- The policy content is the minimum permissions of the services on which DataArts Studio components depend. For details, see Permission Management.
Figure 9 Creating a custom policy
- DataArtsStudio_PermissionsOfDependentServices_global: custom policy for a global dependent cloud service
{ "Version": "1.1", "Statement": [ { "Effect": "Allow", "Action": [ "obs:object:GetObject", "obs:object:PutObject", "obs:object:DeleteObject", "obs:bucket:GetBucketStorage", "obs:bucket:GetBucketLocation", "obs:bucket:ListAllMyBuckets", "obs:bucket:ListBucket", "obs:bucket:ListBucketVersions", "obs:bucket:CreateBucket", "obs:bucket:DeleteBucket", "rms:resources:list", "iam:agencies:listAgencies" ] } ] } - DataArtsStudio_PermissionsOfDependentServices_region: custom policy for a regional dependent cloud service
{
    "Version": "1.1",
    "Statement": [
        {
            "Effect": "Allow",
            "Action": [
                "cdm:cluster:get",
                "cdm:cluster:list",
                "cdm:cluster:create",
                "cdm:link:operate",
                "cdm:job:operate",
                "ces:*:get",
                "ces:*:list",
                "cloudtable:*:get",
                "cloudtable:*:list",
		"css:*:get",
                "css:*:list",
                "dis:streams:list",
                "dis:transferTasks:list",
                "dli:queue:submitJob",
                "dli:queue:cancelJob",
                "dli:table:insertOverwriteTable",
                "dli:table:insertIntoTable",
                "dli:table:alterView",
                "dli:table:alterTableRename",
                "dli:table:compaction",
                "dli:table:truncateTable",
                "dli:table:alterTableDropColumns",
                "dli:table:alterTableSetProperties",
                "dli:table:alterTableChangeColumn",
                "dli:table:showSegments",
                "dli:table:alterTableRecoverPartition",
                "dli:table:dropTable",
                "dli:table:update",
                "dli:table:alterTableDropPartition",
                "dli:table:alterTableAddPartition",
                "dli:table:alterTableAddColumns",
                "dli:table:alterTableRenamePartition",
                "dli:table:delete",
                "dli:table:alterTableSetLocation",
                "dli:table:describeTable",
                "dli:table:showPartitions",
                "dli:table:showCreateTable",
                "dli:table:showTableProperties",
                "dli:table:select",
                "dli:resource:updateResource",
                "dli:resource:useResource",
                "dli:resource:getResource",
                "dli:resource:listAllResource",
                "dli:resource:deleteResource",
                "dli:database:explain",
                "dli:database:createDatabase",
                "dli:database:dropFunction",
                "dli:database:createFunction",
                "dli:database:displayAllDatabases",
		"dli:database:displayAllTables",
                "dli:database:displayDatabase",
                "dli:database:describeFunction",
                "dli:database:createView",
                "dli:database:createTable",
                "dli:database:showFunctions",
                "dli:database:dropDatabase",
                "dli:group:useGroup",
                "dli:group:updateGroup",
                "dli:group:listAllGroup",
                "dli:group:getGroup",
                "dli:group:deleteGroup",
                "dli:column:select",
                "dli:jobs:start",
                "dli:jobs:export",
                "dli:jobs:update",
                "dli:jobs:list",
                "dli:jobs:listAll",
                "dli:jobs:get",
                "dli:jobs:delete",
                "dli:jobs:create",
                "dli:jobs:stop",
		"dli:variable:update",
		"dli:variable:delete",
                "dws:cluster:list",
                "dws:cluster:getDetail",
                "dws:openAPICluster:getDetail",
                "ecs:servers:get",
		"ecs:servers:list",
                "ecs:servers:stop",
                "ecs:servers:start",
		"ecs:flavors:get",
                "ecs:cloudServerFlavors:get",
                "ecs:cloudServers:list",
                "ecs:availabilityZones:list",
                "ges:graph:access",
                "ges:metadata:create",
                "ges:jobs:list",
                "ges:graph:operate",
                "ges:jobs:getDetail",
                "ges:graph:getDetail",
                "ges:graph:list",
                "ges:metadata:list",
                "ges:metadata:getDetail",
                "ges:metadata:delete",
                "ges:metadata:operate",
                "kms:cmk:get",
                "kms:cmk:list",
                "kms:cmk:create",
                "kms:cmk:decrypt",
                "kms:cmk:encrypt",
                "kms:dek:create",
                "kms:dek:encrypt",
                "kms:dek:decrypt",
                "mrs:cluster:get",
                "mrs:cluster:list",
                "mrs:job:get",
                "mrs:job:list",
                "mrs:job:submit",
                "mrs:job:stop",
                "mrs:job:delete",
                "mrs:sql:execute",
                "mrs:sql:cancel",
                "rds:*:get",
                "rds:*:list",
                "smn:topic:publish",
                "smn:topic:list",
		"vpc:publicIps:list",
                "vpc:publicIps:get",
                "vpc:vpcs:get",
                "vpc:vpcs:list",
                "vpc:subnets:get",
                "vpc:securityGroups:get",
                "vpc:firewalls:list",
                "vpc:routeTables:list",
                "vpc:subNetworkInterfaces:list"
            ]
        }
    ]
}
- Go to the User Groups page again, locate the DQC user group, and click Authorize in the Operation column. Select Policies/Roles for Authorization Model and select the following system roles and custom policies:
- System roles: DIS Operator and DIS User
- Custom policy DataArtsStudio_PermissionsOfDependentServices_global
- Custom policy DataArtsStudio_PermissionsOfDependentServices_region
The image read permission of SWR is required only when a custom image is selected for a DLI Spark node of a job in DataArts Factory. The account administrator is advised to grant permissions to users through image authorization. (Log in to the SWR console as the SWR administrator, choose My Images in the navigation pane on the left, access the details page of the required custom image, and grant the read permission of the image to users.) Otherwise, you need to grant the SWR Administrator permissions to users.
Figure 10 Configuring minimum permissions for the user group
- After the authorization is successful, click the created DQC user group on the User Groups page of the IAM console to go to the user group details page. Figure 11 Accessing the user group details page

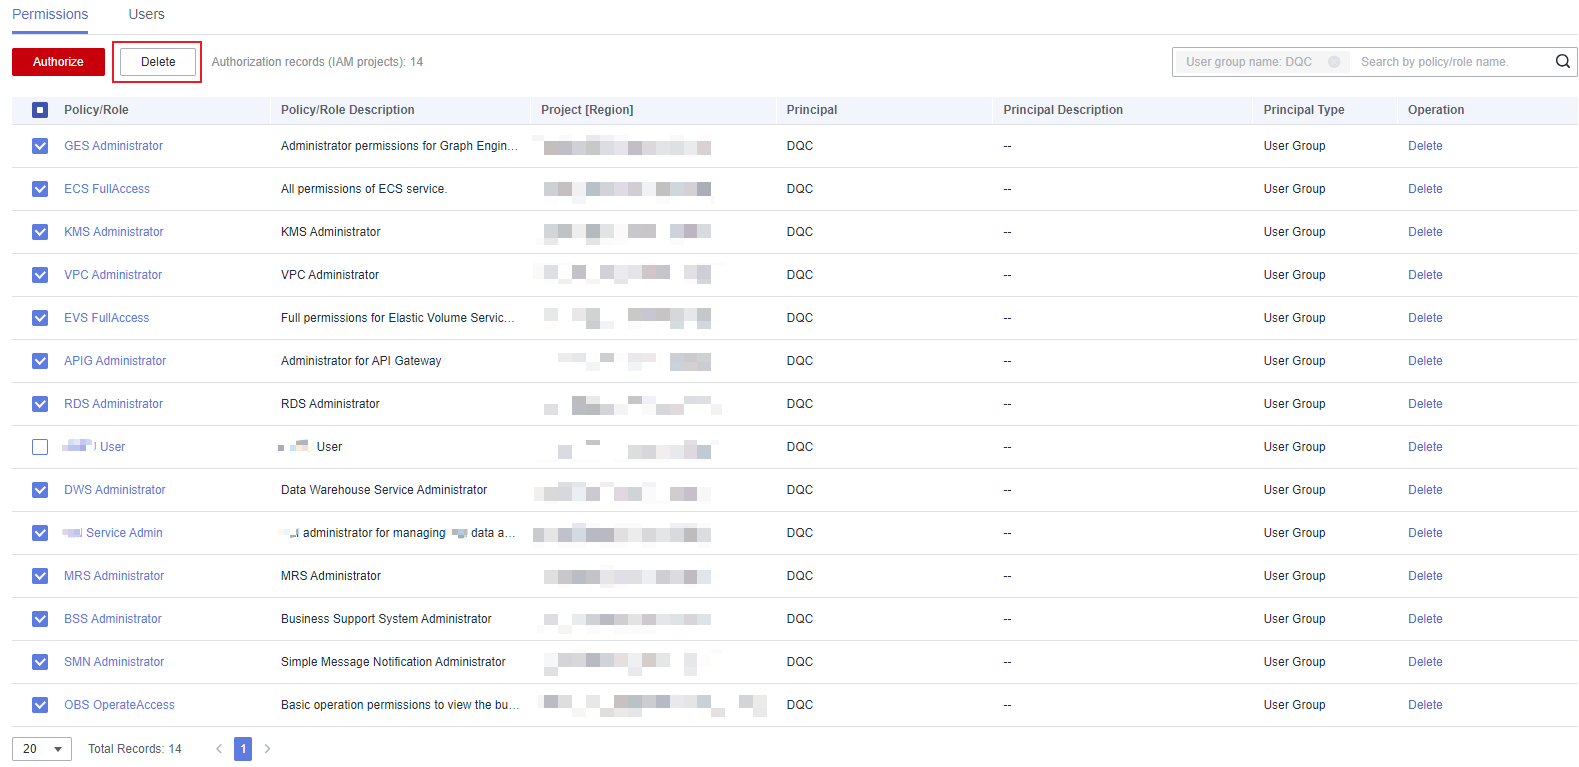
- On the Permissions tab page, select all the preset permissions of dependent services except DAYU User and the minimum permissions of dependent services, and click Delete above the list. Figure 12 Deleting permissions of dependent services
- After the permissions of dependent services are deleted, minimum permissions have been configured for dependent services.
Creating an IAM User and Adding It to the User Group
- On the IAM console, choose Users from the navigation pane on the left and click Create User in the upper right corner. Figure 13 Creating a user

- On the Set User Details page, set the following parameters and click Next in the lower right corner.
- User Details: Enter DataArts Studio-DQC for Username.
- Access Type: Select Programmatic access and Management console access.
An IAM user can pass the authentication and access DataArts Studio through an API or SDK only if Programmatic access is selected for Access Type during the creation of the IAM user.
- Credential Type: Select Access key and Password. You are advised to select Set now for Password.
- Login Protection: Set this parameter as required. Generally, this function does not need to be enabled. Figure 14 Configuring user information

- Select the DQC user group and click Create in the lower right corner of the page. Figure 15 Create

- Return to the user list to view the created user. Figure 16 Successful creation

Creating a Custom Workspace Role
- Log in to the DataArts Studio console using the a Huawei account and click the Roles tab.
Whether the deployer role is available and the parameters for creating a custom role depend on whether the enterprise mode is enabled. In this section, the enterprise mode is disabled.
Figure 17 Creating a custom role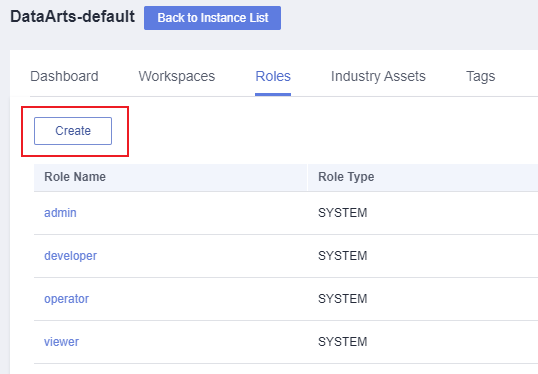
- Click Create. In the displayed dialog box, set the following parameters:
- Role Name: Enter Developer_DQC (unique ID of the custom role).
- Role Description: Enter This role is based on the developer role, and only the DataArts Quality permissions are retained.
- Role Type: Select any custom role.
- Reuse: Select developer and deselect the CREATE, DELETE, OPERATE, and EDIT permissions of other modules except DataArts Quality and retain all permissions of DataArts Quality. Figure 18 Creating a custom role
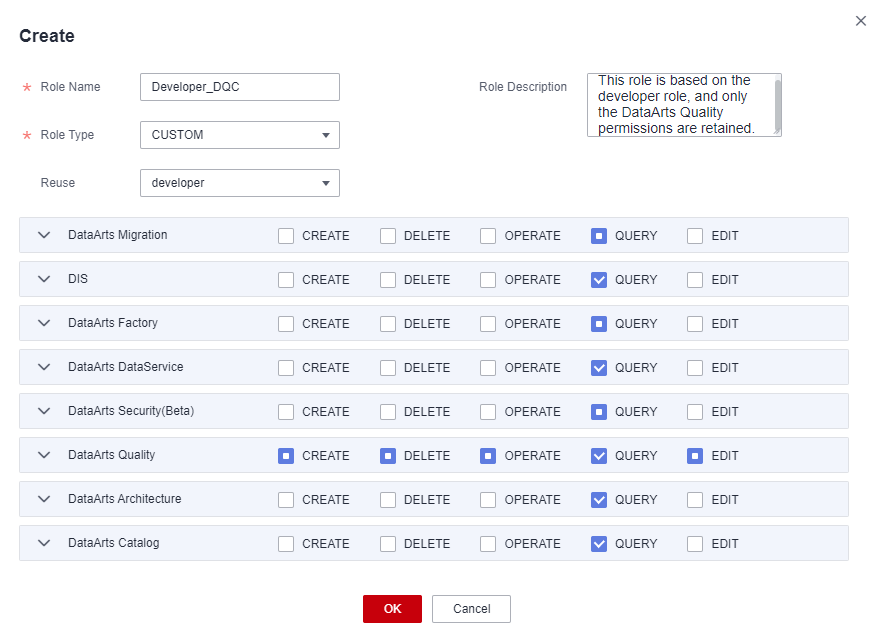
- Click OK.
Adding a Workspace Member and Assigning a Role
- Log in to the DataArts Studio console using the a Huawei account and click the Workspaces tab. Figure 19 Workspaces page

- Locate the target workspace and click Edit. Figure 20 Editing a workspace

- In the displayed Workspace Information page, click Add. Figure 21 Adding a member

- Add the created IAM user to the workspace and click OK.
- Account Type: Select Add User.
- Member Account: Select the IAM user created in Creating an IAM User and Adding It to the User Group.
- Role: Select the role. Figure 22 Adding a member

- After added to the workspace, the IAM user has operation permissions of DataArts Quality and view permissions of other components.
Logging In to the Console and Verifying Permissions
- Log in to the Huawei Cloud console as the IAM user created in Creating an IAM User and Adding It to the User Group and switch to the region where the user has been granted permissions.
- Choose Service List > DataArts Studio. Locate a DataArts Studio instance and click Access. Check whether the workspace list is displayed.
- Access the workspace to which the current user has been added, access each component (such as Management Center and DataArts Quality), and check whether you can perform operations in DataArts Quality.
Feedback
Was this page helpful?
Provide feedbackThank you very much for your feedback. We will continue working to improve the documentation.See the reply and handling status in My Cloud VOC.
For any further questions, feel free to contact us through the chatbot.
Chatbot


