Creating an Offline Processing Migration Job
An offline processing migration job can be executed to perform a series of operations on data. Before configuring an offline processing migration job, create a job.

This function is in OBT (or restricted use). To use this function, submit a service ticket.
Notes and Constraints
Offline processing migration jobs are not supported in enterprise mode.
Procedure
- Log in to the DataArts Studio console by following the instructions in Accessing the DataArts Studio Instance Console.
- On the DataArts Studio console, locate a workspace and click DataArts Factory.
- In the left navigation pane of DataArts Factory, choose .
- Create a migration job using either of the following methods:
Method 1: On the Develop Job page, click Create Data Migration Job.
Figure 1 Creating a migration job (method 1)
Method 2: In the directory list, right-click a directory and select Create Data Migration Job.
Figure 2 Creating a migration job (method 2)
- In the displayed Create Data Migration Job dialog box, configure job parameters. Table 1 describes the job parameters.
Table 1 Job parameters Parameter
Description
Job Name
Name of the job. The name must contain 1 to 128 characters, including only letters, numbers, hyphens (-), underscores (_), and periods (.).
Job Type
Job type. Select Offline processing.
Select Directory
Directory to which the job belongs. The root directory is selected by default.
Job Description
Description of the job
- Click OK.
Configuring Basic Job Information
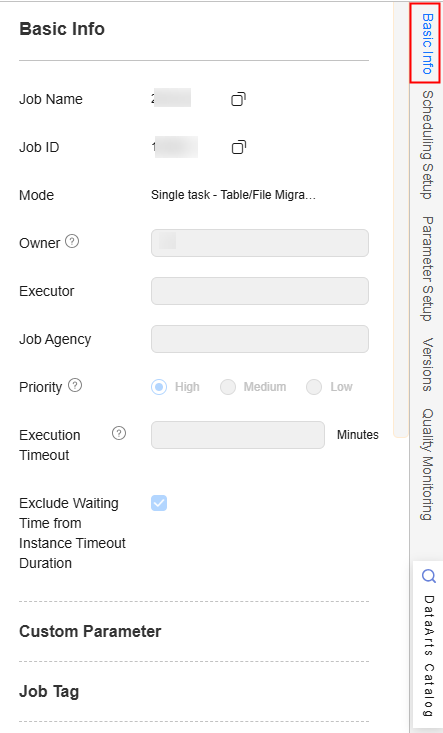
After you configure the owner and priority for a job, you can search for the job by the owner and priority. The procedure is as follows:
Click the Basic Info tab on the right of the canvas to expand the configuration page and configure the job parameters listed in Table 2.

|
Parameter |
Description |
|---|---|
|
Owner |
An owner configured during job creation is automatically matched. This parameter value can be modified. |
|
Executor |
This parameter is available when Scheduling Identities is set to Yes. User that executes the job. When you enter an executor, the job is executed by the executor. If the executor is left unspecified, the job is executed by the user who submitted the job for startup.
NOTE:
You can configure execution users only after you apply for the whitelist membership. To enable it, contact customer service or technical support. |
|
Job Agency |
This parameter is available when Scheduling Identities is set to Yes. After an agency is configured, the job interacts with other services as an agency during job execution. |
|
Priority |
Priority configured during job creation is automatically matched. This parameter value can be modified. |
|
Execution Timeout |
Timeout of the job instance. If this parameter is set to 0 or is not set, this parameter does not take effect. If the notification function is enabled for the job and the execution time of the job instance exceeds the preset value, the system sends a specified notification. |
|
Exclude Waiting Time from Instance Timeout Duration |
Whether to exclude the wait time from the instance execution timeout duration
|
|
Custom Parameter |
Set the name and value of the parameter. |
|
Job Tag |
Configure job tags to manage jobs by category. Click Add to add a tag to the job. You can also select a tag configured in Managing Job Tags. |
|
Node Status Polling Interval (s) |
How often the system checks completeness of the node task. The value ranges from 1 to 60 seconds. |
|
Max. Node Execution Duration |
Execution timeout interval for the node. If retry is configured and the execution is not complete within the timeout interval, the node will be executed again. |
|
Retry upon Failure |
You can select Retry 3 times or Never. Never is recommended. You are advised to configure automatic retry only for file migration jobs or database migration jobs with Import to Staging Table enabled to avoid repeated data writes caused by automatic retry.
NOTE:
If you want to set parameters in DataArts Studio DataArts Factory to schedule the CDM migration job, do not configure this parameter. Instead, set parameter Retry upon Failure for the CDM node in DataArts Factory. |
|
Policy for Handling Subsequent Nodes If the Current node Fails |
Policy for handling subsequent nodes if the current node fails
|
Configuring Job Parameters
Job parameters can be globally used in any node in jobs. The procedure is as follows:
Click Parameter Setup on the right of the editor and set the parameters described in Table 3.
|
Functions |
Description |
|---|---|
|
Variables |
|
|
Add |
Click Add and enter the variable parameter name and parameter value in the text boxes.
After the parameter is configured, it is referenced in the format of ${parameter name} in the job. |
|
Edit Parameter Expression |
Click |
|
Modifying a Job |
Change the parameter name or value in the corresponding text boxes. |
|
Mask |
If the parameter value is a key, click |
|
Delete |
Click |
|
Constant Parameter |
|
|
Add |
Click Add and enter the constant parameter name and parameter value in the text boxes.
After the parameter is configured, it is referenced in the format of ${parameter name} in the job. |
|
Edit Parameter Expression |
Click |
|
Modifying a Job |
Modify the parameter name and parameter value in text boxes and save the modifications. |
|
Delete |
Click |
Feedback
Was this page helpful?
Provide feedbackThank you very much for your feedback. We will continue working to improve the documentation.See the reply and handling status in My Cloud VOC.
For any further questions, feel free to contact us through the chatbot.
Chatbot


