
DataArts Factory Data Migration Configuration

In Management Center, you can directly migrate the scripts and jobs submitted in DataArts Factory. When you export jobs, the scripts and resources on which the jobs depend are not exported by default.
You can perform a migration by following the instructions provided in Management Center Data Migration Configuration or by using the import and export functions of DataArts Factory described in this section.
This function depends on the script, job, resource import and export, and environment variable functions of DataArts Factory.
Constraints
- Management Center Data Migration is complete.
- Data such as notifications, backups, job tags, agencies, and default items cannot be imported or exported. If such data needs to be migrated, you need to manually synchronize the data.
- Importing scripts, jobs, environment variables, and resources depends on the OBS service.
Exporting Data from the Old Workspace
Log in to the console, access the DataArts Factory module of the old workspace, and perform the following operations in sequence to export scripts, jobs, resources, and environment variables:
Exporting scripts
- On the DataArts Factory page, choose Develop Script in the left navigation pane.
- Click
 in the script directory and select Show Check Box.
 - Select scripts, click , and select . After the export is successful, you can obtain the exported .zip file. Figure 1 Selecting and exporting specified scripts

- In the displayed Export Script dialog box, set Export Status and click OK. Figure 2 Exporting scripts

Exporting jobs
- Click
 above the script tree to switch to the job directory.
 - Click in the job directory and select Show Check Box.
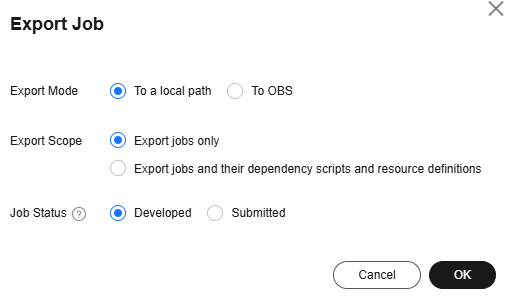
- Select jobs, click , and select Export Selected Job. In the displayed dialog box, select Export jobs only or Export jobs and their dependency scripts and resource definitions. After the export is successful, you can obtain the exported .zip file.
- In the displayed Export Job dialog box, set Export Scope and Job Status and click OK. You can view the result in the download center. Figure 3 Exporting jobs
Exporting environment variables
- In the navigation pane on the left, choose Configure.
- On the Environment Variable page, click Export. Figure 4 Exporting environment variables

Exporting resources
- In the left navigation pane, choose Manage Resource.
- Click
 in the resource directory and select Show Check Box. Figure 5 Showing the check box
- Select the resources to export, click
 , and select Export Resource. After the export is successful, you can obtain the exported .zip file. Figure 6 Selecting and exporting resources
Importing Data to the New Workspace
Log in to the console, access the DataArts Factory module of the new workspace, and perform the following operations in sequence to import resources, environment variables, scripts, and jobs:
Importing resources
- On the DataArts Factory page, choose Manage Resource in the left navigation pane.
- Click
 in the resource directory and select Import Resource. Figure 7 Selecting Import Resource
- In the displayed dialog box, select Local for File Location, select the resource file exported from the old workspace, select Overwrite for Duplicate Name Policy, and click Next. Figure 8 Importing resources

- The system starts to import resources. After the import is successful, the names of the imported resources are displayed. Figure 9 Successful resource import

Importing environment variables
- In the navigation pane on the left, choose Configure.
- On the Environment Variable page, click Import. Figure 10 Clicking Import

- In the displayed dialog box, select Local for File Location, select the environment variable file exported from the old workspace, select Overwrite for Duplicate Name Policy, and click Next. Figure 11 Importing environment variables

- The system starts to import the environment variables. You can choose whether to change the values of the variables. Figure 12 Confirming the import result

Importing scripts
- In the left navigation pane, choose Develop script.
- Click
 in the script directory and select Import Script. Figure 13 Selecting Import Script
- In the displayed dialog box, select Local for File Location, select the script file exported from the old workspace, select Overwrite for Duplicate Name Policy, and click Next. Figure 14 Importing scripts

- The system starts to import scripts. After the import is successful, the names of the imported scripts are displayed. Figure 15 Successful script import

Importing jobs
- Click
 above the script tree to switch to the job directory.
 - Click
 in the job directory and select Import Job. Figure 16 Selecting Import Job
- In the displayed dialog box, select Local for File Location, select the job file exported from the old workspace, and click Next. Figure 17 Importing jobs

- The system starts to import jobs. After the import is successful, the names of the imported jobs are displayed. Figure 18 Successful job import

Verifying the Migration
Check whether the scripts, jobs, resources, and environment variables imported to the new workspace are consistent with those in the old workspace. If they are consistent, the migration is successful.
Feedback
Was this page helpful?
Provide feedbackThank you very much for your feedback. We will continue working to improve the documentation.See the reply and handling status in My Cloud VOC.
For any further questions, feel free to contact us through the chatbot.
Chatbot


