
File Formats
When creating a CDM job, you need to specify File Format in the job parameters of the migration source and destination in some scenarios. This section describes the application scenarios, subparameters, common parameters, and usage examples of the supported file formats.
CSV
To read or write a CSV file, set File Format to CSV. The CSV format can be used in the following scenarios:
- Import files to a database or NoSQL.
- Export data from a database or NoSQL to files.
After selecting the CSV format, you can also configure the following optional sub-parameters:
- Line Separator
Character used to separate lines in a CSV file. The value can be a single character, multiple characters, or special characters. Special characters can be entered using the URL encoded characters. The following table lists the URL encoded characters of commonly used special characters.
- Field Delimiter
Character used to separate columns in a CSV file. The value can be a single character, multiple characters, or special characters. For details, see Table 1.
- Encoding Type
Encoding type of a CSV file. The default value is UTF-8.
If this parameter is specified at the migration source, the specified encoding type is used to parse the file. If this parameter is specified at the migration destination, the specified encoding type is used to write data to the file.
- Use Quote Character
- Exporting data from a database or NoSQL to CSV files (configuring Use Quote Character at the migration destination): If a field delimiter appears in the character string of a column of data at the migration source, set Use Quote Character to Yes at the migration destination to quote the character string as a whole and write it into the CSV file. Currently, CDM uses double quotation marks ("") as the quote character only. Figure 1 shows that the value of the name field in the database contains a comma (,).
If you do not use the quote character, the exported CSV file is displayed as follows:
3.hello,world,abc
If you use the quote character, the exported CSV file is displayed as follows:
3,"hello,world",abc
If the data in the database contains double quotation marks ("") and you set Use Quote Character to Yes, the quote character in the exported CSV file is displayed as three double quotation marks ("""). For example, if the value of a field is a"hello,world"c, the exported data is as follows:
"""a"hello,world"c"""
- Exporting CSV files to a database or NoSQL (configuring Use Quote Character at the migration source): If you want to import the CSV files with quoted values to a database correctly, set Use Quote Character to Yes at the migration source to write the quoted values as a whole.
- Exporting data from a database or NoSQL to CSV files (configuring Use Quote Character at the migration destination): If a field delimiter appears in the character string of a column of data at the migration source, set Use Quote Character to Yes at the migration destination to quote the character string as a whole and write it into the CSV file. Currently, CDM uses double quotation marks ("") as the quote character only. Figure 1 shows that the value of the name field in the database contains a comma (,).
- Use RE to Separate Fields
This function is used to parse complex semi-structured text, such as log files. For details, see Using Regular Expressions to Separate Semi-structured Text.
- Use First Row as Header
This parameter is used when CSV files are exported to other locations. If this parameter is specified at the migration source, CDM uses the first row as the header when extracting data. When the CSV files are transferred, the headers are skipped. The number of rows extracted from the migration source is more than the number of rows written to the migration destination. The log files will output the information that the header is skipped during the migration.
- File Size
This parameter is used when data is exported from the database to a CSV file. If a table contains a large amount of data, a large CSV file is generated after migration, which is inconvenient to download or view. In this case, you can specify this parameter at the migration destination so that multiple CSV files with the specified size can be generated. The value of this parameter is an integer. The unit is MB.

JSON
- JSON types supported by CDM: JSON object and JSON array
- JSON object: A JSON file contains a single object or multiple objects separated/merged by rows.
- The following is a single JSON object:
{ "took" : 190, "timed_out" : false, "total" : 1000001, "max_score" : 1.0 } - The following are JSON objects separated by rows:
{"took" : 188, "timed_out" : false, "total" : 1000003, "max_score" : 1.0 } {"took" : 189, "timed_out" : false, "total" : 1000004, "max_score" : 1.0 } - The following are merged JSON objects:
{
    "took": 190,
    "timed_out": false,
    "total": 1000001,
    "max_score": 1.0
 }
 {
    "took": 191,
    "timed_out": false,
    "total": 1000002,
    "max_score": 1.0
 }
- The following is a single JSON object:
- JSON array: A JSON file is a JSON array consisting of multiple JSON objects.
[{
      "took" : 190,
      "timed_out" : false,
      "total" : 1000001,
      "max_score" : 1.0
  },
  {
      "took" : 191,
      "timed_out" : false,
      "total" : 1000001,
      "max_score" : 1.0
  }]
- JSON object: A JSON file contains a single object or multiple objects separated/merged by rows.
- JSON Reference Node
Root node that records data. The data corresponding to the node is a JSON array. CDM extracts data from the array in the same mode. Use periods (.) to separate multi-layer nested JSON nodes.
- Copying Data from a JSON File
- Example 1: Extract data from multiple objects that are separated or merged. A JSON file contains multiple JSON objects. The following gives an example:
 {
    "took": 190,
    "timed_out": false,
    "total": 1000001,
    "max_score": 1.0
 }
 {
    "took": 191,
    "timed_out": false,
    "total": 1000002,
    "max_score": 1.0
 }
 {
    "took": 192,
    "timed_out": false,
    "total": 1000003,
    "max_score": 1.0
 }
To extract data from the JSON object and write data to the database in the following formats, set File Format to JSON and JSON Type to JSON object, and then map fields.took
timedOut
total
maxScore
190
false
1000001
1.0
191
false
1000002
1.0
192
false
1000003
1.0
- Example 2: Extract data from the reference node. A JSON file contains a single JSON object, but the valid data is on a data node. The following gives an example:
{
    "took": 190,
    "timed_out": false,
    "hits": {
        "total": 1000001,
        "max_score": 1.0,
        "hits":
         [{
            "_id": "650612",
            "_source": {
                "name": "tom",
                "books": ["book1","book2","book3"]
            }
         },
         {
             "_id": "650616",
             "_source": {
                 "name": "tom",
                 "books": ["book1","book2","book3"]
             }
         },
       {
             "_id": "650618",
             "_source": {
                 "name": "tom",
                 "books": ["book1","book2","book3"]
             }
         }]
     }
 }
To write data to the database in the following formats, set File Format to JSON, JSON Type to JSON object, and JSON Reference Node to hits.hits, and then map fields.ID
SourceName
SourceBooks
650612
tom
["book1","book2","book3"]
650616
tom
["book1","book2","book3"]
650618
tom
["book1","book2","book3"]
- Example 3: Extract data from the JSON array. A JSON file is a JSON array consisting of multiple JSON objects. The following gives an example:
[{
      "took" : 190,
      "timed_out" : false,
      "total" : 1000001,
      "max_score" : 1.0
  },
  {
      "took" : 191,
      "timed_out" : false,
      "total" : 1000002,
      "max_score" : 1.0
  }]
To write data to the database in the following formats, set File Format to JSON and JSON Type to JSON array, and then map fields.
took
timedOut
total
maxScore
190
false
1000001
1.0
191
false
1000002
1.0
- Example 4: Configure a converter when parsing the JSON file. On the premise of example 2, to add the hits.max_score field to all records, that is, to write the data to the database in the following formats, perform the following operations:
ID
SourceName
SourceBooks
MaxScore
650612
tom
["book1","book2","book3"]
1.0
650616
tom
["book1","book2","book3"]
1.0
650618
tom
["book1","book2","book3"]
1.0
Set File Format to JSON, JSON Type to JSON object, and JSON Reference Node to hits.hits, and then create a converter.- Click
 to add a field.
Figure 2 Adding a field
to add a field.
Figure 2 Adding a field
- Click
 to create a converter for the new field.
Figure 3 Creating a field converter
to create a converter for the new field.
Figure 3 Creating a field converter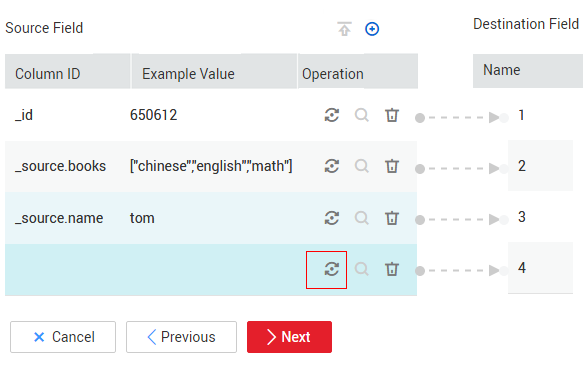
- Set Converter to Expression conversion, enter "1.0" in the Expression text box, and click Save.
Figure 4 Configuring a field converter

- Click
- Example 1: Extract data from multiple objects that are separated or merged. A JSON file contains multiple JSON objects. The following gives an example:
Binary
If you want to copy files between file systems, you can select the binary format. The binary format delivers the optimal rate and performance in file transfer, and does not require field mapping.
- Directory structure for file transfer
CDM can transfer a single file or all files in a directory at a time. After the files are transferred to the migration destination, the directory structure remains unchanged.
- Migrating incremental files
When you use CDM to transfer files in binary format, configure Duplicate File Processing Method at the migration destination for incremental file migration. For details, see Incremental File Migration.
During incremental file migration, set Duplicate File Processing Method to Skip. If new files exist at the migration source or a failure occurs during the migration, run the job again, so that the migrated files will not be migrated repeatedly.
- Write to Temporary File
When migrating files in binary format, you can specify whether to write the files to a temporary file at the migration destination. If this parameter is specified, the file is written to a temporary file during file replication. After the file is successfully migrated, run the rename or move command to restore the file at the migration destination.
- Generate MD5 Hash Value
An MD5 hash value is generated for each transferred file, and the value is recorded in a new .md5 file. You can specify the directory where the MD5 value is generated.
Common parameters
- Source File Processing Method
After a file is copied successfully, CDM can perform operations on the source file, including renaming the file, deleting the file, and performing no operation on the file.
- Start Job by Marker File
In automation scenarios, a scheduled task is configured on CDM to periodically read files from the migration source. However, files are being generated at the migration source. As a result, CDM reads data repeatedly or fails to read data from the migration source. You can specify the marker file for starting a job as ok.txt in the job parameters of the migration source. After the file is successfully generated at the migration source, the ok.txt file is generated in the file directory. In this way, CDM can read the complete file.
In addition, you can set the suspension period. Within the suspension period, CDM periodically queries whether the marker file exists. If the file does not exist after the suspension period expires, the job fails.
The marker file will not be migrated.
- Job Success Marker File
After data is successfully migrated to a file system, an empty file is generated in the destination directory. You can specify the file name. Generally, this parameter is used together with Start Job by Marker File.
Note that the file cannot be confused with the file to be transferred. For example, if the file to be transferred is finish.txt and the job success marker file is set to finish.txt, the two files will overwrite each other.
- Filter
When using CDM to migrate files, you can specify a filter to filter files. Files can be filtered by wildcard character or time filter.
- If you select Wildcard, CDM migrates only the paths or files that meet the filter condition.
- If you select Time Filter, CDM migrates only the files modified after the specified time point.
For example, the /table/ directory stores a large number of data table directories divided by day. DRIVING_BEHAVIOR_20180101 to DRIVING_BEHAVIOR_20180630 store all data of DRIVING_BEHAVIOR from January to June. To migrate only the table data of DRIVING_BEHAVIOR in March, set Source Directory/File to /table, Filter Type to Wildcard, and Path Filter to DRIVING_BEHAVIOR_201803*.
Solutions to File Format Problems
- When data in a database is exported to a CSV file, if the data contains commas (,), the data in the exported CSV file is disordered.
The following solutions are available:
- Specify a field delimiter.
Use a character that does not exist in the database or a rare non-printable character as the field delimiter. For example, set Field Delimiter at the migration destination to %01. In this way, the exported field delimiter is \u0001. For details, see Table 1.
- Use the quote character.
Set Use Quote Character to Yes at the migration destination. In this way, if the field in the database contains the field delimiter, CDM quotes the field using the quote character and write the field as a whole to the CSV file.
- Specify a field delimiter.
- The data in the database contains line separators.
Scenario: When you use CDM to export a table in the MySQL database (a field value contains the line separator \n) to a CSV file, and then use CDM to import the exported CSV file to MRS HBase, data in the exported CSV file is truncated.
Solution: Specify a line separator.
When you use CDM to export MySQL table data to a CSV file, set Line Separator at the migration destination to %01 (ensure that the value does not appear in the field value). In this way, the line separator in the exported CSV file is %01. Then use CDM to import the CSV file to MRS HBase. Set Line Separator at the migration source to %01. This avoids data truncation.
Feedback
Was this page helpful?
Provide feedbackThank you very much for your feedback. We will continue working to improve the documentation.See the reply and handling status in My Cloud VOC.
For any further questions, feel free to contact us through the chatbot.
Chatbot


