Using a Public Network to Enable Network Communications
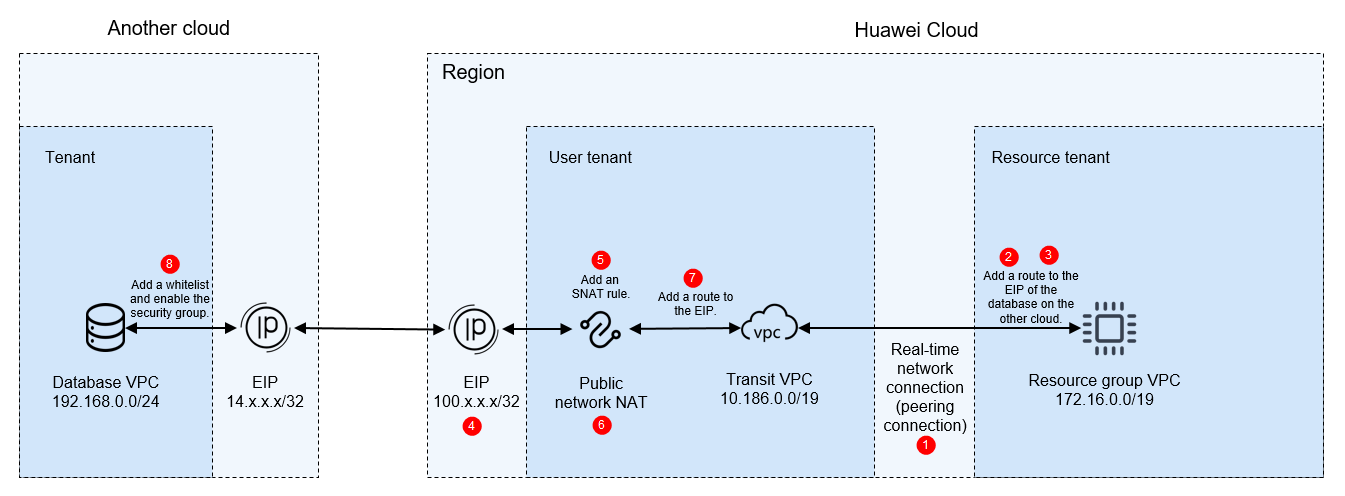
This section describes how to use a public network to enable communications when the database is deployed in another cloud.

Notes and Constraints
A migration resource group does not have a public network segment. You can only use the public network NAT to convert its IP address into an EIP so that the resource group can access the public network. The EIP cannot be the same as the public IP address of the data source.
Prerequisites
You have purchased a migration resource group. For details, see Buying a DataArts Migration Resource Group Incremental Package.
Preparations
Obtain the network segments of the related objects (including the data source, tenant VPC, and migration resource group).
|
Resource |
Description |
Example Private Network Segment |
|---|---|---|
|
Public IP address of the data source |
Public IP address of the data source of another cloud. Obtain the value based on the site requirements. |
14.x.x.x/32 |
|
EIP |
A migration resource group does not have a public network segment. You can only use the public network NAT to convert its IP address into an EIP so that the resource group can access the public network. To enable an EIP, log in to the EIP console and click Buy EIP. Configure the EIP parameters by referring to Setting Up a Network in a VPC and Enabling Internet Access Using an EIP. |
100.x.x.x/32 |
|
Tenant VPC and its subnet |
Used for the communications between the data source and migration resource group. In this solution, a VPC of the current tenant is used. For how to create a VPC, see Creating a VPC and Subnet. |
VPC: 10.186.0.0/19 Subnet: 10.186.0.0/24 |
|
Migration resource group VPC |
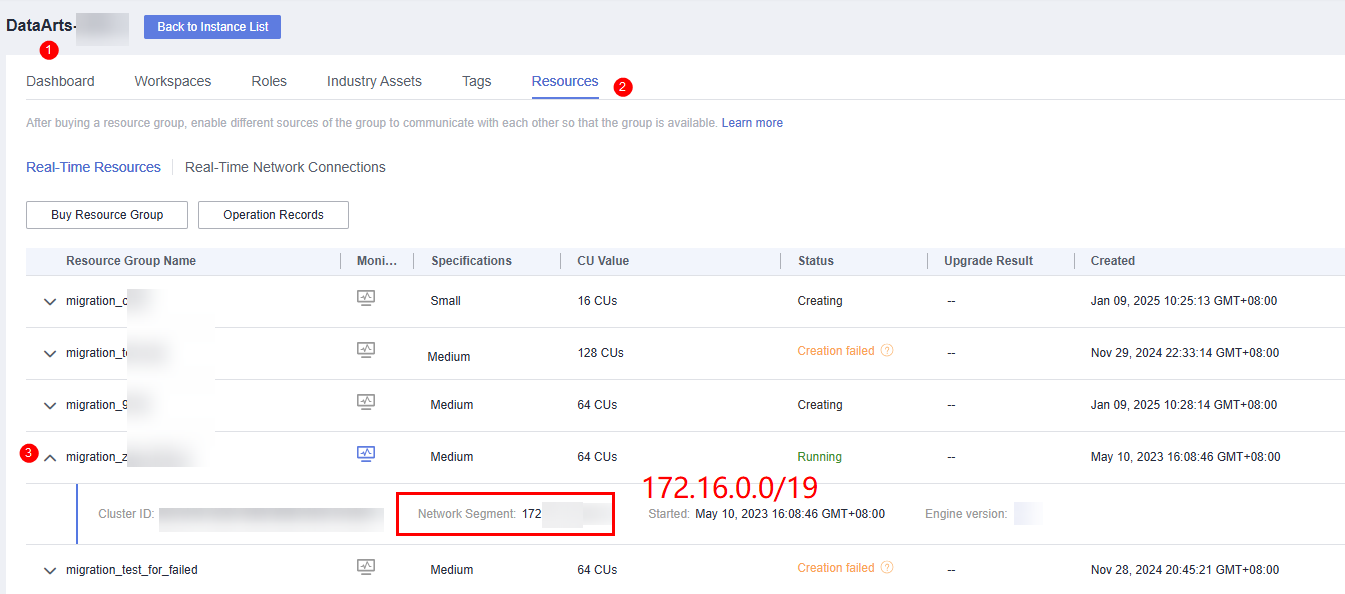
VPC to which the real-time computing resource group belongs. The migration resource group is created under the resource tenant of the user account and uses the VPC network segment of the resource tenant. To obtain the VPC, perform the following operations: Log in to the DataArts Studio console, access an instance, and click the Resources tab. On the Real-Time Resources page, expand the target migration resource group to view its VPC network segment.
Figure 2 Obtaining the migration resource group network segment

|
172.16.0.0/19 |
Network Configuration Process
- Create a real-time network connection (VPC peering connection) for migration.
To connect the tenant VPC to the real-time migration resource group VPC, you can create a VPC peering connection between the two VPCs using the resource management function provided of DataArts Studio.
Log in to the DataArts Studio console, access an instance, and click the Resources tab.
Figure 3 Creating a network connection
On the Real-Time Network Connections tab page, click Create. In the displayed Create Network Connection dialog box, set required parameters.
Table 2 Parameters for creating a network connection Parameter
Description
Connection Name
Name of the network connection
Only letters, digits, and underscores (_) are allowed.
Resource Group
Migration resource group that can communicate with the specified VPC.
If you do not select a migration resource group, you can bind migration resource groups to the connection after the connection is created by clicking More in the Operation column and selecting Bind Resource Group.
VPC
VPC that can communicate with the migration resource group
In this solution, the migration resource group network segment and the tenant VPC are connected through a VPC peering connection. Therefore, you must select a tenant VPC (for example, 10.186.0.0/19).
Subnet
Subnet of the tenant VPC, for example, 10.186.0.0/24
Routing Table
Routing table associated with the subnet. When the connection is bound to a migration resource group, routing information of the migration resource group is added to the routing table. You do not need to set this parameter.
When the connection is bound to a migration resource group, a route to the migration resource group VPC network segment is added to the routing table. The route connects the migration resource group network segment to the tenant VPC.
- Add a route to the data source network segment for the real-time network connection (VPC peering connection).
Locate the real-time network connection created in step 1, click More in the Operation column and select Add Route. In the displayed dialog box, enter the public network address of the database of the on-premises IDC, for example, 14.x.x.x/32.
Figure 4 Adding route 1 Figure 5 Adding route 2
- (Optional) For MRS data sources, perform the following extra operations to enable network communications:
After creating a real-time network connection and binding it to a migration resource group, click More in the Operation column and select Modify Host Information. In the displayed dialog box, enter the IP addresses and domain names of all nodes in the MRS cluster as prompted.
Figure 6 Modifying host information

To obtain the IP addresses and domain names of the nodes in an MRS cluster, perform the following steps:
- Open the MRS page, access the MRS cluster, click the Nodes tab, and expand all node groups to view the IP address and name (domain name) of each node.
Add the IP addresses (1 in the figure) and domain names (2 in the figure) of all nodes and separate them by pressing Enter.
Figure 7 Obtaining the IP addresses and domain names of the nodes in the MRS cluster
- Log in to an MRS cluster node by referring to Logging In to an MRS Cluster Node and run the cat /etc/hosts command to list the IP addresses and domain names of all nodes.
- Open the MRS page, access the MRS cluster, click the Nodes tab, and expand all node groups to view the IP address and name (domain name) of each node.
- Buy an EIP.
Log in to the EIP console, click Buy EIP, and set the parameters as prompted. For details, see Setting Up a Network in a VPC and Enabling Internet Access Using an EIP.
- Create a public NAT gateway.
- Log in to the NAT Gateway console, choose NAT Gateway > Public NAT Gateways in the navigation pane on the left, and click Buy Public NAT Gateway.
- When configuring the NAT gateway, set Region to the region where DataArts Migration is located, VPC to the tenant VPC (for example, 10.186.0.0/19), and Subnet to the subnet of the tenant VPC (for example, 10.186.0.0/24). For details about how to configure other parameters, see Buying a Public NAT Gateway.
Figure 8 Configuring a public NAT gateway

- Add an SNAT rule for the public NAT gateway.
You need to add an SNAT rule for the NAT gateway to allow the hosts in the migration resource group to communicate with the Internet. Click the name of the public NAT gateway you have created and then the SNAT Rules tab. On the displayed page, click Add SNAT Rule.
Figure 9 Adding an SNAT rule 1
Select Direct Connect/Cloud Connect for Scenario, enter the network segment (for example, 172.16.0.0/19) of the migration resource group VPC, and select the EIP (100.x.x.x/32) purchased in step 3.
Figure 10 Adding an SNAT rule 2
- Add a route to the tenant VPC subnet.
Add a route to the route table of the tenant VPC subnet. Set the destination to the EIP (for example, 14.x.x.x/32) of the database of the on-premises IDC and the next hop to the NAT gateway you have configured.
- Log in to the VPC console. In the navigation pane on the left, choose Virtual Private Cloud > Subnets. Locate the subnet of the tenant VPC, and click the route table name to go to the configuration page.
Figure 11 Querying the route table

- Click the Summary tab and Add Route. In the displayed dialog box, set Destination to the EIP (for example, 14.x.x.x/32) of the database of the on-premises IDC and Next Hop to the NAT gateway you have configured.
Figure 12 Adding a route to the route table

- Log in to the VPC console. In the navigation pane on the left, choose Virtual Private Cloud > Subnets. Locate the subnet of the tenant VPC, and click the route table name to go to the configuration page.
- Configure a whitelist and security group rules for the database of another cloud.
- Allow the VPC network segment (for example, 100.x.x.x/32) of the migration resource group to access the database of another cloud. The method of configuring a whitelist varies depending on the database type. For details, see the official documentation of each database.
- If a security group has been configured for the database on another cloud, you need to add an inbound rule to allow the VPC network segment (for example, 100.x.x.x/32) of the resource group to access the database listening port.

The ports used by different data sources vary. Configure the ports for security group rules by referring to Which Ports Must Be Allowed by the Data Source Security Group So That DataArts Migration Can Access the Data Source?
- Test the network connectivity.
In a DataArts Studio workspace, create a data connection and a real-time migration job, and select the corresponding data connection and migration resource group to test the connectivity. For details, see Creating a Real-Time Migration Job.
Feedback
Was this page helpful?
Provide feedbackThank you very much for your feedback. We will continue working to improve the documentation.See the reply and handling status in My Cloud VOC.
For any further questions, feel free to contact us through the chatbot.
Chatbot


