Creating a Job
A job is composed of one or more nodes that are performed collaboratively to complete data operations. Before developing a job, create a new one.
Prerequisites
A workspace can contain a maximum of 10,000 jobs, 5,000 job directories, and 10 directory levels. Ensure that these upper limits are not reached.
Creating a Common Directory
If a directory is available, skip this step.
- Log in to the DataArts Studio console by following the instructions in Accessing the DataArts Studio Instance Console.
- On the DataArts Studio console, locate a workspace and click DataArts Factory.
- In the left navigation pane of DataArts Factory, choose .
- In the job directory list, right-click a directory and choose Create Directory from the shortcut menu.
- In the Create Directory dialog box, configure directory parameters based on Table 1.
Table 1 Job directory parameters Parameter
Description
Directory Name
Name of a job directory. The name must contain 1 to 64 characters, including only letters, numbers, underscores (_), and hyphens (-).
Select Directory
Parent directory of the job directory. The parent directory is the root directory by default.
- Click OK.
Creating a Job
- Log in to the DataArts Studio console by following the instructions in Accessing the DataArts Studio Instance Console.
- On the DataArts Studio console, locate a workspace and click DataArts Factory.
- In the left navigation pane of DataArts Factory, choose .
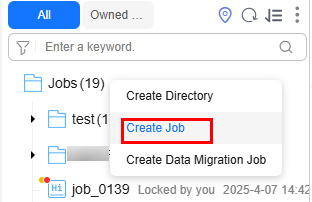
- In the job directory list, right-click a directory and select Create Job.
Figure 1 Creating a job

- In the displayed dialog box, configure job parameters. Table 2 describes the job parameters.
Table 2 Job parameters Parameter
Description
Job Name
Name of the job. The name must contain 1 to 128 characters, including only letters, numbers, hyphens (-), underscores (_), and periods (.).
Processing Mode
Type of the job.
- Batch processing: Data is processed periodically in batches based on the scheduling plan, which is used in scenarios with low real-time requirements. This type of job is a pipeline that consists of one or more nodes and is scheduled as a whole. It cannot run for an unlimited period of time, that is, it must end after running for a certain period of time.
You can configure job-level scheduling tasks for this type of job. That is, the job is scheduled as a whole. For details, see Setting Up Scheduling for a Job Using the Batch Processing Mode.
- Real-time processing: Data is processed in real time, which is used in scenarios with high real-time performance. This type of job is a business relationship that consists of one or more nodes. You can configure scheduling policies for each node, and the tasks started by nodes can keep running for an unlimited period of time. In this type of job, lines with arrows represent only service relationships, rather than task execution processes or data flows.
You can configure node-level scheduling tasks for this type of job, that is, each node can be independently scheduled. For details, see Setting Up Scheduling for Nodes of a Job Using the Real-Time Processing Mode.
Mode
- Pipeline: You drag and drop one or more nodes to the canvas to create a job. The nodes are executed in sequence like a pipeline.
NOTE:
In enterprise mode, real-time processing jobs do not support the pipeline mode.
- Single task: The job contains only one node. Currently, this mode supports DLI SQL, DWS SQL, RDS SQL, MRS Hive SQL, DLI Spark, Flink SQL, Flink JAR, and MRS Spark SQL nodes. Instead of creating a script and referencing the script in the node of a job, you can debug the script and configure scheduling in the SQL editor of a single-task job.
NOTE:
Currently, jobs with a single Flink SQL node support MRS 3.2.0-LTS.1 and later versions.
Select Directory
Directory to which the job belongs. The root directory is selected by default.
Owner
Owner of the job.
Priority
Priority of the job. The value can be High, Medium, or Low.
NOTE:Job priority is a label attribute of the job and does not affect the scheduling and execution sequence of the job.
Agency
After an agency is configured, the job interacts with other services as an agency during job execution. If an agency has been configured for the workspace (for details, see Configuring a Public Agency), the job uses the workspace-level agency by default. You can also change the agency to a job-level agency by referring to Configuring a Job-Level Agency.
NOTE:Job-level agency takes precedence over workspace-level agency.
Log Path
Selects the OBS path to save job logs. By default, logs are stored in a bucket named dlf-log-{Projectid}.
NOTE:- If you want to customize a storage path, select the bucket that you have created in OBS by following the instructions in (Optional) Changing the Job Log Storage Path.
- Ensure that you have the read and write permissions on the OBS path specified by this parameter. Otherwise, the system cannot write logs or display logs.
Job Description
Descriptive information about the job.
- Batch processing: Data is processed periodically in batches based on the scheduling plan, which is used in scenarios with low real-time requirements. This type of job is a pipeline that consists of one or more nodes and is scheduled as a whole. It cannot run for an unlimited period of time, that is, it must end after running for a certain period of time.
- Click OK.
Feedback
Was this page helpful?
Provide feedbackThank you very much for your feedback. We will continue working to improve the documentation.See the reply and handling status in My Cloud VOC.
For any further questions, feel free to contact us through the chatbot.
Chatbot


