在CCE集群中部署使用Tensorflow
资源准备
- 购买CCE集群,购买GPU节点并使用gpu-beta插件安装显卡驱动。
- 在集群下添加一个对象存储卷。

获取tensorflow的ML范例,加以简单的修改。
basicClass.py
# TensorFlow and tf.keras
import tensorflow as tf
from tensorflow import keras

# Helper libraries
import numpy as np
import gzip
from tensorflow.python.keras.utils import get_file
import matplotlib as mpl
mpl.use('Agg')
import matplotlib.pyplot as plt

print(tf.__version__)

#fashion_mnist = keras.datasets.fashion_mnist
#(train_images, train_labels), (test_images, test_labels) = fashion_mnist.load_data()

def load_data():
    base = "file:////home/data/"
    files = [
        'train-labels-idx1-ubyte.gz', 'train-images-idx3-ubyte.gz',
        't10k-labels-idx1-ubyte.gz', 't10k-images-idx3-ubyte.gz'
    ]

    paths = []
    for fname in files:
        paths.append(get_file(fname, origin=base + fname))

    with gzip.open(paths[0], 'rb') as lbpath:
        y_train = np.frombuffer(lbpath.read(), np.uint8, offset=8)

    with gzip.open(paths[1], 'rb') as imgpath:
        x_train = np.frombuffer(
            imgpath.read(), np.uint8, offset=16).reshape(len(y_train), 28, 28)

    with gzip.open(paths[2], 'rb') as lbpath:
        y_test = np.frombuffer(lbpath.read(), np.uint8, offset=8)

    with gzip.open(paths[3], 'rb') as imgpath:
        x_test = np.frombuffer(
            imgpath.read(), np.uint8, offset=16).reshape(len(y_test), 28, 28)

    return (x_train, y_train), (x_test, y_test)

(train_images, train_labels), (test_images, test_labels) = load_data()

class_names = ['T-shirt/top', 'Trouser', 'Pullover', 'Dress', 'Coat',
               'Sandal', 'Shirt', 'Sneaker', 'Bag', 'Ankle boot']

plt.figure()
plt.imshow(train_images[0])
plt.colorbar()
plt.grid(False)
plt.savefig('/home/img/basicimg1.png')

train_images = train_images / 255.0

test_images = test_images / 255.0

plt.figure(figsize=(10,10))
for i in range(25):
    plt.subplot(5,5,i+1)
    plt.xticks([])
    plt.yticks([])
    plt.grid(False)
    plt.imshow(train_images[i], cmap=plt.cm.binary)
    plt.xlabel(class_names[train_labels[i]])
plt.savefig('/home/img/basicimg2.png')

model = keras.Sequential([
    keras.layers.Flatten(input_shape=(28, 28)),
    keras.layers.Dense(128, activation=tf.nn.relu),
    keras.layers.Dense(10, activation=tf.nn.softmax)
])

model.compile(optimizer=tf.train.AdamOptimizer(),
              loss='sparse_categorical_crossentropy',
              metrics=['accuracy'])

model.fit(train_images, train_labels, epochs=5)

test_loss, test_acc = model.evaluate(test_images, test_labels)

print('Test accuracy:', test_acc)

predictions = model.predict(test_images)

def plot_image(i, predictions_array, true_label, img):
  predictions_array, true_label, img = predictions_array[i], true_label[i], img[i]
  plt.grid(False)
  plt.xticks([])
  plt.yticks([])

  plt.imshow(img, cmap=plt.cm.binary)

  predicted_label = np.argmax(predictions_array)
  if predicted_label == true_label:
    color = 'blue'
  else:
    color = 'red'

  plt.xlabel("{} {:2.0f}% ({})".format(class_names[predicted_label],
                                100*np.max(predictions_array),
                                class_names[true_label]),
                                color=color)

def plot_value_array(i, predictions_array, true_label):
  predictions_array, true_label = predictions_array[i], true_label[i]
  plt.grid(False)
  plt.xticks([])
  plt.yticks([])
  thisplot = plt.bar(range(10), predictions_array, color="#777777")
  plt.ylim([0, 1])
  predicted_label = np.argmax(predictions_array)

  thisplot[predicted_label].set_color('red')
  thisplot[true_label].set_color('blue')

i = 0
plt.figure(figsize=(6,3))
plt.subplot(1,2,1)
plot_image(i, predictions, test_labels, test_images)
plt.subplot(1,2,2)
plot_value_array(i, predictions,  test_labels)
plt.savefig('/home/img/basicimg3.png')

i = 12
plt.figure(figsize=(6,3))
plt.subplot(1,2,1)
plot_image(i, predictions, test_labels, test_images)
plt.subplot(1,2,2)
plot_value_array(i, predictions,  test_labels)
plt.savefig('/home/img/basicimg4.png')

# Plot the first X test images, their predicted label, and the true label
# Color correct predictions in blue, incorrect predictions in red
num_rows = 5
num_cols = 3
num_images = num_rows*num_cols
plt.figure(figsize=(2*2*num_cols, 2*num_rows))
for i in range(num_images):
  plt.subplot(num_rows, 2*num_cols, 2*i+1)
  plot_image(i, predictions, test_labels, test_images)
  plt.subplot(num_rows, 2*num_cols, 2*i+2)
  plot_value_array(i, predictions, test_labels)
plt.savefig('/home/img/basicimg5.png')
进入刚刚创建的OBS桶页面,创建文件夹data和img,并将basicClass.py上传。

进入data文件夹,将刚刚下载的四个gz文件上传。
机器学习范例
本篇范例采用tensorflow官网的ml example,可参考https://www.tensorflow.org/tutorials/keras/classification?hl=zh-cn。
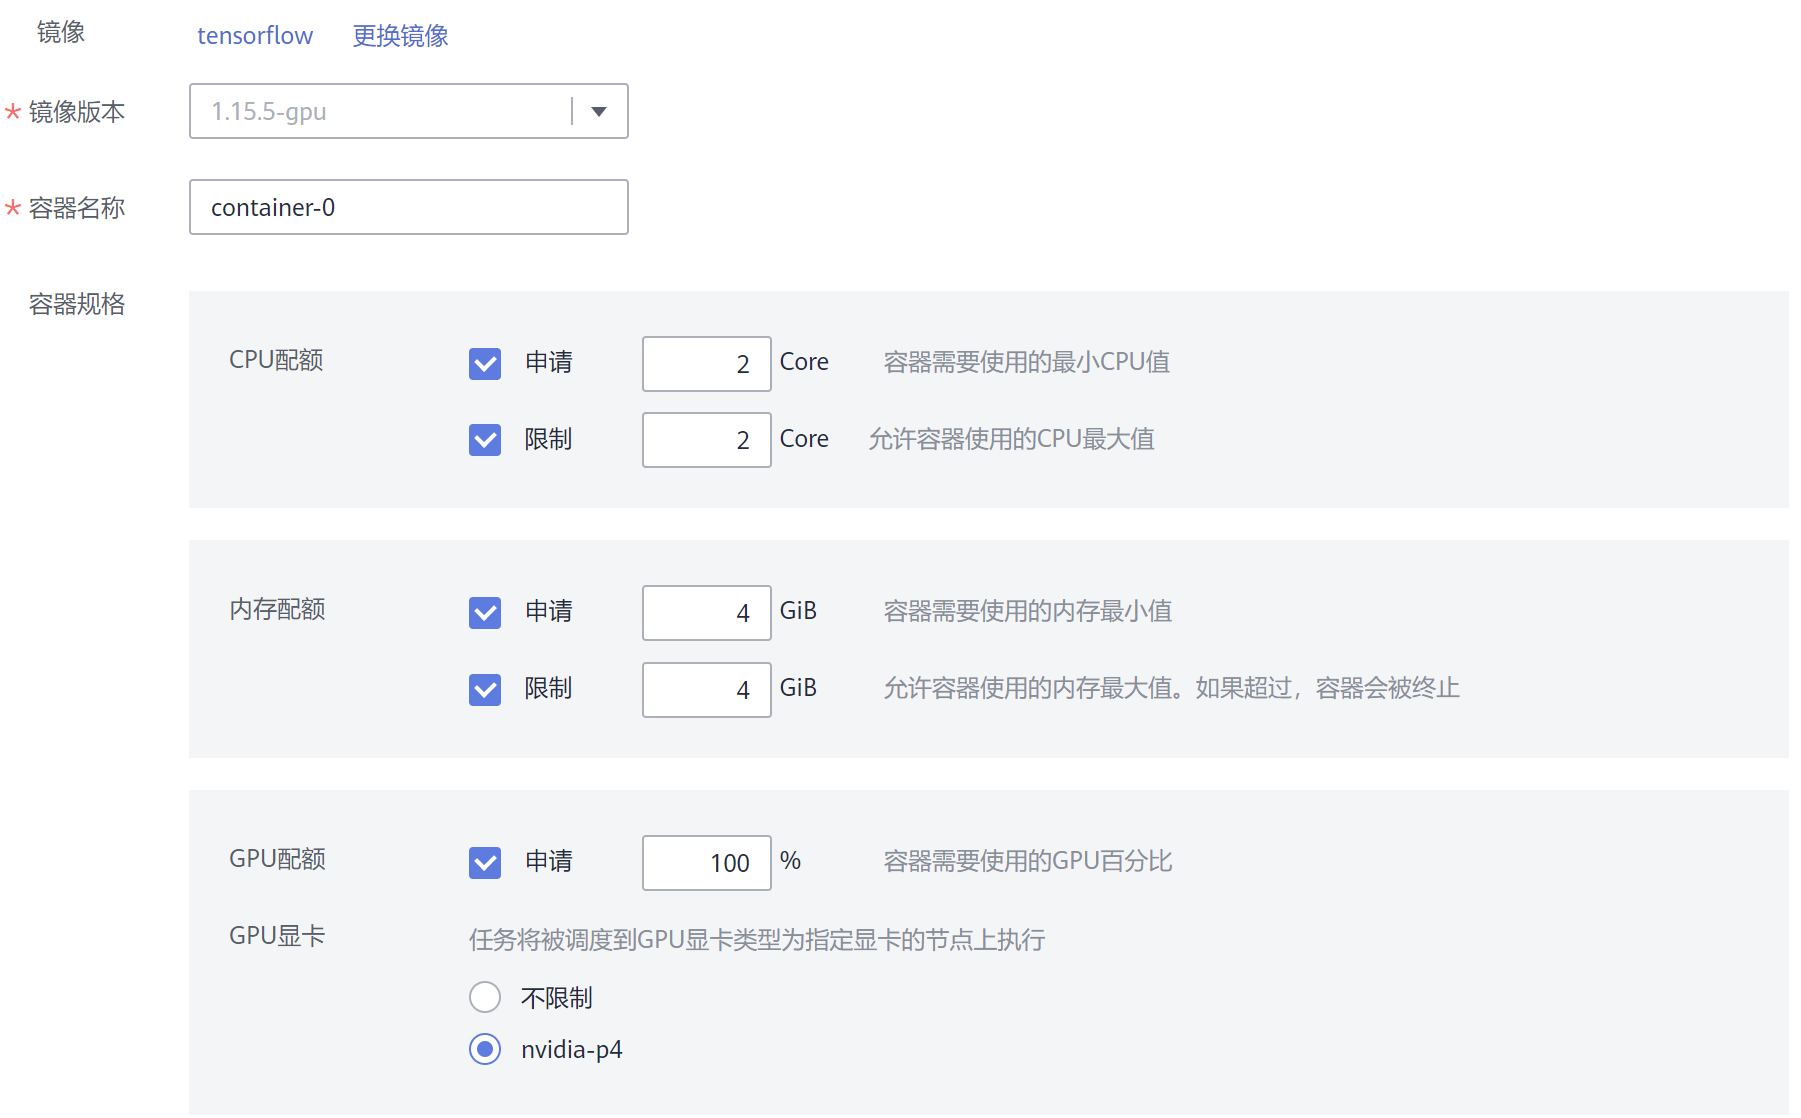
创建一个普通job,镜像输入第三方镜像tensorflow/tensorflow:1.15.5-gpu,设置对应的容器规格。

启动命令添加 pip install matplotlib;python /home/basicClass.py 。

挂载刚刚创建的OBS存储盘:

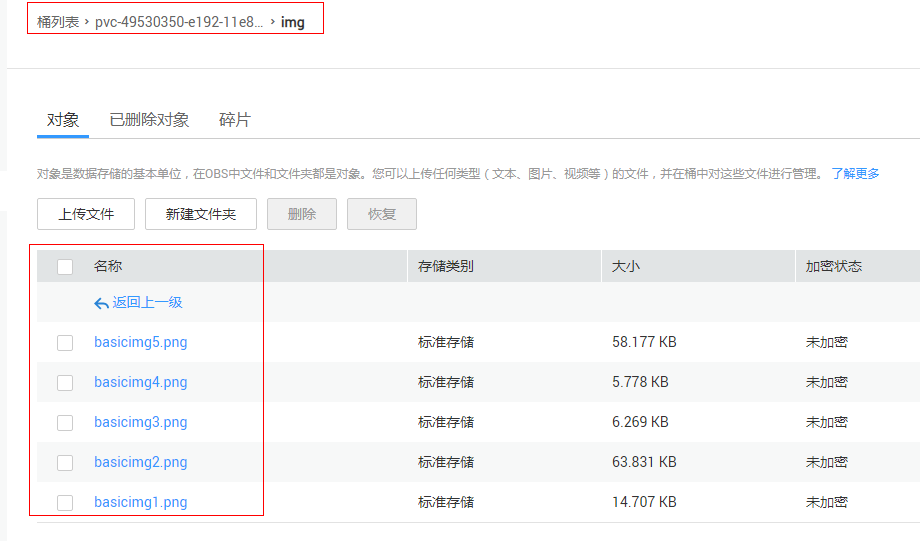
单击“创建”。等待job执行完成,进入OBS页面,可以查看到以图片形式展示的执行结果。

通过kubectl创建可以按如下YAML执行。
kind: Job
apiVersion: batch/v1
metadata:
  name: testjob
  namespace: default
spec:
  parallelism: 1
  completions: 1
  backoffLimit: 6
  template:
    metadata:
      name: testjob
    spec:
      volumes:
        - name: cce-obs-tensorflow
          persistentVolumeClaim:
            claimName: cce-obs-tensorflow
      containers:
        - name: container-0
          image: 'tensorflow/tensorflow:1.15.5-gpu'
          restartPolicy: OnFailure
          command:
            - /bin/bash
          args:
            - '-c'
            - pip install matplotlib;python /home/basicClass.py
          resources:
            limits:
              cpu: '2'
              memory: 4Gi
              nvidia.com/gpu: '1'
            requests:
              cpu: '2'
              memory: 4Gi
              nvidia.com/gpu: '1'
          volumeMounts:
            - name: cce-obs-tensorflow
              mountPath: /home
          imagePullPolicy: IfNotPresent
      imagePullSecrets:
        - name: default-secret


