Developing an MQTT-based Simulated Smart Street Light Online
Scenarios
This section uses a smart street light as an example to describe how to use device simulators to experience data reporting and command delivery. You can use MQTT.fx (recommended) or MQTT_Simulator.
A street light reports the light intensity (luminance) in JSON format. The command (switch) can be used to remotely control the street light status.
Prerequisites
- You have registered a Huawei Cloud account.
- You have subscribed to IoTDA. If you have not subscribed to the service, go to the IoTDA service page, and click Access Console to subscribe to the service.
Service Flow
The MQTT.fx simulator is used as an example to describe data reporting and command delivery.
- Create an MQTT product.
- Develop a product model. Define a product model to develop a street light that supports light intensity reporting and status control commands.
- Register an MQTT device to experience data reporting.
- Perform connection authentication. Use MQTT.fx to activate the device registered on IoTDA.
- Report data. Use MQTT.fx to report data to IoTDA.
- Deliver a command on the console to remotely control a device.
Creating a Product
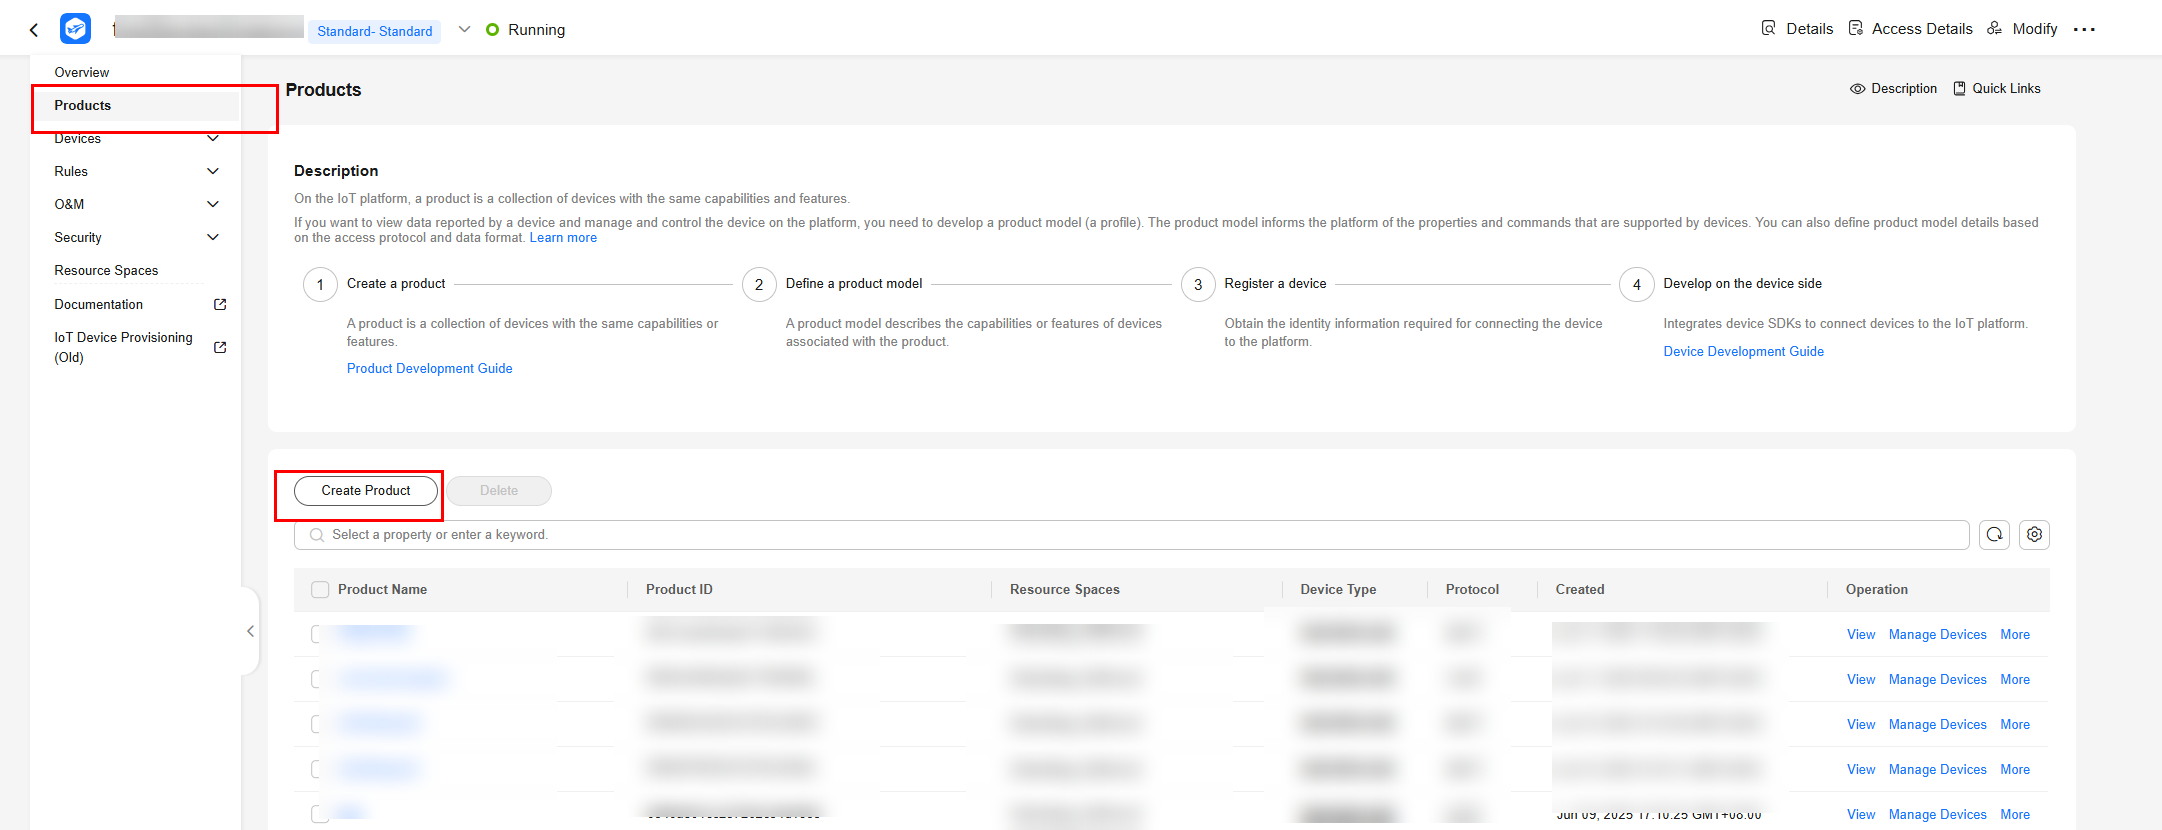
- Log in to the console, choose Products in the navigation pane, and click Create Product on the left.
Figure 1 Creating a product
- Create a product whose protocol type is MQTT and device type is StreetLamp, set parameters as prompted, and click OK.
Figure 2 Creating a product - MQTT

Developing a Product Model
- Click the created product. The product details page is displayed.
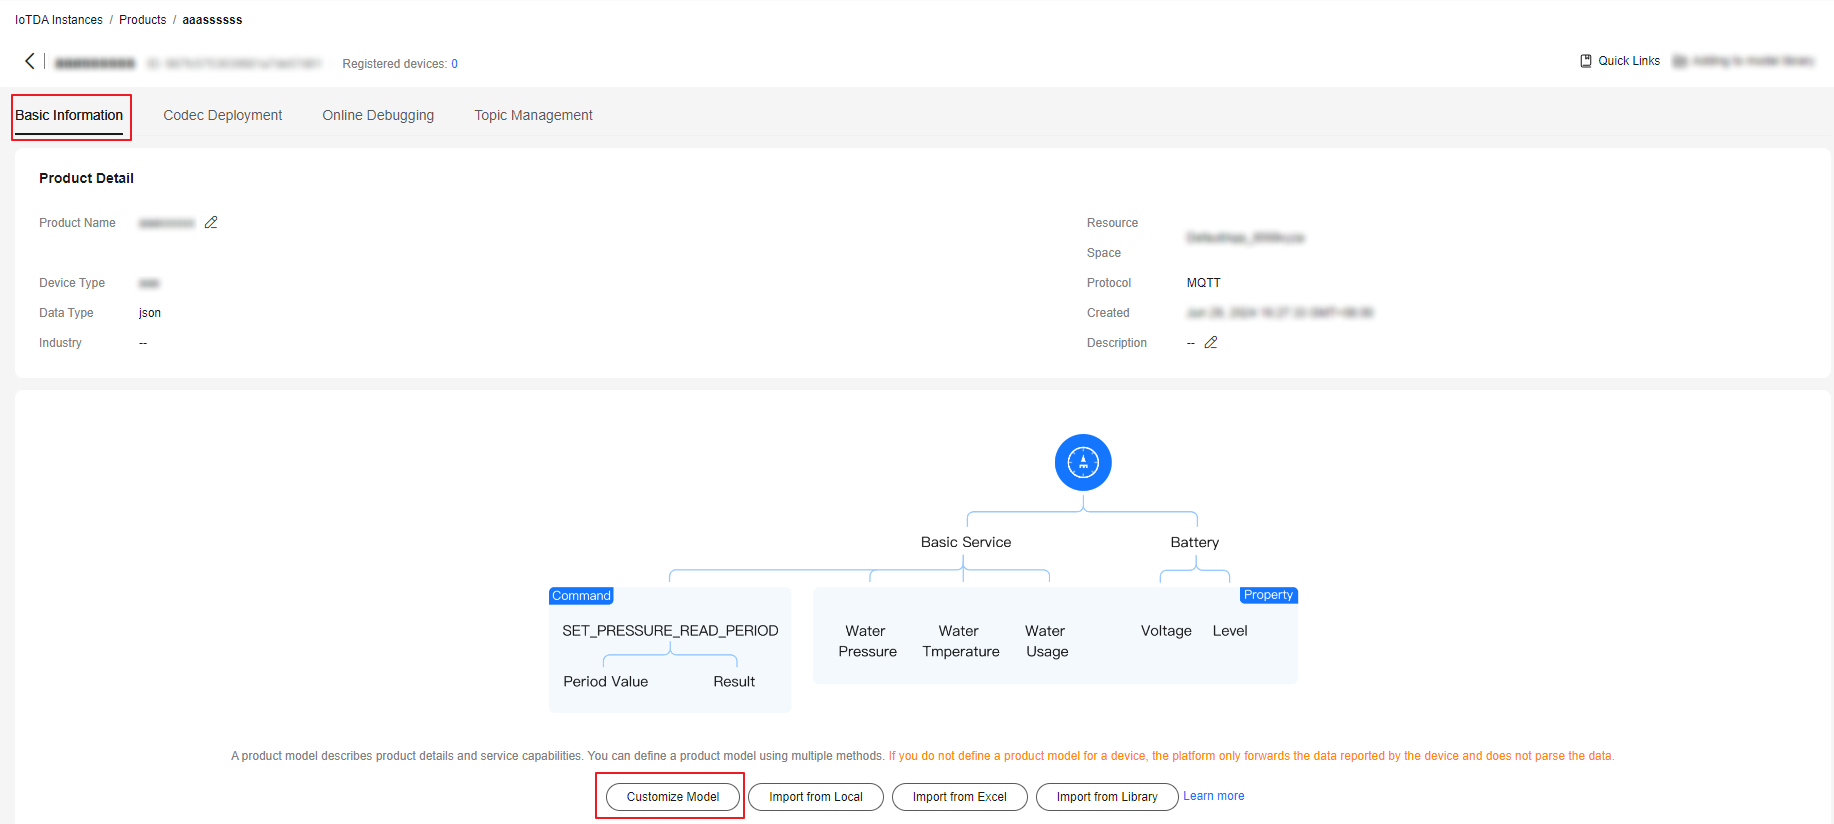
- On the Model Definition tab page, click Customize Model to add services of the product.
Figure 3 Custom model - MQTT
- Add the BasicData service.
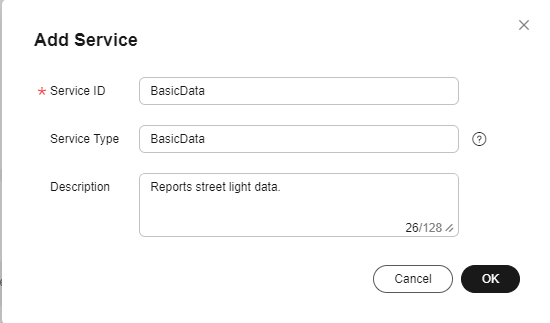
- On the Add Service page, specify Service ID, Service Type, and Description, and click OK.
Figure 4 Adding a service - BasicData
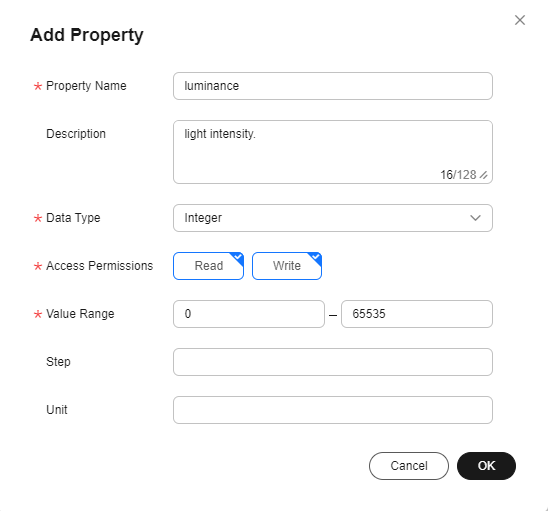
- In the BasicData service list on the right, click Add Property, enter related information, and click OK.
Figure 5 Adding a property - luminance
- On the Add Service page, specify Service ID, Service Type, and Description, and click OK.
- Add the LightControl service.
- Click Add Service on the Model Definition tab page, set parameters as prompted, and click OK.
- Service ID: Enter LightControl.
- Service Type: You are advised to set this parameter to the same value as Service ID.
- Description: Enter Controls the street light.
- Choose LightControl, click Add Command, and enter the command name Switch.
Figure 6 Adding a command - Switch

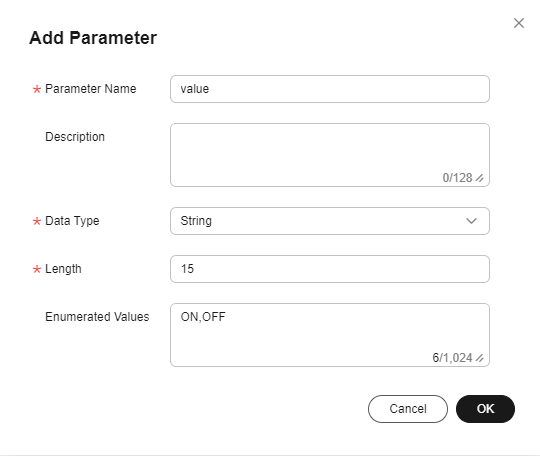
- Click Add Command Parameter, enter related information, and click OK.
Figure 7 Adding a command parameter - -value
- Click Add Service on the Model Definition tab page, set parameters as prompted, and click OK.
Registering a Device
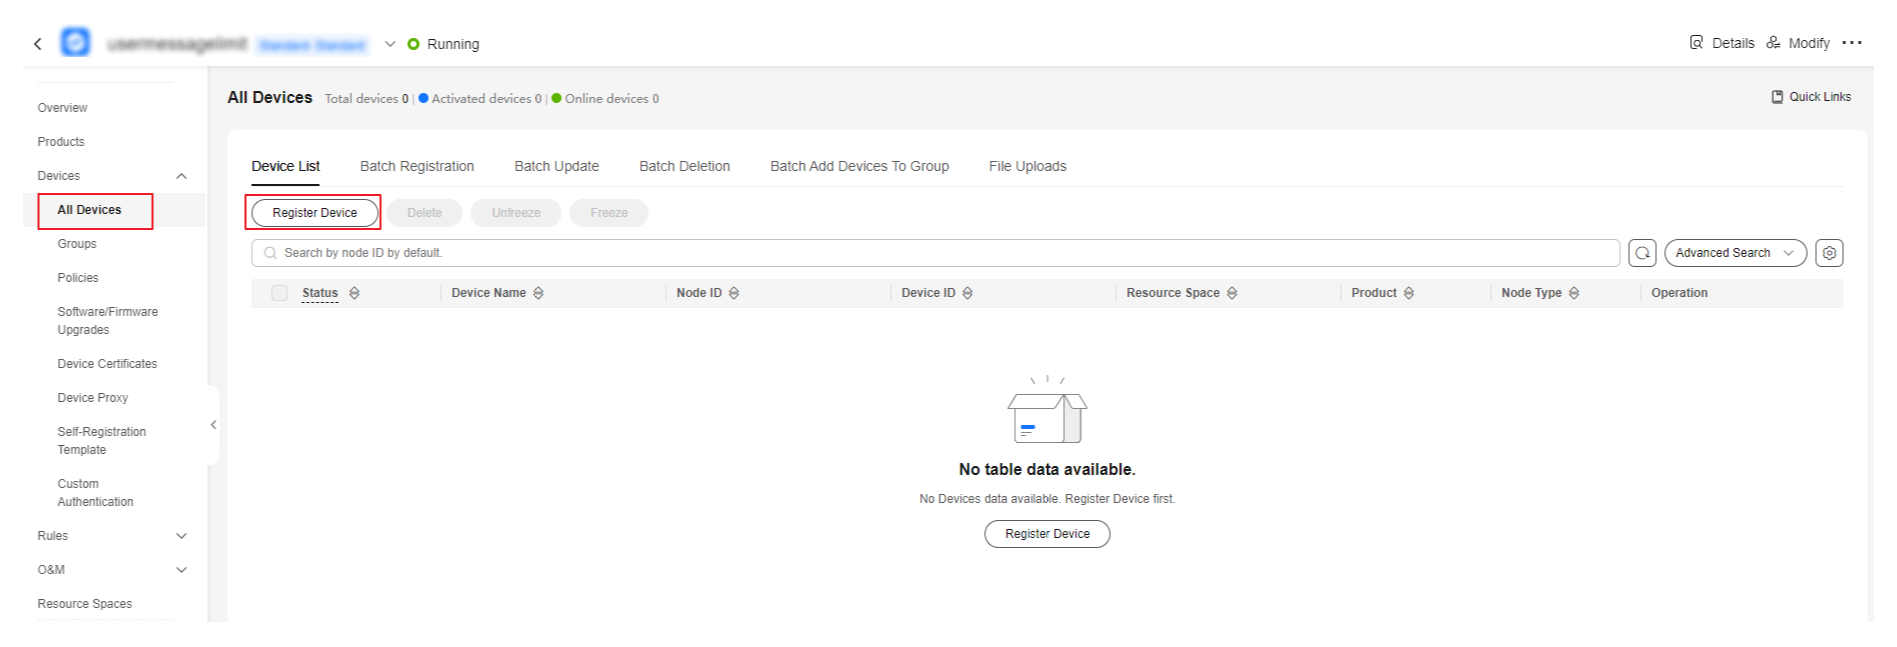
- On the IoTDA console, choose Devices > All Devices in the navigation pane, and click Register Device in the upper right corner.
Figure 8 Registering a device
- Set the parameters as prompted and click OK.
Parameter
Description
Resource Space
Ensure that the device and its associated product belong to the same resource space.
Product
Select a corresponding product.
Node ID
Customize a unique physical identifier for the device. The value consists of letters and digits.
Device Name
Customize the device name.
Authentication Type
Select Secret.
Secret
If you do not set this parameter, IoTDA automatically generates a value.
Figure 9 Registering a device - MQTT
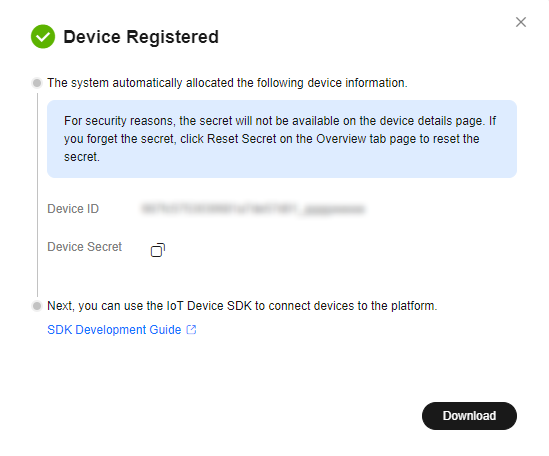
- After the device is registered, the platform automatically generates a device ID and secret. Save the device ID and secret for device access.
Figure 10 Device - Device registered
Performing Connection Authentication
Use MQTT.fx to activate the device registered on IoTDA.
- Download MQTT.fx (64-bit OS) or MQTT.fx (32-bit OS) and install it.
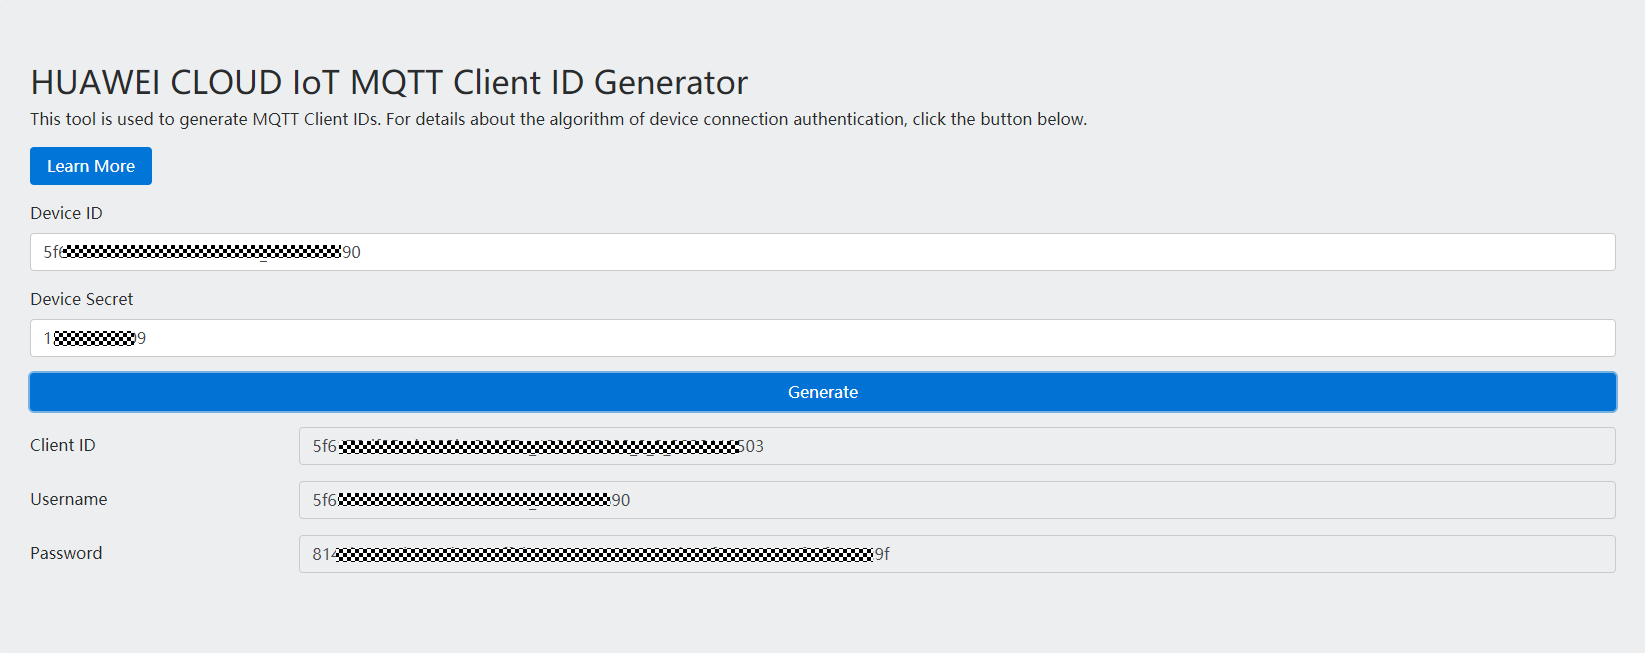
- Go to the IoTDA client ID generator page, enter the device ID and secret generated after registering a device to generate connection information (including ClientId, Username, and Password).
Parameter
Mandatory
Type
Description
ClientId
Yes
String(256)
The value of this parameter consists of a device ID, device type, password signature type, and timestamp. They are separated by underscores (_).
- Device ID: A device ID uniquely identifies a device and is generated when the device is registered with IoTDA. The value usually consists of a device's product ID and node ID which are separated by an underscore (_).
- Device type: The value is fixed at 0, indicating a device ID.
- Password signature type: The length is 1 byte, and the value can be 0 or 1.
- 0: The timestamp is not verified using the HMAC-SHA256 algorithm.
- 1: The timestamp is verified using the HMAC-SHA256 algorithm.
- Timestamp: The UTC time when the device was connected to IoTDA. The format is YYYYMMDDHH. For example, if the UTC time is 2018/7/24 17:56:20, the timestamp is 2018072417.
Username
Yes
String(256)
Device ID.
Password
Yes
String(256)
Encrypted device secret. The value of this parameter is the device secret encrypted by using the HMAC-SHA256 algorithm with the timestamp as the key.
The device secret is returned by IoTDA upon successful device registration.
Each device performs authentication using the MQTT CONNECT message, which must contain all information of the client ID. After receiving a CONNECT message, IoTDA checks the authentication type and password digest algorithm of the device.
The generated client ID is in the format Device ID_0_0_Timestamp. By default, the timestamp is not verified.
- If the timestamp needs to be verified using the HMAC-SHA256 algorithm, the platform checks whether the message timestamp is consistent with the platform time and then checks whether the password is correct.
- If the timestamp does not need to be verified using the HMAC-SHA256 algorithm, the timestamp must also be contained in the CONNECT message, but the platform does not check whether the time is correct. In this case, only the password is checked.
If the authentication fails, the platform returns an error message and automatically disconnects the MQTT connections.
- Open the MQTT.fx tool and click the setting icon.

- Configure authentication parameters and click Apply.
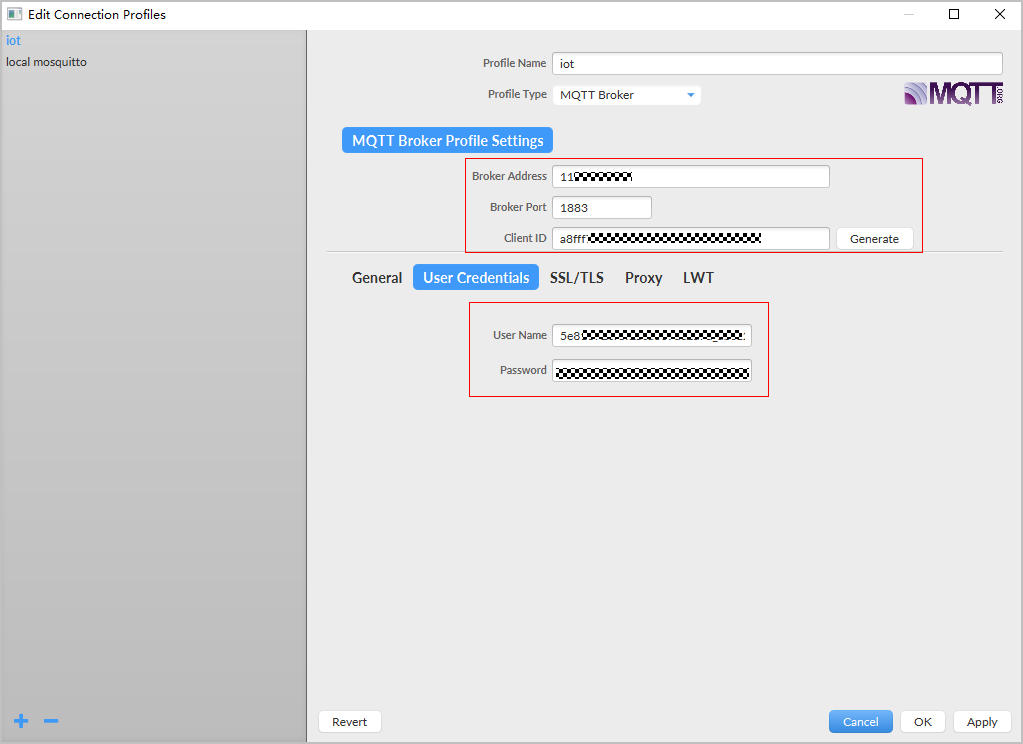
Parameter
Description
Broker Address
Enter the device access address (domain name) obtained from the IoTDA console. For devices that cannot be connected to the platform using a domain name, run the ping Domain name command in the CLI to obtain the IP address. The IP address is variable and needs to be set using a configuration item.
Broker Port
The default value is 1883.
Client ID
Enter the device client ID obtained in 2.
User Name
Enter the device ID obtained in 2.
Password
Enter the encrypted device secret obtained in 2.
- Click Connect. If the device authentication is successful, the device is displayed online on the platform.
Figure 11 Device online status

Reporting Data
Use MQTT.fx to report data to IoTDA. If a device reports data through the MQTT channel, the data needs to be sent to a specific topic in the format $oc/devices/{device_id}/sys/properties/report. For devices that each has a different secret, set device_id to the device ID returned upon successful device registration.
- Enter the API address in the format of "$oc/devices/{device_id}/sys/properties/report", for example, $oc/devices/5e4e2e92ac-164aefa8fouquan1/sys/properties/report.

- Enter the data to report in the blank area in the middle of the tool and click Publish.
Table 1 Service data list Field Name
Mandatory
Data Type
Description
services
Yes
List<ServiceProperty>
Service data list. (For details, see the ServiceProperty structure below.)
Table 2 ServiceProperty structure Field Name
Mandatory
Data Type
Description
service_id
Yes
String
Service ID.
properties
Yes
Object
Service properties, which are defined in the product model associated with the device.
eventTime
No
String
UTC time when the device reports data. The format is yyyyMMddTHHmmssZ, for example, 20161219T114920Z.
If this parameter is not carried in the reported data or is in incorrect format, the time when IoTDA receives the data is used.
Example request
{ "services": [{ "service_id": "BasicData", "properties": { "luminance": 30 } } ] } - Check whether the device successfully reports data on the device details page.
Figure 12 Viewing reported data - MQTT

Delivering a Command
Deliver a command on the console to remotely control a device.
- In the navigation pane, choose , locate the target device, and click View to access its details page.
- Click the Commands tab and deliver a synchronization command.
Figure 13 Command delivery - MQTT


MQTT devices support only synchronous command delivery. NB-IoT devices support only asynchronous command delivery.
- In the MQTT.fx simulator, select Subscribe and enter the command delivery topic. After the subscription, you can view the delivered command parameters.
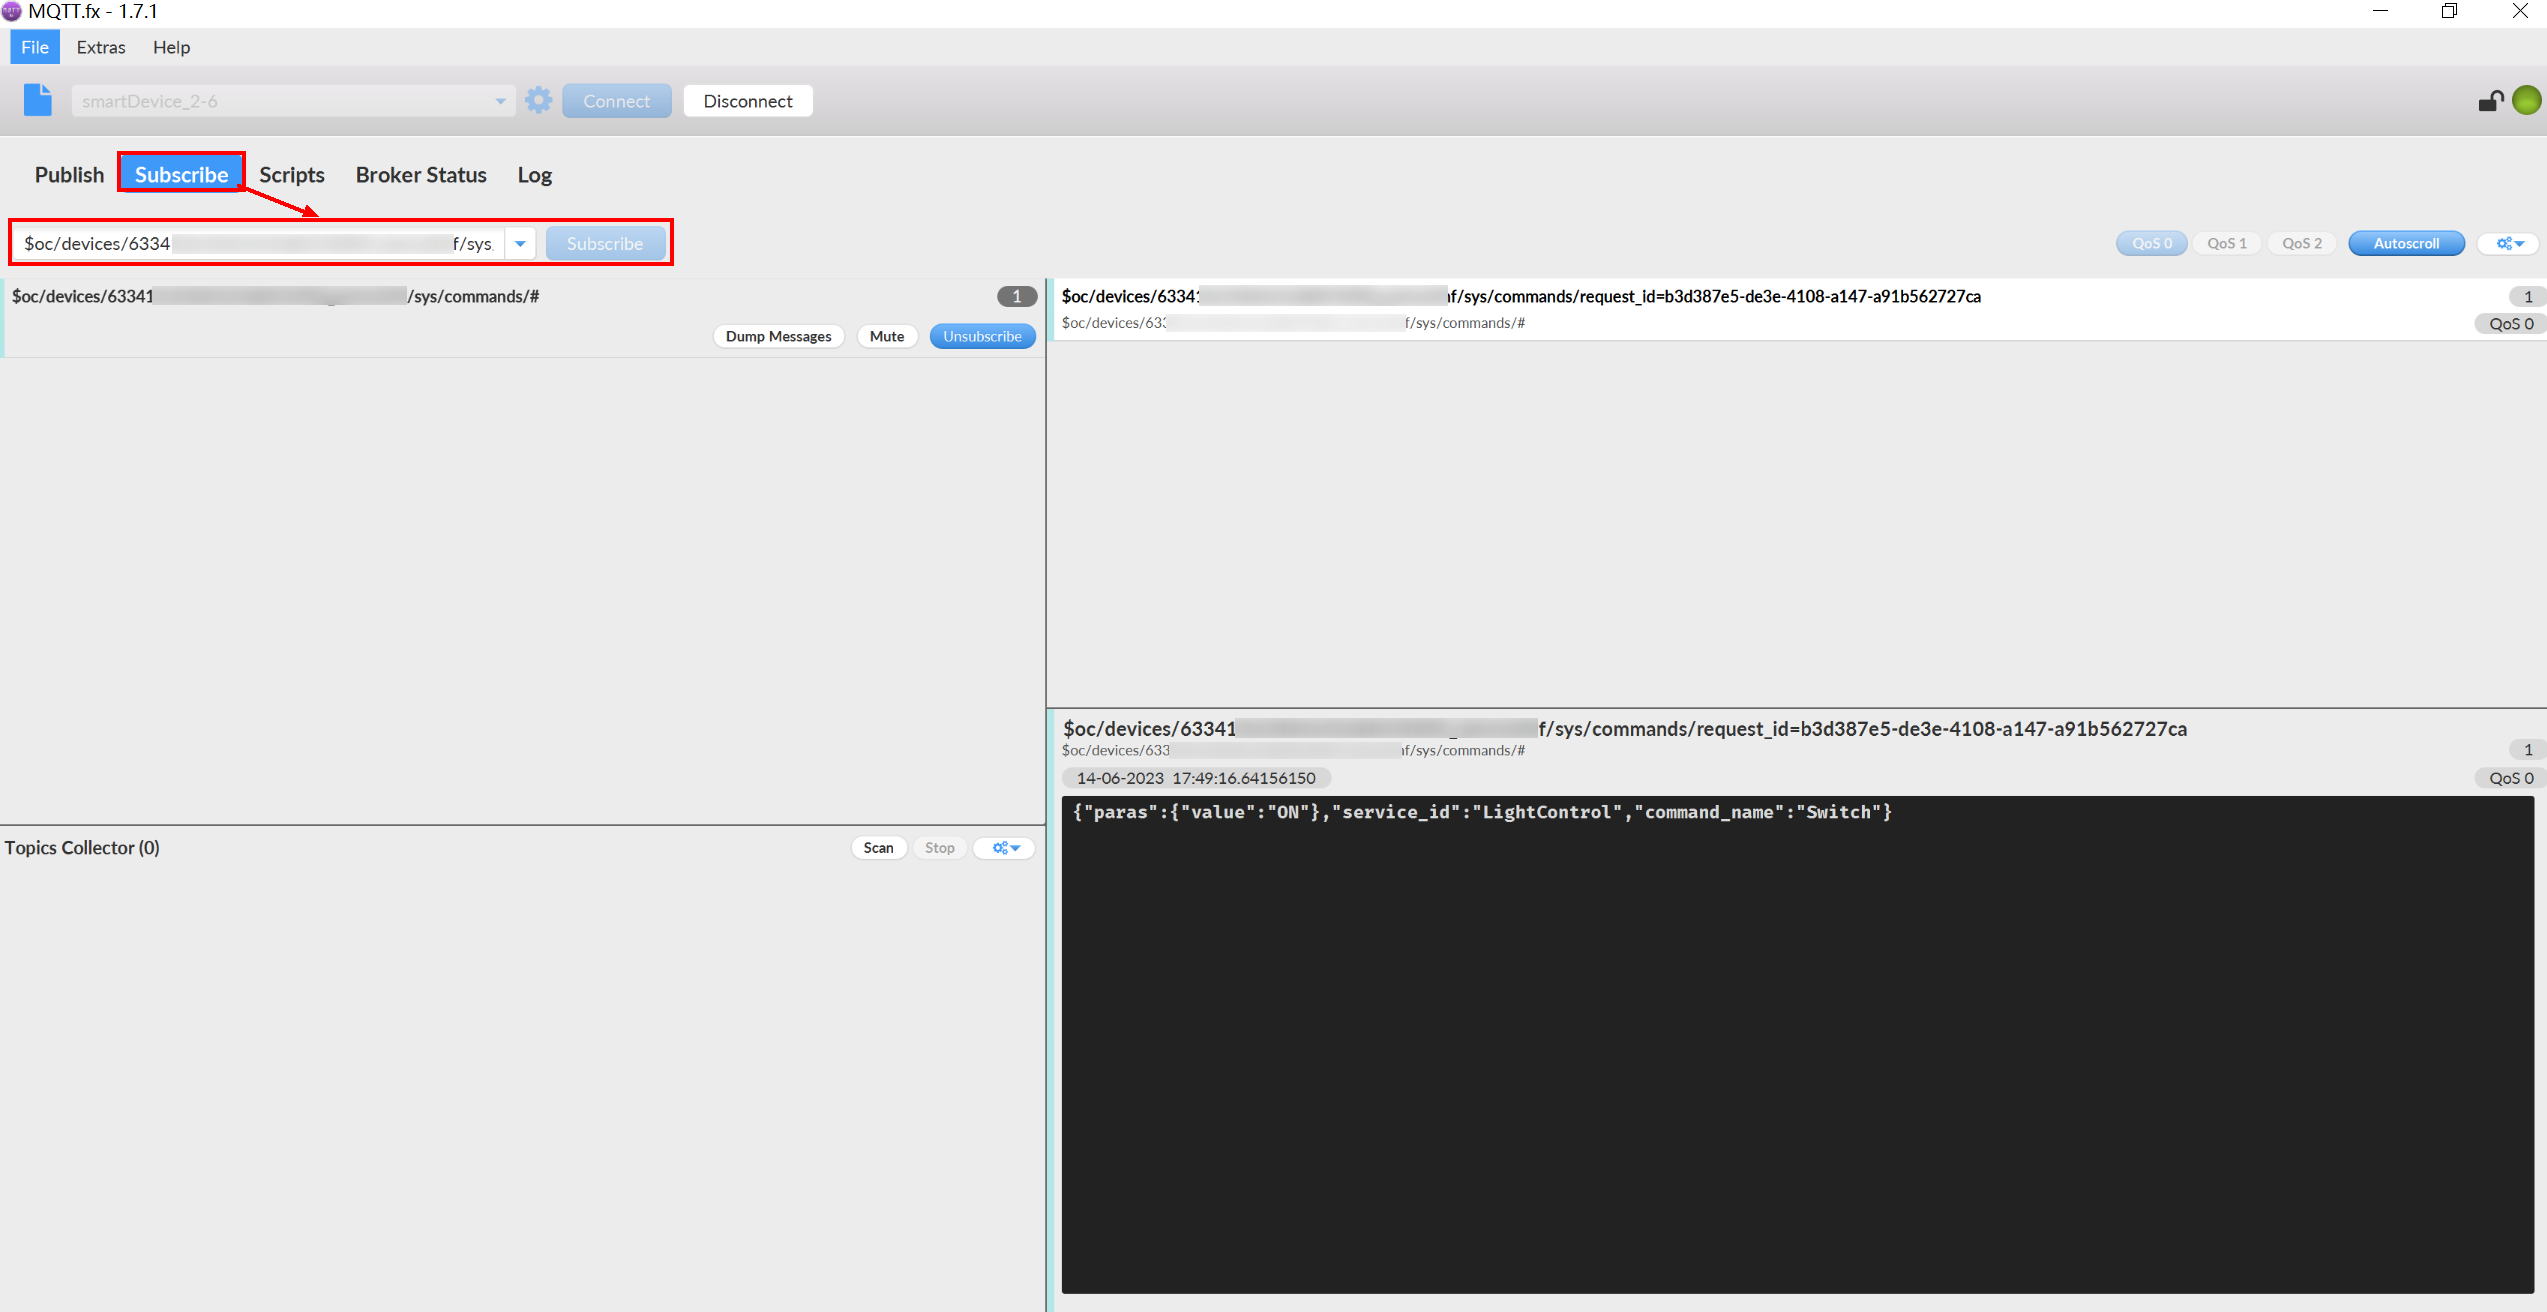

- Use the MQTT.fx simulator to view the delivered command parameters. The command delivery topic is in the format of $oc/devices/{device_id}/sys/commands/#, where {device_id} indicates the value of device ID returned after the device is registered successfully.
- If the system displays a message indicating that the command delivery fails, the device needs to respond to the synchronization command in a timely manner. For details about the response content, see Platform Delivering a Command.
Using MQTT_Simulator for Access
- Download the MQTT_Simulator simulator (for 64-bit operating system by default) and start it.
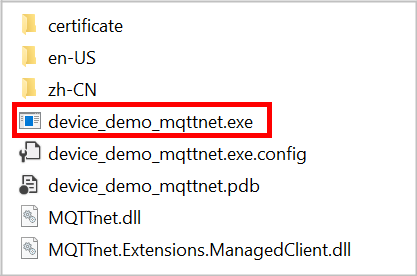
- Perform operations on the UI.
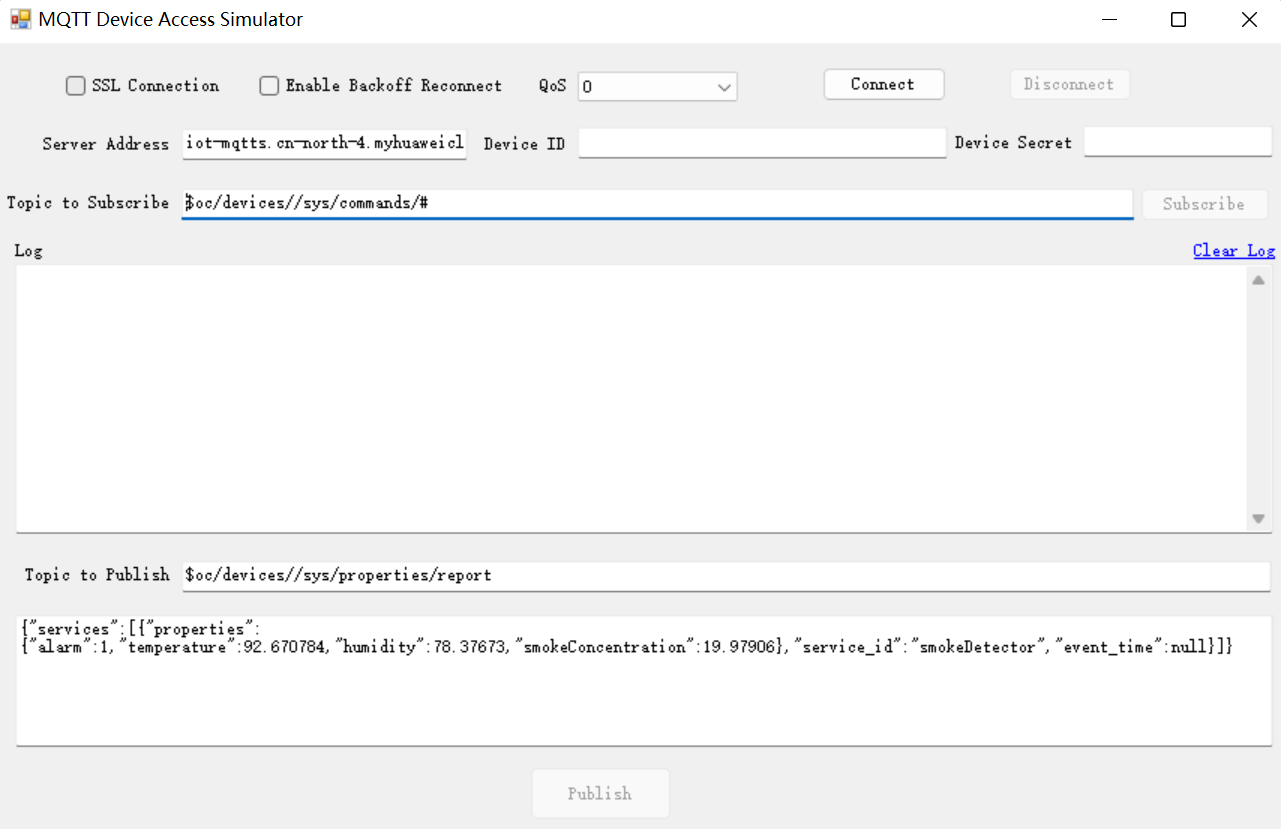
- On the simulator UI, enter the server address, device ID, and device secret. Set the parameters based on the actual device information.
- Server Address: domain name. Obtain it by referring to Platform Connection Information.
- Device ID and Device Secret: Obtain them from here.
- Use the corresponding certificates together with different server addresses during SSL-encrypted access. Obtain certificates by referring to Obtaining Resources and replace certificates in the certificate folder.
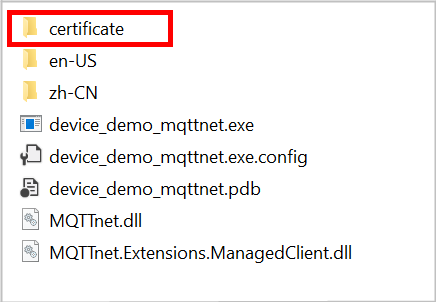
- Select SSL encryption or no encryption when establishing a connection on the device side and set the QoS mode to 0 or 1. Currently, QoS 2 is not supported. For details, see Constraints.
- On the simulator UI, enter the server address, device ID, and device secret. Set the parameters based on the actual device information.
- Establish a connection.
To connect a device or gateway to the platform, upload the device information to bind the device or gateway to the platform. Click Connect. If the domain name, device ID, and secret are correct, a device connection success is displayed in the log. Check the device status on IoTDA, as shown in the following figure.
Figure 14 Device list - Device online status
- Subscribe to a topic.
Only devices that subscribe to a specific topic can receive messages about the topic published by the broker. For details on the preset topics, see Topics.
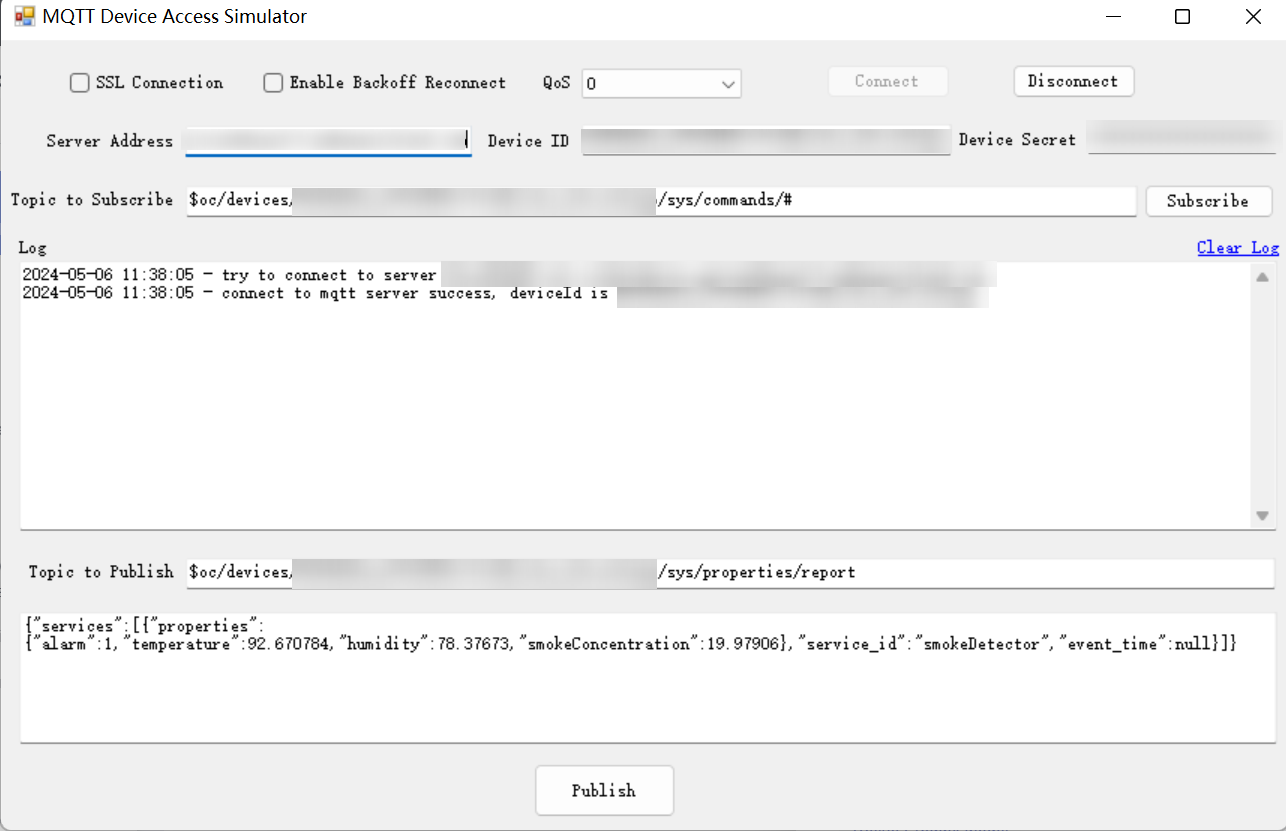
After the connection is established and a topic is subscribed to, the following information is displayed in the log area on the home page of the demo.
- Publish a topic.
Publishing a topic means that a device proactively reports its properties or messages to the platform. For details, see the API Device Reporting Properties.
The simulator implements the property reporting topic and property reporting.
Enter the JSON message to be reported. The value of luminance is 30. After a topic is published, the following information is displayed on the demo page.
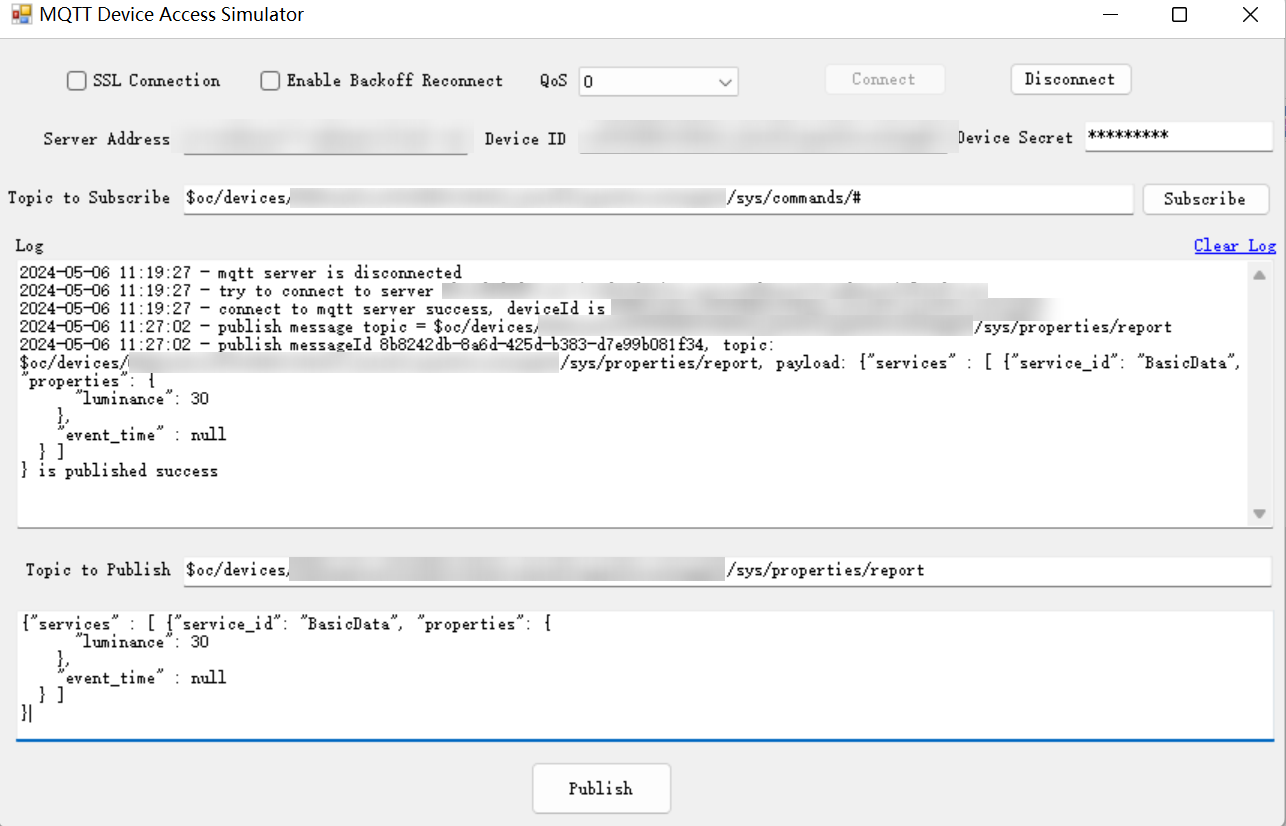
If the reporting is successful, the reported device properties are displayed on the device details page.
Figure 15 Viewing reported data - MQTT
- Receive a command.
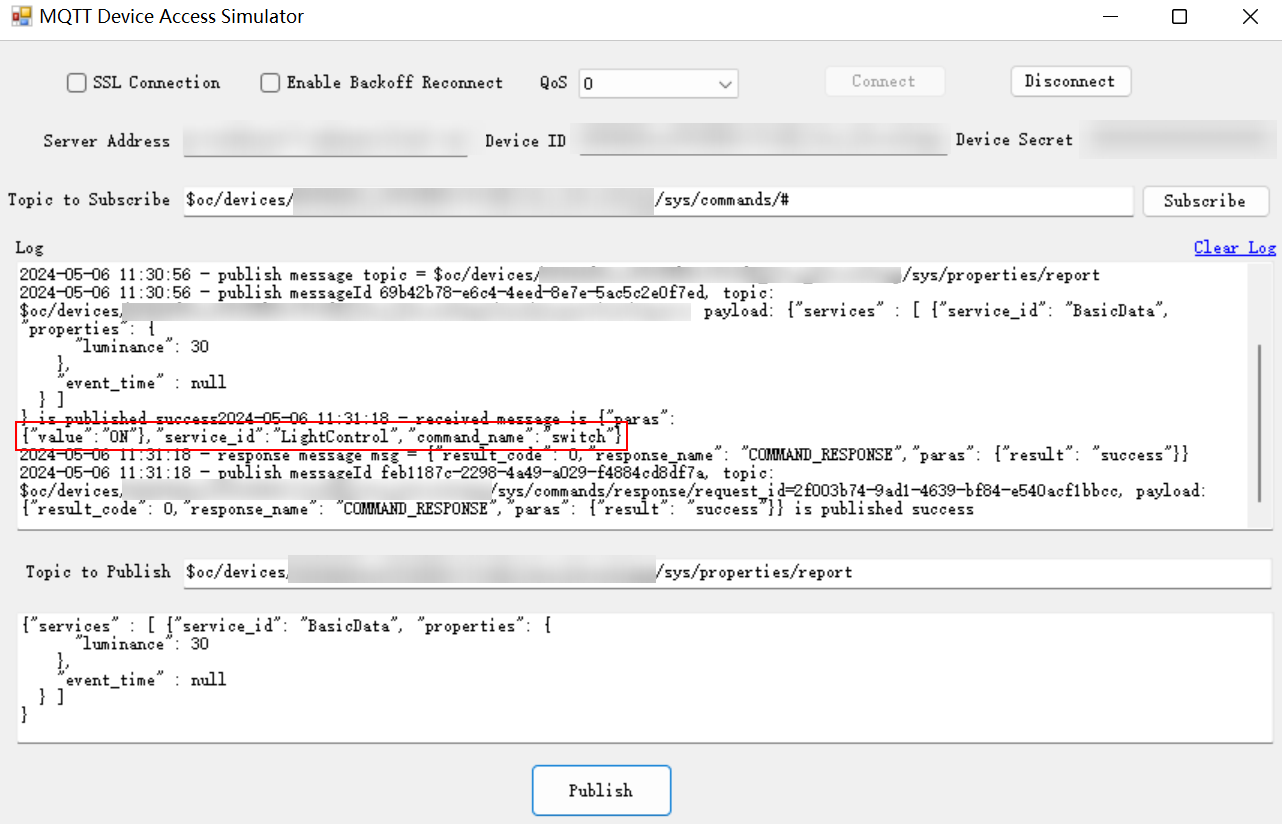
The simulator can receive commands delivered by the platform. After an MQTT connection is established and a topic is subscribed, you can deliver a command on the device details page of the IoTDA console. After the command is delivered, the MQTT callback receives the command delivered by the platform.
For example, if you want to remotely turn on the light, deliver the LightControl: switch command with the parameter value ON.
Figure 16 Command delivery - Synchronous command delivery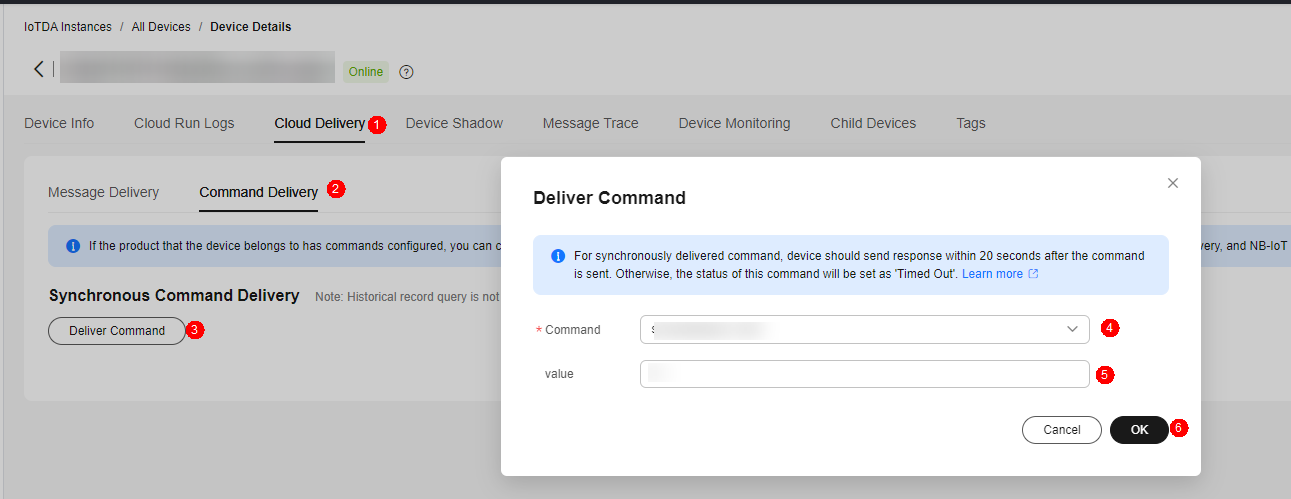
After the synchronous command is delivered, the following information is displayed on the demo page.
Advanced Experience
After using the simulator to connect a simulated MQTT device to the platform, you may understand how the MQTT device interacts with the platform through open APIs.
To better experience the IoTDA service, develop real-world applications and devices and connect them to the platform. For details, see Developer Guide.
Feedback
Was this page helpful?
Provide feedbackThank you very much for your feedback. We will continue working to improve the documentation.See the reply and handling status in My Cloud VOC.
For any further questions, feel free to contact us through the chatbot.
Chatbot


