IoT Device SDK (Java)
Maven Reference
<dependencies>
    <dependency>
        <groupId>com.huaweicloud</groupId>
        <artifactId>iot-device-sdk-java</artifactId>
        <version>1.2.0</version>
    </dependency>
</dependencies>
Preparations
- Ensure that the JDK (version 1.8 or later) and Maven have been installed.
- Download the SDK. The project contains the following subprojects:

iot-device-sdk-java: SDK code
iot-device-demo: demo code for common directly connected devices
iot-gateway-demo: demo code for gateways
iot-bridge-sdk: SDK code for the bridge
iot-bridge-demo: demo code for the bridge, which is used to bridge a TCP device to the platform
iot-bridge-sample-tcp-protocol: sample code of a child device using TCP to connect to a bridge
iot-device-code-generator: device code generator, which can automatically generate device code for different product models
- Go to the SDK root directory and run the mvn install command to build and install the SDK.
Creating a Product
A smokeDetector product model is provided to help you understand the product model. This smoke detector can report the smoke density, temperature, humidity, and smoke alarms, and execute the ring alarm command. The following uses the smoke detector as an example to introduce the procedures of message reporting and property reporting.
- Access the IoTDA service page and click Access Console. Click the target instance card. Check and save the MQTTS device access domain name.
- Choose Products in the navigation pane and click .
- Set the parameters as prompted and click OK.
Set Basic Info
Resource Space
The platform automatically allocates the created product to the default resource space. If you want to allocate the product to another resource space, select the resource space from the drop-down list box. If a resource space does not exist, create it first.
Product Name
Customize the product name. The name can contain letters, numbers, underscores (_), and hyphens (-).
Protocol
Select MQTT.
Data Type
Select JSON.
Device Type Selection
Select Custom.
Device Type
Select smokeDetector.
Advanced Settings
Product ID
Leave this parameter blank.
Description
Set this parameter based on service requirements.
Uploading a Product Model
- Download the smokeDetector product model file.
- Click the name of the product created in 3 to access its details.
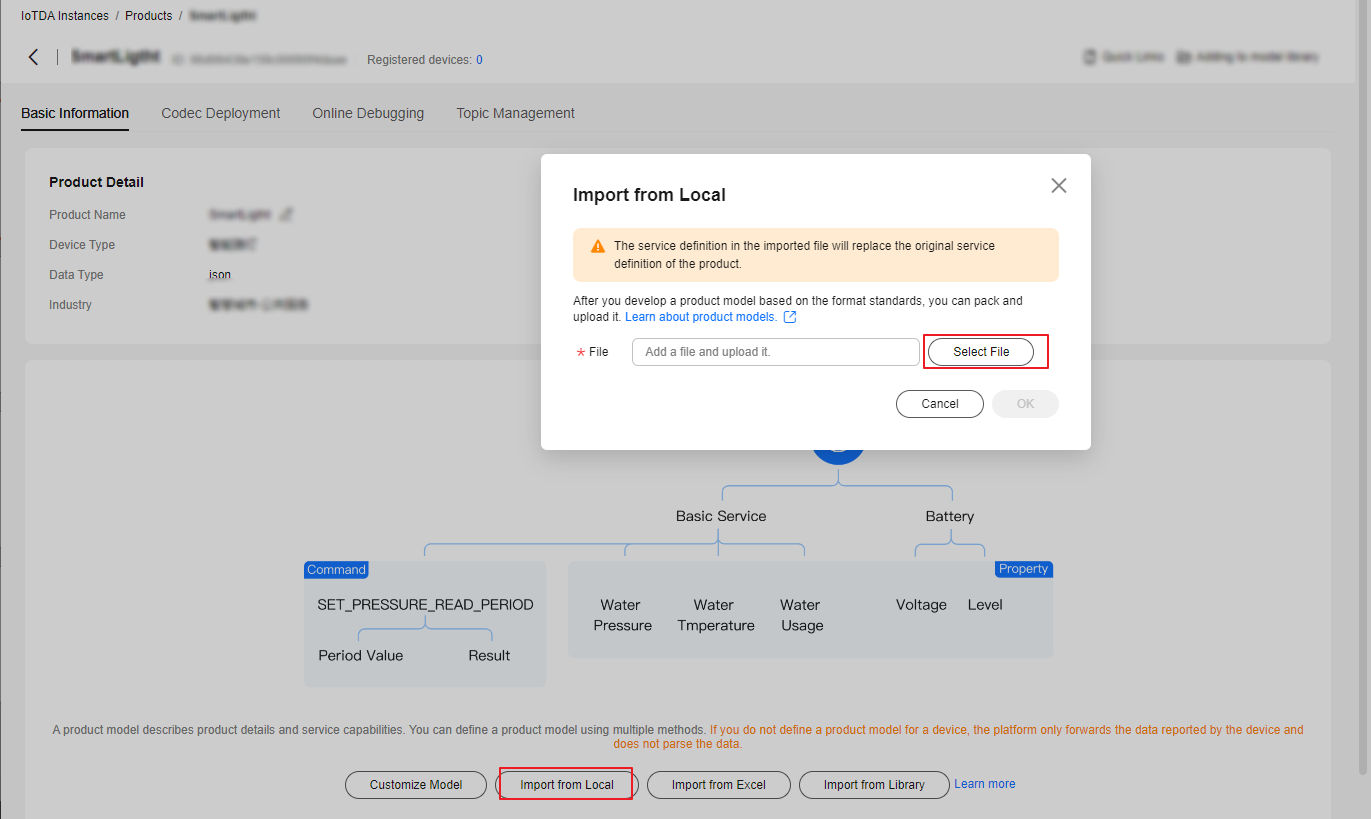
- On the Basic Information tab page, click Import from Local to upload the product model file obtained in 1.
Figure 1 Product - Uploading a product model
Registering a Device
- In the navigation pane, choose Devices > All Devices, and click Register Device.
- Set the parameters as prompted and click OK.
Parameter
Description
Resource Space
Ensure that the device and the product created in 3 belong to the same resource space.
Product
Select the product created in 3.
Node ID
This parameter specifies the unique physical identifier of the device. The value can be customized and consists of letters and numbers.
Device Name
Customize the device name.
Authentication Type
Select Secret.
Secret
Customize the device secret. If this parameter is not set, the platform automatically generates a secret.
After the device is registered, save the node ID, device ID, and secret.
Initializing a Device
- Enter the device ID and secret obtained in Registering a Device and the device connection information obtained in 1. The format is ssl://Domain name:Port or ssl://IP address:Port.
1
2
3
4
5
6
// Obtaining the certificate path: Load the CA certificate of the platform and use the default ca.jks of the SDK for server verification.
     URL resource = MessageSample.class.getClassLoader().getResource("ca.jks");
     File file = new File(resource.getPath());
     //For example, modify the following parameters in MessageSample.java in the iot-device-demo file:
     IoTDevice device = new IoTDevice("ssl://Domain name:8883",
                "5e06bfee334dd4f33759f5b3_demo", "mysecret", file);

All files that involve device IDs and passwords must be modified accordingly.
- Establish a connection. Call init of the IoT Device SDK. The thread is blocked until a result is returned. If the connection is established, 0 is returned.
1
2
3
      if (device.init() != 0) {
            return;
        }
If the connection is successful, information similar to the following is displayed:12023-07-17 17:22:59 INFO MqttConnection:105 - Mqtt client connected. address :ssl://Domain name: 8883
- After the device is created and connected, it can be used for communication. You can call getClient of the IoT Device SDK to obtain the device client. The client provides communication APIs for processing messages, properties, and commands.
Reporting a Message
Message reporting is the process in which a device reports messages to the platform.
- Call getClient of the IoT Device SDK to obtain the client from the device.
- Call reportDeviceMessage to enable the client to report a device message. In the sample below, messages are reported periodically.
 1
 2
 3
 4
 5
 6
 7
 8
 9
10
11
12
13
14
15
16
17
18
19
20
21
22
23
24
25
26
27
28
29
30
        while (true) {
            device.getClient().reportDeviceMessage(new DeviceMessage("hello"), new ActionListener() {
                @Override
                public void onSuccess(Object context) {
                    log.info("reportDeviceMessage ok");
                }

                @Override
                public void onFailure(Object context, Throwable var2) {
                    log.error("reportDeviceMessage fail: " + var2);
                }
            });

            // Report a message using a custom topic, which must be configured on the platform first.
            String topic = "$oc/devices/" + device.getDeviceId() + "/user/wpy";
            device.getClient().publishRawMessage(new RawMessage(topic, "hello raw message "),
                new ActionListener() {
                    @Override
                    public void onSuccess(Object context) {
                        log.info("publishRawMessage ok: ");
                    }

                    @Override
                    public void onFailure(Object context, Throwable var2) {
                        log.error("publishRawMessage fail: " + var2);
                    }
                });

            Thread.sleep(5000);
        }
- Replace the device parameters with the actual values in the main function of the MessageSample class, and run this class. Then view the logs about successful connection and message reporting.
 1
 2
 3
 4
 5
 6
 7
 8
 9
10
11
2024-04-16 16:43:09  INFO AbstractService:103 - create device, the deviceId is 5e06bfee334dd4f33759f5b3_demo
2024-04-16 16:43:09 INFO MqttConnection:233 - try to connect to ssl://Domain name: 8883
2024-04-16 16:43:10 INFO MqttConnection:257 - connect success, the uri is ssl://Domain name: 8883
2024-04-16 16:43:11  INFO MqttConnection:299 - publish message topic is $oc/devices/5e06bfee334dd4f33759f5b3_demo/sys/events/up, msg =  {"object_device_id":"5e06bfee334dd4f33759f5b3_demo","services":[{"paras":{"type":"DEVICE_STATUS","content":"connect success","timestamp":"1713256990817"},"service_id":"$log","event_type":"log_report","event_time":"20240416T084310Z","event_id":null}]}
2024-04-16 16:43:11 INFO MqttConnection:140 - Mqtt client connected. address is ssl://Domain name: 8883
2024-04-16 16:43:11  INFO MqttConnection:299 - publish message topic is $oc/devices/5e06bfee334dd4f33759f5b3_demo/sys/events/up, msg =  {"object_device_id":"5e06bfee334dd4f33759f5b3_demo","services":[{"paras":{"device_sdk_version":"JAVA_v1.2.0","fw_version":null,"sw_version":null},"service_id":"$sdk_info","event_type":"sdk_info_report","event_time":"20240416T084311Z","event_id":null}]}
2024-04-16 16:43:11 INFO MqttConnection:299 - publish message topic is $oc/devices/ 5e06bfee334dd4f33759f5b3_demo /sys/events/up, msg = {"object_device_id": "5e06bfee334dd4f33759f5b3_demo ","services": [{"paras":{"type":"DEVICE_STATUS","content":"connect complete, the url is ssl://Domain name: 8883","timestamp":"1713256991263"},"service_id":"$log","event_type":"log_report","event_time":"20240416T084311Z","event_id":null}]}
2024-04-16 16:43:11  INFO MqttConnection:299 - publish message topic is $oc/devices/5e06bfee334dd4f33759f5b3_demo/sys/messages/up, msg =  {"name":null,"id":null,"content":"hello","object_device_id":null}
2024-04-16 16:43:11  INFO MqttConnection:299 - publish message topic is $oc/devices/5e06bfee334dd4f33759f5b3_demo/user/wpy, msg =  hello raw message
2024-04-16 16:43:11  INFO MessageSample:98 - reportDeviceMessage ok
2024-04-16 16:43:11  INFO MessageSample:113 - publishRawMessage ok:
- On the IoTDA console, choose and check whether the device is online.
Figure 2 Device list - Device online status

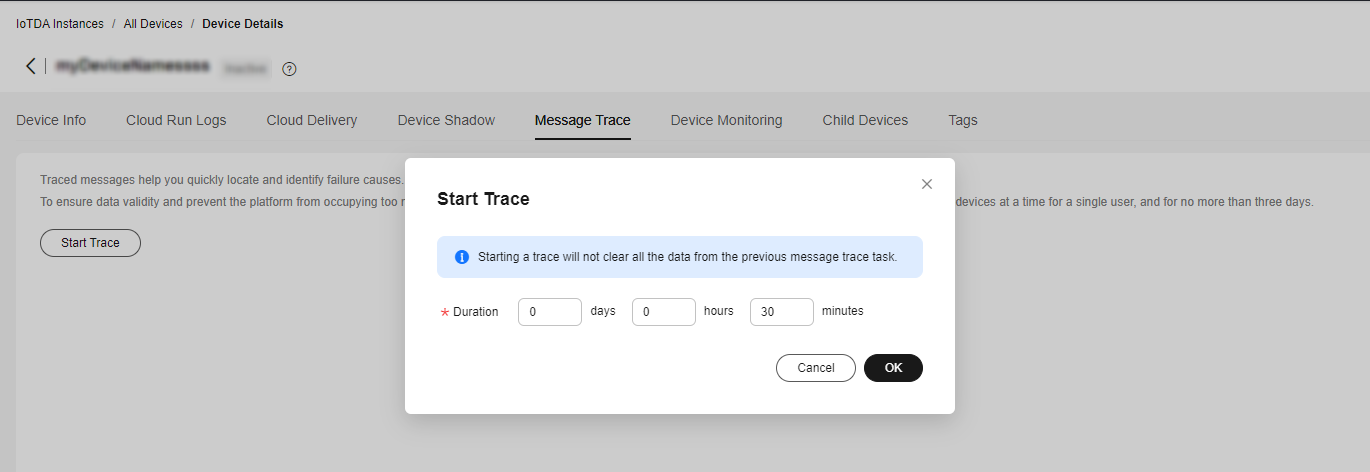
- Select the device, click View, and enable message trace on the device details page.
Figure 3 Message tracing - Starting message tracing
- View the messages received by the platform.
Figure 4 Message tracing - Viewing device_sdk_java tracing result

Note: Message trace may be delayed. If no data is displayed, wait for a while and refresh the page.
Reporting Properties
Open the PropertySample class. In this example, the alarm, temperature, humidity, and smokeConcentration properties are periodically reported to the platform.
1 2 3 4 5 6 7 8 9 10 11 12 13 14 15 16 17 18 19 20 21 22 23 24 25 26 27 28 29 30 31 32 |
// Report properties periodically. while (true) { Map<String ,Object> json = new HashMap<>(); Random rand = new Random(); // Set properties based on the product model. json.put("alarm", 1); json.put("temperature", rand.nextFloat()*100.0f); json.put("humidity", rand.nextFloat()*100.0f); json.put("smokeConcentration", rand.nextFloat() * 100.0f); ServiceProperty serviceProperty = new ServiceProperty(); serviceProperty.setProperties(json); serviceProperty.setServiceId("smokeDetector");// The serviceId must the consistent with that defined in the product model. device.getClient().reportProperties(Arrays.asList(serviceProperty), new ActionListener() { @Override public void onSuccess(Object context) { log.info("pubMessage success" ); } @Override public void onFailure(Object context, Throwable var2) { log.error("reportProperties failed" + var2.toString()); } }); Thread.sleep(10000); } } |
Modify the main function of the PropertySample class and run this class. Then view the logs about successful property reporting.
2024-04-17 15:38:37  INFO AbstractService:103 - create device, the deviceId is 5e06bfee334dd4f33759f5b3_demo
2024-04-17 15:38:37 INFO MqttConnection:233 - try to connect to ssl://Domain name: 8883
2024-04-17 15:38:38 INFO MqttConnection:257 - connect success, the uri is ssl://Domain name: 8883
2024-04-17 15:38:38  INFO MqttConnection:299 - publish message topic is $oc/devices/5e06bfee334dd4f33759f5b3_demo/sys/events/up, msg =  {"object_device_id":"661e35467bdccc0126d1a595_feng-sdk-test3","services":[{"paras":{"type":"DEVICE_STATUS","content":"connect success","timestamp":"1713339518043"},"service_id":"$log","event_type":"log_report","event_time":"20240417T073838Z","event_id":null}]}
2024-04-17 15:38:38 INFO MqttConnection:140 - Mqtt client connected. address is ssl://Domain name: 8883
2024-04-17 15:38:38  INFO MqttConnection:299 - publish message topic is $oc/devices/5e06bfee334dd4f33759f5b3_demo/sys/events/up, msg =  {"object_device_id":"661e35467bdccc0126d1a595_feng-sdk-test3","services":[{"paras":{"device_sdk_version":"JAVA_v1.2.0","fw_version":null,"sw_version":null},"service_id":"$sdk_info","event_type":"sdk_info_report","event_time":"20240417T073838Z","event_id":null}]}
2024-04-17 15:38:38 INFO MqttConnection:299 - publish message topic is $oc/devices/ 5e06bfee334dd4f33759f5b3_demo /sys/events/up, msg = {"object_device_id": "5e06bfee334dd4f33759f5b3_demo ","services": [{"paras":{"type":"DEVICE_STATUS","content":"connect complete, the url is ssl://Domain name :8883","timestamp":"1713339518464"},"service_id":"$log","event_type":"log_report","event_time":"20240417T073838Z","event_id":null}]}
2024-04-17 15:38:38  INFO MqttConnection:299 - publish message topic is $oc/devices/5e06bfee334dd4f33759f5b3_demo/sys/properties/report, msg =  {"services":[{"properties":{"alarm":1,"temperature":55.435158,"humidity":51.950867,"smokeConcentration":43.89913},"service_id":"smokeDetector","event_time":null}]}
2024-04-17 15:38:38  INFO PropertySample:144 - pubMessage success
The latest property values are displayed on the device details page of the platform.

Reading and Writing Properties
Call the setPropertyListener method of the client to set the property callback. In PropertySample, the property reading/writing API is implemented.
Property reading: Only the alarm property can be written.
Property reading: Assemble the local property value based on the API format.
1 2 3 4 5 6 7 8 9 10 11 12 13 14 15 16 17 18 19 20 21 22 23 24 25 26 27 28 29 30 31 32 33 34 35 36 37 38 39 40 41 42 |
device.getClient().setPropertyListener(new PropertyListener() { // Process property writing. @Override public void onPropertiesSet(String requestId, List<ServiceProperty> services) { // Traverse services. for (ServiceProperty serviceProperty : services) { log.info("OnPropertiesSet, serviceId is {}", serviceProperty.getServiceId()); // Traverse properties. for (String name : serviceProperty.getProperties().keySet()) { log.info("property name is {}", name); log.info("set property value is {}", serviceProperty.getProperties().get(name)); } } // Change the local property value. device.getClient().respondPropsSet(requestId, IotResult.SUCCESS); } /** * Process property reading. In most scenarios, you can directly read the device shadow on the platform, so this interface does not need to be implemented. * To read device properties in real time, implement this method. */ @Override public void onPropertiesGet(String requestId, String serviceId) { log.info("OnPropertiesGet, the serviceId is {}", serviceId); Map<String, Object> json = new HashMap<>(); Random rand = new SecureRandom(); json.put("alarm", 1); json.put("temperature", rand.nextFloat() * 100.0f); json.put("humidity", rand.nextFloat() * 100.0f); json.put("smokeConcentration", rand.nextFloat() * 100.0f); ServiceProperty serviceProperty = new ServiceProperty(); serviceProperty.setProperties(json); serviceProperty.setServiceId("smokeDetector"); device.getClient().respondPropsGet(requestId, Arrays.asList(serviceProperty)); } }); |
Note:
- The property reading/writing API must call respondPropsGet and respondPropsSet to report the operation result.
- If the device does not allow the platform to proactively read data from the device, onPropertiesGet can be left not implemented.
Run the PropertySample class and check whether the value of the alarm property is 1 on the Device Shadow tab page.

Change the value of the alarm property to 0.
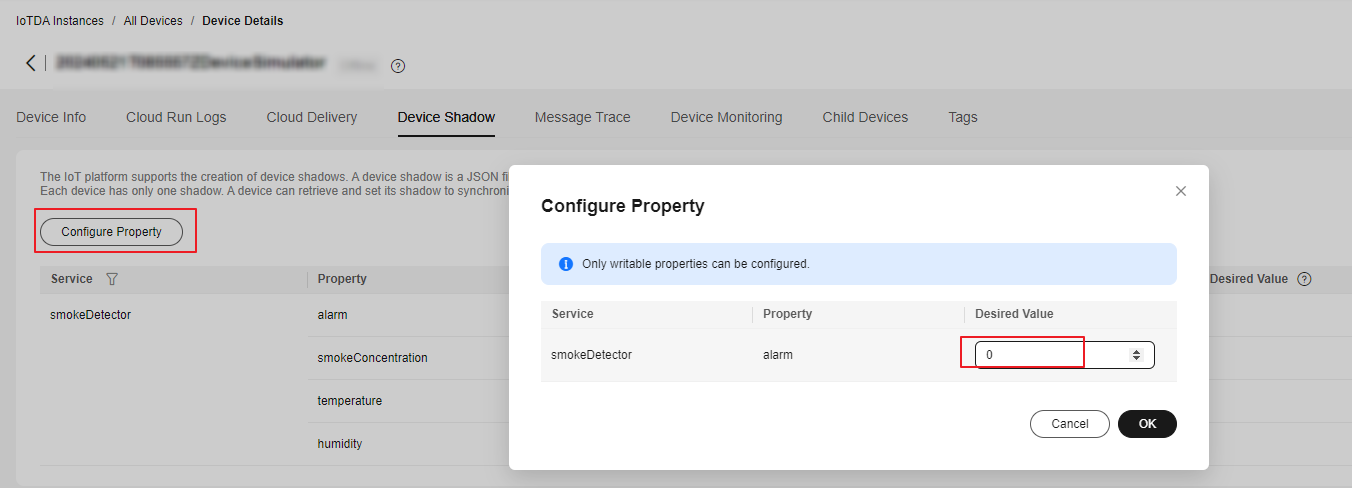
In the device logs, the value of alarm is 0.

Delivering a Command
You can set a command listener to receive commands delivered by the platform. The callback needs to process the commands and report responses.
The CommandSample class prints commands after receiving them and calls respondCommand to report the responses.
1 2 3 4 5 6 7 8 9 10 11 12 13 14 15 16 |
device.getClient().setCommandListener(new CommandListener() { @Override public void onCommand(String requestId, String serviceId, String commandName, Map<String, Object> paras) { log.info("onCommand, serviceId = {}", serviceId); log.info("onCommand , name = {}", commandName); log.info("onCommand, paras = {}", paras.toString()); // Process the command. // Send a command response. device.getClient().respondCommand(requestId, new CommandRsp(0)); } }); |
Run the CommandSample class and deliver a command on the platform. In the command, set serviceId to smokeDetector, name to ringAlarm, and paras to duration=20.
The log shows that the device receives the command and reports a response.

Object-oriented Programming
Calling device client APIs to communicate with the platform is flexible but requires you to properly configure each API.
The SDK provides a simpler method, object-oriented programming. You can use the product model capabilities provided by the SDK to define device services and call the property reading/writing API to access the device services. In this way, the SDK can automatically communicate with the platform to synchronize properties and call commands.
Object-oriented programming simplifies the complexity of device code and enables you to focus only on services rather than the communications with the platform. This method is much easier than calling client APIs and suitable for most scenarios.
The following uses smokeDetector to demonstrate the process of object-oriented programming.
- Define the service class and properties based on the product model. (If there are multiple services, define multiple service classes.)
 1
 2
 3
 4
 5
 6
 7
 8
 9
10
11
12
13
14
public static class SmokeDetectorService extends AbstractService {

        // Define properties based on the product model. Ensure that the device name and type are the same as those in the product model. writeable indicates whether the property can be written, and name indicates the property name.
        @Property(name = "alarm", writeable = true)
        int smokeAlarm = 1;

        @Property(name = "smokeConcentration", writeable = false)
        float concentration = 0.0f;

        @Property(writeable = false)
        int humidity;

        @Property(writeable = false)
        float temperature;
@Property indicates a property. You can use name to specify a property name. If no property name is specified, the field name is used.
You can add writeable to a property to control permissions on it. If the property is read-only, add writeable = false. If writeable is not added, the property can be read and written.
- Define service commands. The SDK automatically calls the service commands when the device receives commands from the platform.
The type of input parameters and return values for APIs cannot be changed. Otherwise, a runtime error occurs.
The following code defines a ring alarm command named ringAlarm. The delivered parameter is duration, which indicates the duration of the ringing alarm.
1
2
3
4
5
6
7
// Define the command. The type of input parameters and return values for APIs cannot be changed. Otherwise, a runtime error occurs.
        @DeviceCommand(name = "ringAlarm")
        public CommandRsp alarm(Map<String, Object> paras) {
            int duration = (int) paras.get("duration");
            log.info("ringAlarm  duration = " + duration);
            return new CommandRsp(0);
        }
- Define the getter and setter methods.
- The device automatically calls the getter method after receiving the commands for querying and reporting properties from the platform. The getter method reads device properties from the sensor in real time or from the local cache.
- The device automatically calls the setter method after receiving the commands for setting properties from the platform. The setter method updates the local values of the device. If a property is not writable, leave the setter method not implemented.
 1
 2
 3
 4
 5
 6
 7
 8
 9
10
11
12
13
14
15
16
17
18
19
20
21
22
23
24
25
26
27
28
29
30
31
32
33
34
35
36
37
38
39
40
41
42
43
44
45
// Ensure that the names of the setter and getter methods comply with the JavaBean specifications so that the APIs can be automatically called by the SDK.
        public int getHumidity() {

            // Simulate the action of reading data from the sensor.
            humidity = new Random().nextInt(100);
            return humidity;
        }

        public void setHumidity(int humidity) {
            // You do not need to implement this method for read-only fields.
        }

        public float getTemperature() {

            // Simulate the action of reading data from the sensor.
            temperature = new Random().nextInt(100);
            return temperature;
        }

        public void setTemperature(float temperature) {
            // You do not need to implement this method for read-only fields.
        }

        public float getConcentration() {

            // Simulate the action of reading data from the sensor.
            concentration = new Random().nextFloat()*100.0f;
            return concentration;
        }

        public void setConcentration(float concentration) {
            // You do not need to implement this method for read-only fields.
        }

        public int getSmokeAlarm() {
            return smokeAlarm;
        }

        public void setSmokeAlarm(int smokeAlarm) {

            this.smokeAlarm = smokeAlarm;
            if (smokeAlarm == 0){
                log.info("alarm is cleared by app");
            }
        }
- Create a service instance in the main function and add the service instance to the device.
 1
 2
 3
 4
 5
 6
 7
 8
 9
10
      // Create a device.
        IoTDevice device = new IoTDevice(serverUri, deviceId, secret);

        // Create a device service.
        SmokeDetectorService smokeDetectorService = new SmokeDetectorService();
        device.addService("smokeDetector", smokeDetectorService);

        if (device.init() != 0) {
            return;
        }
- Enable periodic property reporting.
1
2
// Enable periodic property reporting.
smokeDetectorService.enableAutoReport(10000);
If you do not want to report properties periodically, you can call firePropertiesChanged to manually report them.
Run the SmokeDetector class to view the logs about property reporting.

View the device shadow on the platform.
Figure 8 Device shadow - Viewing property (Alarm)
Modify the alarm property on the platform and view the device logs about property modification.

Deliver the ringAlarm command on the platform.
View the logs about calling the ringAlarm command and reporting a response.

Using the Code Generator
The SDK provides a code generator, which allows you to automatically generate a device code framework only using a product model. The code generator parses the product model, generates a service class for each service defined in the model, and generates a device main class based on the service classes. In addition, the code generator creates a device and registers a service instance in the main function.
To use the code generator to generate device code, proceed as follows:
- Download the huaweicloud-iot-device-sdk-java project, decompress it, go to the huaweicloud-iot-device-sdk-java directory, and run the mvn install command.
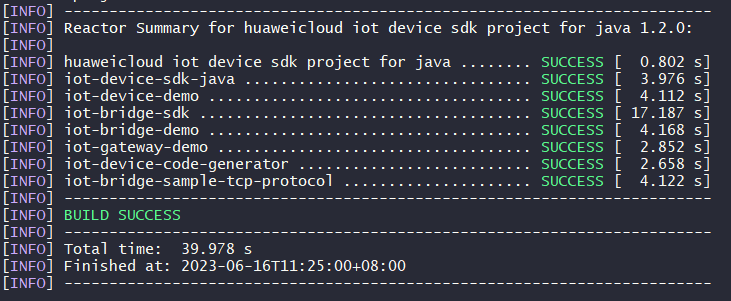
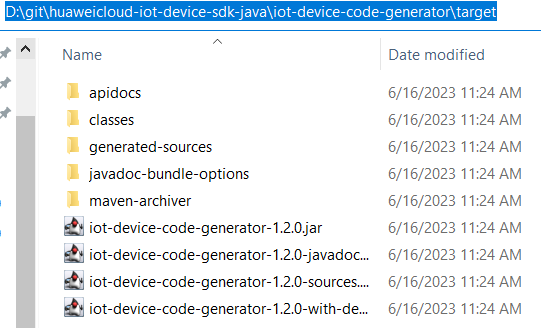
- Check whether an executable JAR package is generated in the target folder of iot-device-code-generator.
- Save the product model to a local directory. For example, save the smokeDetector.zip file to disk D.
- Access the SDK root directory and run the java -jar .\iot-device-code-generator\target\iot-device-code-generator-1.2.0-with-deps.jar D:\smokeDetector.zip command.

- Check whether the generated-demo package is generated in the huaweicloud-iot-device-sdk-java directory.
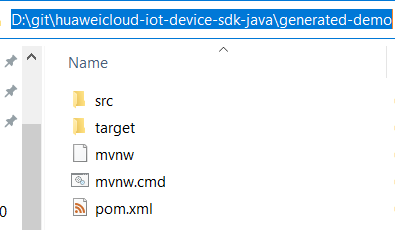
The device code is generated.
To compile the generated code, proceed as follows:
- Go to the huaweicloud-iot-device-sdk-java\generated-demo directory, and run the mvn install command to generate a JAR package in the target folder.

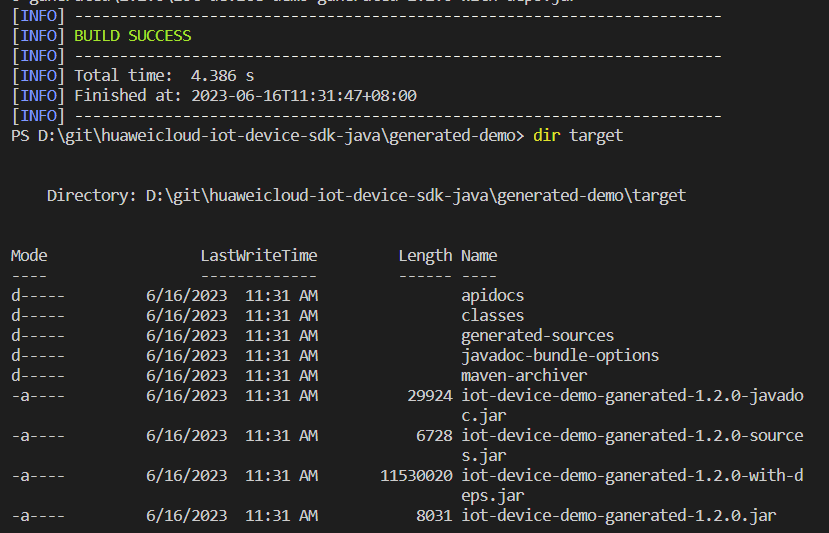
- Run the java -jar .\target\iot-device-demo-ganerated-1.2.0-with-deps.jar ssl://Domain name:8883 device_id secret command. The three parameters are the device access address, device ID, and password, respectively. Run the generated demo.
D:\git\huaweicloud-iot-device-sdk-java\generated-demo> java -jar .\target\iot-device-demo-ganerated-1.2.0-with-deps.jar ssl://Domain name:8883 5e06bfee334dd4f33759f5b3_demo secret
2024-04-17 15:50:53  INFO AbstractService:73 - create device, the deviceId is 5e06bfee334dd4f33759f5b3_demo
2024-04-17 15:50:54 INFO MqttConnection:204 - try to connect to ssl://Domain name: 8883
2024-04-17 15:50:55 INFO MqttConnection:228 - connect success, the uri is ssl://Domain name: 8883
2024-04-17 15:50:55  INFO MqttConnection:268 - publish message topic is $oc/devices/5e06bfee334dd4f33759f5b3_demo/sys/events/up, msg =  {"object_device_id":"5e06bfee334dd4f33759f5b3_demo","services":[{"paras":{"type":"DEVICE_STATUS","content":"connect success","timestamp":"1713340255148"},"service_id":"$log","event_type":"log_report","event_time":"20240417T075055Z","event_id":null}]}
2024-04-17 15:50:55 INFO MqttConnection:111 - Mqtt client connected. address is ssl://Domain name: 8883
2024-04-17 15:50:55  INFO MqttConnection:268 - publish message topic is $oc/devices/5e06bfee334dd4f33759f5b3_demo/sys/events/up, msg =  {"object_device_id":"5e06bfee334dd4f33759f5b3_demo","services":[{"paras":{"device_sdk_version":"JAVA_v1.2.0","fw_version":null,"sw_version":null},"service_id":"$sdk_info","event_type":"sdk_info_report","event_time":"20240417T075055Z","event_id":null}]}
2024-04-17 15:50:55 INFO MqttConnection:268 - publish message topic is $oc/devices/ 5e06bfee334dd4f33759f5b3_demo /sys/events/up, msg = {"object_device_id": "5e06bfee334dd4f33759f5b3_demo ","services": [{"paras":{"type":"DEVICE_STATUS","content":"connect complete, the url is ssl://Domain name :8883","timestamp":"1713340255496"},"service_id":"$log","event_type":"log_report","event_time":"20240417T075055Z","event_id":null}]}
2024-04-17 15:51:03  INFO smokeDetectorService:78 - report property alarm value =  50
2024-04-17 15:51:03  INFO smokeDetectorService:104 - report property temperature value =  0.3648571367849047
2024-04-17 15:51:03  INFO smokeDetectorService:91 - report property smokeConcentration value =  0.679772877336927
2024-04-17 15:51:03  INFO smokeDetectorService:117 - report property humidity value =  15
2024-04-17 15:51:03  INFO MqttConnection:268 - publish message topic is $oc/devices/5e06bfee334dd4f33759f5b3_demo/sys/properties/report, msg =  {"services":[{"properties":{"alarm":50,"temperature":0.3648571367849047,"smokeConcentration":0.679772877336927,"humidity":15},"service_id":"smokeDetector","event_time":"20240417T075103Z"}]}
To modify the extended code, proceed as follows:
Service definition and registration have already been completed through the generated code. You only need to make small changes to the code.
- Command API: Add specific implementation logic.
- getter method: Change the value return mode of the generated code from returning a random value to reading from the sensor.
- setter method: Add specific processing logic, such as delivering instructions to the sensor, because the generated code only modifies and saves the properties.
Developing a Gateway
Gateways are special devices that provide child device management and message forwarding in addition to the functions of common devices. The SDK provides the AbstractGateway class to simplify gateway implementation. This class can collect and save child device information (with a data persistence API), forward message responses (with a message forwarding API), and report child device list, properties, statuses, and messages.
- AbstractGateway Class
Inherit this class to provide APIs for persistently storing device information and forwarding messages to child devices in the constructor.
1
2
3
4
5
6
7
    public abstract void onSubdevCommand(String requestId, Command command);

    public abstract void onSubdevPropertiesSet(String requestId, PropsSet propsSet);

    public abstract void onSubdevPropertiesGet(String requestId, PropsGet propsGet);

    public abstract void onSubdevMessage(DeviceMessage message);
- iot-gateway-demo Code
The iot-gateway-demo project implements a simple gateway with AbstractGateway to connect TCP devices. The key classes include:
SimpleGateway: inherited from AbstractGateway to manage child devices and forward messages to child devices.
StringTcpServer: implements a TCP server based on Netty. In this example, child devices support the TCP protocol, and the first message is used for authentication.
SubDevicesFilePersistence: persistently stores child device information in a JSON file and caches the file in the memory.
Session: stores the mapping between device IDs and TCP channels.
- SimpleGateway Class
Adding or Deleting a Child Device
Adding a child device: onAddSubDevices of AbstractGateway can store child device information. Additional processing is not required, and onAddSubDevices does not need to be overridden for SimpleGateway.
Deleting a child device: You need to modify persistently stored information of the child device and disconnect the device from the platform. Therefore, onDeleteSubDevices is overridden to add the link release logic, and onDeleteSubDevices in the parent class is called.
 1
 2
 3
 4
 5
 6
 7
 8
 9
10
11
12
13
14
15
16
17
18
 @Override
    public int onDeleteSubDevices(SubDevicesInfo subDevicesInfo) {

        for (DeviceInfo subdevice : subDevicesInfo.getDevices()) {
            Session session = nodeIdToSesseionMap.get(subdevice.getNodeId());
            if (session != null) {
                if (session.getChannel() != null) {
                    session.getChannel().close();
                    channelIdToSessionMap.remove(session.getChannel().id().asLongText());
                    nodeIdToSesseionMap.remove(session.getNodeId());
                }
            }
        }
        return super.onDeleteSubDevices(subDevicesInfo);

    }
- Processing Messages to Child Devices
The gateway needs to forward messages received from the platform to child devices. The messages from the platform include device messages, property reading/writing, and commands.
- Device messages: Obtain the nodeId based on the deviceId, and then obtain the session of the device to get a channel for sending messages. You can choose whether to convert messages during forwarding.
 1
 2
 3
 4
 5
 6
 7
 8
 9
10
11
12
13
14
15
16
17
18
19
20
21
22
23
24
25
 @Override
    public void onSubdevMessage(DeviceMessage message) {

        // Each platform API carries a deviceId, which consists of a nodeId and productId.
        //deviceId = productId_nodeId
        String nodeId = IotUtil.getNodeIdFromDeviceId(message.getDeviceId());
        if (nodeId == null) {
            return;
        }

        // Obtain the session based on the nodeId for a channel.
        Session session = nodeIdToSesseionMap.get(nodeId);
        if (session == null) {
            log.error("subdev is not connected " + nodeId);
            return;
        }
        if (session.getChannel() == null){
            log.error("channel is null " + nodeId);
            return;
        }

        // Directly forward messages to the child device.
        session.getChannel().writeAndFlush(message.getContent());
        log.info("writeAndFlush " + message);
    }
- Property Reading and Writing
Property reading and writing include property setting and query.
Property setting:
 1
 2
 3
 4
 5
 6
 7
 8
 9
10
11
12
13
14
15
16
17
18
19
20
21
22
23
24
25
26
 @Override
    public void onSubdevPropertiesSet(String requestId, PropsSet propsSet) {

        if (propsSet.getDeviceId() == null) {
            return;
        }

        String nodeId = IotUtil.getNodeIdFromDeviceId(propsSet.getDeviceId());
        if (nodeId == null) {
            return;
        }

        Session session = nodeIdToSesseionMap.get(nodeId);
        if (session == null) {
            return;
        }

        // Convert the object into a string and send the string to the child device. Encoding/Decoding may be required in actual situations.
        session.getChannel().writeAndFlush(JsonUtil.convertObject2String(propsSet));

        // Directly send a response. A more reasonable method is to send a response after the child device processes the request.
        getClient().respondPropsSet(requestId, IotResult.SUCCESS);

        log.info("writeAndFlush " + propsSet);

    }
Property query:1 2 3 4 5 6 7
@Override public void onSubdevPropertiesGet(String requestId, PropsGet propsGet) { // Send a failure response. It is not recommended that the platform directly reads the properties of the child device. log.error("not supporte onSubdevPropertiesGet"); deviceClient.respondPropsSet(requestId, IotResult.FAIL); }
- Commands: The procedure is similar to that of message processing. Different types of encoding/decoding may be required in actual situations.
1 2 3 4 5 6 7 8 9 10 11 12 13 14 15 16 17 18 19 20 21 22 23 24
@Override
    public void onSubdevCommand(String requestId, Command command) {

        if (command.getDeviceId() == null) {
            return;
        }

        String nodeId = IotUtil.getNodeIdFromDeviceId(command.getDeviceId());
        if (nodeId == null) {
            return;
        }

        Session session = nodeIdToSesseionMap.get(nodeId);
        if (session == null) {
            return;
        }

        // Convert the command object into a string and send the string to the child device. Encoding/Decoding may be required in actual situations.
        session.getChannel().writeAndFlush(JsonUtil.convertObject2String(command));

        // Directly send a response. A more reasonable method is to send a response after the child device processes the request.
        getClient().respondCommand(requestId, new CommandRsp(0));
        log.info("writeAndFlush " + command);
    }
- Device messages: Obtain the nodeId based on the deviceId, and then obtain the session of the device to get a channel for sending messages. You can choose whether to convert messages during forwarding.
- Upstream Message Processing
Upstream message processing is implemented by channelRead0 of StringTcpServer. If no session exists, create a session.
If the child device information does not exist, the session cannot be created and the connection is rejected.
 1
 2
 3
 4
 5
 6
 7
 8
 9
10
11
12
13
14
15
16
17
18
 @Override
        protected void channelRead0(ChannelHandlerContext ctx, String s) throws Exception {
            Channel incoming = ctx.channel();
            log.info("channelRead0" + incoming.remoteAddress() + " msg :" + s);

            // Create a session for the first message.
// Create a session for the first message.
            Session session = simpleGateway.getSessionByChannel(incoming.id().asLongText());
            if (session == null) {
                String nodeId = s;
                session = simpleGateway.createSession(nodeId, incoming);

                // The session fails to create and the connection is rejected.
                if (session == null) {
                    log.info("close channel");
                    ctx.close();
                }
            }
If the session exists, the message is forwarded.
1
2
3
4
5
6
7
else {
                // Call reportSubDeviceProperties to report properties of the child device.
                DeviceMessage deviceMessage = new DeviceMessage(s);
                deviceMessage.setDeviceId(session.getDeviceId());
                simpleGateway.reportSubDeviceMessage(deviceMessage, null);

            }
For details about the gateway, view the source code. The demo is open-source and can be extended as required. For example, you can modify the persistence mode, add message format conversion during forwarding, and support other device access protocols.
- Using iot-gateway-demo
- Create a product for the child device. For details, see Creating a Product.
- Define a model in the created product and add a service whose ID is parameter. Add alarm and temperature properties, as shown in the following figure.
Figure 9 Model definition - Child device product

- Modify the main function of StringTcpServer by replacing the constructor parameters, and run this class.
1
2
3
 simpleGateway = new SimpleGateway(new SubDevicesFilePersistence(),
                "ssl://iot-acc.cn-north-4.myhuaweicloud.com:8883",
                "5e06bfee334dd4f33759f5b3_demo", "mysecret");
- After the gateway is displayed as Online on the platform, add a child device.
Figure 10 Device - Adding a child device

Table 1 Child device parameters Parameter
Description
Product
Product to which the child device belongs. Select the product created in 1.
Device Name
Customize a device name, for example, subdev_name.
Node ID
Enter subdev.
Device ID
This parameter is optional and is automatically generated.
A log similar to the following is displayed on the gateway:
2024-04-16 21:00:01 INFO SubDevicesFilePersistence:112 - add subdev, the nodeId is subdev
- Run the TcpDevice class. After the connection is set up, enter the node ID of the child device registered in step 3, for example, subdev.
Figure 11 Child device connection

A log similar to the following is displayed on the gateway:
2024-04-16 21:00:54 INFO StringTcpServer:196 - initChannel: /127.0.0.1:21889 2024-04-16 21:01:00 INFO StringTcpServer:137 - channelRead0 is /127.0.0.1:21889, the msg is subdev 2024-04-16 21:01:00 INFO SimpleGateway:100 - create new session ok, the session is Session{nodeId='subdev', channel=[id: 0xf9b89f78, L:/127.0.0.1:8080 - R:/127.0.0.1:21889], deviceId='subdev_deviceId'} - Check whether the child device is online on the platform.
Figure 12 Device list - Device online status

- Enable the child device to report messages.
Figure 13 Enable the child device to report messages.

Logs similar to the following show that the message is reported.
2024-04-16 21:02:36 INFO StringTcpServer:137 - channelRead0 is /127.0.0.1:21889, the msg is hello 2024-04-16 21:02:36 INFO MqttConnection:299 - publish message topic is $oc/devices/5e06bfee334dd4f33759f5b3_demo/sys/messages/up, msg = {"name":null,"id":null,"content":"hello","object_device_id":"subdev_deviceId"] 2024-04-16 21:02:36 INFO MqttConnection:299 - publish message topic is $oc/devices/5e06bfee334dd4f33759f5b3_demo/sys/gateway/sub_devices/properties/report, msg = {"devices":[{"services":[{"properties":{"temprature":2,"alarm":1},"service_id":"parameter","event_time":null}],"device_id":"subdev_deviceId"}]] - View the messages traced.
Click Message Trace on the gateway details page. Send data from the child device to the platform, and view the messages after a while.
Figure 14 Message tracing - Directly connected device
Feedback
Was this page helpful?
Provide feedbackThank you very much for your feedback. We will continue working to improve the documentation.See the reply and handling status in My Cloud VOC.
For any further questions, feel free to contact us through the chatbot.
Chatbot


