Forwarding Data to FunctionGraph
Scenarios
FunctionGraph processes the real-time stream data reported by devices to IoTDA. With FunctionGraph, you only need to upload your code and set running conditions to track device properties, message reporting, and status changes as well as analyze, sort out, and measure data flows.
In this example, all properties reported by devices are forwarded to FunctionGraph. The properties are pushed to different paths on your HTTP server based on the resource space ID. You need to deploy an HTTP server. In this example, the data forwarding capability of IoTDA triggers the event function. No additional trigger is required.
Building a Function Project
You can download and use the source code (including function dependencies) for converting the format of reported device properties and forwarding the data to a third-party application.
Creating a project
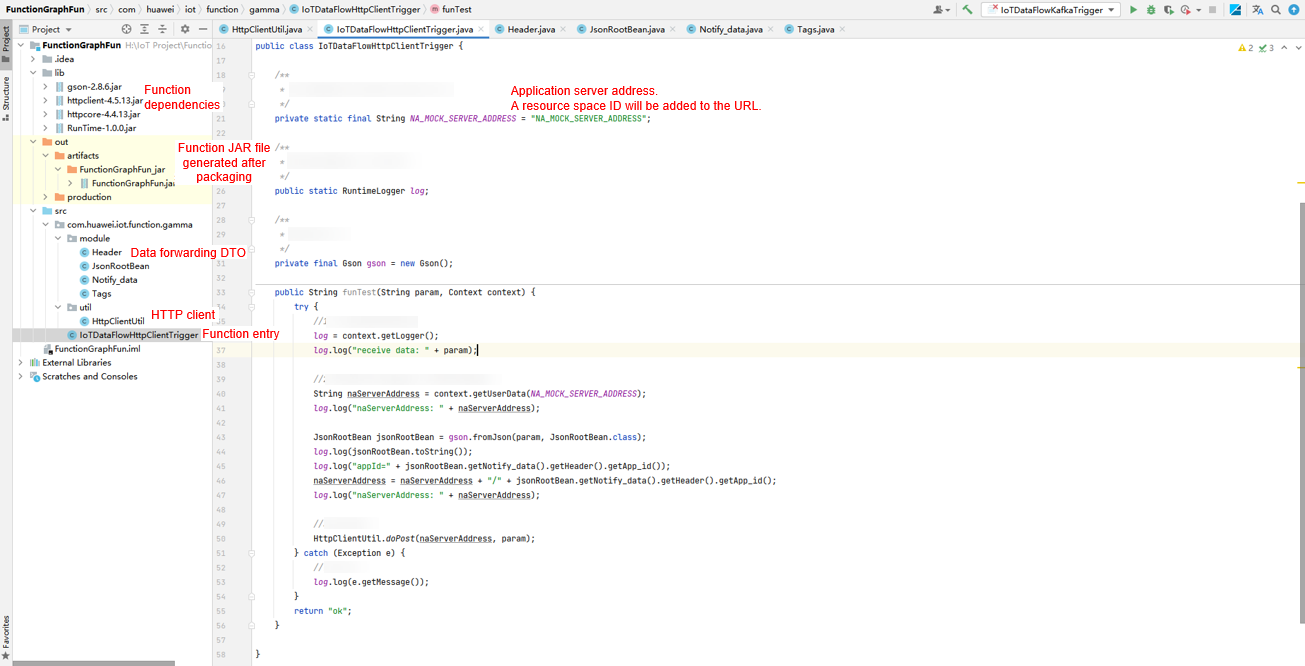
This example uses the Java language to implement device connection, data stream conversion, and data push. For details about function development, see Developing Functions in Java.
Download the sample source code, decompress it, and import it to IDEA. For details about the code, see Sample code. Transfer your server address through the function environment variable NA_MOCK_SERVER_ADDRESS.
Packaging the project
Package the project into a JAR file using Build Artifacts of IDEA. The following figure shows the IDEA configuration and packaging.


Uploading the Function to FunctionGraph
Create a function on the FunctionGraph console.
- Log in to the FunctionGraph console, and choose in the navigation pane.
- Click Create Function.
- Configure the function information, as shown in the following figure.
Click Create from scratch.
Enter IoTDA_FUNCTION_HTTPCLIENT_DEMO in Function Name.
Select Java 8 for Runtime.
Figure 4 Creating a function
- Click Create Function. After the function is created, the function details page is displayed.
- Click the Code tab and click Upload > Local JAR to upload the code package FunctionGraphFun.jar.
Figure 5 Uploading the code

- Modify the function runtime parameters. Click the Configuration tab, choose Basic Settings, and set Handler to com.huawei.iot.function.gamma.IoTDataFlowHttpClientTrigger.funTest. Click Save to save the configuration.
Figure 6 Setting the handler
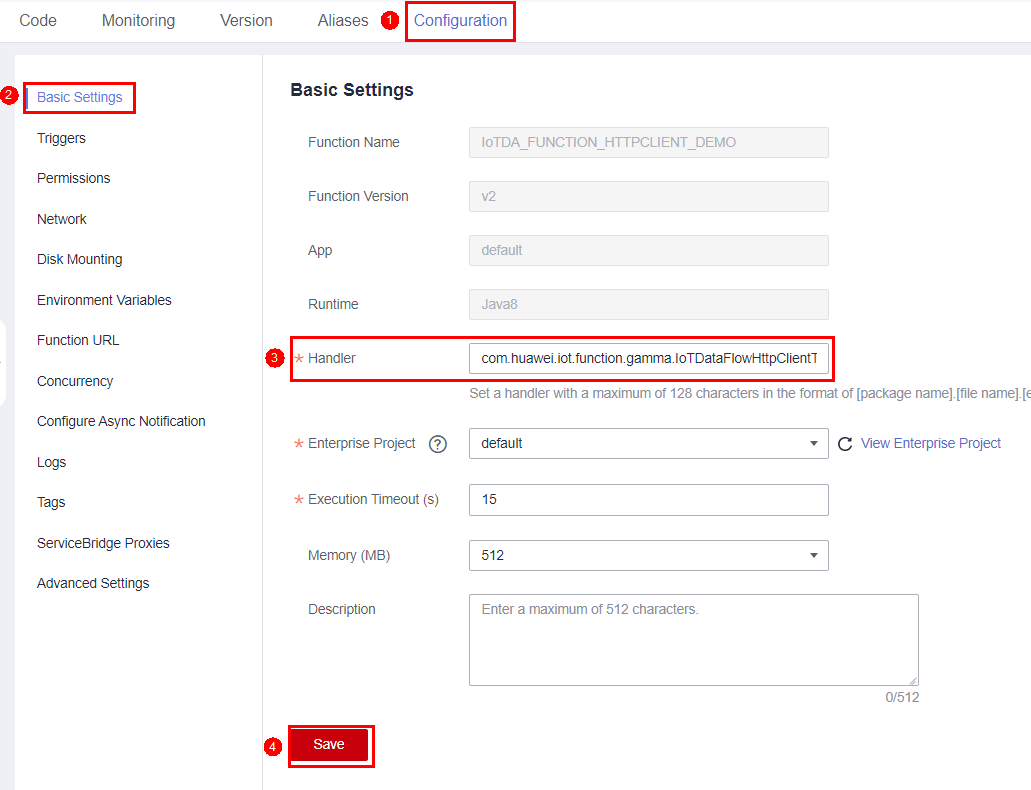

The default function memory size is 512 MB, and the default timeout interval is 15s. This example is only for demonstration. For commercial use, optimize the function parameters based on the site requirements.
- Modify the environment variables transferred during function calling. Set the environment variable NA_MOCK_SERVER_ADDRESS to the target HTTP server address. Note that the server address in the example is not a real one. Replace it with your actual HTTP server address. Click Save to save the configuration.
Figure 7 Configuring environment variables for function calling

Adding an Event Source
After creating the function, you can add an event source. In this example, an HTTP push test event is configured to simulate device data forwarded by IoTDA. The procedure is as follows:
- On the IoTDA_FUNCTION_HTTPCLIENT_DEMO function page, click the Code tab and select Configure Test Event.
Figure 8 Configuring a test event

- In the Configure Test Event dialog box, enter the test event information.
Select Create new test event.
Event Templates: Select blank-template.
Event Name: Enter event-property.
The following is an example of the test parameters for reporting device properties:
{
    "resource":"device.property",
    "event":"report",
    "event_time":"string",
    "notify_data":{
        "header":{
            "app_id":"********",
            "device_id":"********",
            "node_id":"ABC123456789",
            "product_id":"ABC123456789",
            "gateway_id":"********",
            "tags":[{
                    "tag_key":"testTagName",
                    "tag_value":"testTagValue"
             }]
        },
        "body":{
            "services":[{
                    "service_id":"string",
                    "properties":{
                    },
                    "event_time":"string"
             }]
        }
    }
}
Figure 9 Configuring a test event
- Click Save.
Testing Data
Perform the following steps to process the simulated data:
- On the function details page, select test event event-property, and click Test to test the function.
Figure 10 Configuring a test event

- After the function is executed, view the function execution status in the log on the right of the function details page.
Figure 11 Function execution result

Configuring IoTDA
You can set configure data forwarding rules in IoTDA to forward data reported by devices to FunctionGraph.
- Visit the IoTDA product page and click Try Now.
- In the navigation pane, choose , and click Create Rule in the upper left corner.
- Set the parameters based on the table below. The following parameter values are only examples. You can create a rule by referring to Data Forwarding Overview and click Create Rule.
Parameter
Description
Rule Name
Customize a name, for example, iotda-functiongraph.
Description
Enter a rule description, for example, forwarding data to FunctionGraph.
Data Source
Select Device property.
Trigger
Device property reported is automatically populated.
Resource Spaces
Select All resource spaces.
Figure 12 Rules triggered by property reporting - Forwarding data to FunctionGraph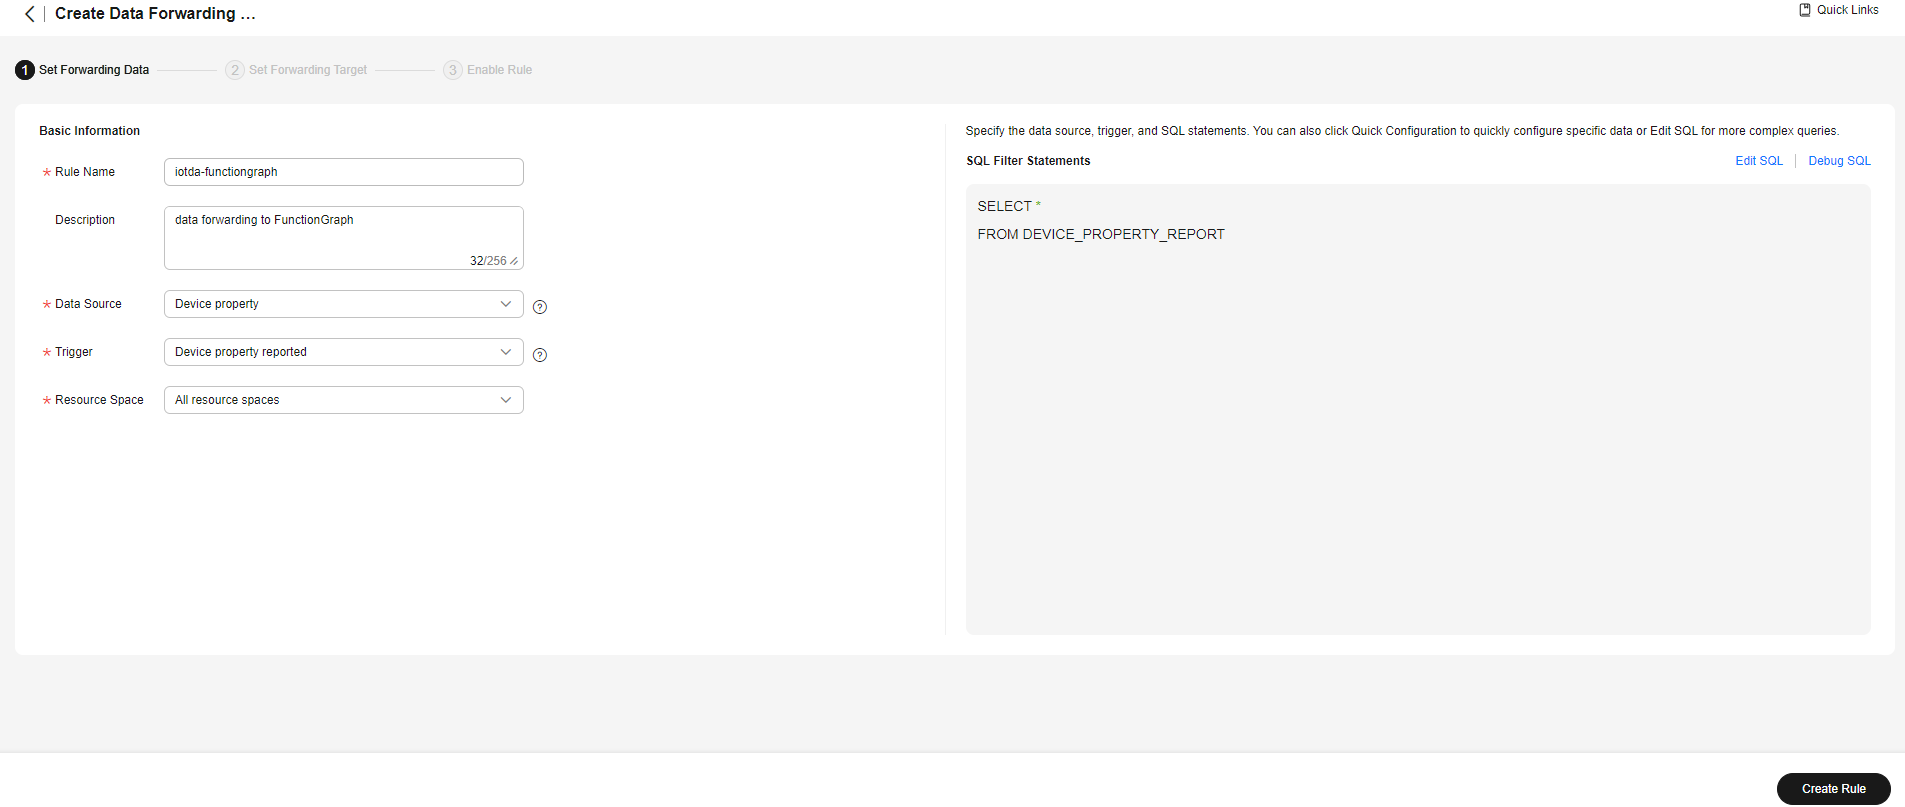
- Click the Set Forwarding Target tab, click Add to set a forwarding target, and click OK.
Parameter
Description
Forwarding Target
Select FunctionGraph.
Region
Currently, you can only forward data to FunctionGraph in the same region. If IoTDA is not authorized to access the service in this region, configure cloud service access authorization as prompted.
Target Function
Select the function created in FunctionGraph.
Figure 13 Creating a forwarding target - to FunctionGraph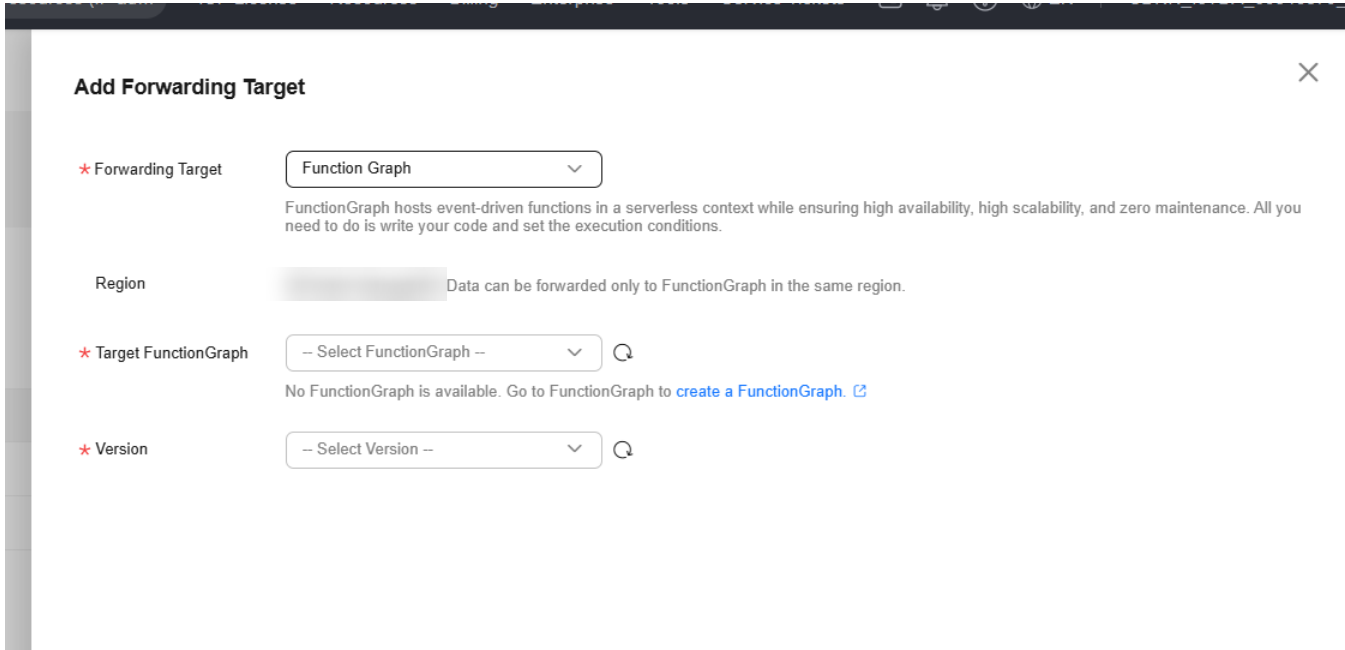
- Click Enable Rule to activate the configured data forwarding rule.
Verifying the Configurations
- You can connect a physical device registered with IoTDA to the platform and report properties defined in the product model.
- You can also use a simulator to simulate device properties reporting. For details, see Developing an MQTT-based Smart Street Light Online.
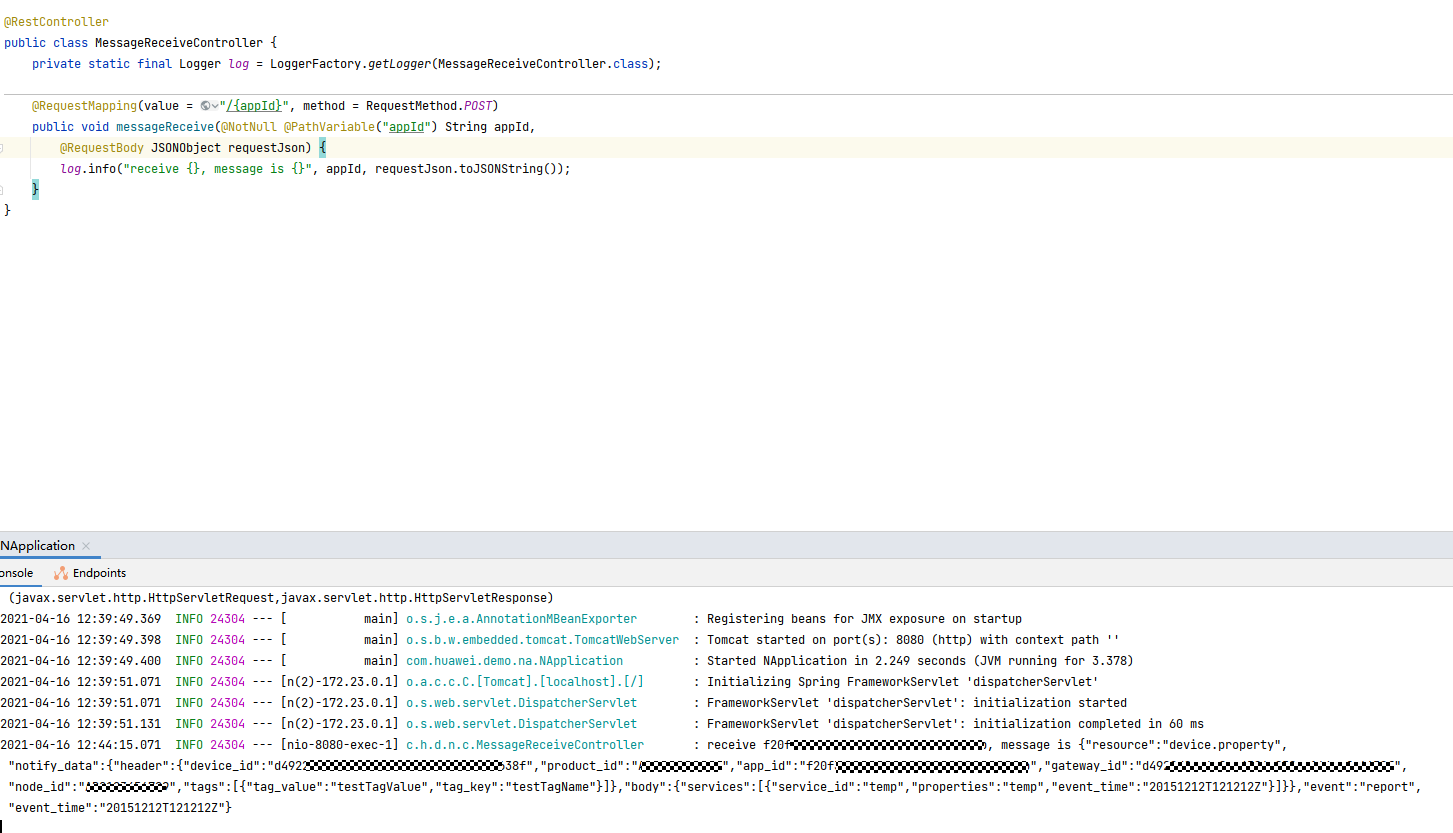
Expected result: The data reported by the device is displayed in the server logs.
Feedback
Was this page helpful?
Provide feedbackThank you very much for your feedback. We will continue working to improve the documentation.See the reply and handling status in My Cloud VOC.
For any further questions, feel free to contact us through the chatbot.
Chatbot


