AMQP Client Access
After configuring and activating rules by calling the platform APIs Creating a Rule Triggering Condition, Creating a Rule Action, and Modifying a Rule Triggering Condition, connect the AMQP client to IoTDA. Then run the AMQP client on your server to receive subscribed-to messages.
Protocol Version
The IoT platform supports only AMQP 1.0.
Connection Establishment and Authentication
- The AMQP client establishes a TCP connection with the platform and performs TLS handshake verification.

For security, the AMQP client must use TLS 1.2 for encryption. Non-encrypted TCP transmission is not supported. The difference between the client time and standard time cannot be greater than 5 minutes. Otherwise, the connection will fail.
- The client requests to set up a connection.
- The client sends a request to the platform to establish a receiver link (a unidirectional channel for the platform to push data to the client). The receiver link must be set up within 15 seconds after the connection is set up on the client. Otherwise, the platform will close the connection. After the receiver link is set up, the client is connected to the platform.

A maximum of 10 receiver links can be created for a connection, and sender links cannot be created. Therefore, the platform can push messages to the client, but the client cannot send messages to the platform.
Connection Configuration
The table below describes the connection address and connection authentication parameters for the AMQP client to connect to the platform.
-
Connection string: amqps://${server.address}:5671?amqp.vhost=default&amqp.idleTimeout=8000&amqp.saslMechanisms=PLAIN
Parameter
Description
server.address
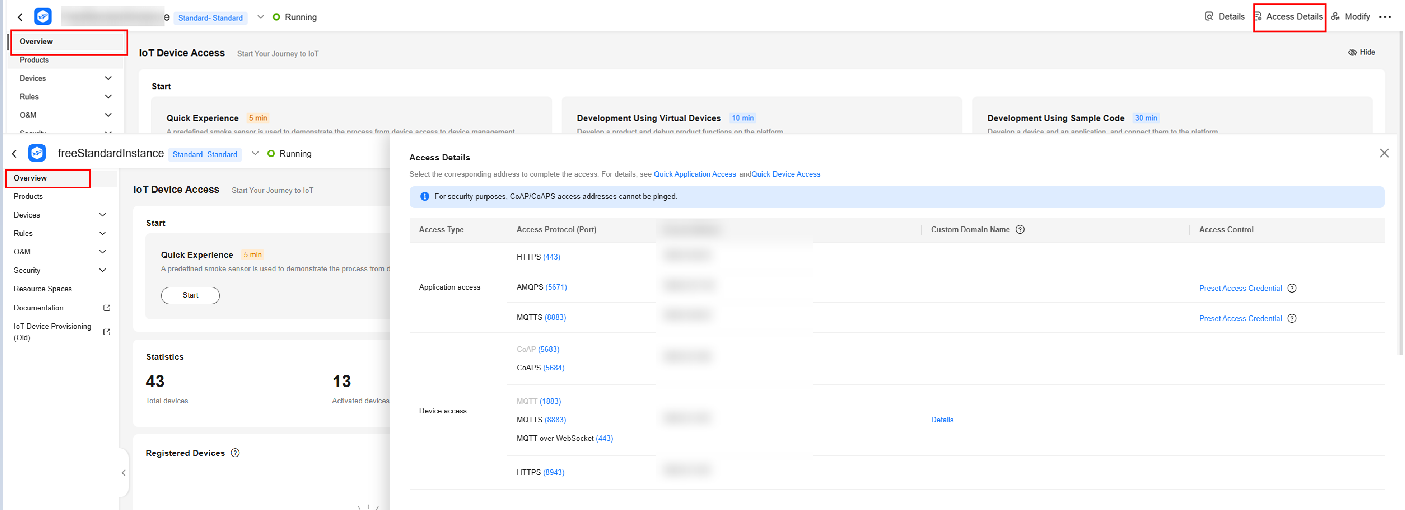
AMQP server access address. Obtaining method: Log in to the console, choose IoTDA Instances, and click the target instance card. In the navigation pane, choose Overview. Click Access Details in the Instance Information area, and check the AMQPS access address.
Figure 1 Obtaining access information
amqp.vhost
Currently, AMQP uses the default host. Only the default host is supported.
amqp.saslMechanisms
Connection authentication mode. Currently, PLAIN-SASL is supported.
amqp.idleTimeout
Heartbeat interval, in milliseconds. If the heartbeat interval expires and no frame is transmitted on the connection, the platform closes the connection.
- Port: 5671
- Client identity authentication parameters
username ="accessKey=${accessKey}|timestamp=${timestamp}|instanceId=${instanceId}"
password = "${accessCode}"
Parameter
Mandatory
Description
accessKey
Yes
An accessKey can be used to establish a maximum of 32 concurrent connections. When establishing a connection for the first time, preset the parameter by following the instructions provided in Obtaining the AMQP Access Credential.
timestamp
Yes
Current time. The value is a 13-digit timestamp, accurate to milliseconds.
The server verifies the client timestamp. There is a 5-minute difference between the client timestamp and server timestamp.
instanceId
No
Instance ID. This parameter is mandatory when multiple instances of the standard edition are purchased in the same region. For details, see Viewing Instance Details.
accessCode
Yes
The value can contain a maximum of 256 characters. When establishing a connection for the first time, preset the parameter by following the instructions provided in Obtaining the AMQP Access Credential. If the accessCode is lost, you can call the API Generating an Access Credential or follow the instructions provided in AMQP Access Credential to reset the accessCode.
AMQP Access Credential
If an application uses AMQP to access the platform for data transfer, preset an access credential. You can call the API Generating an Access Credential or use the console to preset an access credential. The procedure for using the console to generate an access credential is as follows:
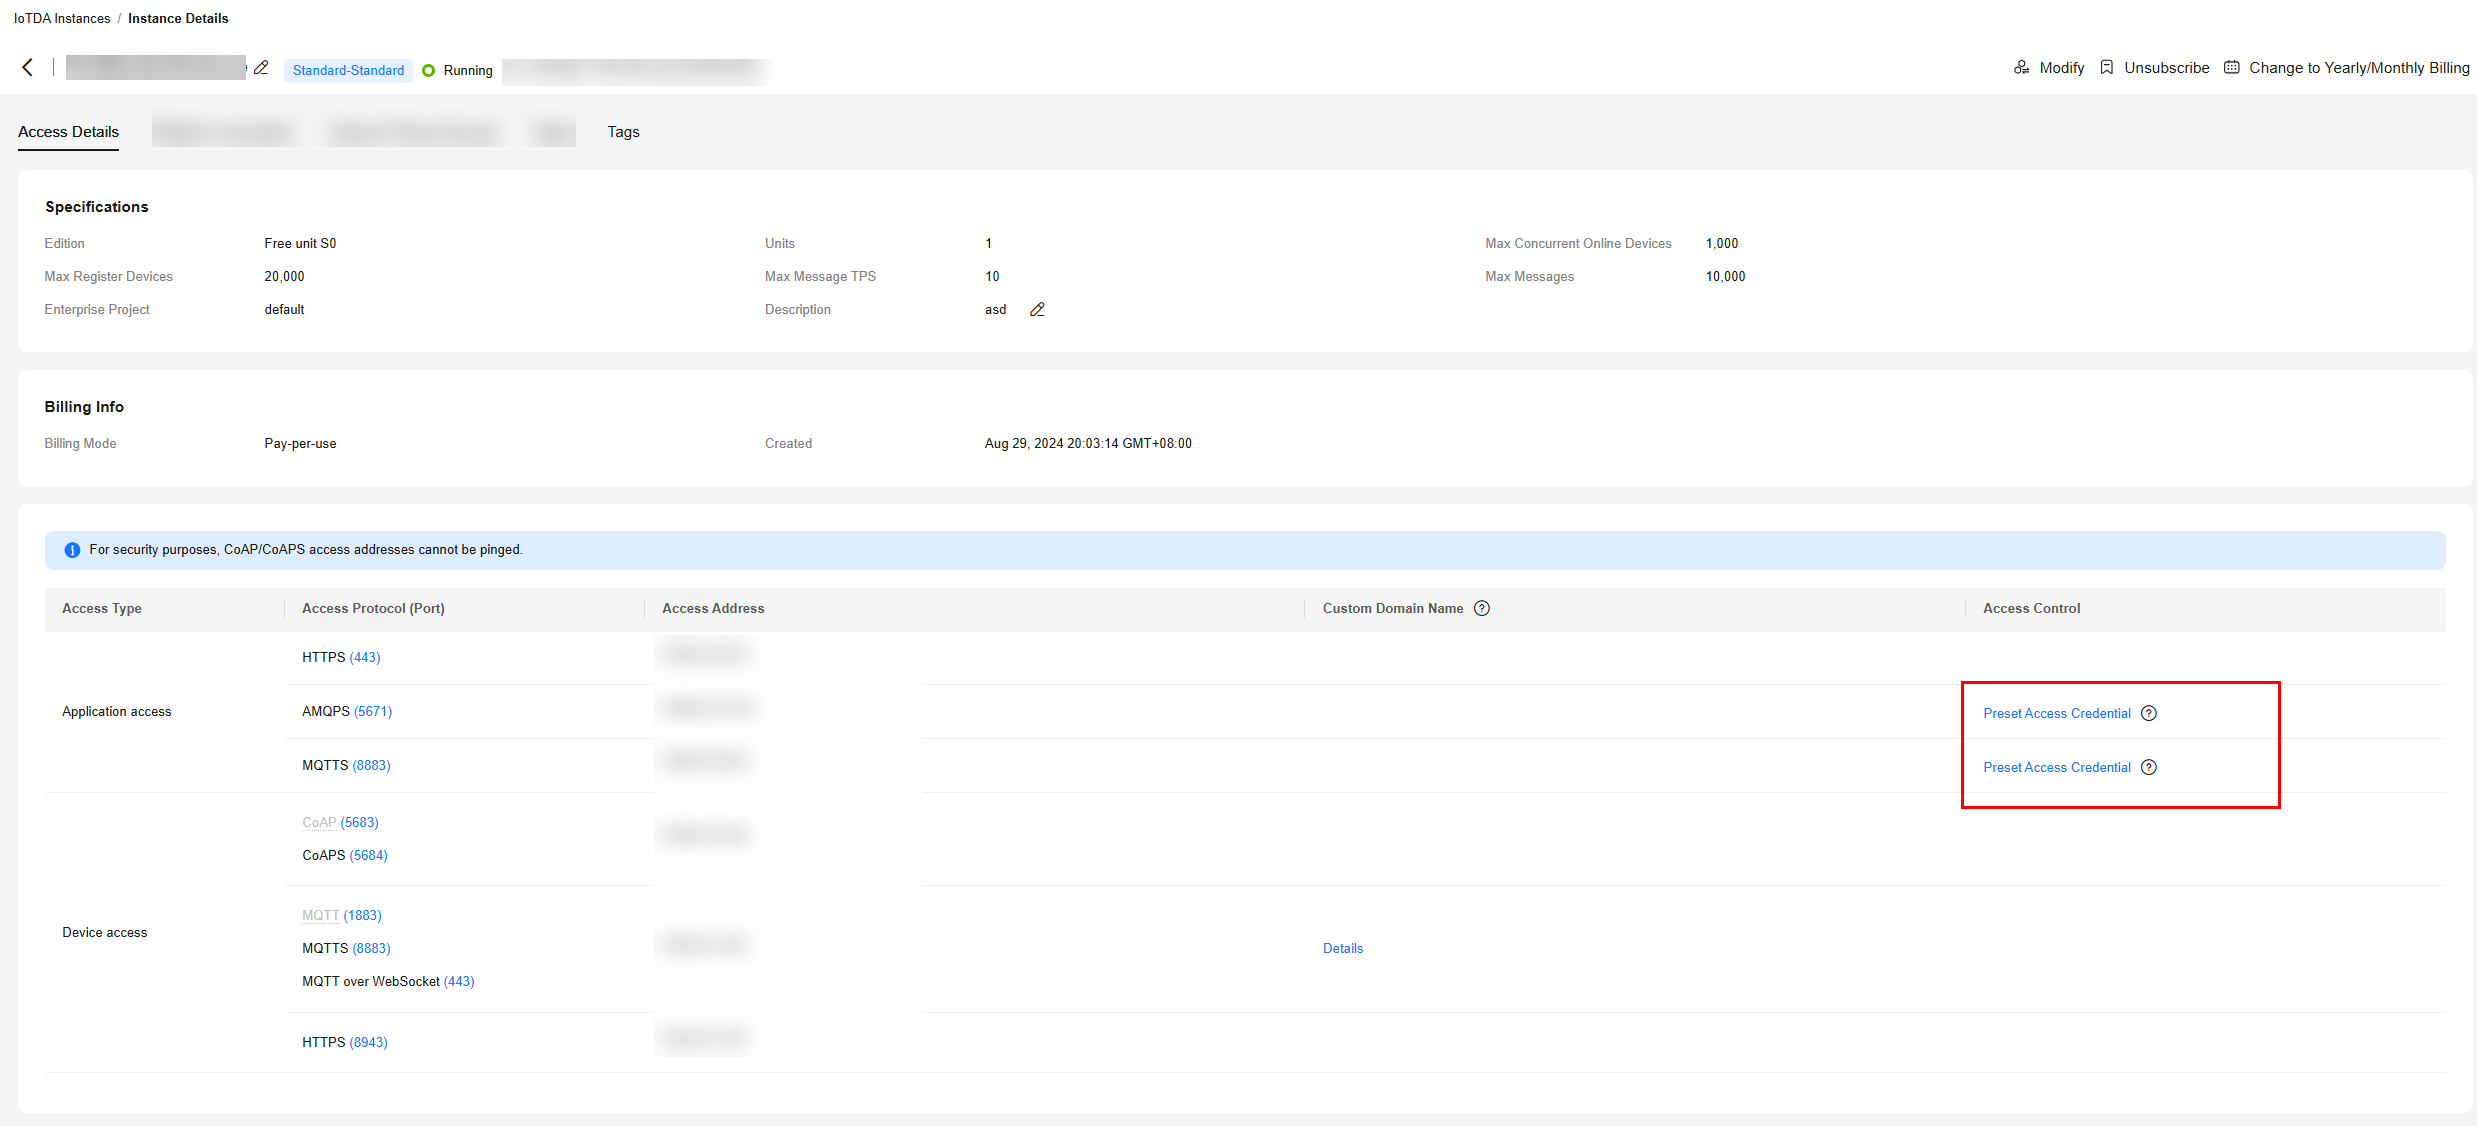
- Choose , select the edition of your instance, and click Details to go to the instance details page.
- Click Preset Access Credential to preset the accessCode and accessKey.
Figure 2 Instance management - Preset access credential


If you already have an access credential, the accessKey cannot be used after you preset the access credential again.
Connection Specifications
|
Key |
Documentation |
|---|---|
|
Maximum number of queues that can be subscribed for a connection |
10 |
|
Maximum number of queues for a user |
100 |
|
Maximum number of connections for a tenant |
32 |
|
Cache duration of a message (days) |
1 |
Message Receiving
After the receiver link between the client and platform is established, the client can proactively pull data or register a listener to enable the platform to push data. The proactive mode is recommended, because the client can pull data based on its own capability.
Feedback
Was this page helpful?
Provide feedbackThank you very much for your feedback. We will continue working to improve the documentation.See the reply and handling status in My Cloud VOC.
For any further questions, feel free to contact us through the chatbot.
Chatbot


