Debugging Using Postman
Overview
Postman is a visual editing tool for building and testing API requests. It provides an easy-to-use UI to send HTTP requests, including GET, PUT, POST, and DELETE requests, and modify parameters in HTTP requests. Postman also returns responses to your requests.
To fully understand APIs, refer to API Reference on the Application Side. The Postman Collection is already available, in which the structure of API call requests are ready for use.
This topic uses Postman as an example to describe how to debug the following APIs when the application simulator connects to the IoT platform using HTTPS:
Prerequisites
- You have installed Postman. If Postman is not installed, install it by following the instructions provided in Installing and Configuring Postman.
- You have downloaded the Collection.
- You have developed a product model and a codec on the console.
Installing and Configuring Postman
- Install Postman.
- Visit the Postman website, and download and install the latest version of Postman (64-bit) for Windows.


- Postman requires the .NET Framework 4.5 component.
- To download the latest version of Postman (32-bit) for Windows, visit Postman.
- Enter the email address, username, and password to register Postman.
- Visit the Postman website, and download and install the latest version of Postman (64-bit) for Windows.
- Import the Postman environment variables.
- Click
 in the upper right corner to open the MANAGE ENVIRONMENTS window.

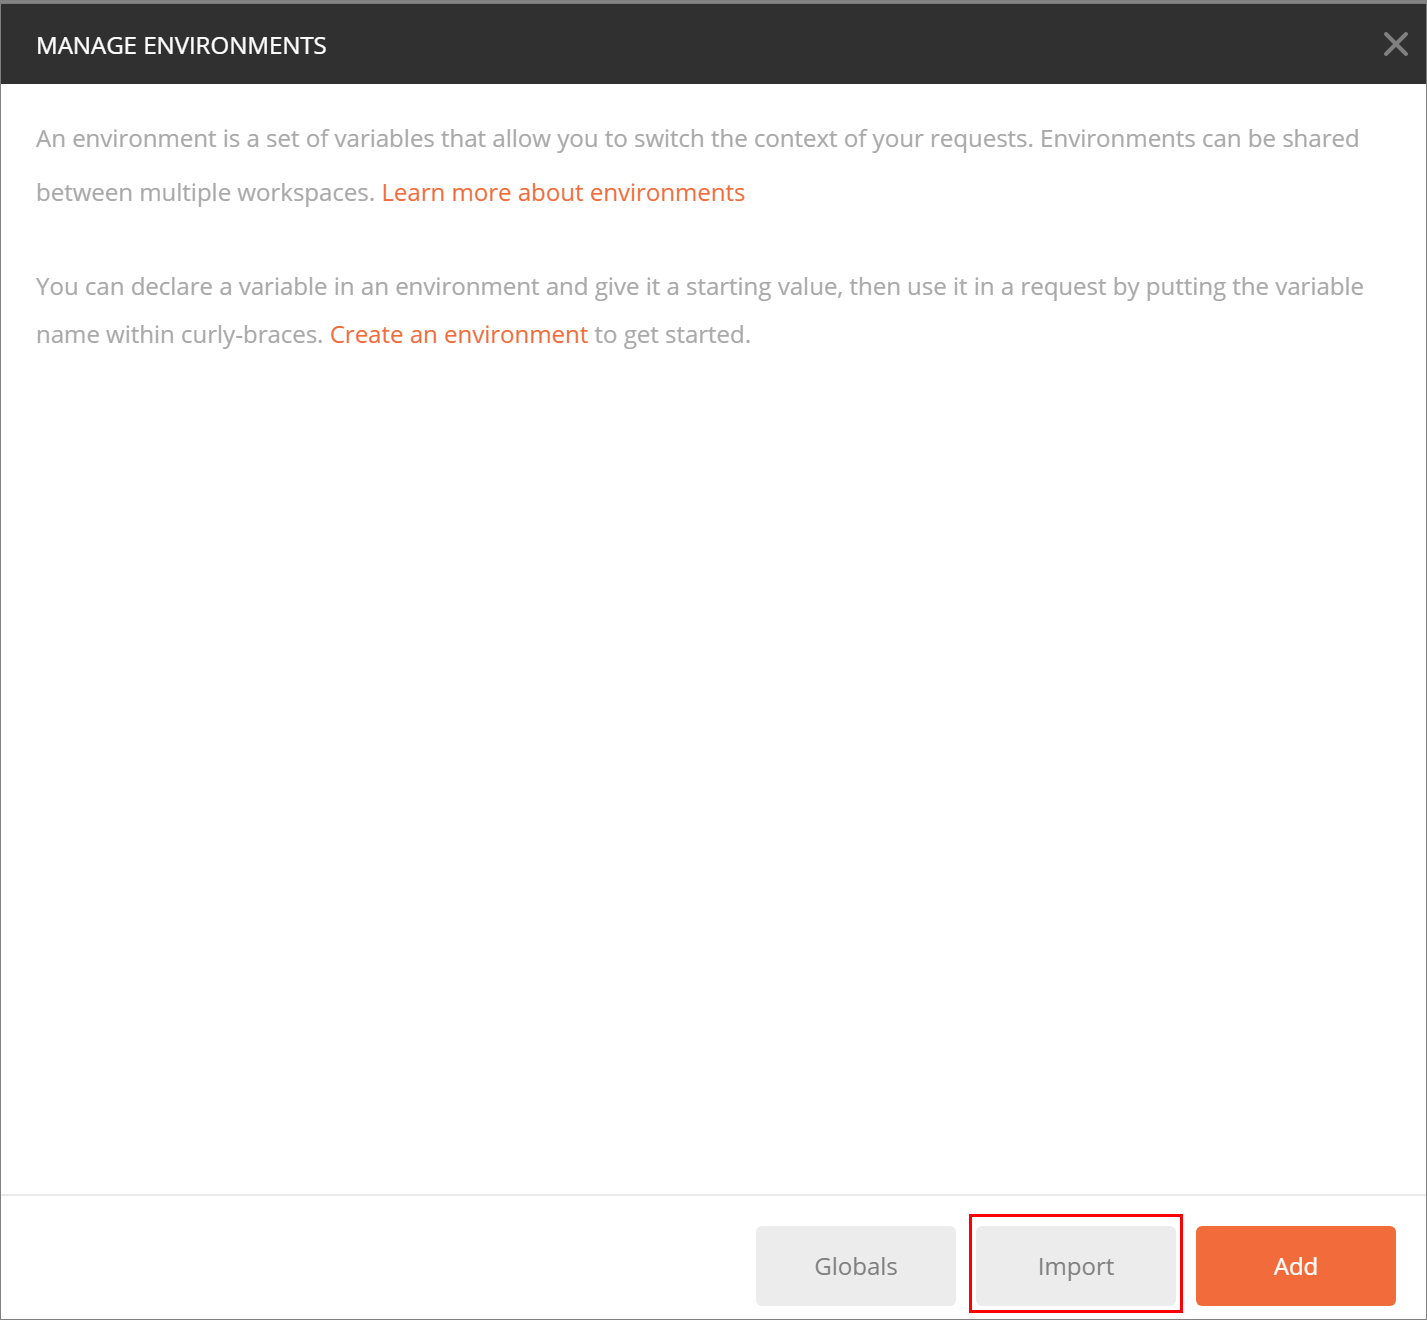
- Click Import. On the page displayed, click Select File to import the IoTDA.postman_environment.json file (obtained after the Collection package is decompressed).
- Click the IoTDA environment imported.

- Configure parameters based on the following table.
Parameter
Description
IAMEndpoint
IAM endpoint. For details, see Regions and Endpoints.
IoTDAEndpoint
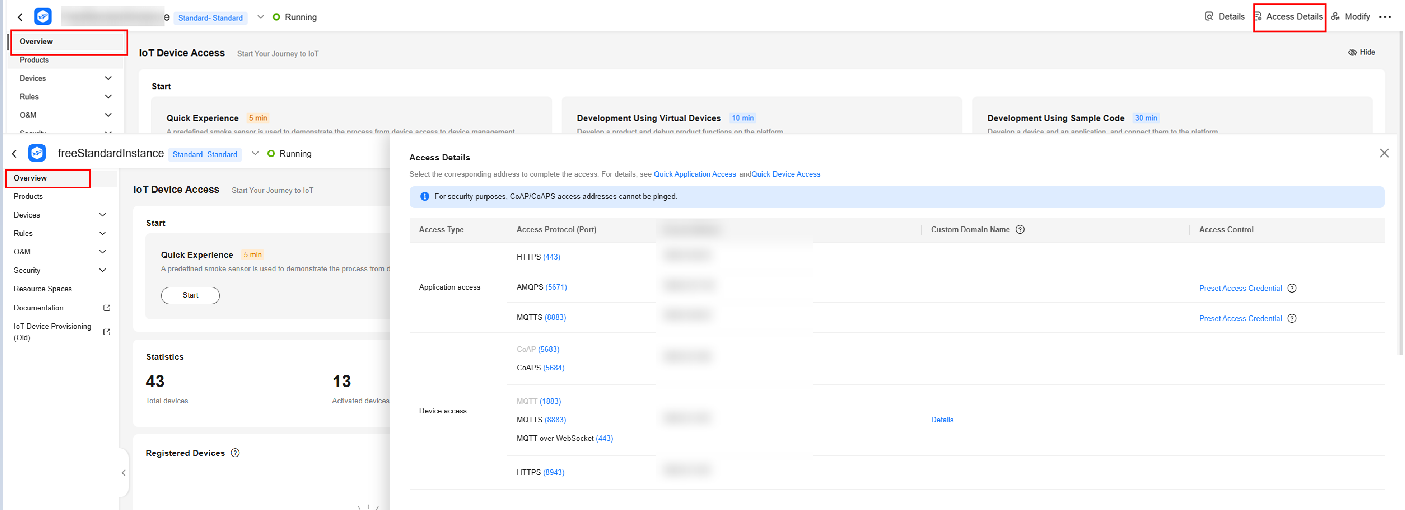
IoTDA endpoint. For details, see 2.e.
IAMUserName
IAM username, which can be obtained from the My Credentials page.
IAMPassword
Password for logging in to Huawei Cloud.
IAMDoaminId
Account name, which can be obtained from the My Credentials page.
region
Region where IoTDA is enabled.
- Obtain IoTDA endpoints.
- Return to the home page and set the environment variable to the imported IoTDA.

- Click
- Click Import in the upper left corner and click Choose Files to import the API call (V5).postman_collection.json file.

After the file is uploaded, the dialog box shown in the following figure is displayed.

Debugging the API Obtaining the Token for an IAM User
Before using platform APIs, an application must call the API Obtaining the Token of an IAM User for authentication. After the authentication is successful, Huawei Cloud returns X-Subject-Token.
To call this API, the application constructs an HTTP request. An example request is as follows:
POST https://iam.cn-north-4.myhuaweicloud.com/v3/auth/tokens
Content-Type: application/json

{
    "auth": {
        "identity": {
            "methods": [
                "password"
            ],
            "password": {
                "user": {
                    "name": "username",
                    "password": "********",
                    "domain": {
                        "name": "domainname"
                    }
                }
            }
        },
        "scope": {
            "project": {
                "name": "xxxxxxxx"
            }
        }
    }
}
Debug the API by following the instructions provided in Obtaining the Token of an IAM User.
- Configure the HTTP method, URL, and headers of the API.

- Configure the body of the API.

- Click Send. The returned code and response are displayed in the lower part of the page.
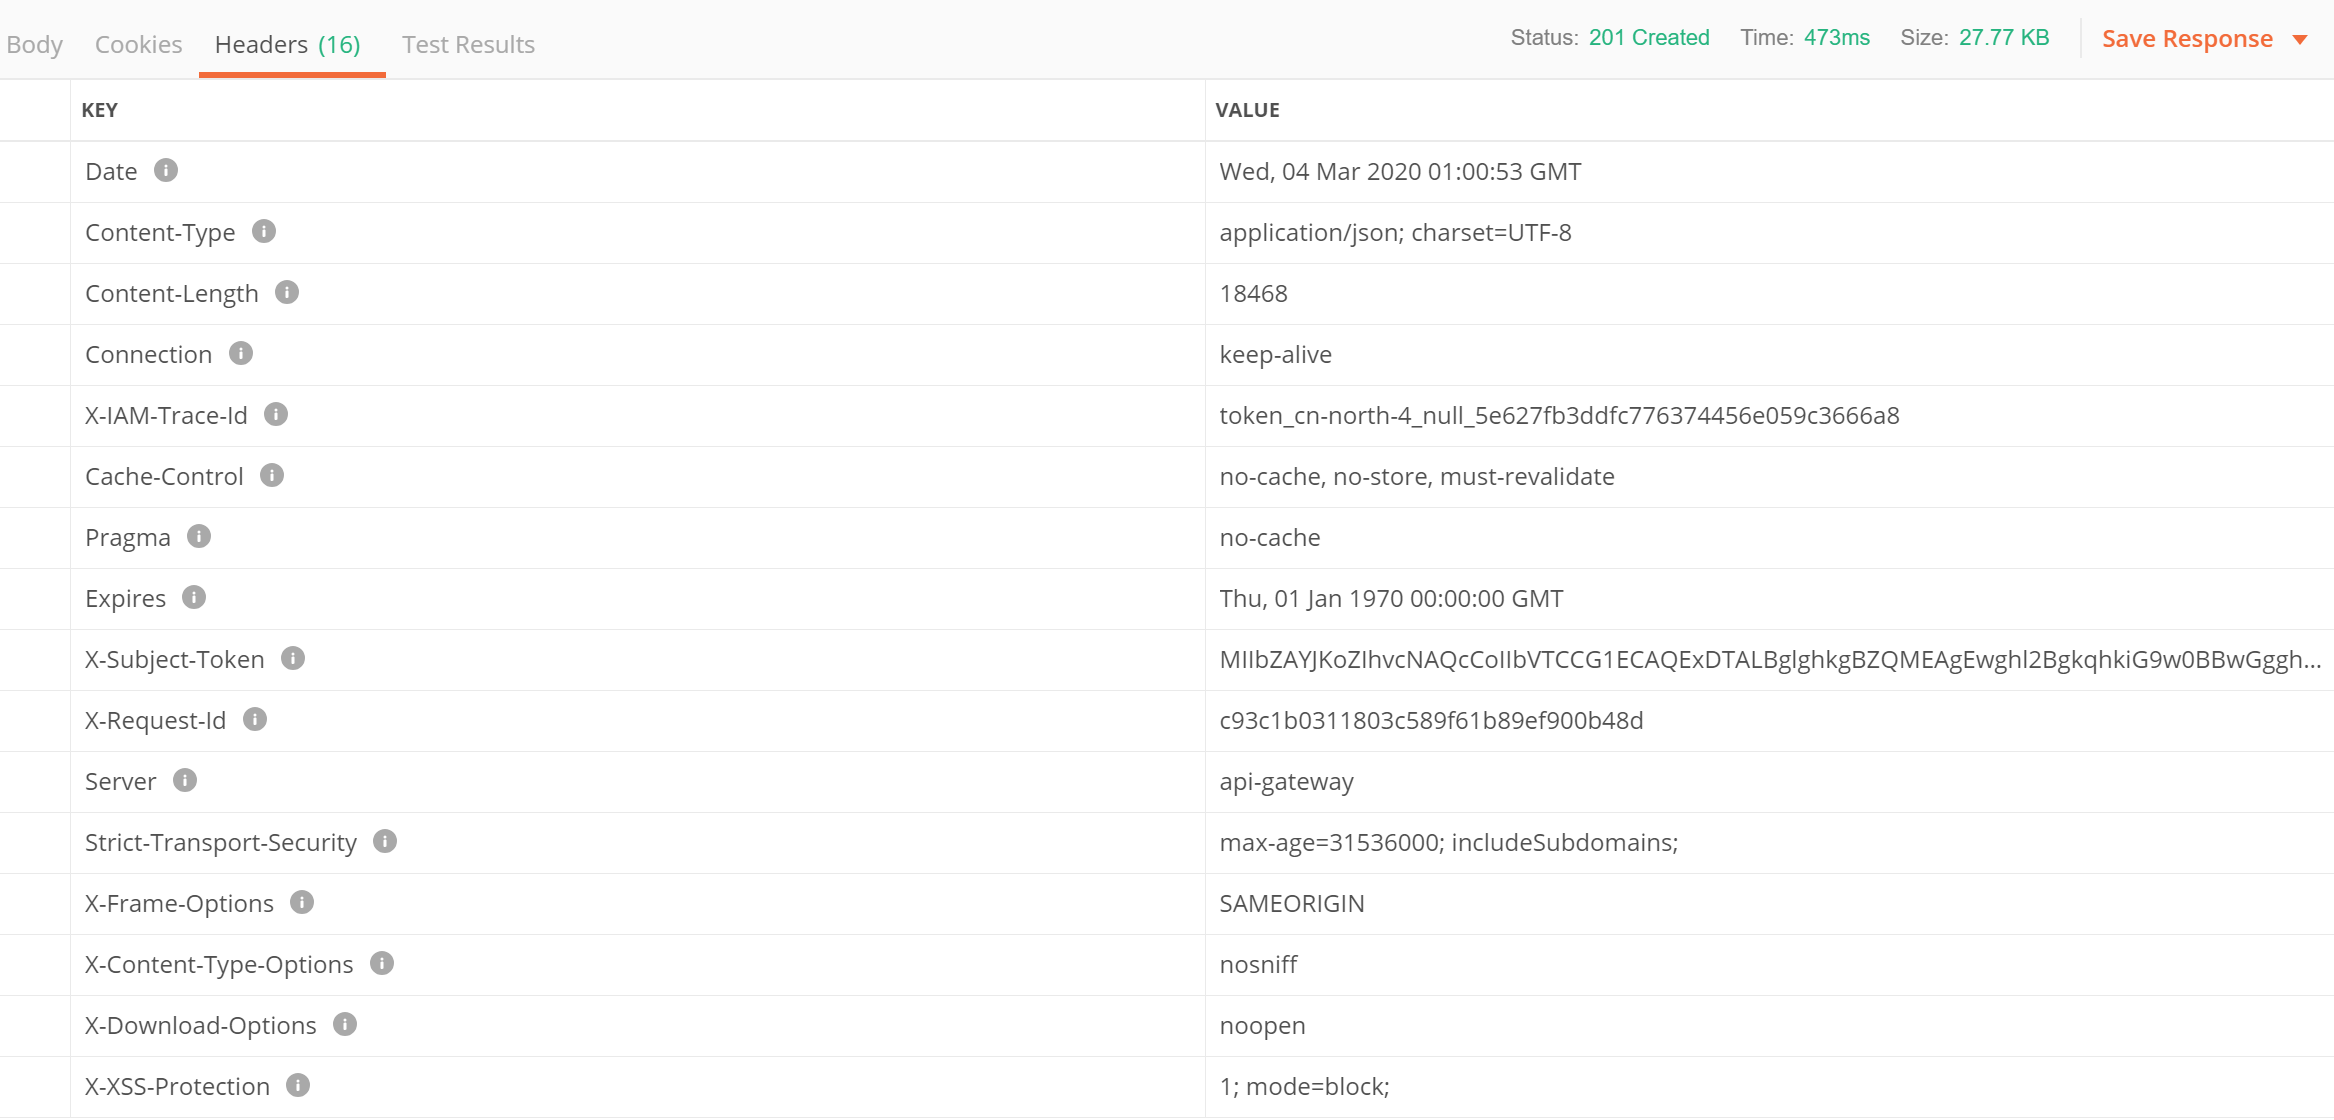
- Use the returned X-Subject-Token value in the header field to update X-Auth-Token in the IoTDA environment so that it can be used in other API calls. If the token expires, the Authentication API must be called again to obtain a new token.

The X-Auth-Token parameter is automatically updated in Postman. You do not need to manually update it.

Debugging the API Listing Projects Accessible to an IAM User
Before accessing platform APIs, the application must call the API Listing Projects Accessible to an IAM User to obtain the project ID of the user.
To call this API, the application constructs an HTTP request. An example request is as follows:
GET https://iam.cn-north-4.myhuaweicloud.com/v3/auth/projects
Content-Type: application/json
X-Auth-Token: ********
Debug the API by following the instructions provided in Listing Projects Accessible to an IAM User.
- Configure the HTTP method, URL, and headers of the API.

- Click Send. The returned code and response are displayed in the lower part of the page.
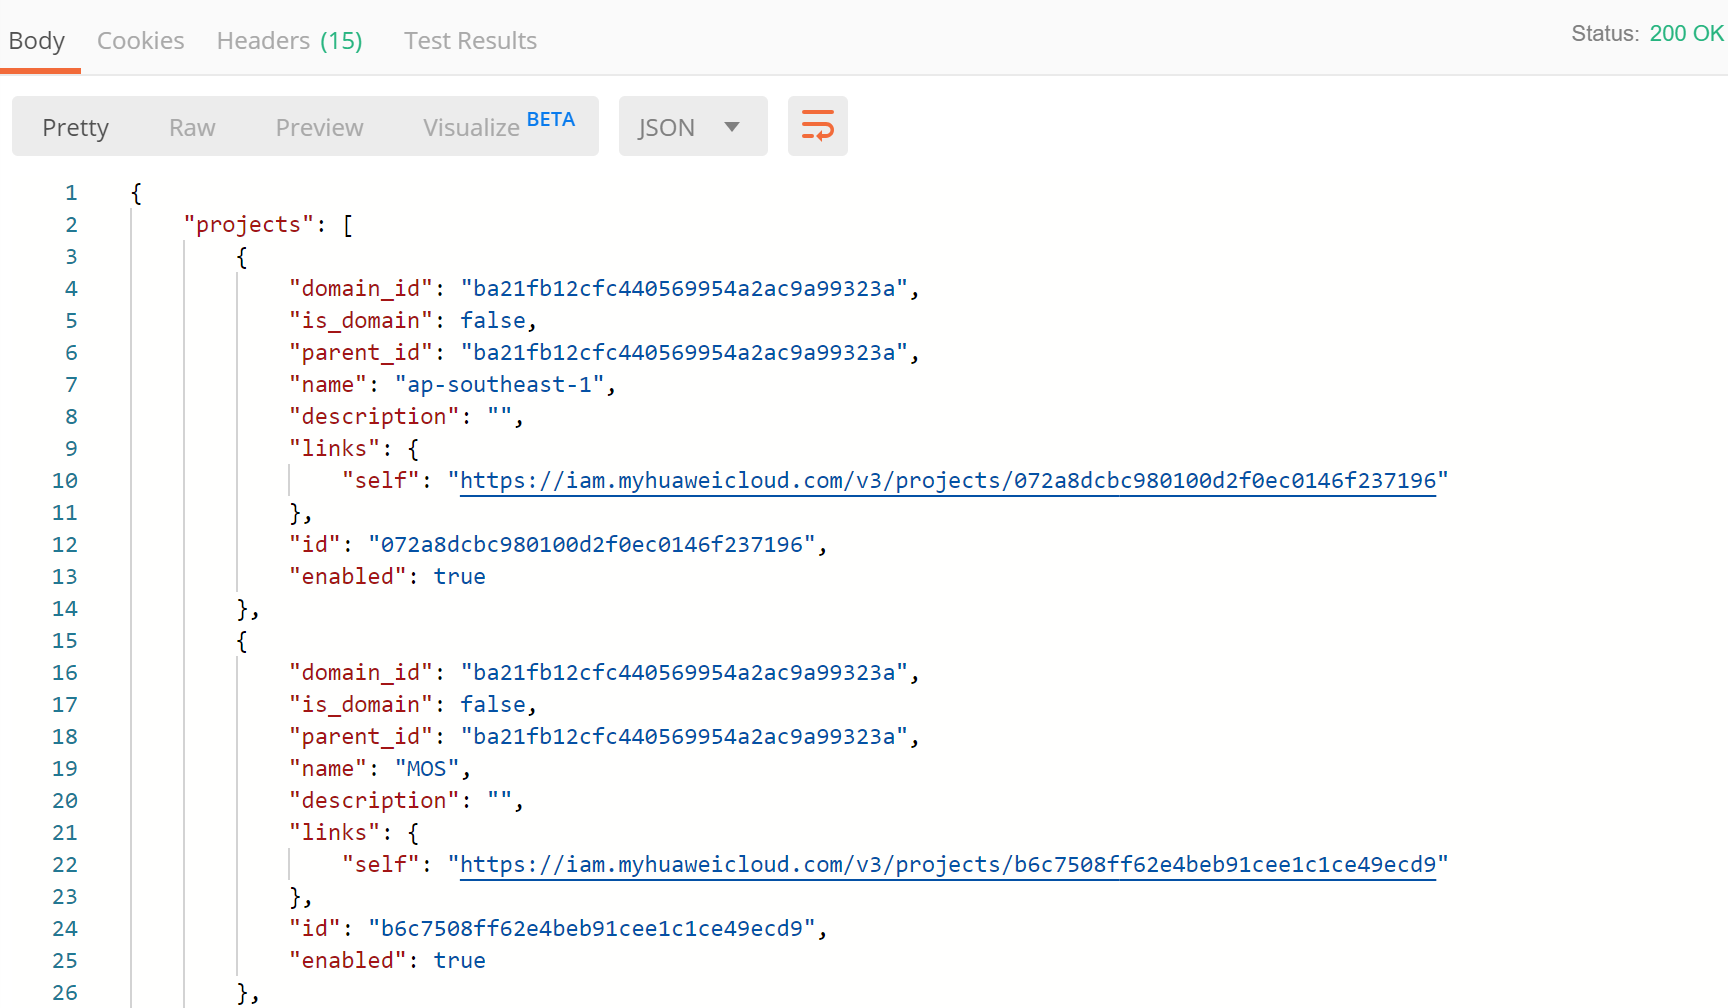
- The returned body contains a list of projects. Search for the item whose name is the same as the value of region in the IoTDA environment, and use the id value to update project_id in the IoTDA environment so that it can be used in other API calls.


In this example, the project_id parameter is automatically updated in Postman. You do not need to manually update it.

Debugging the API Creating a Product
Before connecting a device to the platform, an application must call the API Creating a Product. The product created will be used during device registration.
To call this API, the application constructs an HTTP request. An example request is as follows:
POST https://iotda.cn-north-4.myhuaweicloud.com/v5/iot/{project_id}/products
Content-Type: application/json
X-Auth-Token: ********

{
  "name" : "Thermometer",
  "device_type" : "Thermometer",
  "protocol_type" : "MQTT",
  "data_format" : "binary",
  "manufacturer_name" : "ABC",
  "industry" : "smartCity",
  "description" : "this is a thermometer produced by Huawei",
  "service_capabilities" : [ {
    "service_type" : "temperature",
    "service_id" : "temperature",
    "description" : "temperature",
    "properties" : [ {
      "unit" : "centigrade",
      "min" : "1",
      "method" : "R",
      "max" : "100",
      "data_type" : "decimal",
      "description" : "force",
      "step" : 0.1,
      "enum_list" : [ "string" ],
      "required" : true,
      "property_name" : "temperature",
      "max_length" : 100
    } ],
    "commands" : [ {
      "command_name" : "reboot",
      "responses" : [ {
        "response_name" : "ACK",
        "paras" : [ {
          "unit" : "km/h",
          "min" : "1",
          "max" : "100",
          "para_name" : "force",
          "data_type" : "string",
          "description" : "force",
          "step" : 0.1,
          "enum_list" : [ "string" ],
          "required" : false,
          "max_length" : 100
        } ]
      } ],
      "paras" : [ {
        "unit" : "km/h",
        "min" : "1",
        "max" : "100",
        "para_name" : "force",
        "data_type" : "string",
        "description" : "force",
        "step" : 0.1,
        "enum_list" : [ "string" ],
        "required" : false,
        "max_length" : 100
      } ]
    } ],
    "option" : "Mandatory"
  } ],
  "app_id" : "jeQDJQZltU8iKgFFoW060F5SGZka"
}
Debug the API by following the instructions provided in Creating a Product.
Note: Only the parameters used in the debugging example are described in the following steps.
- Configure the HTTP method, URL, and headers of the API.

- Configure the body of the API.

- Click Send. The returned code and response are displayed in the lower part of the page.

- Use the returned product_id value to update the product_id parameter in the IoTDA environment so that it can be used in other API calls.

Note: The product_id parameter is automatically updated in Postman. You do not need to manually update it.

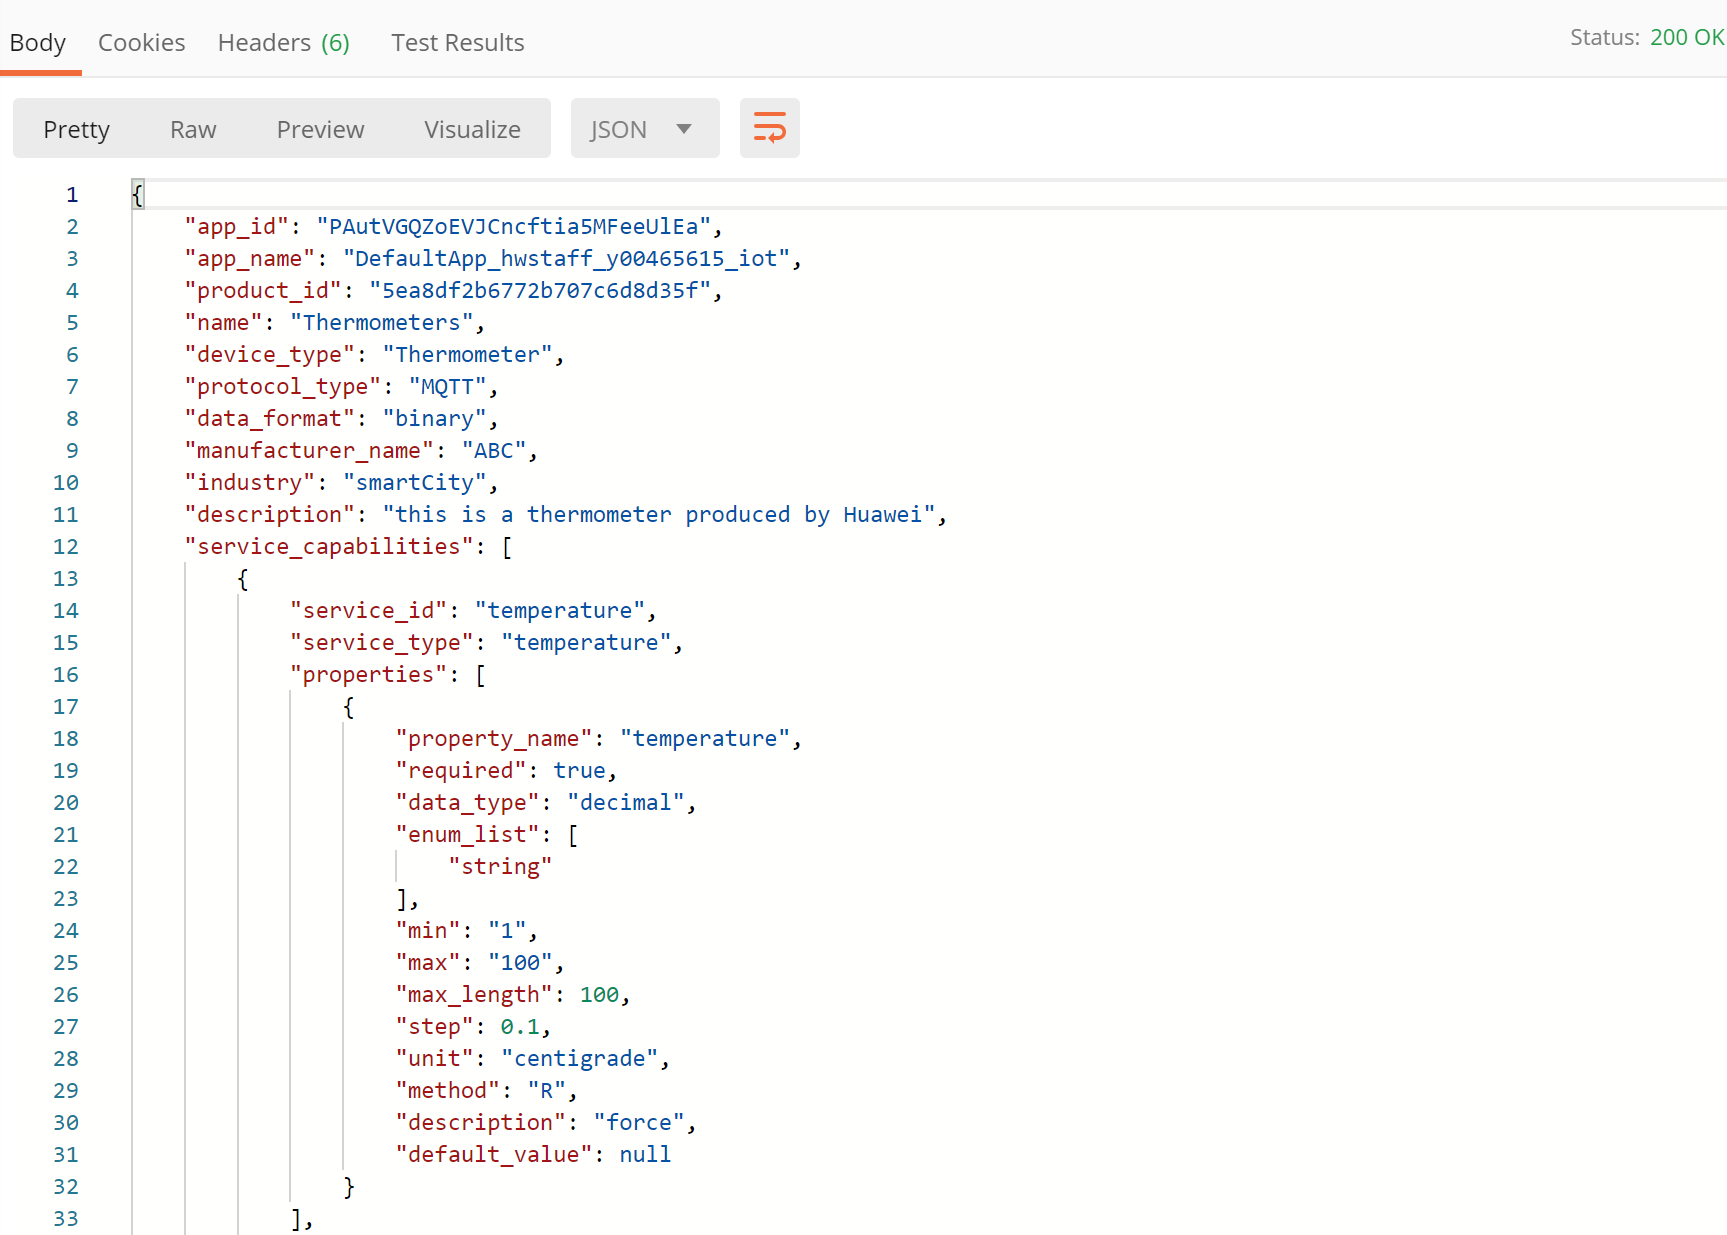
Debugging the API Querying a Product
An application can call the API Querying a Product to query details about a product.
To call this API, the application constructs an HTTP request. An example request is as follows:
GET https://iotda.cn-north-4.myhuaweicloud.com/v5/iot/{project_id}/products/{product_id}
Content-Type: application/json
X-Auth-Token: ********
Debug the API by following the instructions provided in Querying a Product.
Note: Only the parameters used in the debugging example are described in the following steps.
- Configure the HTTP method, URL, and headers of the API.

- Click Send. The returned code and response are displayed in the lower part of the page.
Debugging the API Creating a Device
Before connecting a device to the platform, an application must call the API Registering a Device. Then, the device can use the unique identification code to get authenticated and connect to the platform.
To call this API, the application constructs an HTTP request. An example request is as follows:
POST https://iotda.cn-north-4.myhuaweicloud.com/v5/iot/{project_id}/devices
Content-Type: application/json
X-Auth-Token: ********

{
  "node_id" : "ABC123456789",
  "device_name" : "dianadevice",
  "product_id" : "b640f4c203b7910fc3cbd446ed437cbd",
  "auth_info" : {
    "auth_type" : "SECRET",
    "secure_access" : true,
    "fingerprint" : "********",
    "secret" : "********",
    "timeout" : 300
  },
  "description" : "water meter device"
}
Debug the API by following the instructions provided in Creating a Device.
Note: Only the parameters used in the debugging example are described in the following steps.
- Configure the HTTP method, URL, and headers of the API.

- Configure the body of the API.

- Click Send. The returned code and response are displayed in the lower part of the page.

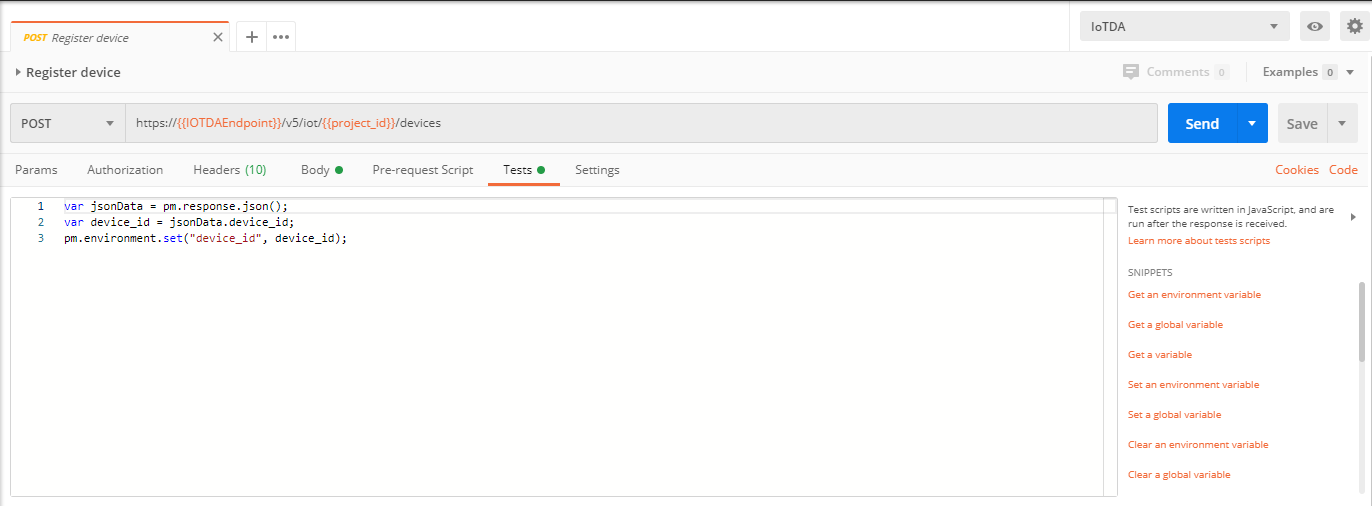
- Use the returned device_id value to update the device_id parameter in the IoTDA environment so that it can be used in other API calls.

Note: The device_id parameter is automatically updated in Postman. You do not need to manually update it.
Debugging the API Querying a Device
An application can call the API Querying a Device to query details about a device registered with the platform.
To call this API, the application constructs an HTTP request. An example request is as follows:
GET https://iotda.cn-north-4.myhuaweicloud.com/v5/iot/{project_id}/devices/{device_id}
Content-Type: application/json
X-Auth-Token: ********
Debug the API by following the instructions provided in Querying a Device.
Note: Only the parameters used in the debugging example are described in the following steps.
- Configure the HTTP method, URL, and headers of the API.

- Click Send. The returned code and response are displayed in the lower part of the page.

Feedback
Was this page helpful?
Provide feedbackThank you very much for your feedback. We will continue working to improve the documentation.See the reply and handling status in My Cloud VOC.
For any further questions, feel free to contact us through the chatbot.
Chatbot


