Performing OTA Firmware Upgrade for MQTT Devices
Scenarios
Message Queuing Telemetry Transport (MQTT) is a publish/subscribe messaging protocol that transports messages between clients and a server. It is suitable for remote sensors and control devices (such as smart street lights) that have limited computing capabilities and work in low-bandwidth, unreliable networks through persistent connections. Firmware upgrade is a basic function that network devices must support. Online upgrades are important especially when the firmware needs to be upgraded due to security vulnerabilities, software bugs, function optimization, and device performance improvement. This section describes how to upgrade the firmware in Huawei Cloud IoTDA using MQTT.fx to simulate a device.

The software upgrade process is the same as that of the firmware upgrade. The only difference is that the parameters for reporting version numbers are different. For firmware upgrade, the parameter that specifies the version number is fw_version. For software upgrade, the parameter is sw_version. For details, see Device Reporting the Software and Firmware Versions.
Development Process
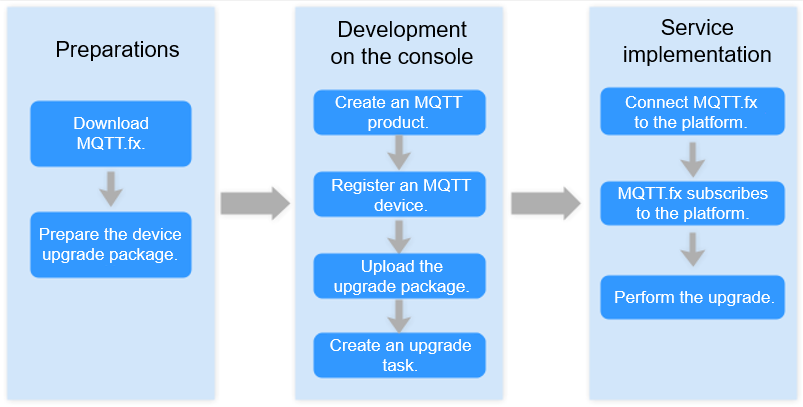
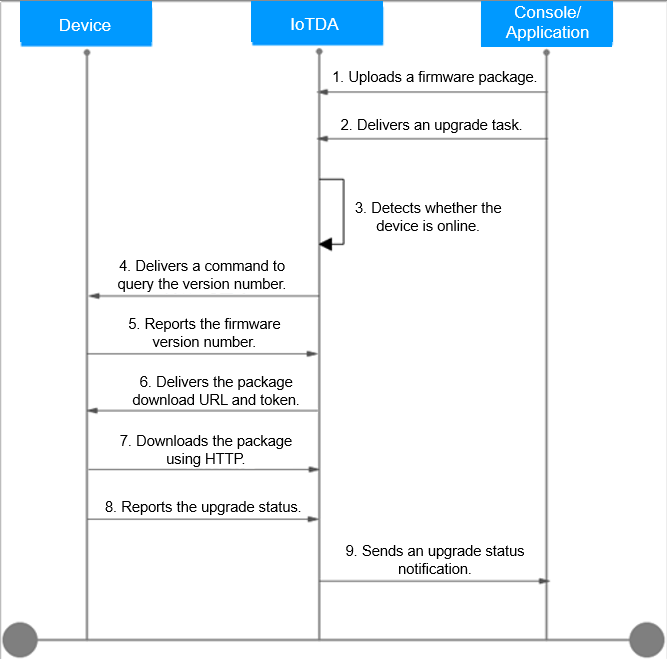
Development Environment
Prerequisites
- You have registered a Huawei Cloud account.
- You have completed real-name authentication. Otherwise, IoTDA cannot be used.
- You have subscribed to IoTDA. If you have not subscribed to the service, go to the IoTDA service page, and click Access Console to subscribe to the service.
Preparations
- 1. Download and install MQTT.fx (version 1.7.1 or later).
- Prepare the upgrade package. Obtain the firmware upgrade package and its version number from the module vendor. Temporary files are used in this demonstration.
- Create an MQTT product. (If an MQTT product already exists, skip this step.)
- Register an individual device.
- Add the registered device to a device group, which will be used during upgrade task creation.
Uploading an Upgrade Package
- Visit the IoTDA service page and click Access Console. Click the target instance card.
- In the navigation pane, choose .
- Click the Manage Resource Package tab and click Firmware List.
- Click Upload. On the displayed page, upload a firmware package from OBS or your local PC.
Figure 3 Uploading the upgrade package - OBS file
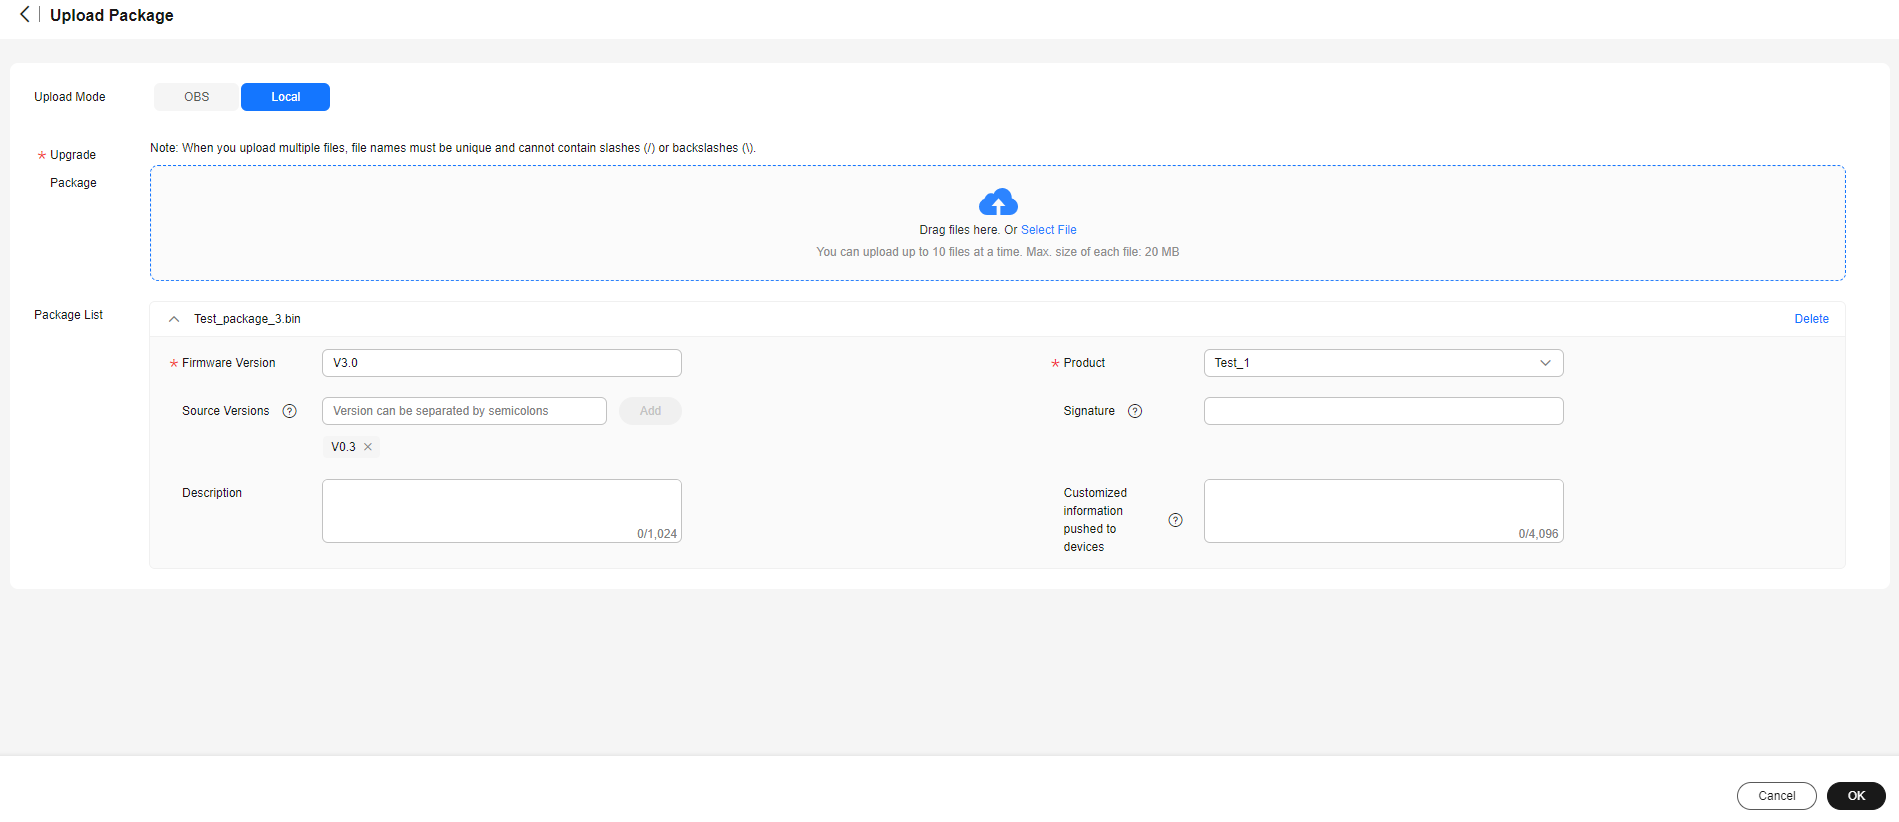
 Figure 4 Uploading the upgrade package - Local file
- After the upgrade package is uploaded, configure package parameters and click OK.
Figure 5 Uploading the upgrade package - OBS file parameters
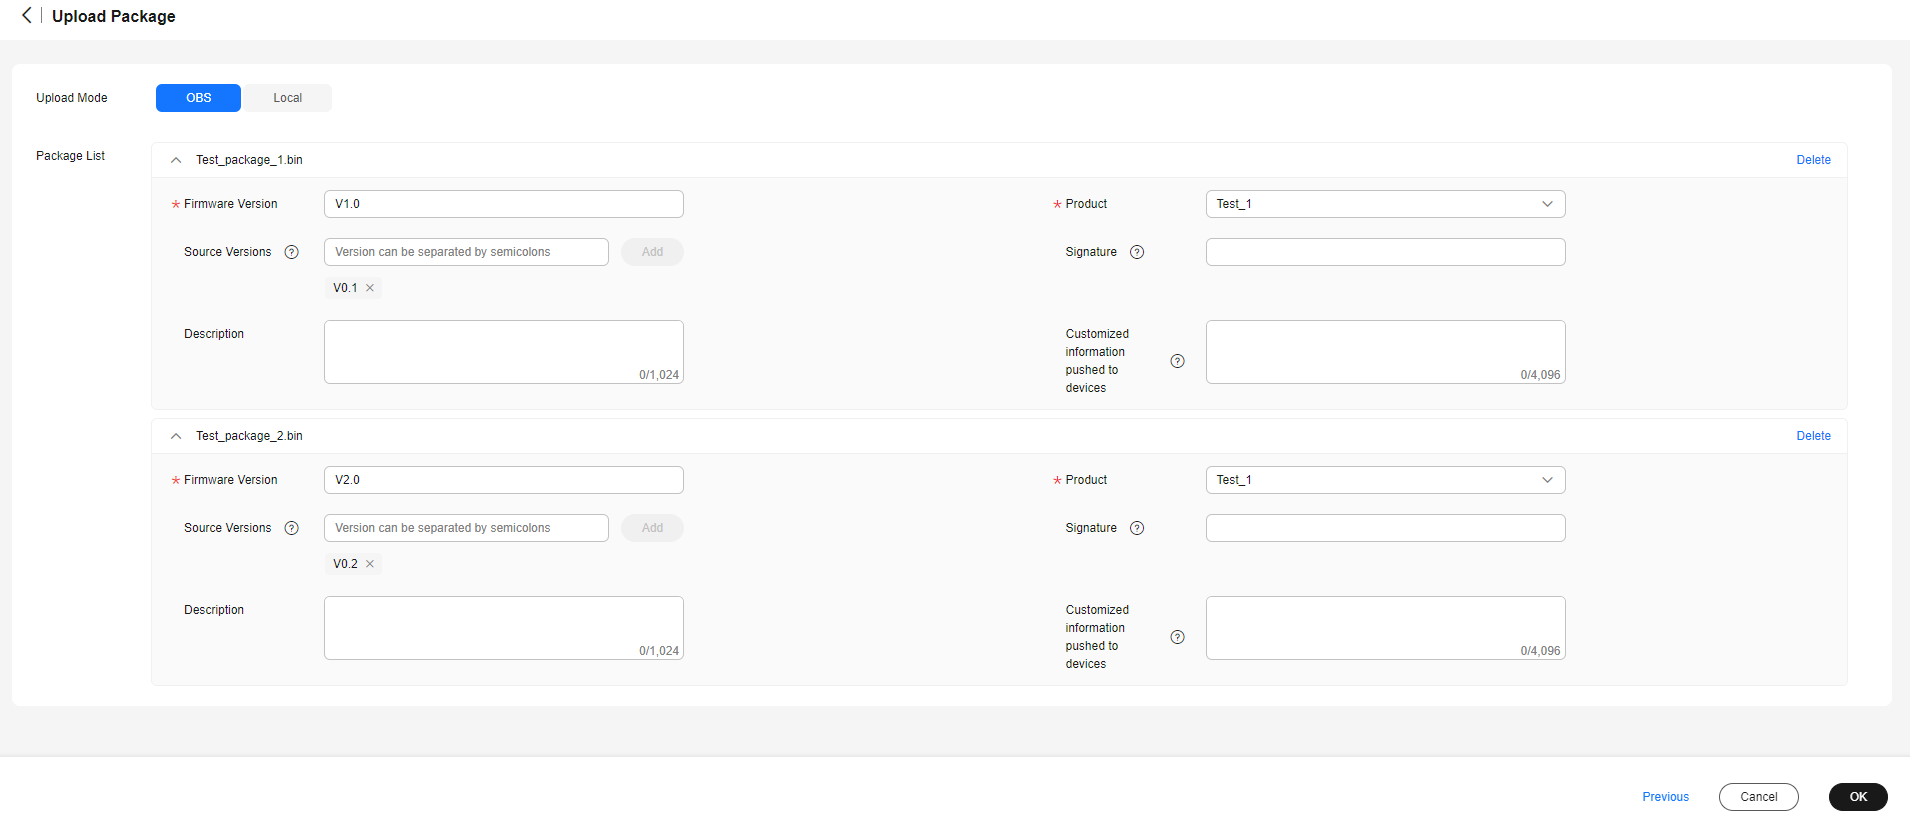 Figure 6 Uploading the upgrade package - Local file parameters
- The uploaded upgrade package is displayed in the firmware list.
Figure 7 Software/Firmware upgrade - Firmware list

- Click Create Upgrade Task. On the Firmware Upgrades tab page, click Create Task. On the displayed page, configure parameters, select upgrade packages, select devices to upgrade, and click Create Now.
Figure 8 Creating a firmware upgrade task - Test_upgrade_1
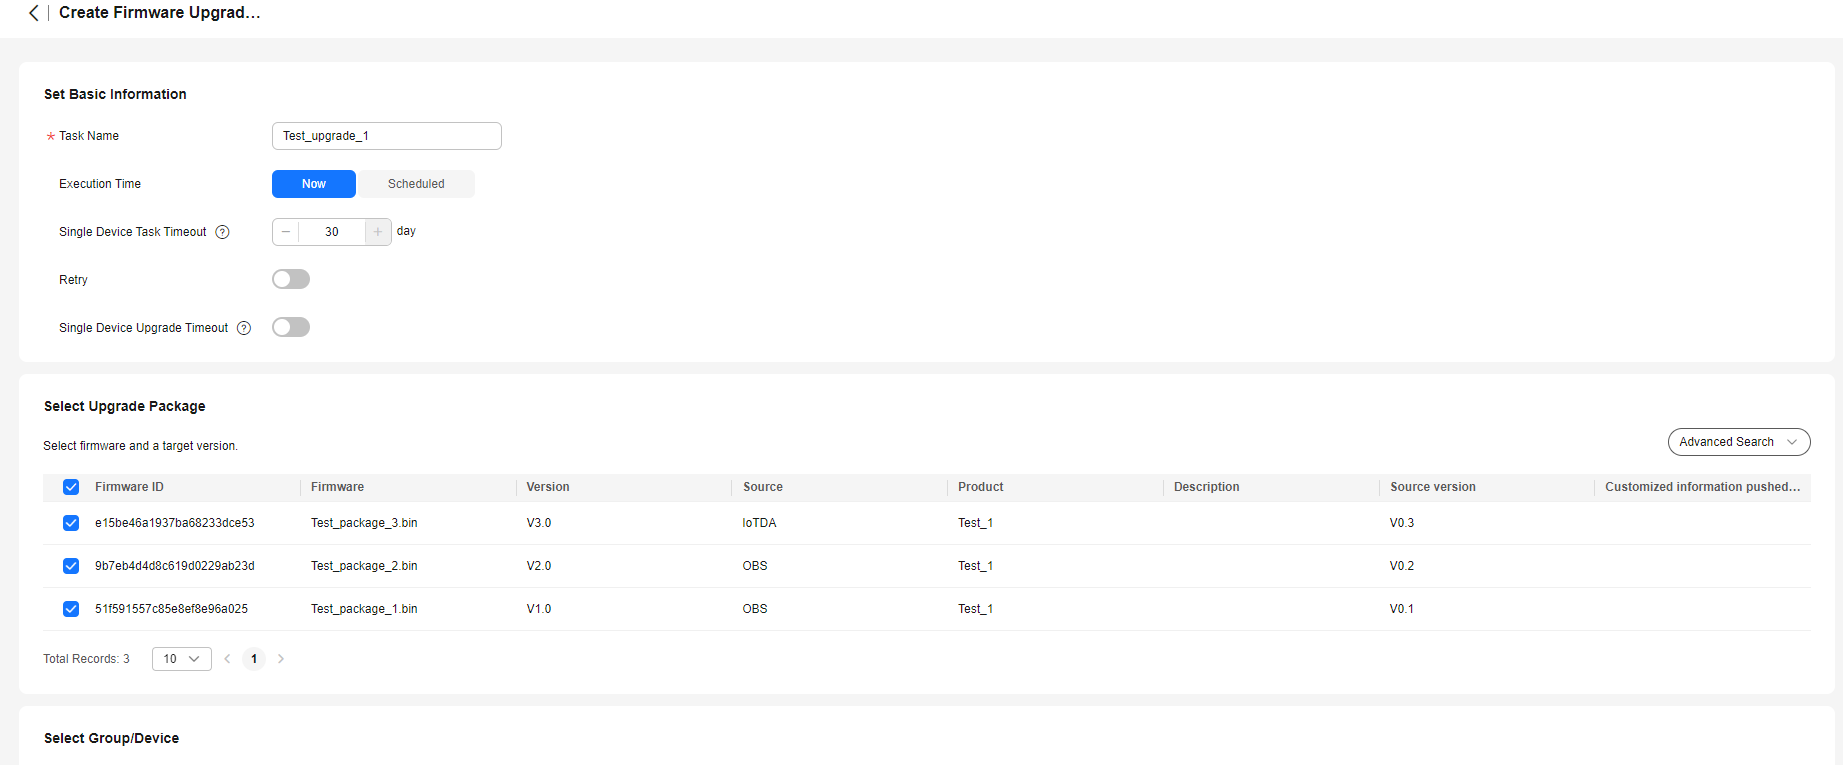

When creating an upgrade task, you can select up to 10 upgrade packages. Supported source versions of the upgrade packages must be unique. If no source version is specified for an upgrade package, the package can be used to upgrade devices of all source versions by default.
- View the created task in the task list. You can click View to view the task details. On the task details page, you can stop executing upgrade tasks for up to 100 devices in batches or an upgrade task for a single device. You can retry failed upgrade tasks for up to 100 devices in batches or an upgrade task for a single device. You can click All Retry to retry the upgrade task for all failed devices.
Figure 9 Task details - Test_upgrade_1

Performing Upgrade
- Use MQTT.fx to simulate device access to the platform. For details, see "Performing Connection Authentication".
- Use MQTT.fx to subscribe to the downstream message topic of the platform. MQTT.fx receives the version query command delivered by the platform.
Topic
Downstream: $oc/devices/{device_id}/sys/events/down
Parameters
For details, see Platform Delivering an Event to Obtain Version Information.
Figure 10 Subscribe/Push
- Report the software and firmware version information using MQTT.fx.
Topic
Upstream: $oc/devices/{device_id}/sys/events/up
Parameters
For details, see Device Reporting the Software and Firmware Versions.
Example
Topic: $oc/devices/{device_id}/sys/events/up
Data format:  {
      "object_device_id": "{object_device_id}",
      "services": [{
          "service_id": "$ota",
          "event_type": "version_report",
          "event_time": "20151212T121212Z",
          "paras": {
              "sw_version": "v1.0",
              "fw_version": "v1.0"
          }
      }]
  }
Figure 11 Reporting version numbers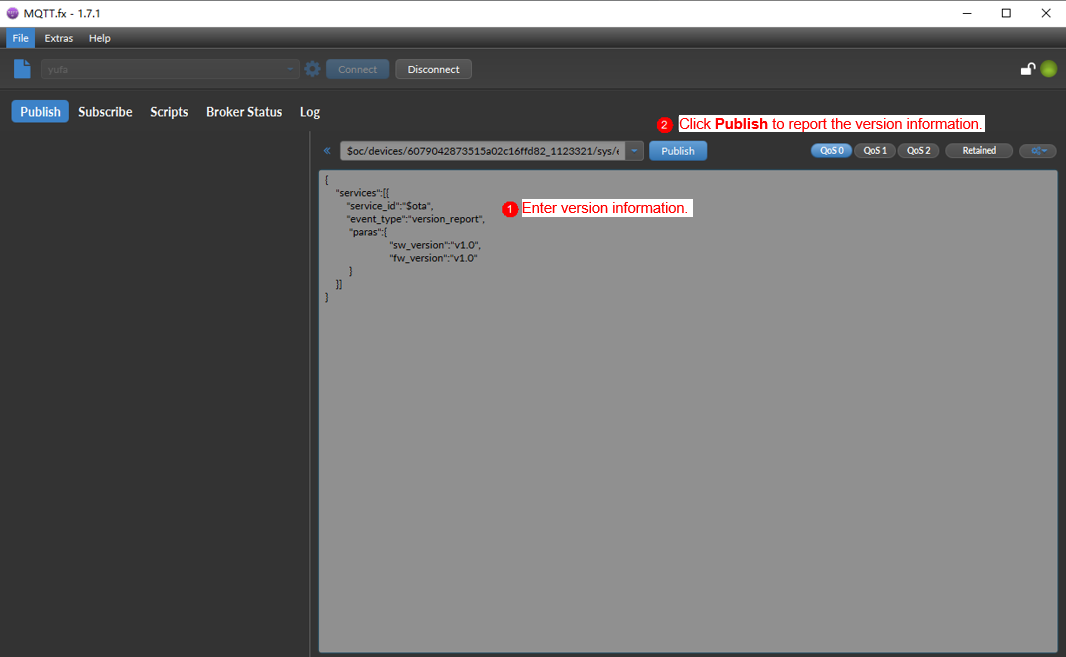
- After the version numbers are reported, the simulator receives an upgrade notification from the platform. The notification is as follows:
Topic
Upstream: $oc/devices/{device_id}/sys/events/down
Parameters
For details, see Platform Delivering an Upgrade Event.
Figure 12 Obtaining the upgrade notification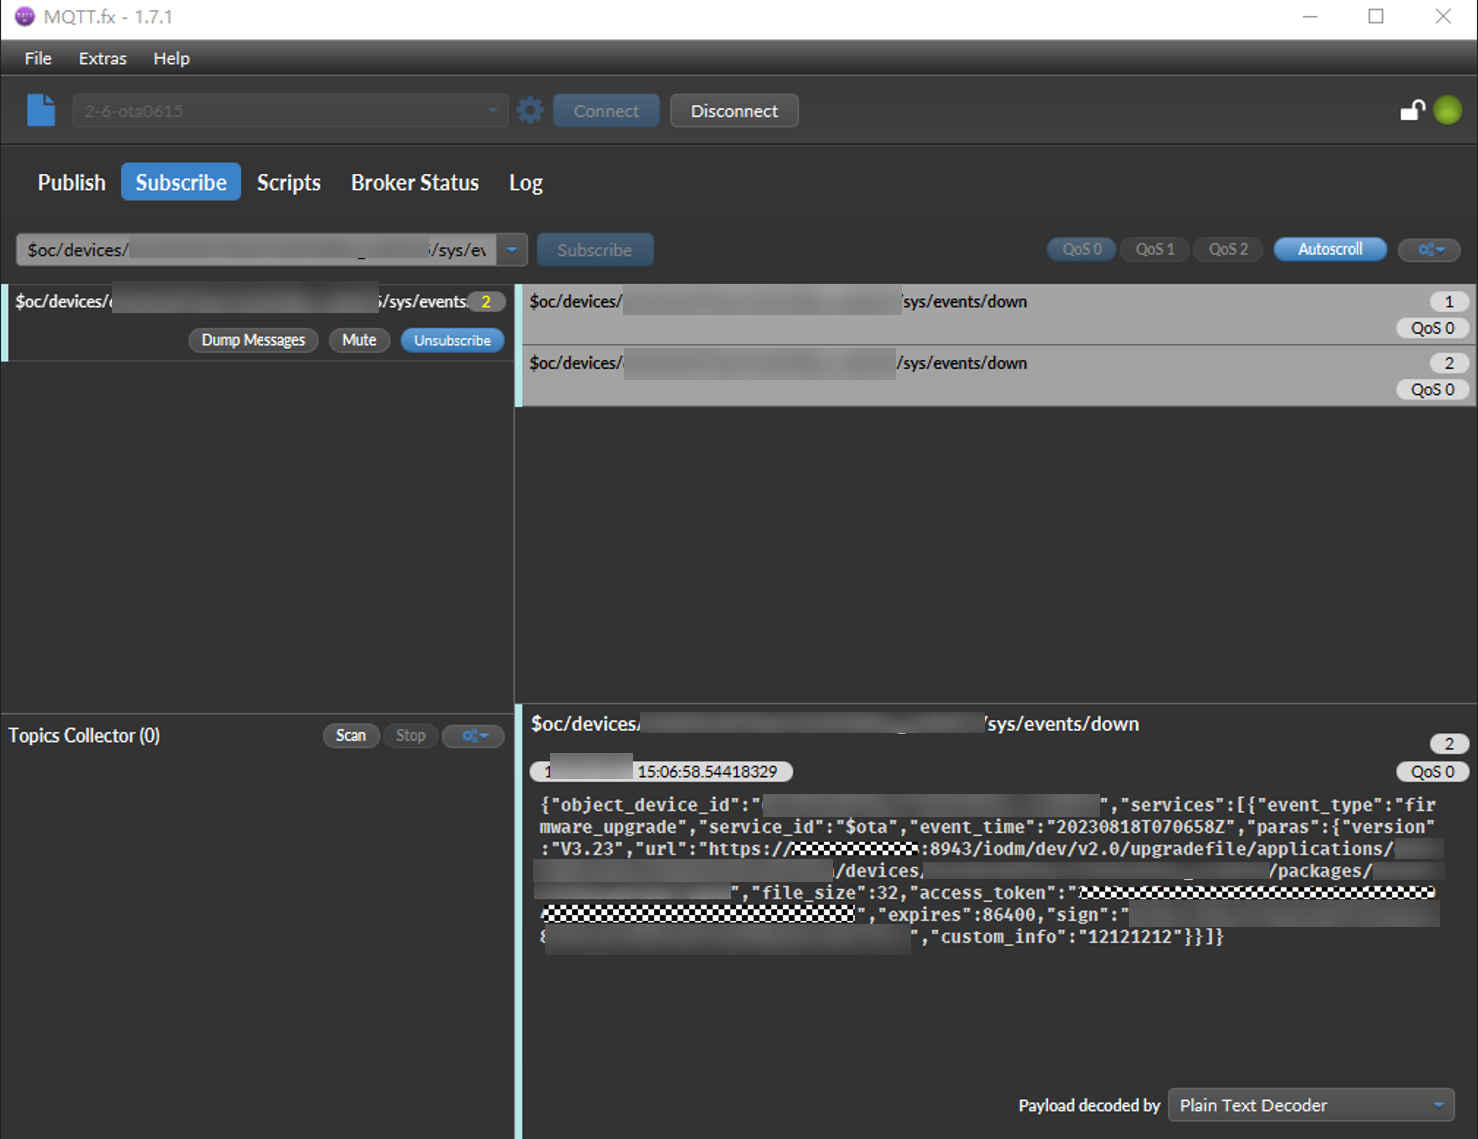
- After the device receives the upgrade notification, send an HTTP request to download the upgrade package.
A cURL command is used in this demonstration.
Figure 13 Downloading the upgrade package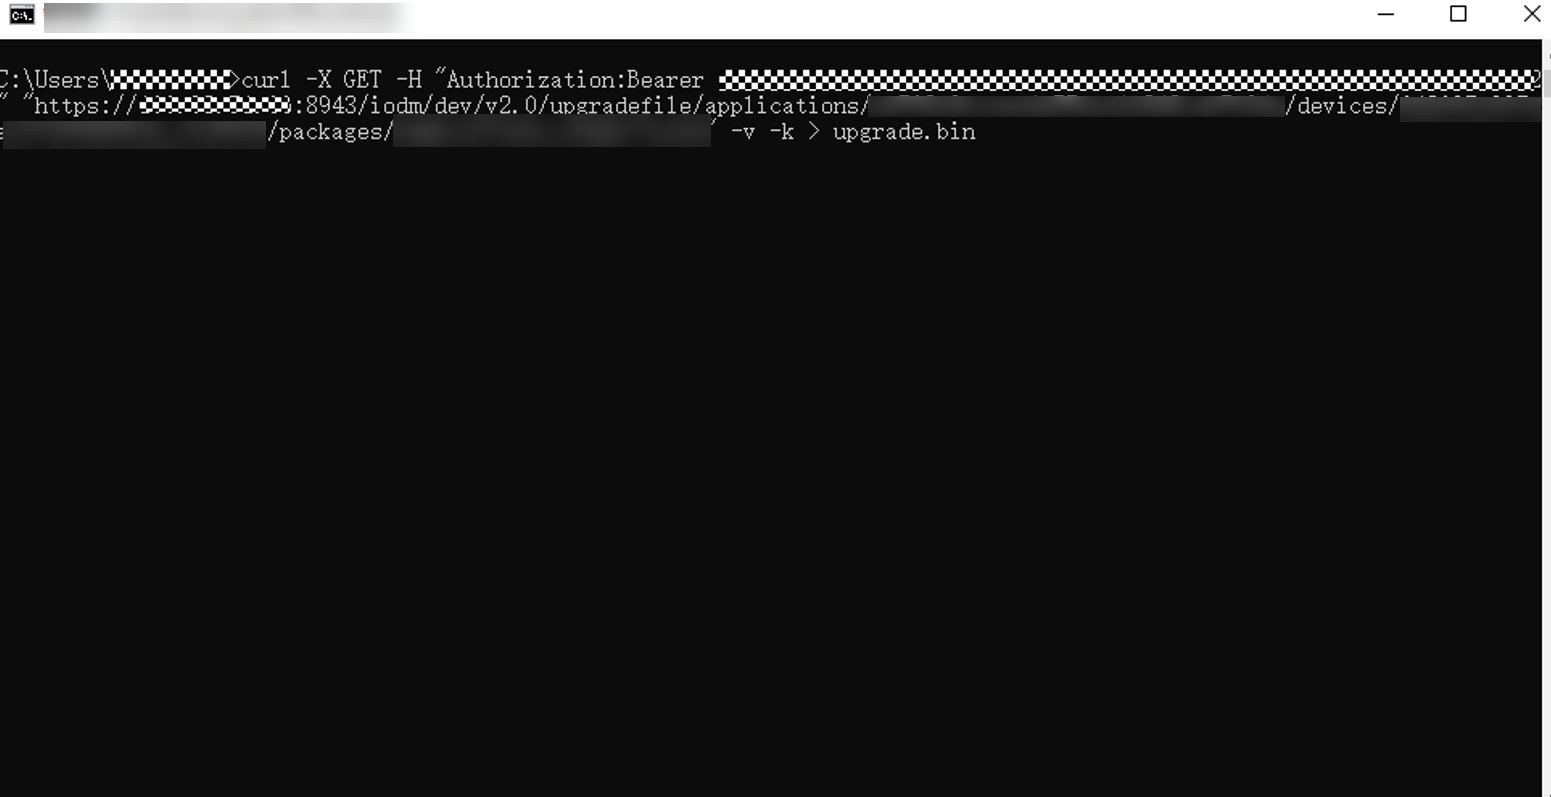
Example
curl -X GET -H "Authorization:Bearer ****************************" "https://**.**.**.**:8943/iodm/dev/v2.0/upgradefile/applications/********/devices/********/packages/********" -v -k

- Add Authorization to the HTTP request header. The value of Authorization is Bearer {access_token}, where the value of {access_token} is the token in the upgrade notification. Leave a space between Bearer and {access_token}.
- If event_type is set to firmware_upgrade_v2 or software_upgrade_v2, the request header does not need to be carried in the request for downloading the software or firmware package. An example request is as follows:
GET https://******.obs.cn-north-4.myhuaweicloud.com:443/test.bin?AccessKeyId=DX5G7W*********
- Enable the device to report the upgrade status.
Topic
Upstream: $oc/devices/{device_id}/sys/events/up
Parameters
For details, see Device Reporting the Upgrade Status.
Example
Topic: $oc/devices/{device_id}/sys/events/up
Data format:
  {     "object_device_id": "{object_device_id}",
     "services": [{
         "service_id": "$ota",
         "event_type": "upgrade_progress_report",
         "event_time": "20151212T121212Z",
         "paras": {
             "result_code": 0,
             "progress": 50,
             "version": "V1.0",
             "description": "upgrade processing"
         }
     }] }
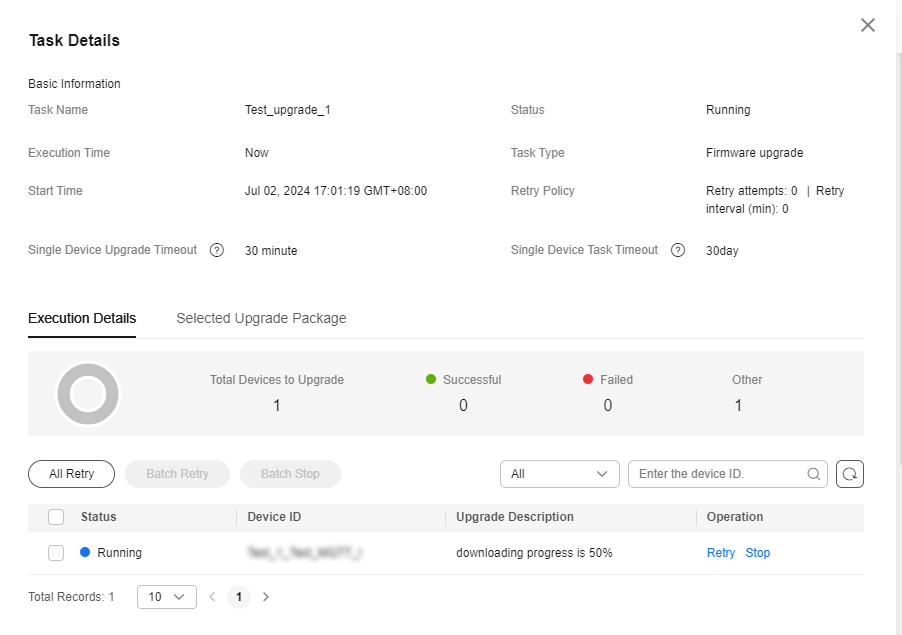
The following figure shows that the upgrade progress is 50%, which is displayed on the platform.
Figure 14 Reporting the upgrade progress (50%)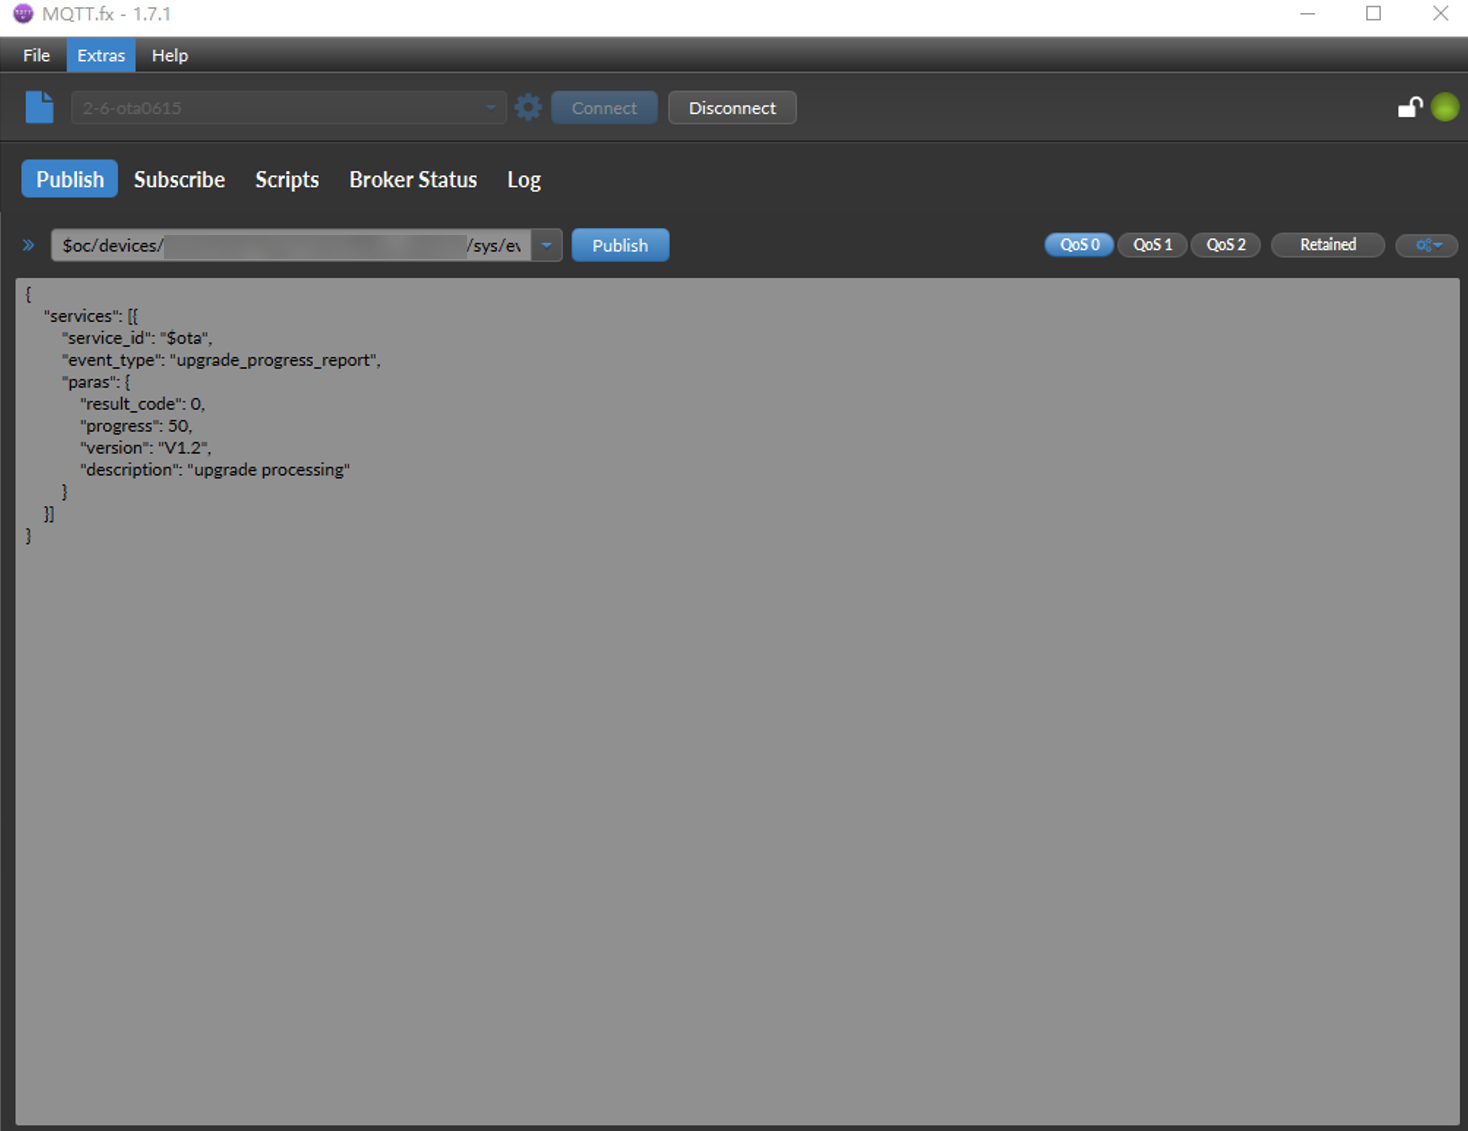 Figure 15 Upgrade progress - Test_upgrade_1-
- Complete the upgrade.
If the upgrade progress is 100% and the current version is the target version, the upgrade task success will be displayed on the platform.
Figure 16 Reporting the upgrade progress (100%)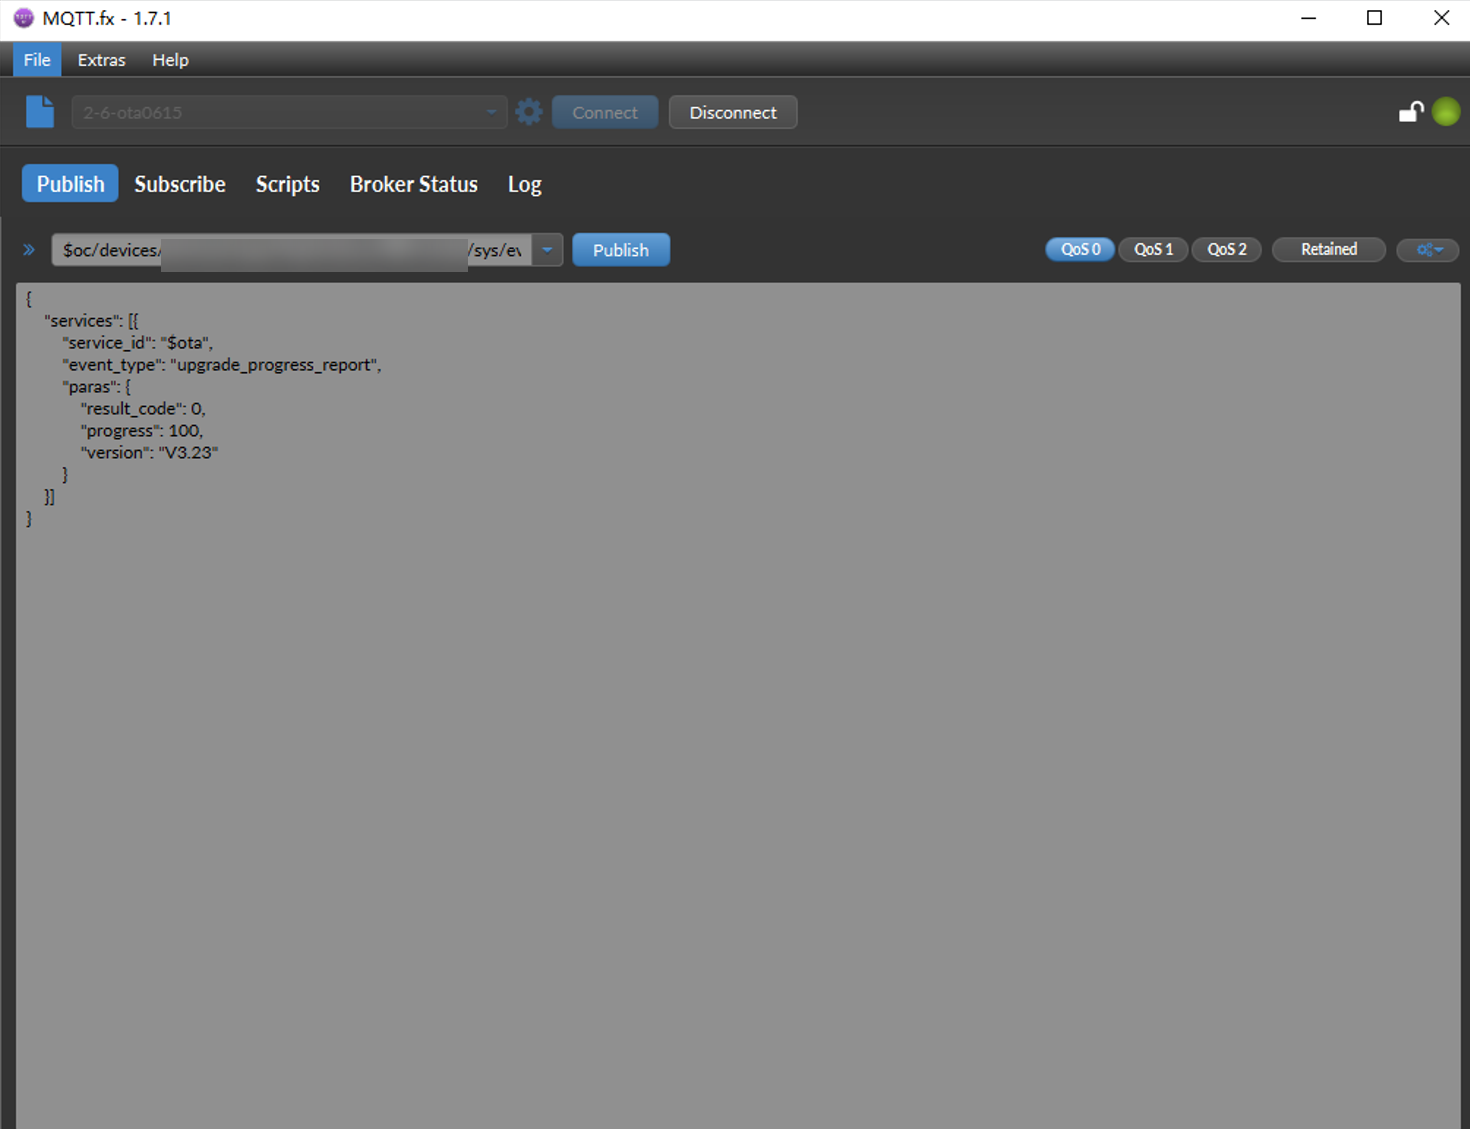 Figure 17 Software/Firmware upgrade - Firmware upgrade
Feedback
Was this page helpful?
Provide feedbackThank you very much for your feedback. We will continue working to improve the documentation.See the reply and handling status in My Cloud VOC.
For any further questions, feel free to contact us through the chatbot.
Chatbot


