Developing a Product Model Online
Overview
Before developing a product model online, you must create a product. When creating a product, enter information such as the product name, protocol type, data format, industry, and device type. The information will be used to fill in the device capability fields in the product model. The IoT platform provides standard models and vendor models. These models involve multiple domains and provide edited product model files. You can modify, add, or delete fields in the product model as required. If you want to customize a product model, you need to define a complete product model.
This topic uses a product model that contains a service as an example. The product model contains functions and fields in scenarios such as data reporting, command delivery, and command response delivery.
Procedure
- Access the IoTDA service page and click Access Console. Click the target instance card.
- In the navigation pane, choose Products. In the product list, click the name of a product to access its details.
- On the Basic Information tab page, click the button for adding a service.
- Specify Service ID, Service Type, and Description, and click OK.
- Service ID: The first letter of the value must be capitalized, for example, WaterMeter and StreetLight.
- Service Type: You are advised to set this parameter to the same value as Service ID.
- Description: You can, for example, define the properties of light intensity (Light_Intensity) and status (Light_Status).
After the service is added, define the properties and commands in the Add Service area. A service can contain properties and/or commands. Configure the properties and commands based on your requirements.
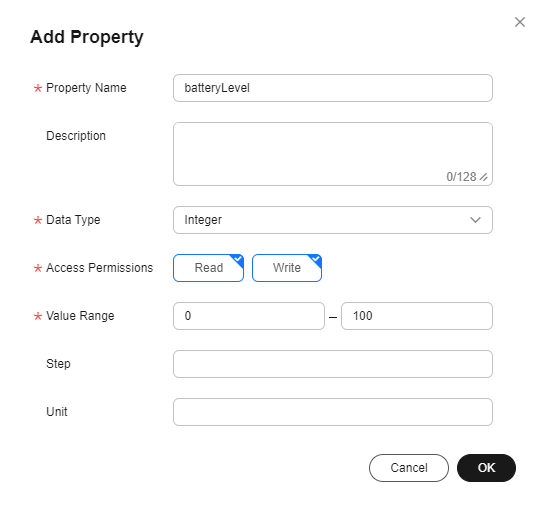
- Click the new service ID added in 4. On the page displayed, click Add Property. In the dialog box displayed, set the parameters and click OK.
Parameter
Description
Property Name
Use camel case, for example, batteryLevel and internalTemperature.
Data Type
- Integer: Select this value if the reported data is an integer value.
- long: Select this value if the reported data is a long integer.
- Decimal: Select this value if the reported data is a decimal. You are advised to set this parameter to Decimal when configuring the longitude and latitude properties.
- String: Select this value if the reported data is a string or an enumerated value. Use commas (,) to separate values.
- DateTime: Select this value if the reported data is a date or time.
Property format examples: 2020-09-01T18:50:20Z and 2020-09-01T18:50:20.200Z
- JsonObject: Select this value if the reported data is in JSON structure.
- enum: Select this value if the reported data is enumerated values.
If enumerated values are OPEN,CLOSE, property format examples include OPEN and CLOSE.
- boolean: Select this value if the reported data is a Boolean value.
Property format examples: true/false and 0/1
- StringList: Select this value if the reported data is a string list.
Property format examples: ["str1","str2","str3"]
Access Permissions
- Read: You can query the property through APIs.
- Write: You can modify the property value through APIs.
Value Range
Set these parameters based on the actual situation of the device.
Step
Unit
Figure 1 Adding a property - batteryLevel
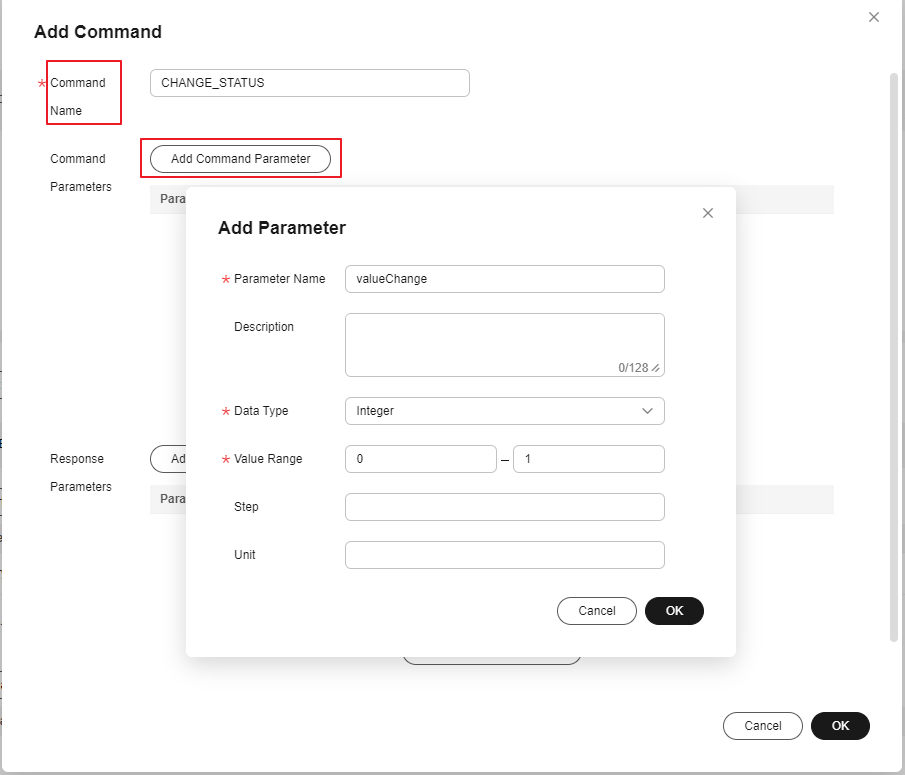
- Click Add Command. In the dialog box displayed, set command parameters.
- Command Name: You are advised to capitalize the full command name and use underscores (_) to separate words, for example, DISCOVERY and CHANGE_STATUS.
- Command Parameters: Click Add Command Parameter. In the dialog box displayed, set the parameters of the command to be delivered and click OK.
Parameter
Description
Parameter
You are advised to start the name with a lowercase letter and capitalize the other words, for example, valueChange.
Data Type
Set these parameters based on the actual situation of the device.
Value Range
Step
Unit
Figure 2 Adding a command - CHANGE_STATUS
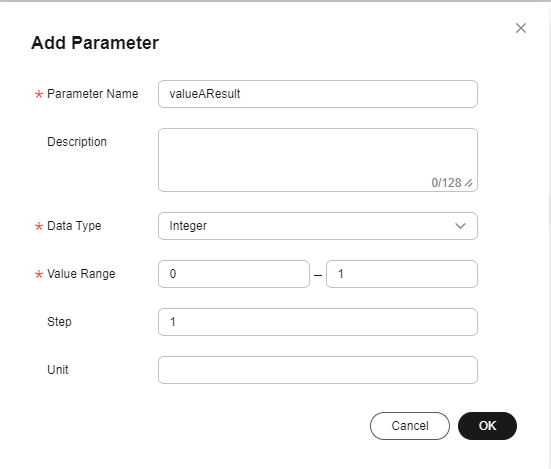
- Click Add Response Parameter to add parameters of a command response when necessary. In the dialog box displayed, set the parameters and click OK.
Parameter
Description
Parameter
You are advised to start the name with a lowercase letter and capitalize the other words, for example, valueResult.
Data Type
Set these parameters based on the actual situation of the device.
Value Range
Step
Unit
Figure 3 Adding a command response parameter - valueAResult
Feedback
Was this page helpful?
Provide feedbackThank you very much for your feedback. We will continue working to improve the documentation.See the reply and handling status in My Cloud VOC.
For any further questions, feel free to contact us through the chatbot.
Chatbot


