Online Development
Codecs developed online on IoTDA apply only to devices that report binary data.
On the IoTDA console, you can quickly develop codecs in a visualized manner.
This section uses an NB-IoT smoke detector as an example to describe how to develop a codec that supports data reporting and command delivery as well as command execution result reporting. The other two scenarios are used as examples to describe how to develop and commission complex codecs.
- Codec for Data Reporting and Command Delivery
- Codec for Strings and Variable-Length Strings
- Codec for Arrays and Variable-Length Arrays
Codec for Data Reporting and Command Delivery
Scenario
A smoke detector provides the following functions:
- Reporting smoke alarms (fire severity) and temperature.
- Receiving and running remote control commands, which can be used to enable the alarm function remotely. For example, the smoke detector can report the temperature on the fire scene and remotely trigger a smoke alarm for evacuation.
- Reporting command execution results
Product Model
- level: indicates the fire severity.
- temperature: indicates the temperature at the fire scene.
- SET_ALARM: indicates whether to enable or disable the alarm function. The value 0 indicates that the alarm function is disabled, and 1 indicates that the alarm function is enabled.
Figure 1 Model definition - smokedetector

Developing a Codec
- On the smoke detector details page, click the Codec Development tab and click Develop Codec.
- Click Add Message to add a smokerinfo message. This step is performed to decode the binary code stream message uploaded by the device to the JSON format so that the platform can understand the message. The following is a configuration example:
- Message Name: smokerinfo
- Message Type: Data reporting
- Add Response Field: selected. After response fields are added, the platform delivers the response data set by the application to the device after receiving the data reported by the device.
- Response: AAAA0000 (default)
Figure 2 Adding a message - smokerinfo
- Click Add Field, select Tagged as address field, and add the messageId field, which indicates the message type. In this scenario, the message type for reporting the fire severity and temperature is 0x0. When a device reports a message, the first field of each message is messageId. For example, if the message reported by a device is 0001013A, the first field 00 indicates that the message is used to report the fire severity and temperature. The subsequent fields 01 and 013A indicate the fire severity and temperature, respectively. If there is only one data reporting message and one command delivery message, the messageId field does not need to be added.
- Data Type is configured based on the number of data reporting message types. The default data type of the messageId field is int8u.
- The value of Offset is automatically filled based on the field location and the number of bytes of the field. messageId is the first field of the message. The start position is 0, the byte length is 1, and the end position is 1. Therefore, the value of Offset is 0-1.
- The value of Length is automatically filled based on the value of Data Type.
- Default Value can be changed but must be in hexadecimal format. In addition, the corresponding field in data reporting messages must be the same as the default value.
Figure 3 Adding a field - messageId

- Add a level field to indicate the fire severity.
- Field Name can contain only letters, digits, underscores (_), and dollar signs ($) and cannot start with a digit.
- Data Type is configured based on the data reported by the device and must match the type defined in the product model. The level property defined in the product model is int, and the maximum value is 9. Therefore, the value of Data Type is int8u.
- The value of Offset is automatically filled based on the field location and the number of bytes of the field. The start position of the level field is the end position of the previous field. The end position of the previous field messageId is 1. Therefore, the start position of the level field is 1. The length of the level field is 1 byte, and the end position is 2. Therefore, the value of Offset is 1-2.
- The value of Length is automatically filled based on Data Type.
- Default Value can be left blank. If you do not set Default Value, the fire level is not fixed and has no default value.
Figure 4 Adding a field - level

- Add the temperature field to indicate the temperature at the fire scene.
- Data Type: In the product model, the data type of the temperature property is int and the maximum value is 1000. Therefore, the value of Data Type is int16u in the codec to meet the value range of the temperature property.
- Offset is automatically configured based on the number of characters between the first field and the end field. The start position of the temperature field is the end position of the previous field. The end position of the previous field level is 2. Therefore, the start position of the temperature field is 2. The length of the temperature field is 2 bytes, and the end position is 4. Therefore, the value of Offset is 2-4.
- The value of Length is automatically filled based on Data Type.
- If you do not set Default Value, the value of the temperature is not fixed and has no default value.
Figure 5 Adding a field - temperature

- Click Add Message to add a SET_ALARM message and set the temperature threshold for fire alarms. For example, if the temperature exceeds 60°C, the device reports an alarm. This step is performed to encode the command message in JSON format delivered by the IoT platform into binary data so that the smoke detector can understand the message. The following is a configuration example:
- Message Name: SET_ALARM
- Message Type: Command delivery
- Add Response Field: selected. After a response field is added, the device reports the command execution result after receiving the command. You can determine whether to add response fields as required.
Figure 6 Adding a message - SET_ALARM

- Click Add Field to add the messageId field, which indicates the message type. For example, set the message type of the fire alarm threshold to 0x3. For details about the message ID, data type, length, default value, and offset, see 1.
Figure 7 Adding a command field - messageId (0x3)

- Add the mid field. This field is generated and delivered by the platform and is used to associate the delivered command with the command delivery response. The data type of the mid field is int16u by default. For details about the length, default value, and offset, see 2.
Figure 8 Adding a command field - mid

- Add the value field to indicate the parameter value of the delivered command. For example, deliver the temperature threshold for a fire alarm. For details about the data type, length, default value, and offset, see 2.
Figure 9 Adding a command field - value

- Click Add Response Field to add the messageId field, which indicates the message type. The command delivery response is an upstream message, which is differentiated from the data reporting message by the messageId field. The message type for reporting the temperature threshold of the fire alarm is 0x4. For details about the message ID, data type, length, default value, and offset, see 1.
Figure 10 Adding a response field - messageId (0x4)
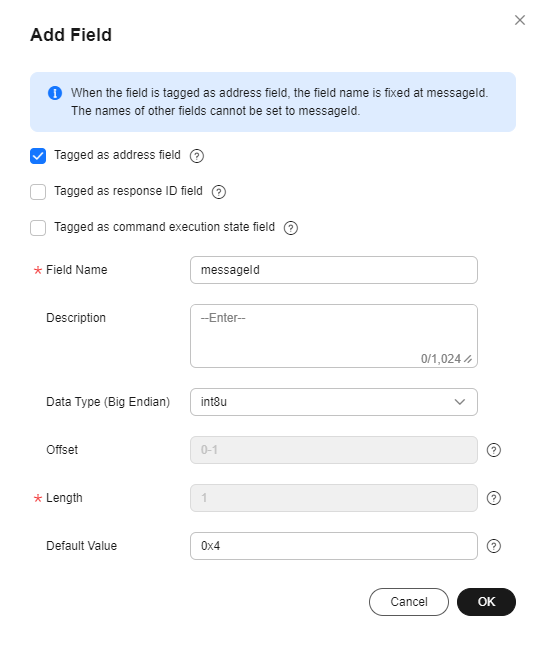
- Add the mid field. This field must be the same as that in the command delivered by the IoT platform. It is used to associate the delivered command with the command execution result. The data type of the mid field is int16u by default. For details about the length, default value, and offset, see 2.
Figure 11 Adding a response field - mid

- Add the errcode field to indicate the command execution status. 00 indicates success and 01 indicates failure. If this field is not carried in the response, the command is executed successfully by default. The data type of the errcode field is int8u by default. For details about the length, default value, and offset, see 2.
Figure 12 Adding a response field - errcode

- Add the result field to indicate the command execution result. For example, the device returns the current alarm threshold to the platform.
Figure 13 Adding a response field - result

- Click Add Field to add the messageId field, which indicates the message type. For example, set the message type of the fire alarm threshold to 0x3. For details about the message ID, data type, length, default value, and offset, see 1.
- Drag the property fields and command fields in Device Model on the right to set up a mapping between the fields in the data reporting message and those in the command delivery message.
Figure 14 Developing a codec online - smokerdetector

- Click Save and then Deploy to deploy the codec on the platform.
Figure 15 Deploying a codec

Testing the Codec
- On the product details page of the smoke detector, click the Online Debugging tab and click Add Test Device.
- You can use a real device or virtual device for debugging based on your service scenario. For details, see Online Debugging. The following uses a virtual device as an example to describe how to debug a codec.
In the Add Test Device dialog box, select Virtual device for Device Type and click OK. The virtual device name contains DeviceSimulator. Only one virtual device can be created for each product.
Figure 16 Online debugging - Creating a virtual device
- Click Debug to access the debugging page.
Figure 17 Entering debugging

- Use the device simulator to report data. For example, a hexadecimal code stream (0008016B) is reported. 00 indicates the messageId field. 08 indicates the fire level, and its length is one byte. 016B indicates the temperature, and its length is two bytes.
View the data reporting result ({level=8, temperature=363}) in Application Simulator. 8 is the decimal number converted from the hexadecimal number 08 and 363 from the hexadecimal number 016B.
In the Device Simulator area, the response data AAAA0000 delivered by the IoT platform is displayed.
Figure 18 Online debugging - Simulating data reporting (smokerdetector)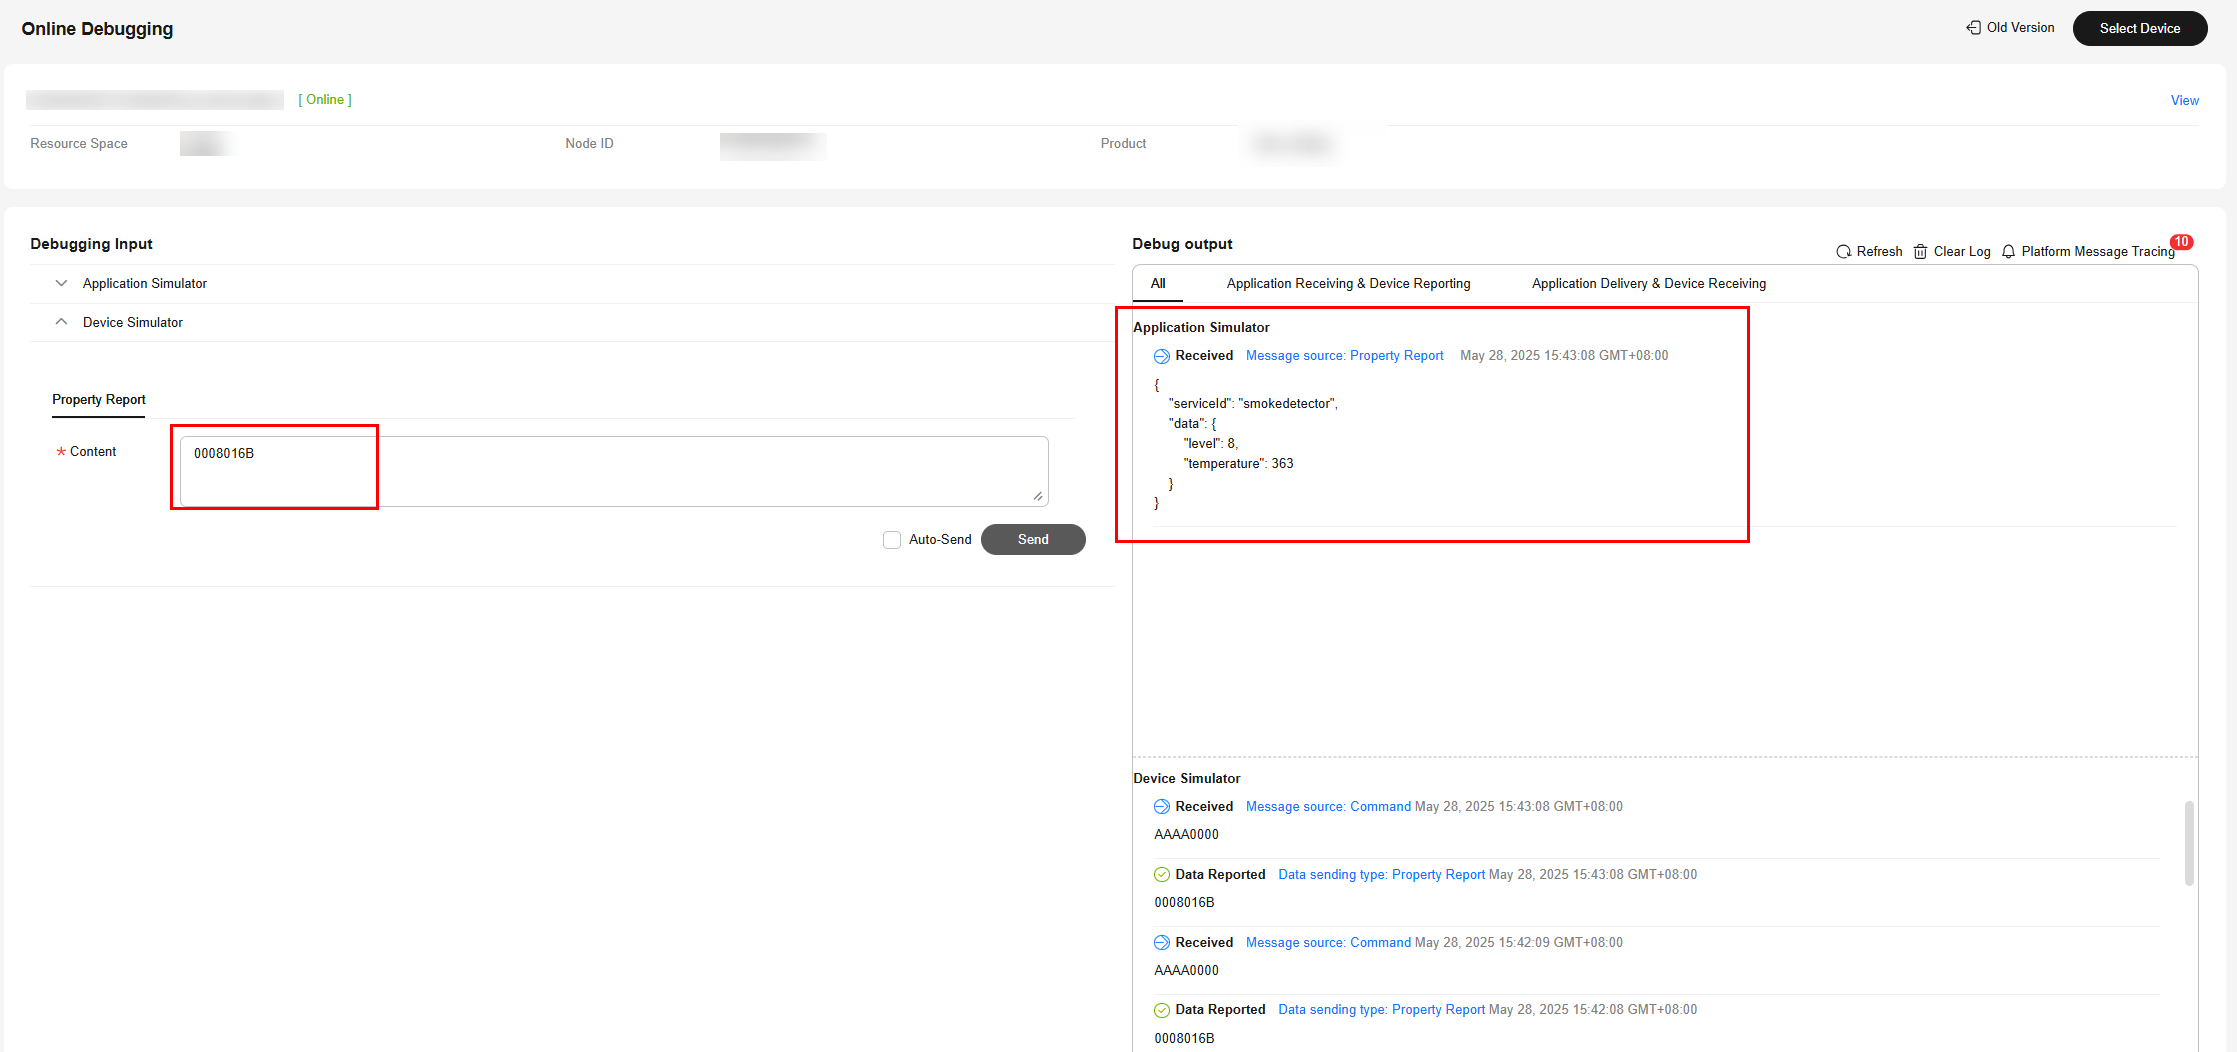
- Use the application simulator to deliver a command and set value to 1. The command {"serviceId": "Smokeinfo", "method": "SET_ALARM", "paras": "{\"value\":1}"} is delivered.
View the command receiving result in Device Simulator, which is 03000101. 03 indicate the messageId field, 0001 indicates the mid field, and 01 is the hexadecimal value converted from the decimal value 1.
Figure 19 Online debugging - Simulating command delivery (smokerdetector)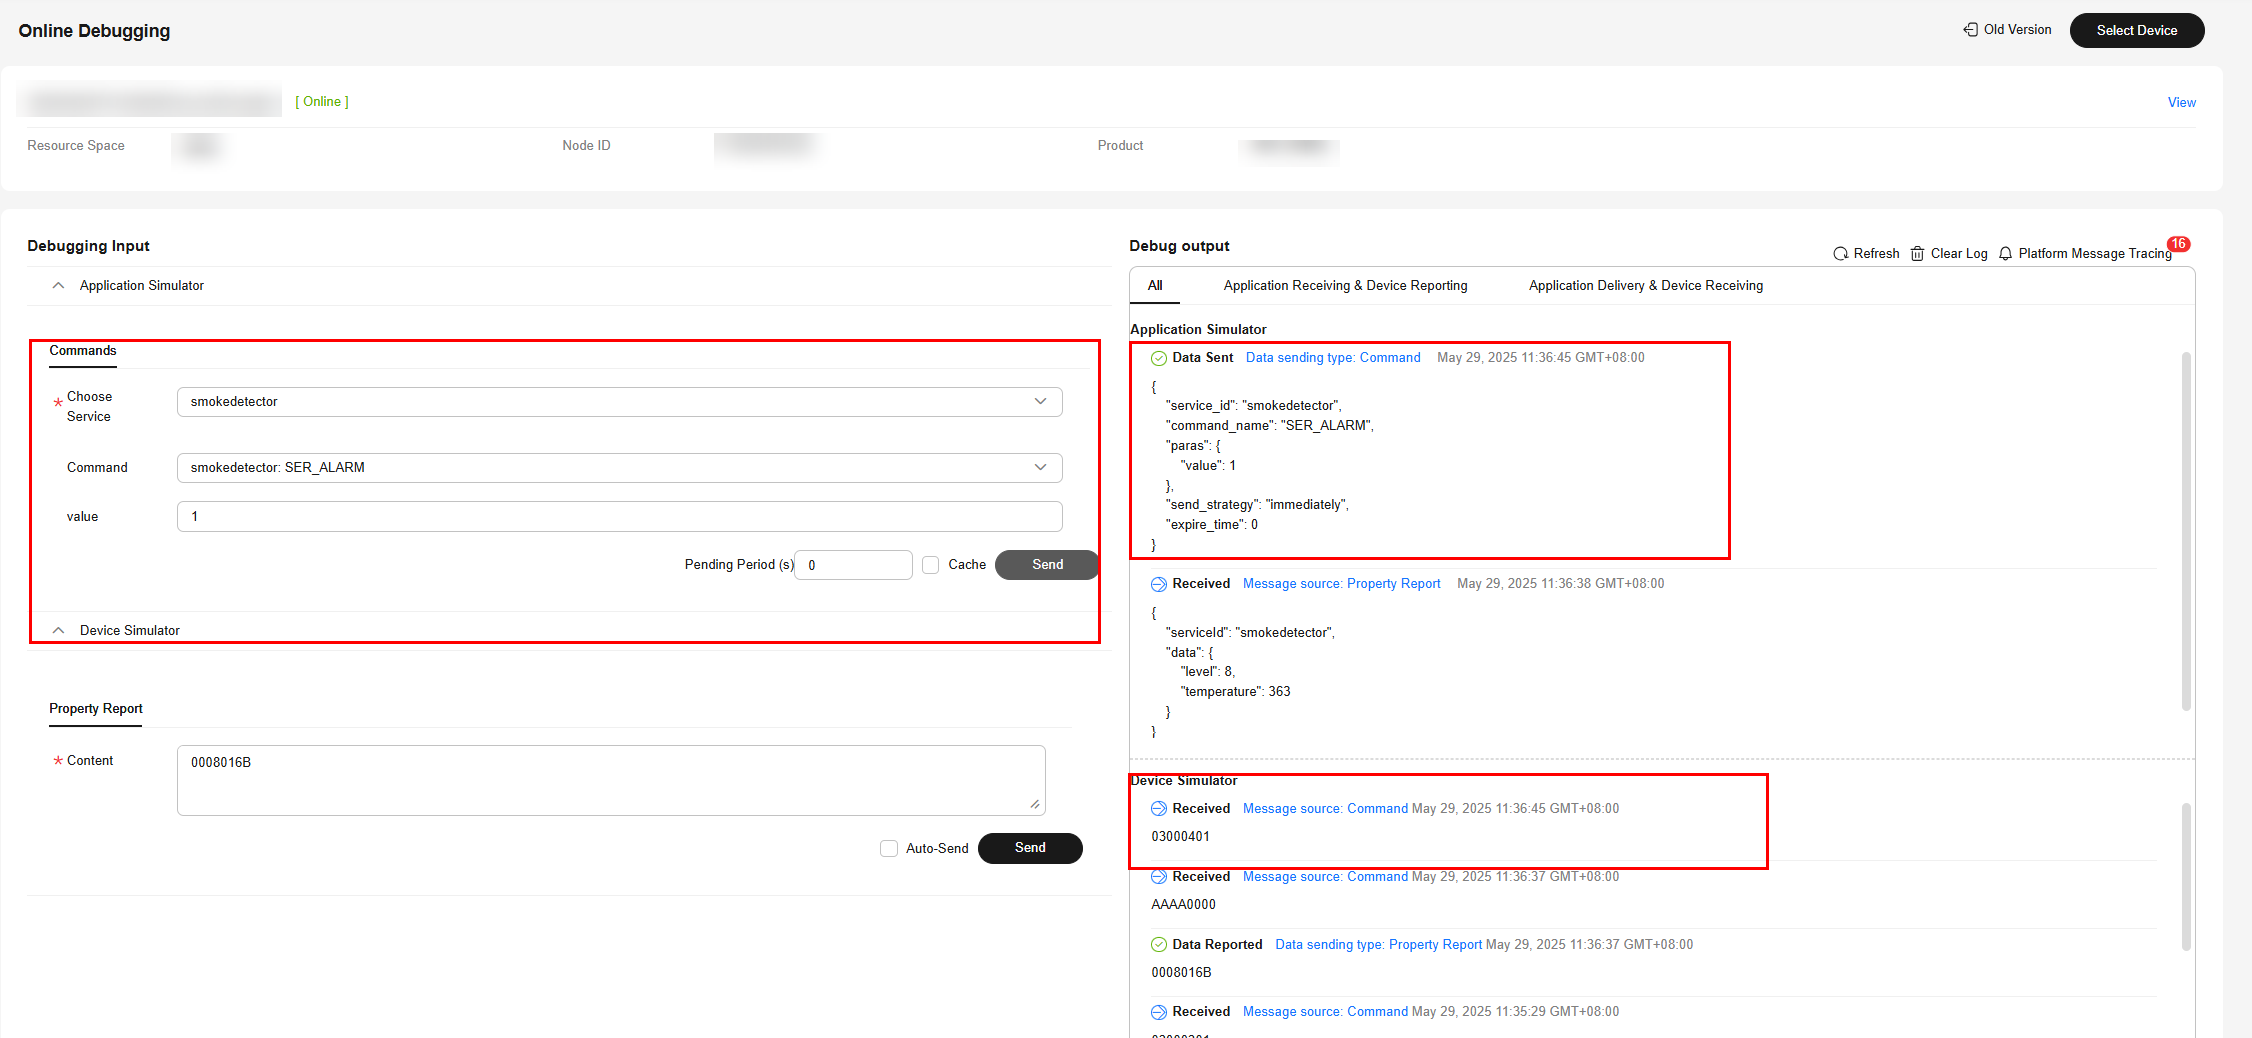

During online debugging of a CoAP virtual device, if the device simulator does not receive the delivered command, use the device simulator to report the property, and deliver the command again.
Summary
- If the codec needs to parse the command execution result, the mid field must be defined in the command and the command response.
- The length of the mid field in a command is two bytes. For each device, mid increases from 1 to 65535, and the corresponding code stream ranges from 0001 to FFFF.
- After a command is executed, the mid field in the reported command execution result must be the same as that in the delivered command. In this way, the IoT platform can update the command status.
Codec for Strings and Variable-Length Strings
If the smoke detector needs to report the description information in strings or variable-length strings, perform the following steps to create messages:
Product Model
Create a smoke sensor product and define the product model on the product details page.

Developing a Codec
- On the smoke detector details page, click the Codec Development tab and click Develop Codec.
- Click Add Message to add the other_info message and report the description of the string type. This step is performed to decode the binary code stream message of the string uploaded by the device to the JSON format so that the platform can understand the message. The following is a configuration example:
- Message Name: other_info
- Message Type: Data reporting
- Add Response Field: selected. After response fields are added, the platform delivers the response data set by the application to the device after receiving the data reported by the device.
- Response: AAAA0000 (default)
Figure 21 Adding a message - other_info
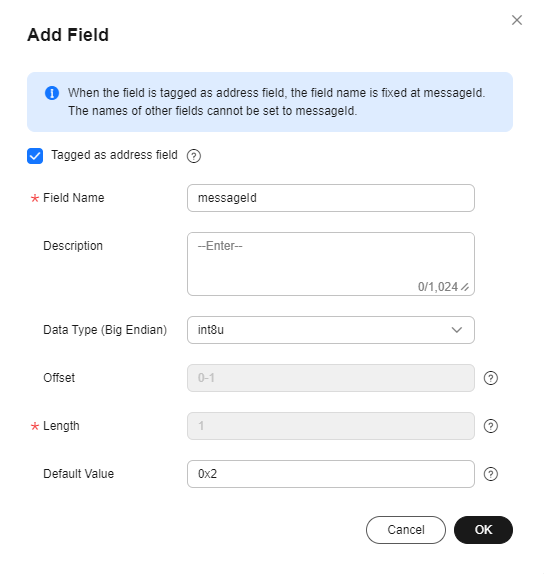
- Click Add Field to add the messageId field, which indicates the message type. In this scenario, the value 0x0 is used to identify the message that reports the fire severity and temperature, 0x1 is used to identify the message that reports only the temperature, and 0x2 is used to identify the message that reports the description (of the string type). For details about the message ID, data type, length, default value, and offset, see 1.
Figure 22 Adding a field - messageId (0x2)
- Add the other_info field to indicate the description of the string type. In this scenario, set Data Type to string and Length to 6. For details about the field name, default value, and offset, see 2.
Figure 23 Adding a field - other_info

- Click Add Message, add the other_info2 message name, and configure the data reporting message to report the description of the variable-length string type. This step is performed to decode the binary code stream message of variable-length strings uploaded by the device to the JSON format so that the platform can understand the message. The following is a configuration example:
- Message Name: other_info2
- Message Type: Data reporting
- Add Response Field: selected. After response fields are added, the platform delivers the response data set by the application to the device after receiving the data reported by the device.
- Response: AAAA0000 (default)
Figure 24 Adding a message - other_info2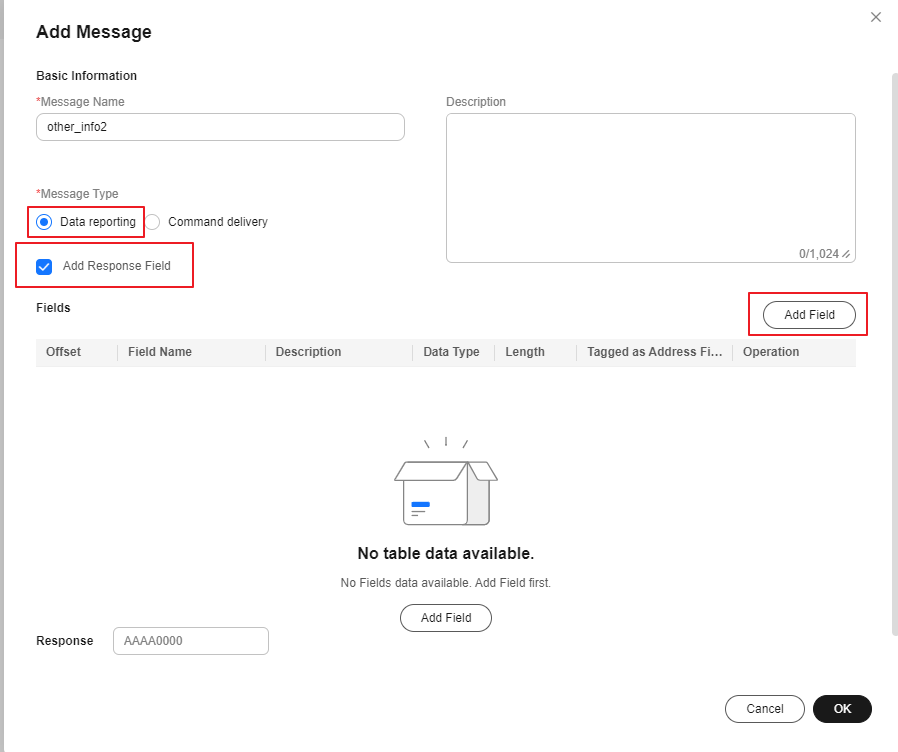
- Add the messageId field to indicate the message type. In this scenario, the value 0x0 is used to identify the message that reports the fire severity and temperature, 0x1 is used to identify the message that reports only the temperature, and 0x3 is used to identify the message that reports the description (of the variable-length string type). For details about the message ID, data type, length, default value, and offset, see 1.
Figure 25 Adding a field - messageId (0x3)

- Add the length field to indicate the length of a variable-length string. Data Type is configured based on the length of the variable-length string. If the string contains 255 or fewer characters in this scenario, set this parameter to int8u. For details about the length, default value, and offset, see 2.
Figure 26 Adding a field - length

- Add the other_info field and set Data Type to varstring, which indicates the description of the variable-length string type. Set Length Correlation Field to length, indicating that the length of the current variable-length string is determined by the reported value of length. The default mask is 0xff, which is used to calculate the actual length of the field. For example, if the value of Length Correlation Field is 5, the binary value is 00000101. If the mask is 0xff, the binary value is 11111111. The result of the AND operation on these two values is 00000101, that is, 5 in decimal format. Therefore, the length of this field that takes effect is 5 bytes. For example, if the reported data is 03051234567890, its message ID is 03, its length is 5 bytes, and the code stream corresponding to other_info is 1234567890.
Figure 27 Adding a field - other_info as varstring

- Drag the property fields in Device Model on the right to set up a mapping between the corresponding fields in the data reporting messages.
Figure 28 Developing a codec - Data reporting field mapping

- Click Save and then Deploy to deploy the codec on the platform.
Figure 29 Deploying a codec

Testing the Codec
- On the product details page of the smoke detector, click the Online Debugging tab and click Add Test Device.
- You can use a real device or virtual device for debugging based on your service scenario. For details, see Online Debugging. The following uses a virtual device as an example to describe how to debug a codec.
In the Add Test Device dialog box, select Virtual device for Device Type and click OK. The virtual device name contains DeviceSimulator. Only one virtual device can be created for each product.
Figure 30 Online debugging - Creating a virtual device
- Click Debug to access the debugging page.
Figure 31 Entering debugging

- Use the device simulator to report the description of the string type.
In the hexadecimal code stream example (0231), 02 indicates the messageId field and specifies that this message reports the description of the string type. 31 indicates the description and its length is one byte.
View the data reporting result ({other_info=null}) in Application Simulator. The length of the description is less than six bytes. Therefore, the codec cannot parse the description.
Figure 32 Simulating data reporting - other_info too short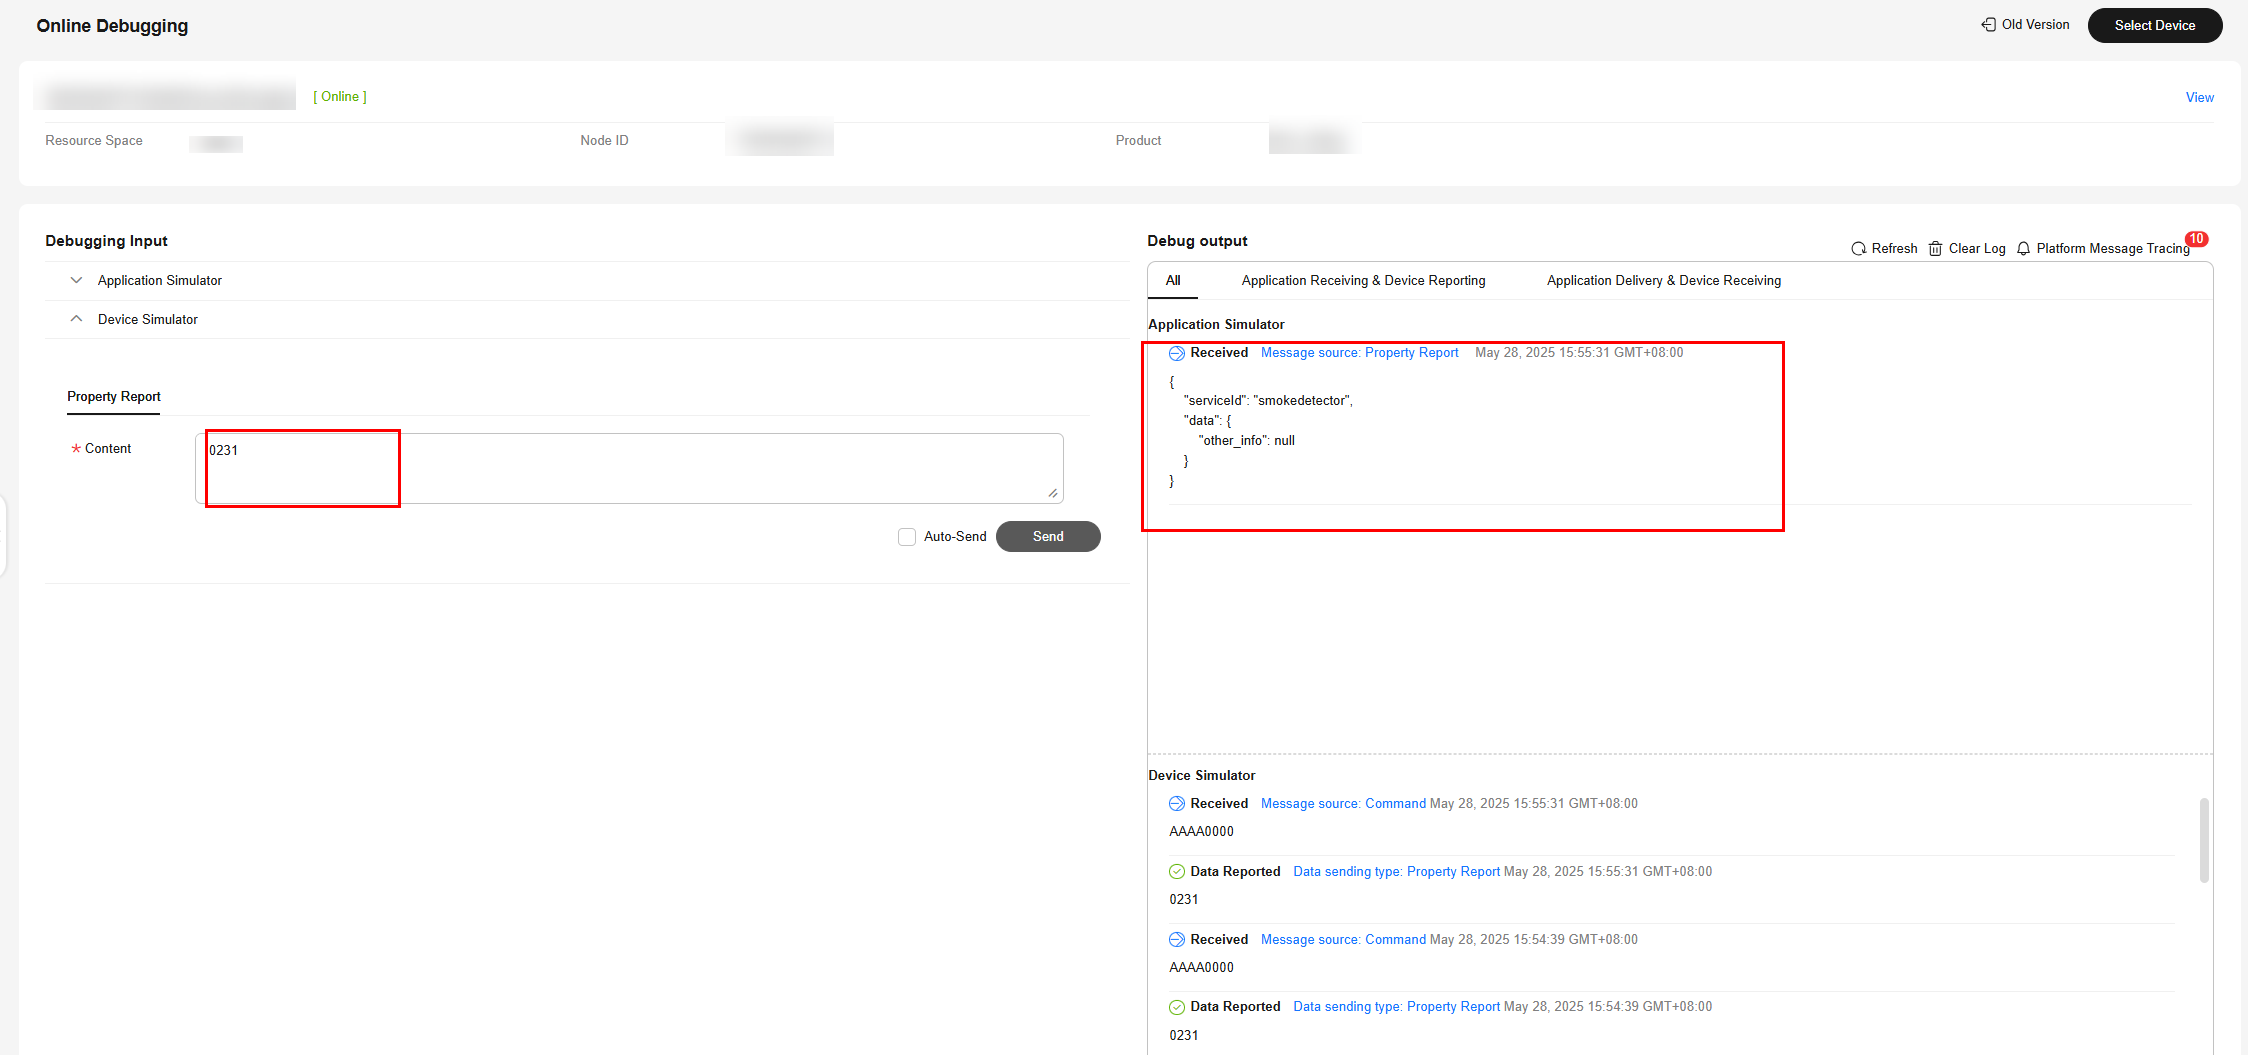
In the hexadecimal code stream example (02313233343536), 02 indicates the messageId field and specifies that this message reports the description of the string type. 313233343536 indicates the description and its length is six bytes.
View the data reporting result ({other_info=123456}) in Application Simulator. The length of the description is six bytes. The description is parsed successfully by the codec.
Figure 33 Simulating data reporting - other_info length proper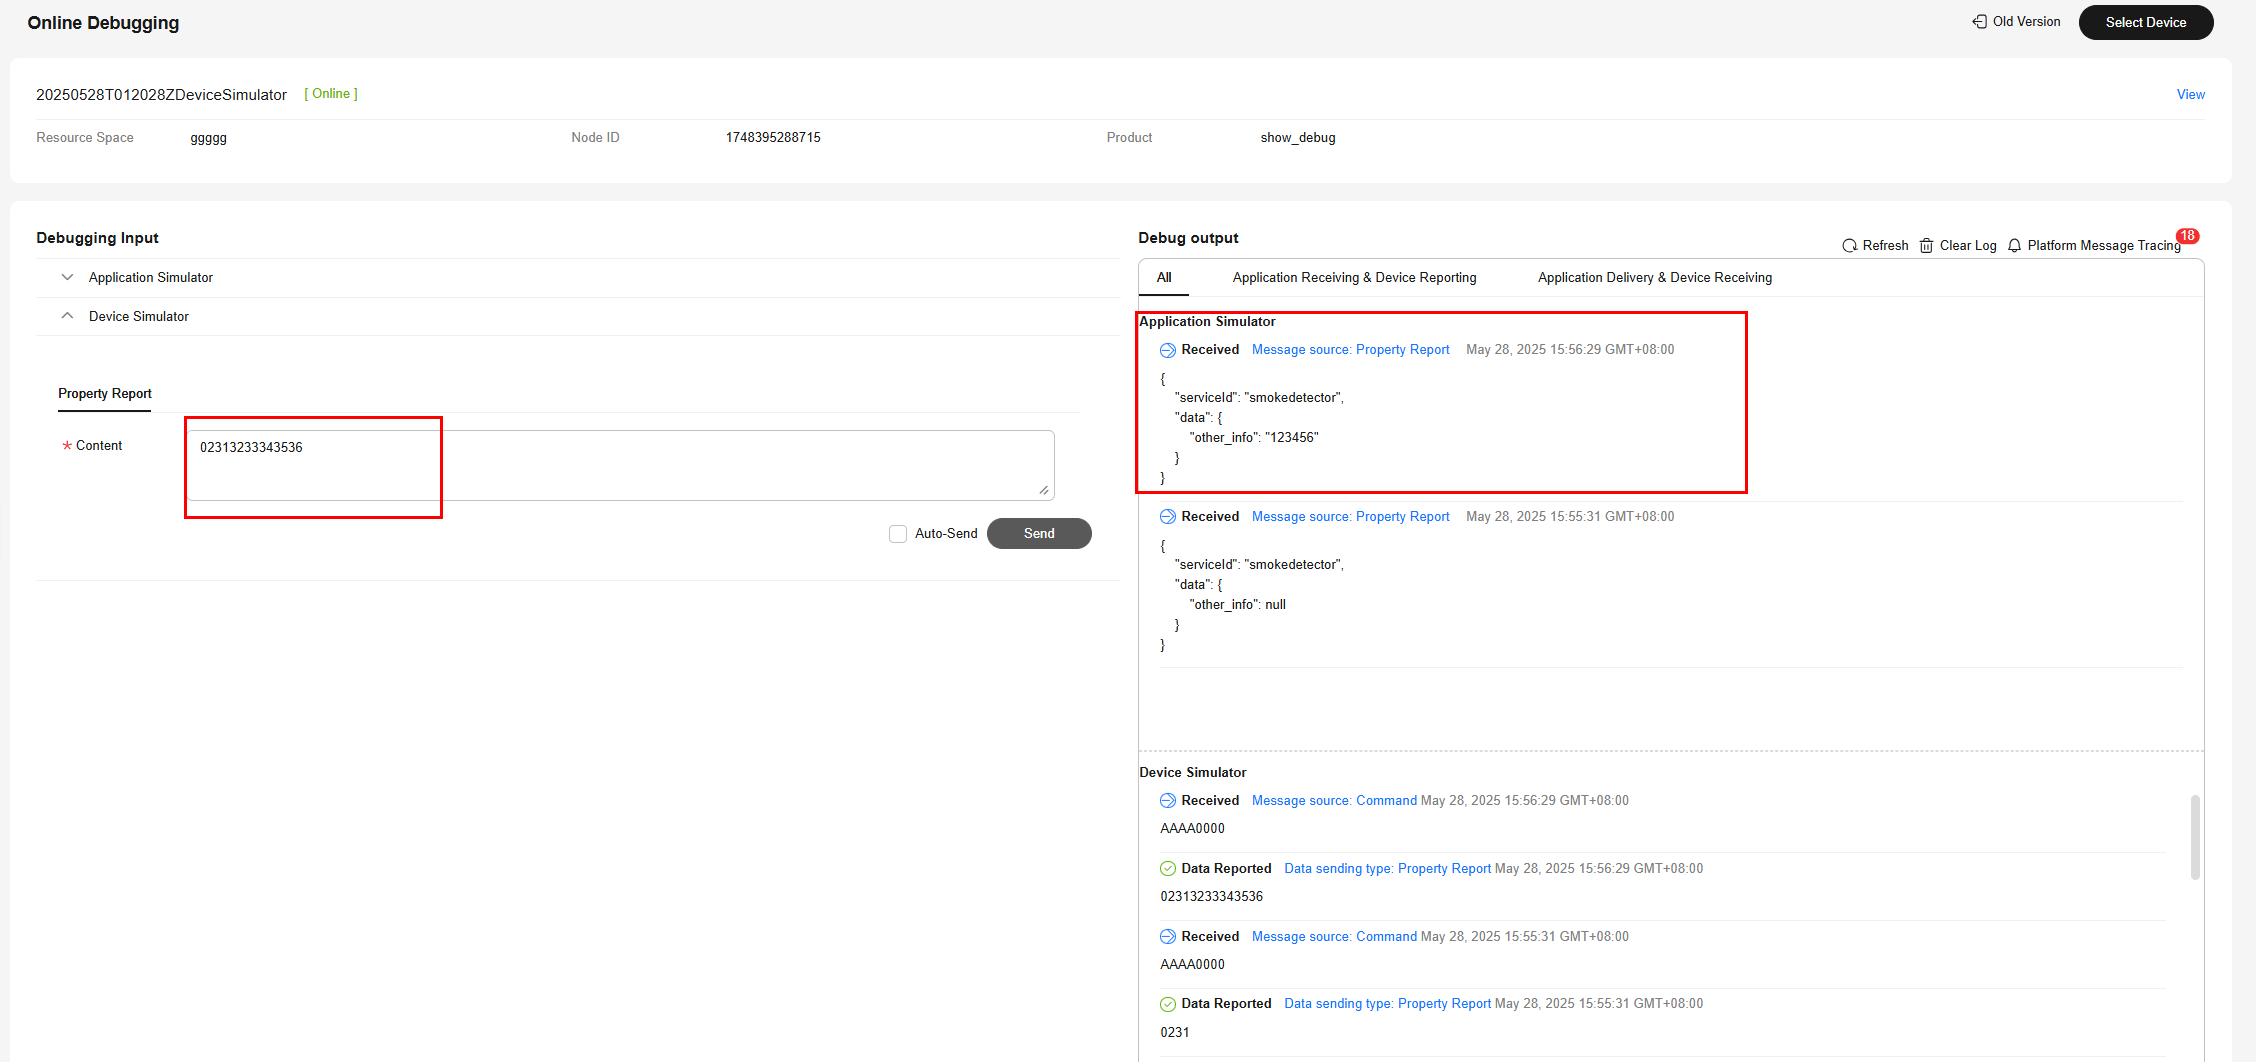
In the hexadecimal code stream example (023132333435363738), 02 indicates the messageId field and specifies that this message reports the description of the string type. 3132333435363738 indicates the description and its length is eight bytes.
View the data reporting result ({other_info=123456}) in Application Simulator. The length of the description exceeds six bytes. Therefore, the first six bytes are intercepted and parsed by the codec.
Figure 34 Simulating data reporting - other_info too long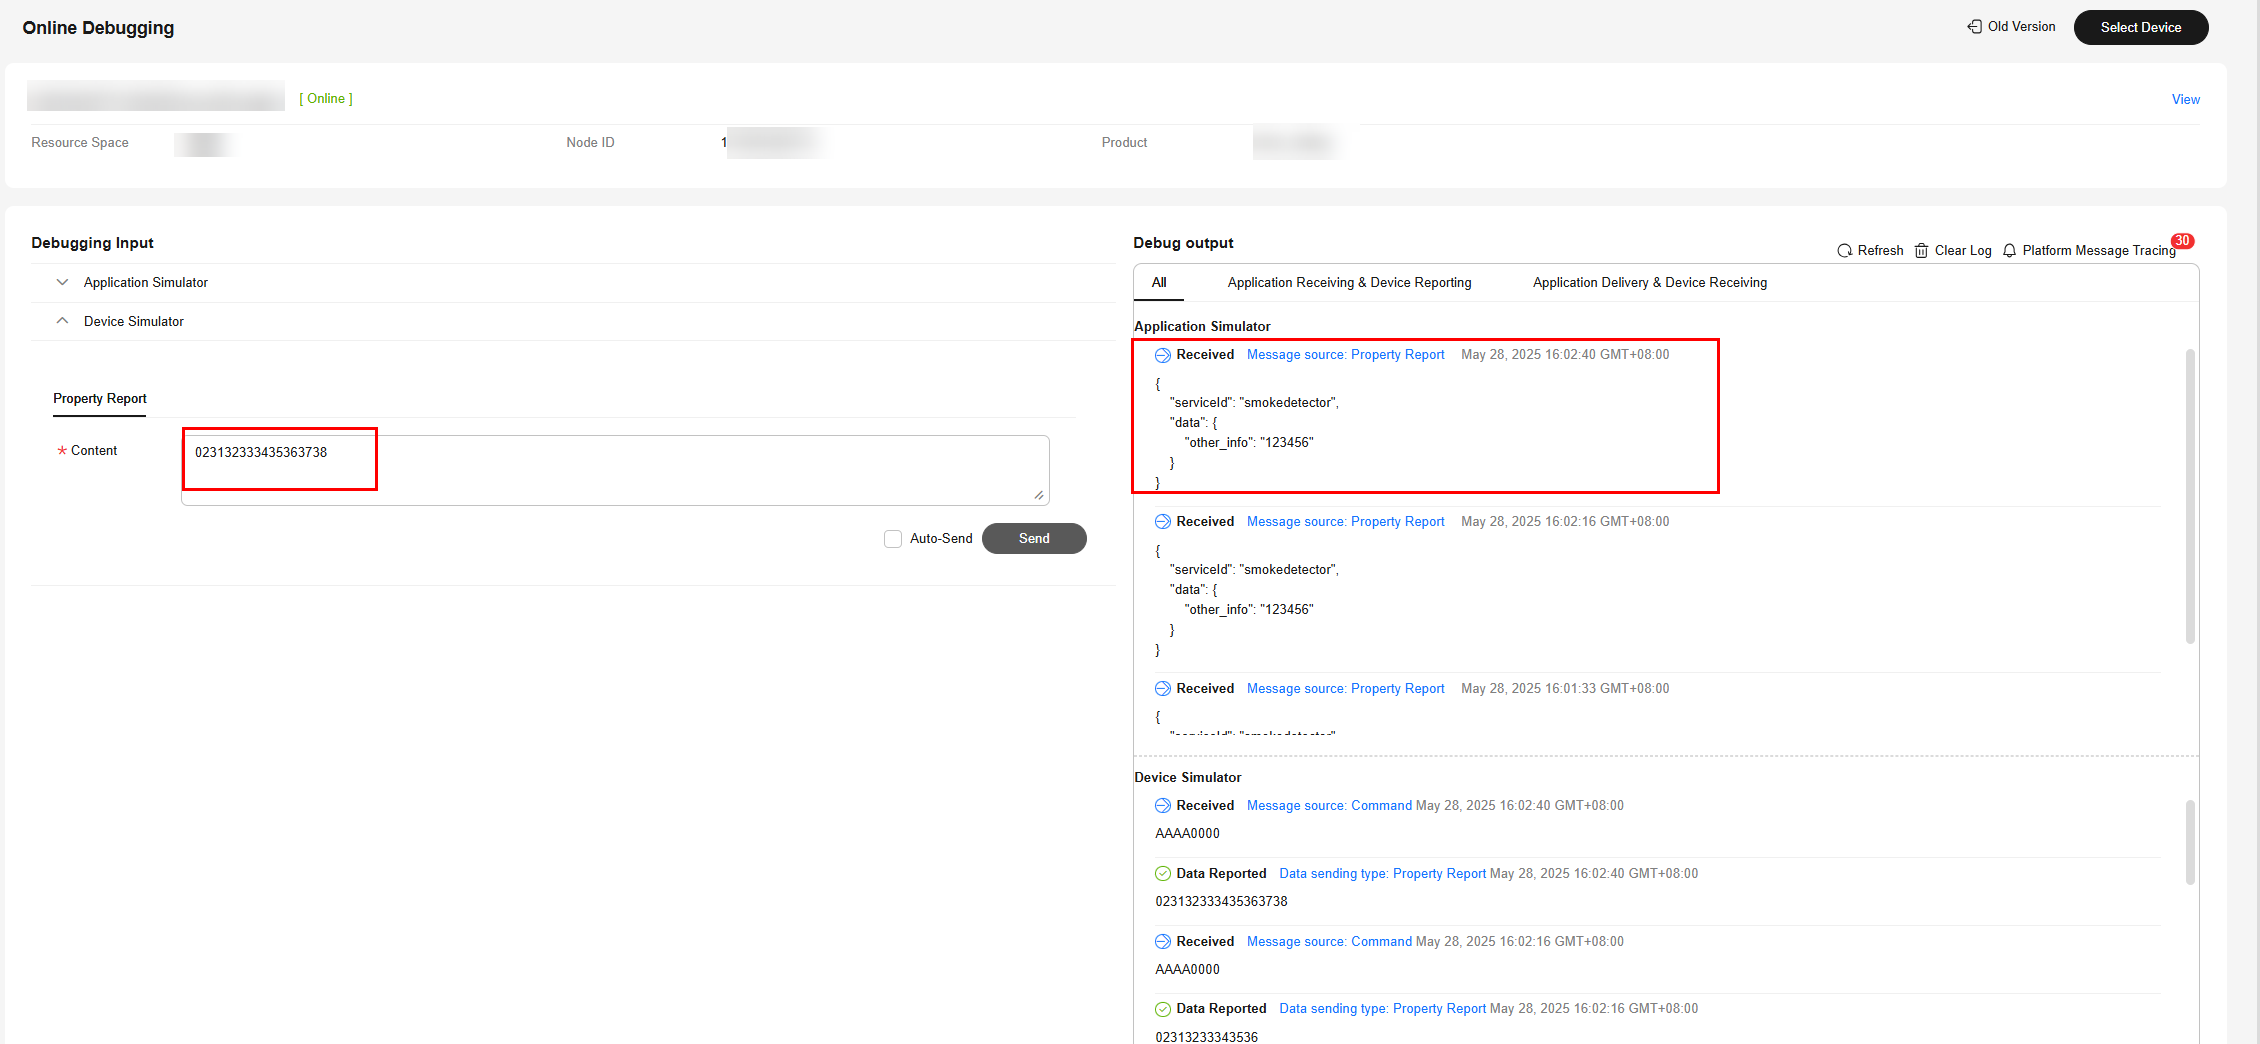
In the hexadecimal code stream example (02013132333435), 02 indicates the messageId field and specifies that this message reports the description of the string type. 013132333435 indicates the description and its length is six bytes.
View the data reporting result ({other_info=\u000112345}) in Application Simulator. In the ASCII code table, 01 indicates start of headline which cannot be represented by specific characters. Therefore, 01 is parsed to \u0001.
Figure 35 Simulating data reporting - other_info as ASCII code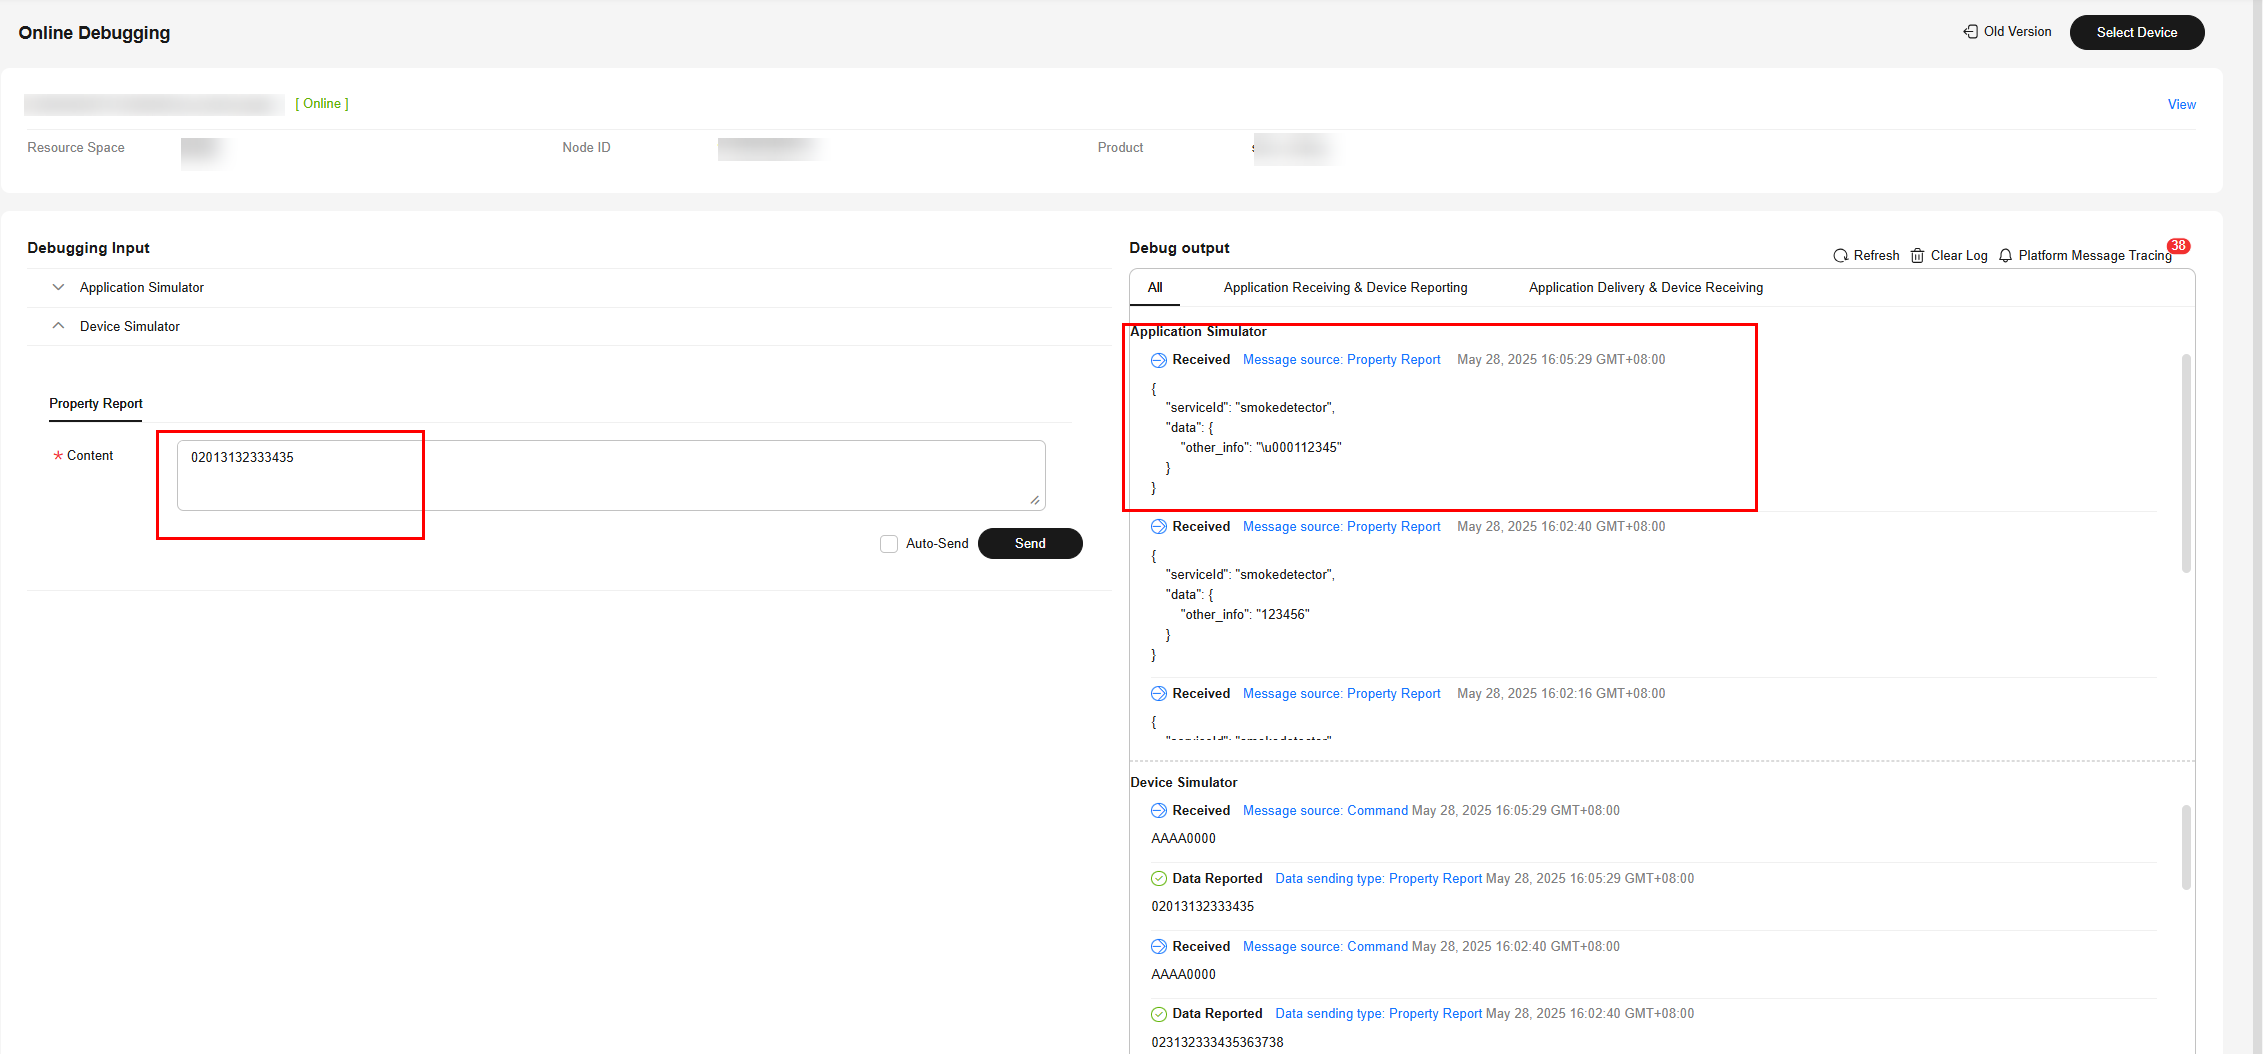
- Use the device simulator to report the description of the variable-length string type.
In the hexadecimal code stream example (030141), 03 indicates the messageId field and specifies that this message reports the description of the variable-length string type. 01 indicates the length of the description. 41 indicates the description content and its length is one byte.
View the data reporting result ({other_info=A}) in Application Simulator. A corresponds to 41 in the ASCII code table.
Figure 36 Simulating data reporting - other_info as variable-length character string 1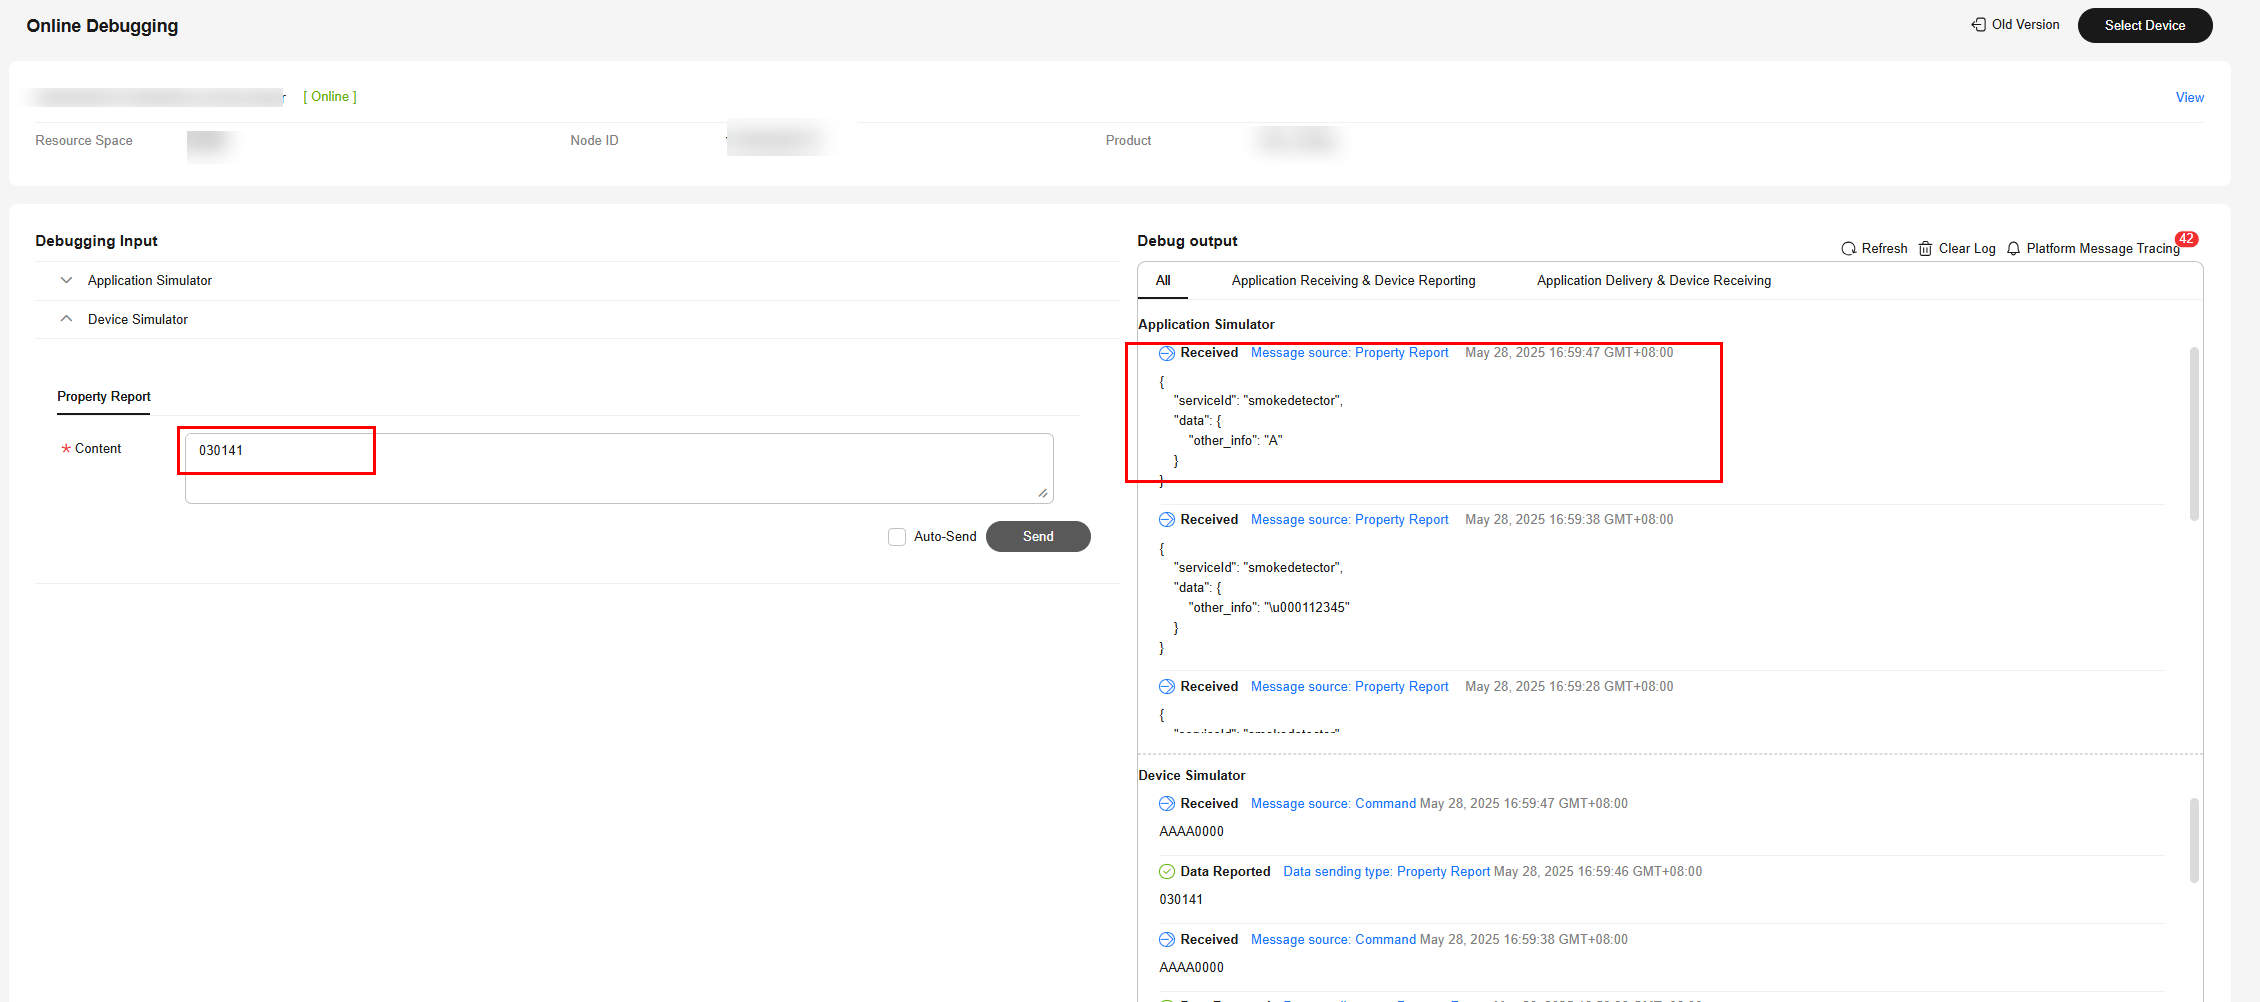
In the hexadecimal code stream example (03024142), 03 indicates the messageId field and specifies that this message reports the description of the variable-length string type. 02 indicates the length of the description. 4142 indicates the description content and its length is two bytes.
View the data reporting result ({other_info=AB}) in Application Simulator. A corresponds to 41 and B corresponds to 42 in the ASCII code table.
Figure 37 Simulating data reporting - other_info as variable-length character string 2
In the hexadecimal code stream example (030341424344), 03 indicates the messageId field and specifies that this message reports the description of the variable-length string type. The second 03 indicates the length of the description. 41424344 indicates the description content and its length is four bytes.
View the data reporting result ({other_info=ABC}) in Application Simulator. The length of the description exceeds three bytes. Therefore, the first three bytes are intercepted and parsed. In the ASCII code table, A corresponds to 41, B to 42, and C to 43.
Figure 38 Simulating data reporting - other_info as variable-length character string 3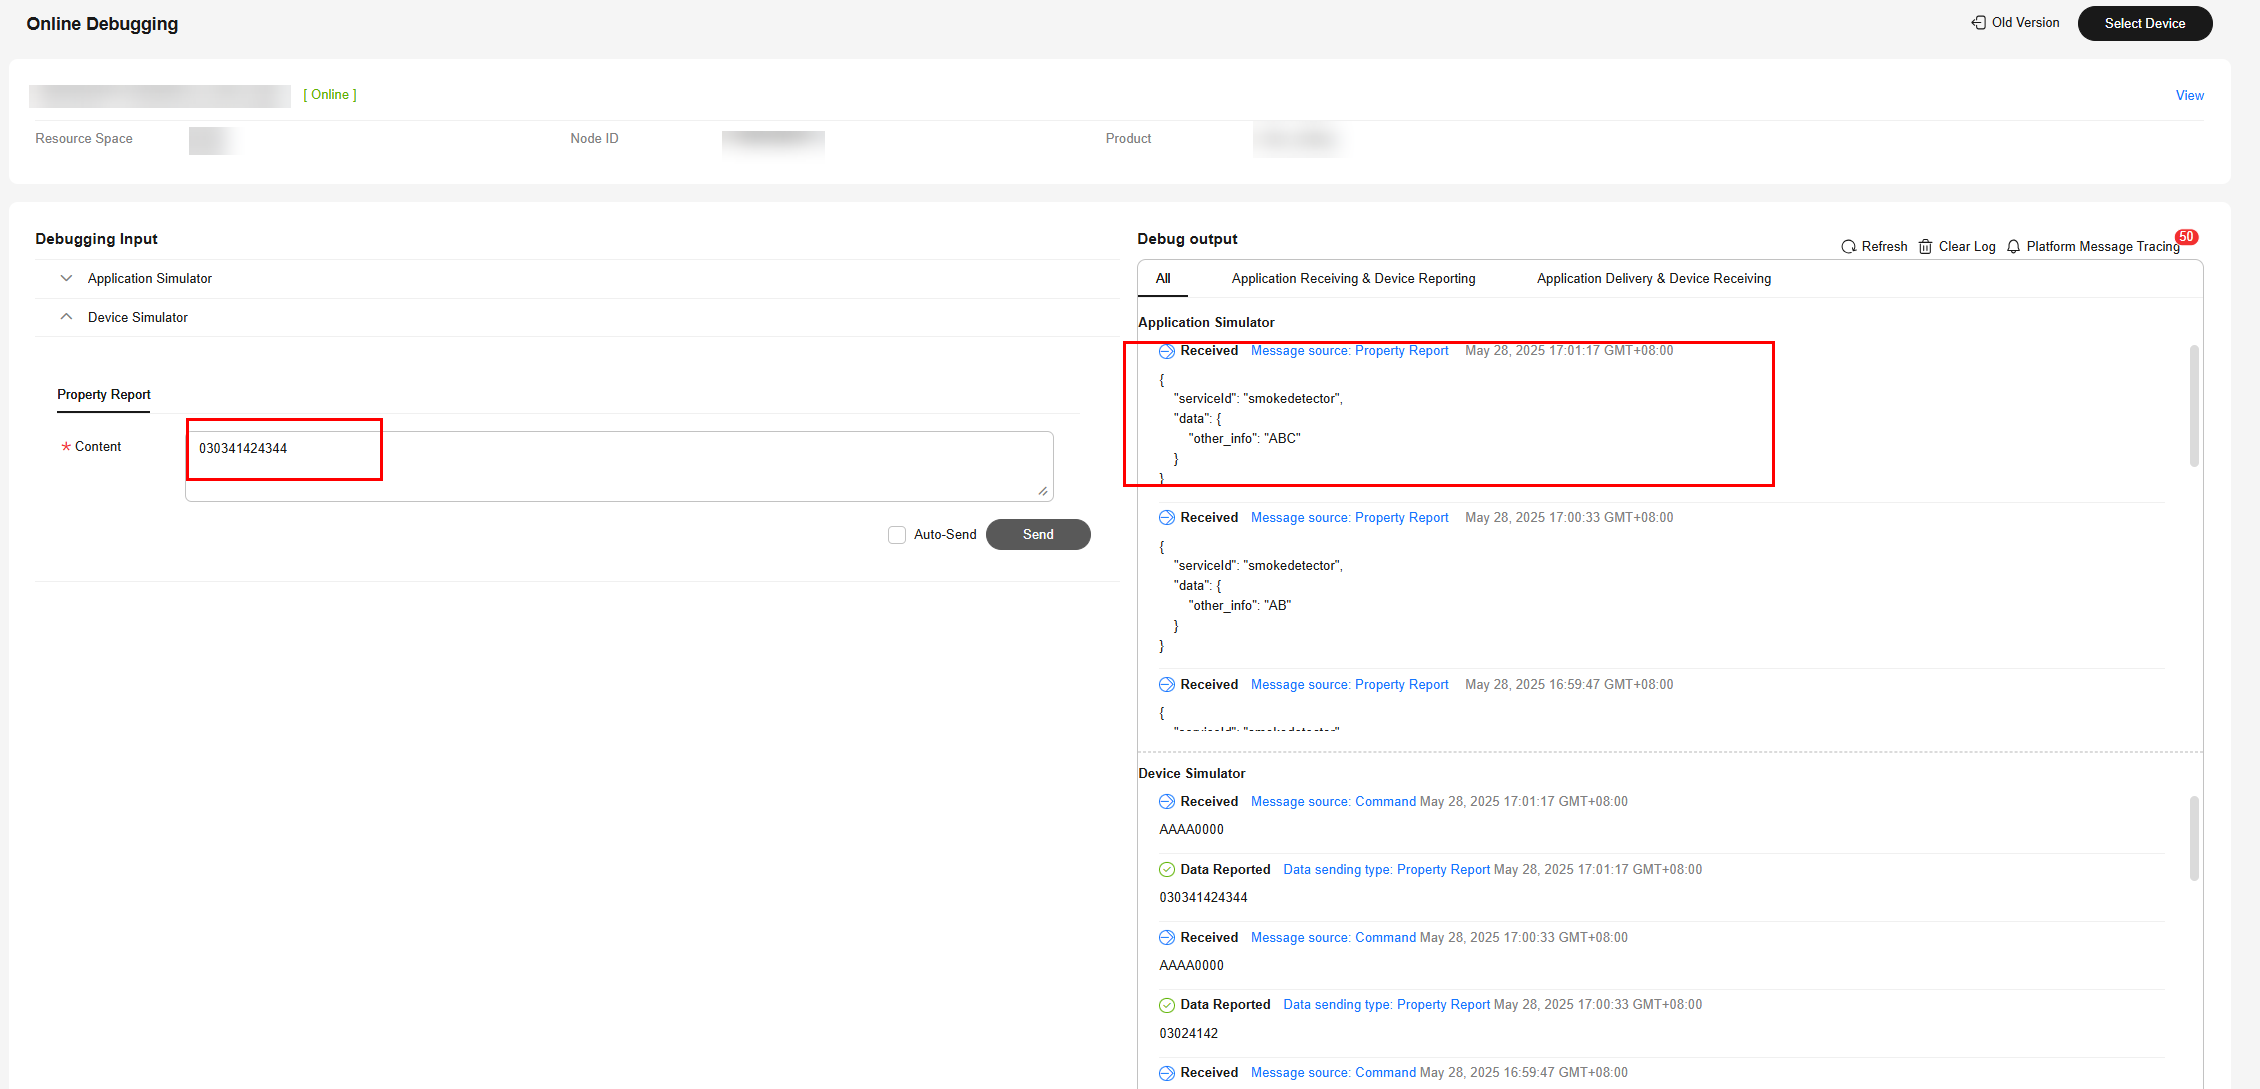
In the hexadecimal code stream example (0304414243), 03 indicates the messageId field and specifies that this message reports the description of the variable-length string type. 04 indicates the string length (four bytes) and its length is one byte. 414243 indicates the description and its length is three bytes.
View the data reporting result ({other_info=null}) in Application Simulator. The length of the description is less than four bytes. The codec fails to parse the description.
Figure 39 Simulating data reporting - other_info as variable-length character string 4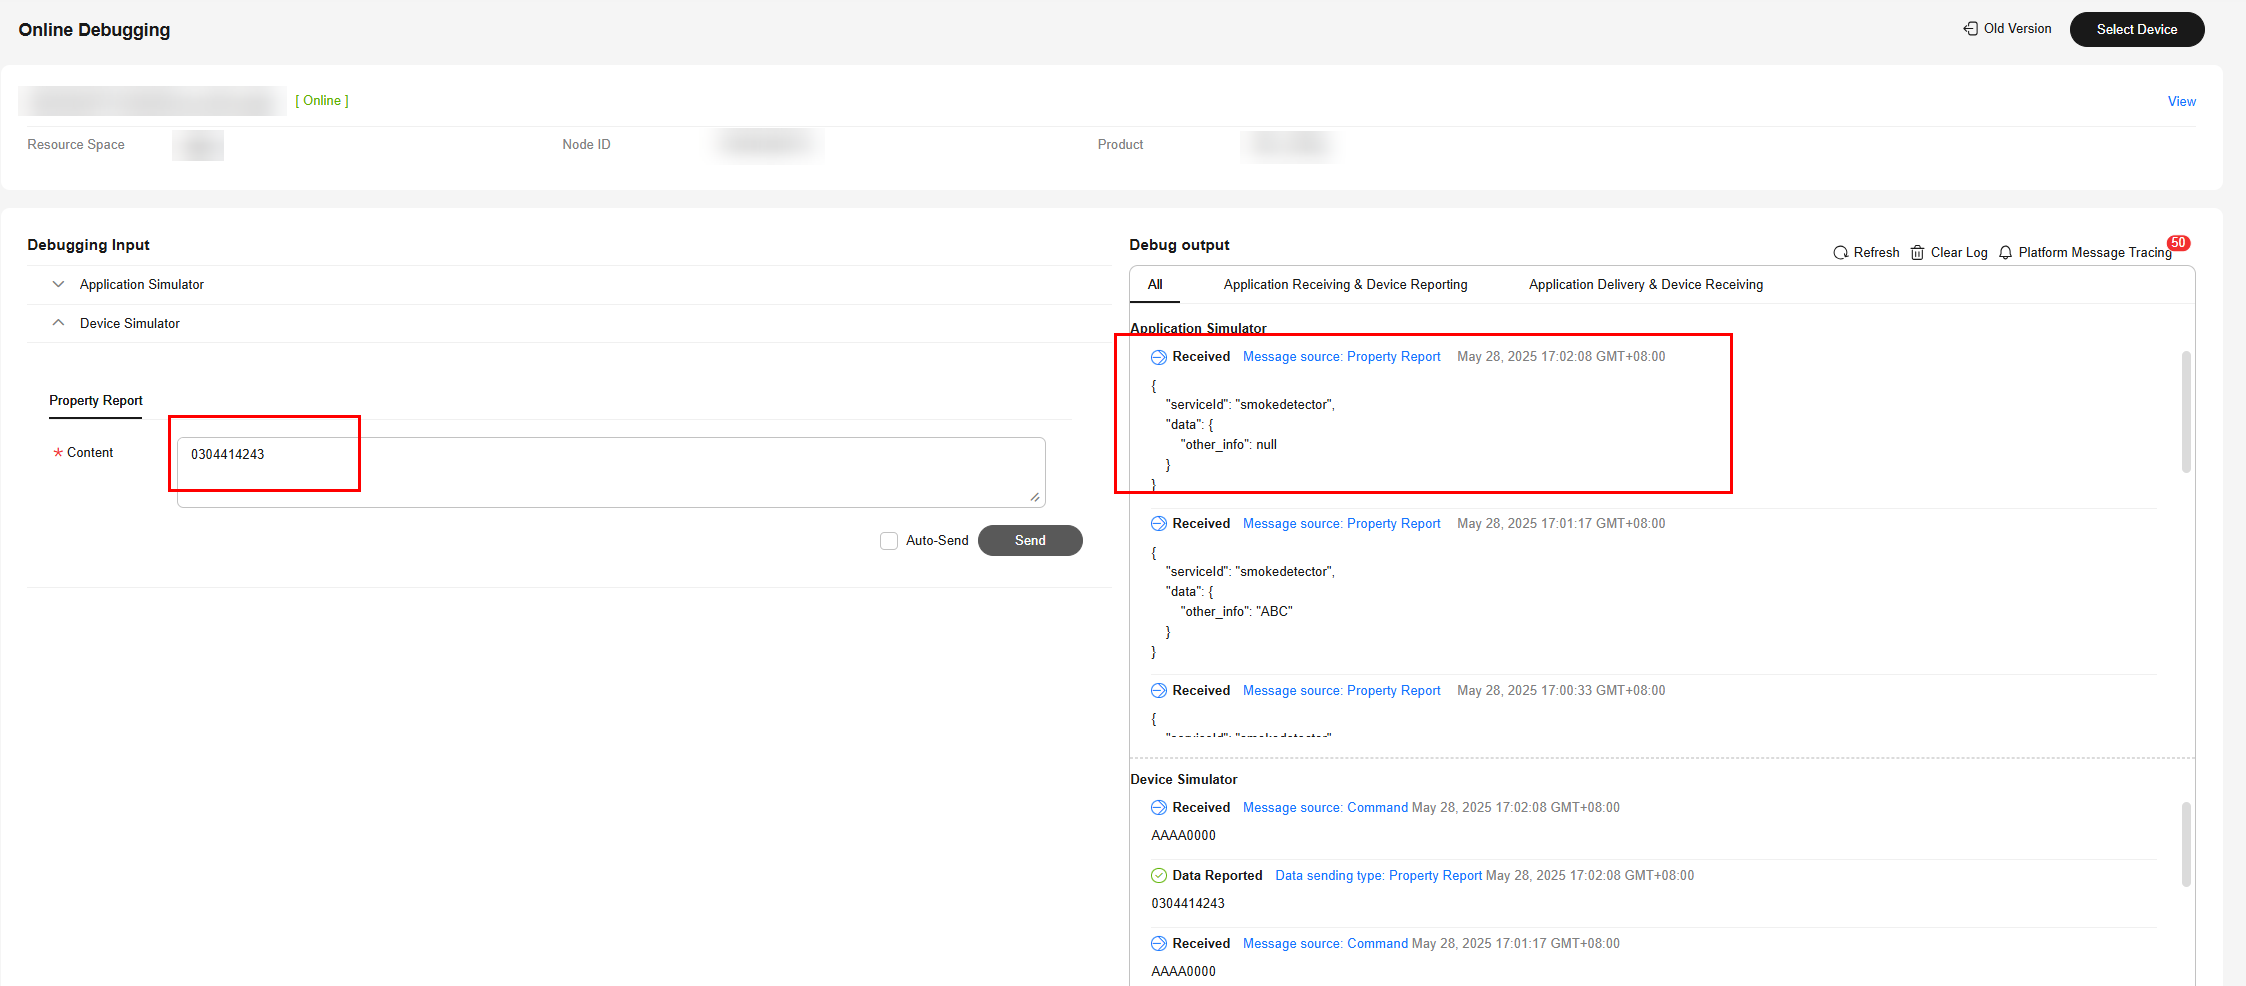
Summary
- When data is a string or a variable-length string, the codec processes the data based on the ASCII code. When data is reported, the hexadecimal code stream is decoded to a string. For example, 21 is parsed to an exclamation mark (!), 31 to 1, and 41 to A. When a command is delivered, the string is encoded into a hexadecimal code stream. For example, an exclamation mark (!) is encoded into 21, 1 into 31, and A into 41.
- When the data type of a field is varstring (variable-length string type), the field must be associated with the length field. The data type of the length field must be int.
- For variable-length strings, the codecs for command delivery and data reporting are developed in the same way.
- Codecs developed online encode and decode strings and variable-length strings using the ASCII hexadecimal standard table. During decoding (data reporting), if the parsing results cannot be represented by specific characters such as start of headline, start of text, and end of text, the \u+2 byte code stream values are used to indicate the results. For example, 01 is parsed to \u0001 and 02 to \u0002. If the parsing results can be represented by specific characters, specific characters are used.
Codec for Arrays and Variable-Length Arrays
If the smoke detector needs to report the description information in arrays or variable-length arrays, perform the following steps to create messages:
Product Model
Define the product model on the product details page of the smoke detector.

Developing a Codec
- On the smoke detector details page, click the Codec Development tab and click Develop Codec.
- Click Add Message to add the other_info message and report the description of the array type. This step is performed to decode the array binary code stream message uploaded by the device to the JSON format so that the platform can understand the message. The following is a configuration example:
- Message Name: other_info
- Message Type: Data reporting
- Add Response Field: selected. After response fields are added, the platform delivers the response data set by the application to the device after receiving the data reported by the device.
- Response: AAAA0000 (default)
Figure 41 Adding a message - other_info
- Click Add Field to add the messageId field, which indicates the message type. In this scenario, the value 0x0 is used to identify the message that reports the fire severity and temperature, 0x1 is used to identify the message that reports only the temperature, and 0x2 is used to identify the message that reports the description (of the array type). For details about the message ID, data type, length, default value, and offset, see 1.
Figure 42 Adding a field - messageId (0x2)

- Add the other_info field and set Data Type to array, which indicates the description of the array type. In this scenario, set Length to 5. For details about the field name, default value, and offset, see 2.
Figure 43 Adding a field - other_info as array

- Click Add Message to add the other_info2 message and report the description of the variable-length array type. This step is performed to decode the binary code stream message of variable-length arrays uploaded by the device to the JSON format so that the platform can understand the message. The following is a configuration example:
- Message Name: other_info2
- Message Type: Data reporting
- Add Response Field: selected. After response fields are added, the platform delivers the response data set by the application to the device after receiving the data reported by the device.
- Response: AAAA0000 (default)
Figure 44 Adding a message - other_info2
- Click Add Field to add the messageId field, which indicates the message type. In this scenario, the value 0x0 is used to identify the message that reports the fire severity and temperature, 0x1 is used to identify the message that reports only the temperature, and 0x3 is used to identify the message that reports the description (of the variable-length array type). For details about the message ID, data type, length, default value, and offset, see 1.
Figure 45 Adding a field - messageId (0x3)

- Add the length field to indicate the length of an array. Data Type is configured based on the length of the variable-length array. If the array contains 255 or fewer characters, set this parameter to int8u. For details about the length, default value, and offset, see 2.
Figure 46 Adding a field - length

- Add the other_info field and set Data Type to variant, which indicates the description of the variable-length array type. Set Length Correlation Field to length, indicating that the length of the current variable-length array is determined by the reported value of length. The default mask is 0xff, which is used to calculate the actual length of the array. For example, if the value of Length Correlation Field is 5, the binary value is 00000101. If the mask is 0xff, the binary value is 11111111. The result of the AND operation on these two values is 00000101, that is, 5 in decimal format. Therefore, the length of this array that takes effect is 5 bytes. For example, if the reported data is 03051234567890, its message ID is 03, its length is 5 bytes, and the code stream corresponding to other_info is 1234567890.
Figure 47 Adding a field - other_info as variant

- Drag the property fields in Device Model on the right to set up a mapping between the corresponding fields in the data reporting messages.
Figure 48 Developing a codec - Data reporting field mapping (other_info to variant)

- Click Save and then Deploy to deploy the codec on the platform.
Figure 49 Deploying a codec

Testing the Codec
- On the product details page of the smoke detector, click the Online Debugging tab and click Add Test Device.
- You can use a real device or virtual device for debugging based on your service scenario. For details, see Online Debugging. The following uses a virtual device as an example to describe how to debug a codec.
In the Add Test Device dialog box, select Virtual device for Device Type and click OK. The virtual device name contains DeviceSimulator. Only one virtual device can be created for each product.
Figure 50 Online debugging - Creating a virtual device
- Click Debug to access the debugging page.
Figure 51 Entering debugging

- Use the device simulator to report the description of the array type.
For example, a hexadecimal code stream (0211223344) is reported. In this code stream, 02 indicates the messageId field and specifies that this message reports the description of the array type. 11223344 indicates the description and its length is four bytes.
View the data reporting result ({other_info=null}) in Application Simulator. The length of the description is less than five bytes. Therefore, the codec cannot parse the description.
Figure 52 Simulating data reporting - other_info as array 1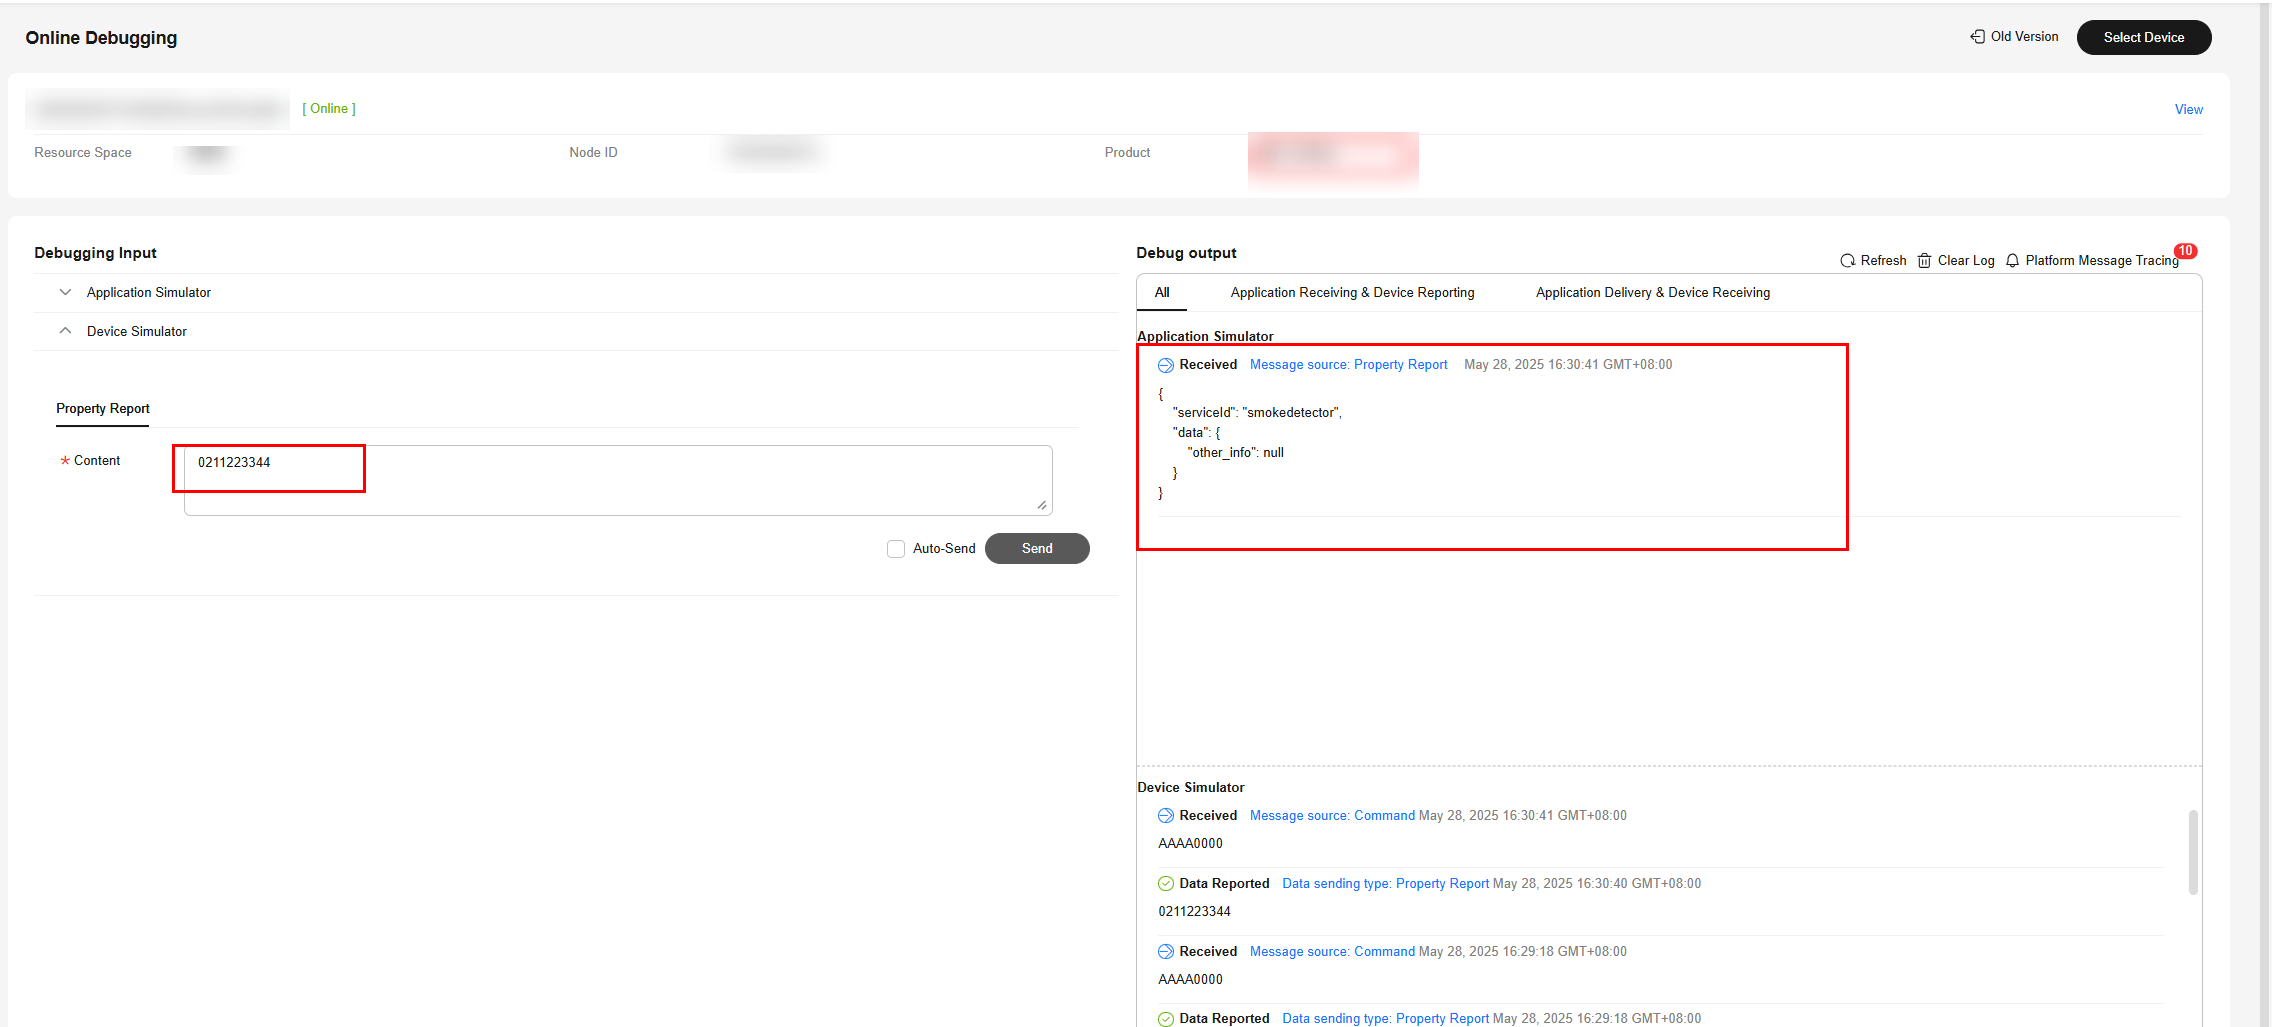
In the hexadecimal code stream example (021122334455), 02 indicates the messageId field and specifies that this message reports the description of the array type. 1122334455 indicates the description and its length is five bytes.
View the data reporting result ({serviceId: smokedetector, data: {"other_info":"ESIzRFU="}}) in Application Simulator. The length of the description is five bytes. The description is parsed successfully by the codec.
Figure 53 Simulating data reporting - other_info as array 2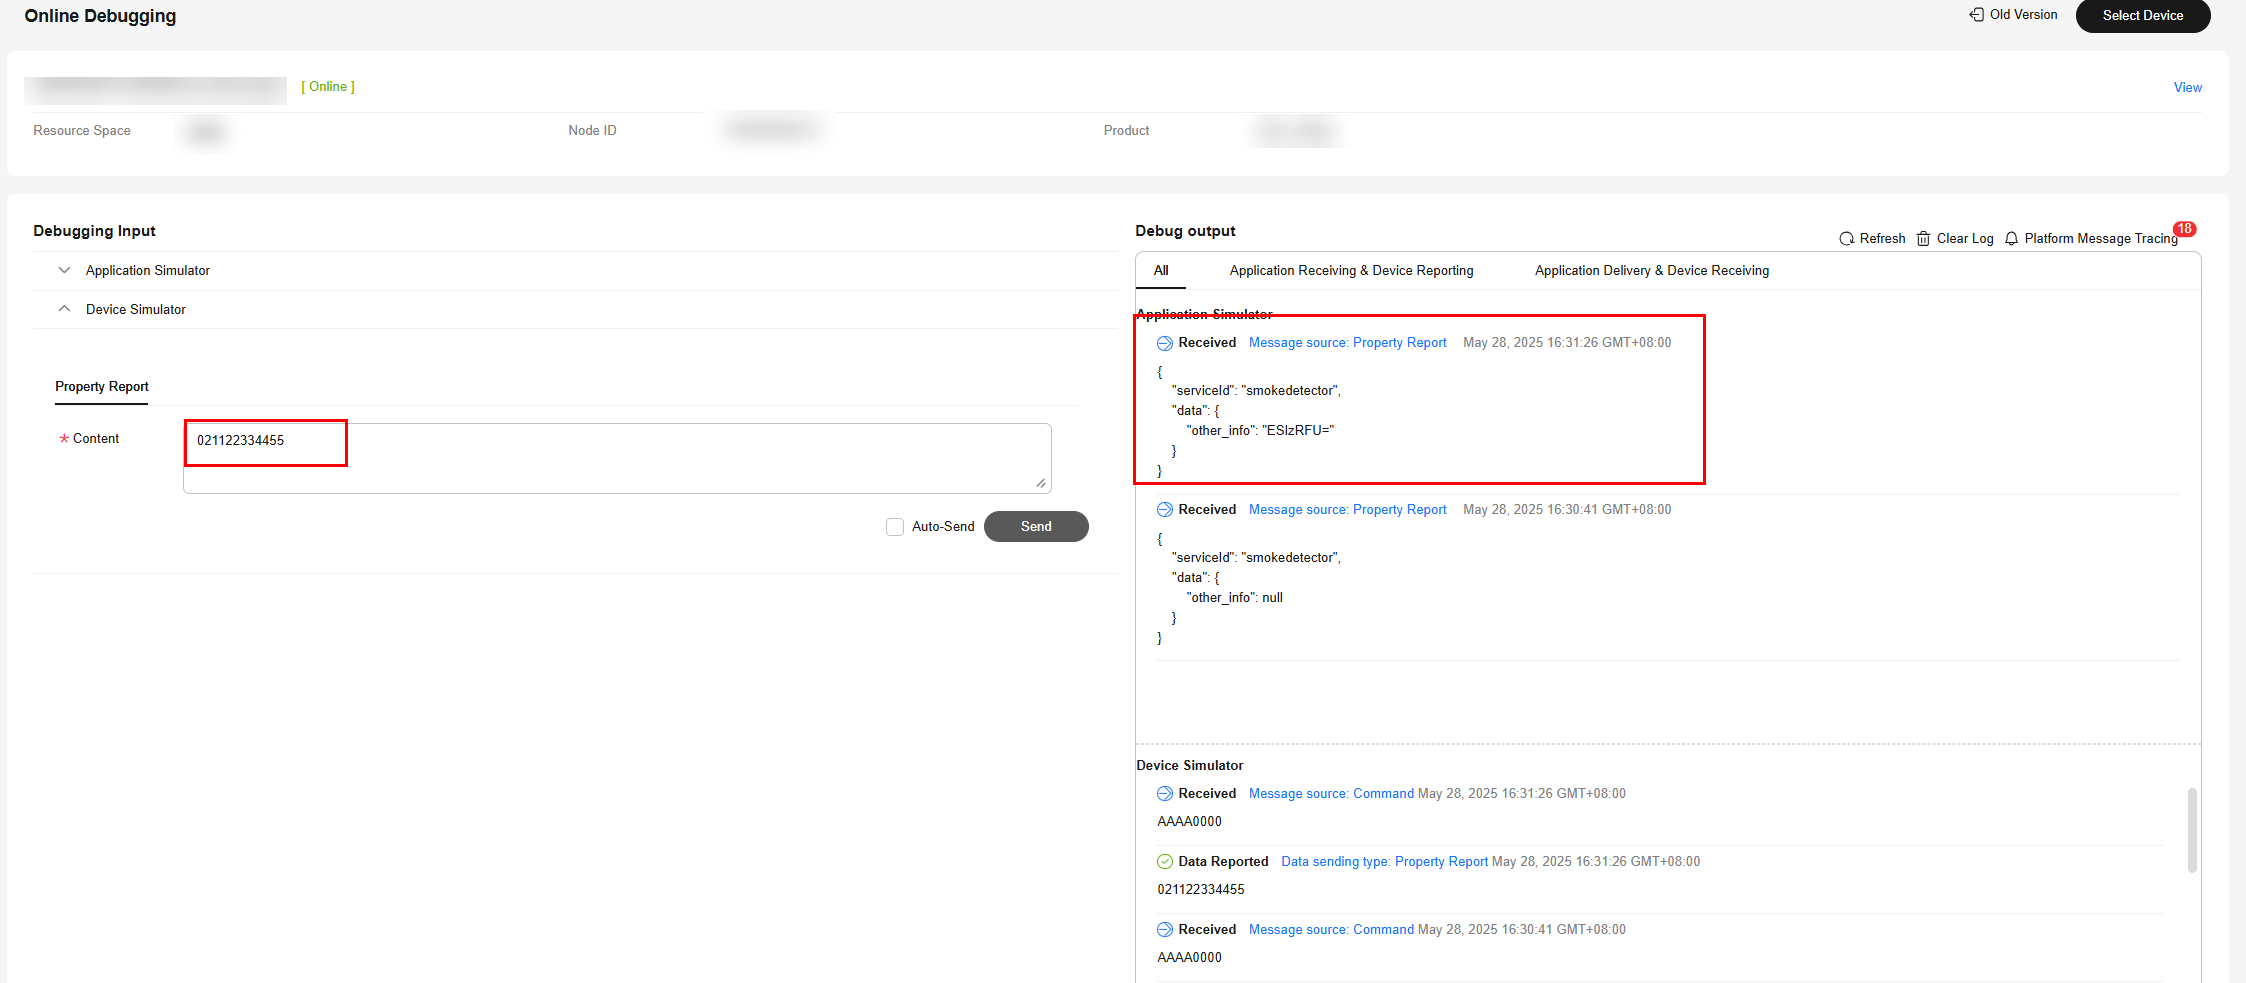
In the hexadecimal code stream example (02112233445566), 02 indicates the messageId field and specifies that this message reports the description of the array type. 112233445566 indicates the description and its length is six bytes.
View the data reporting result ({serviceId: smokedetector, data: {"other_info":"ESIzRFU="}}) in Application Simulator. The length of the description exceeds five bytes. Therefore, the first five bytes are intercepted and parsed by the codec.
Figure 54 Simulating data reporting - other_info as array 3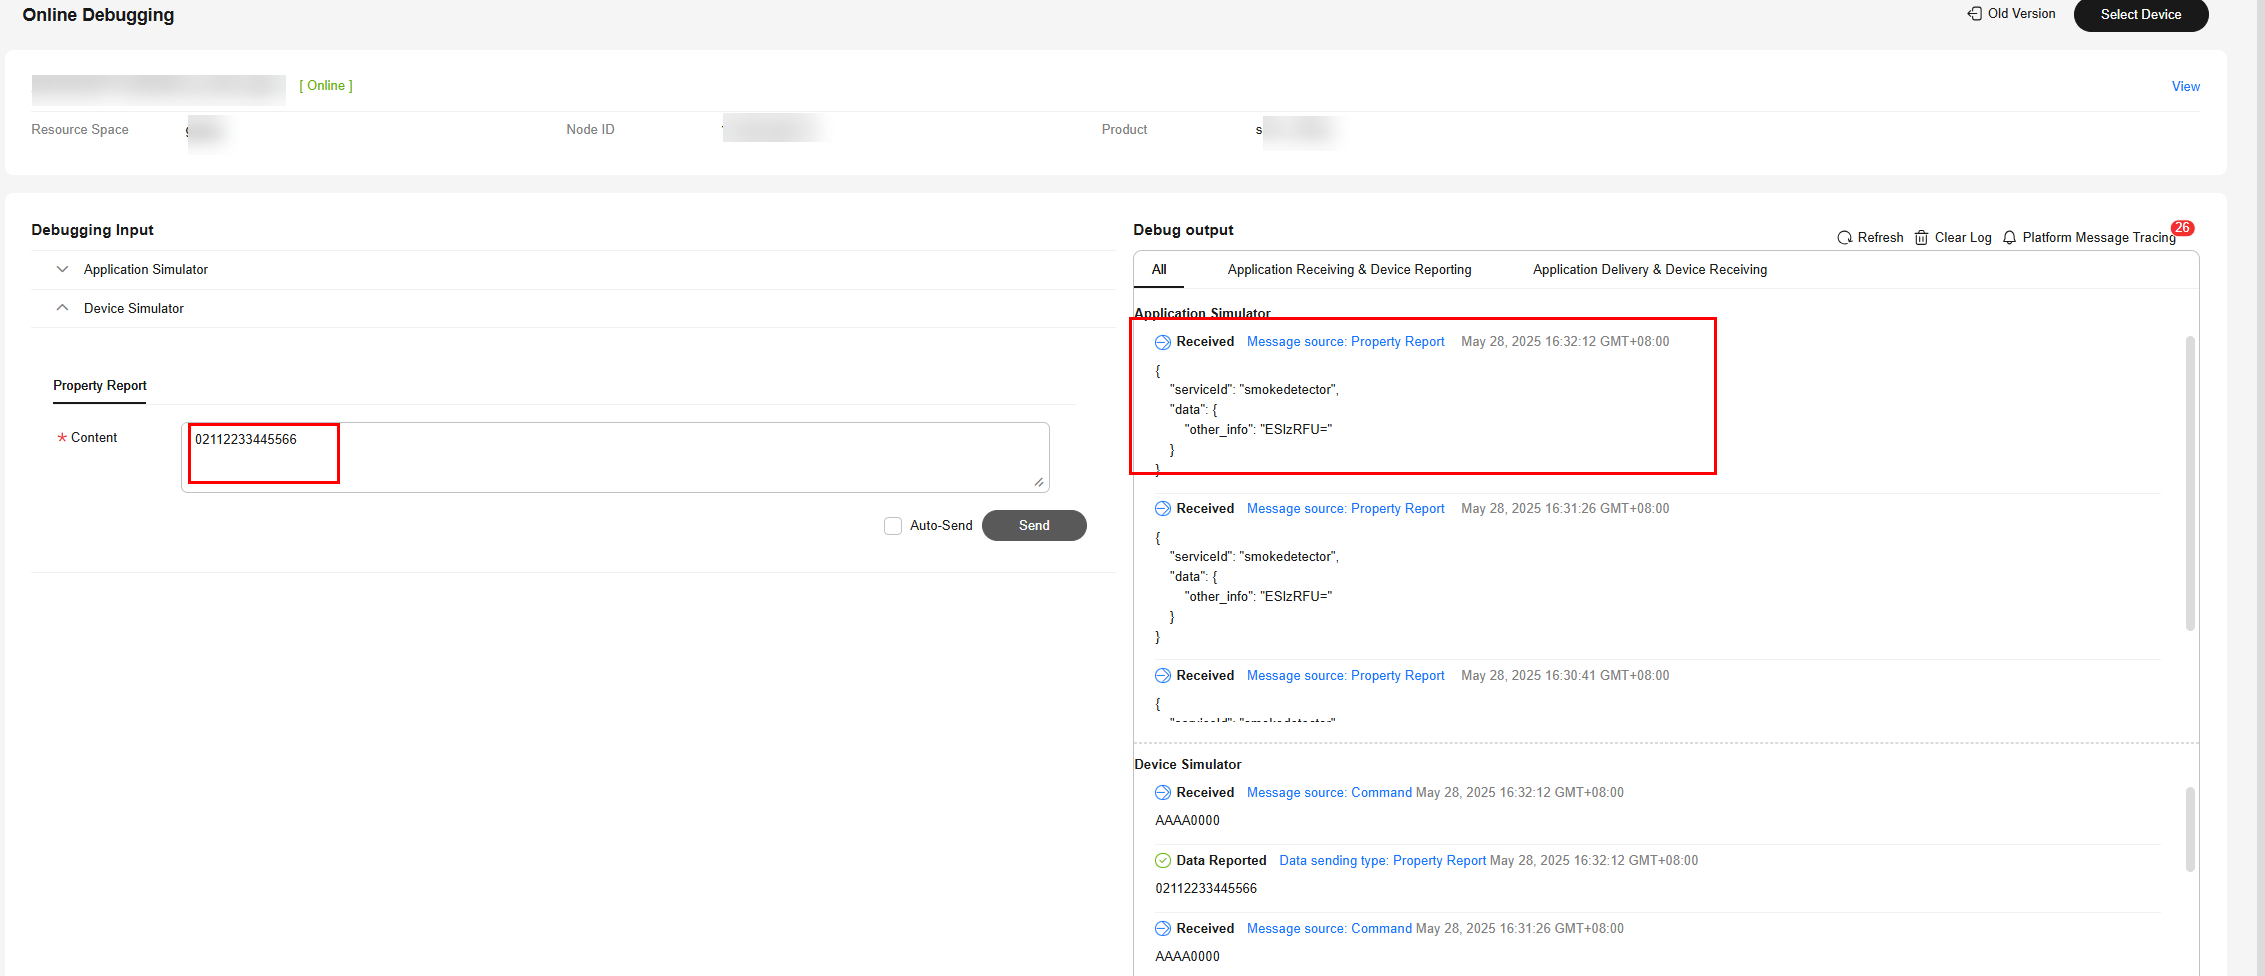
- Use the device simulator to report the description of the variable-length array type.
In the hexadecimal code stream example (030101), 03 indicates the messageId field and specifies that this message reports the description of the variable-length array type. The first 01 indicates the length of the description (one byte) and its length is one byte. The second 01 indicates the description and its length is one byte.
View the data reporting result ({serviceId: smokedetector, data: {"other_info":"AQ=="}}) in Application Simulator. AQ== is the encoded value of 01 using the Base64 encoding mode.
Figure 55 Simulating data reporting - other_info as variable-length array 1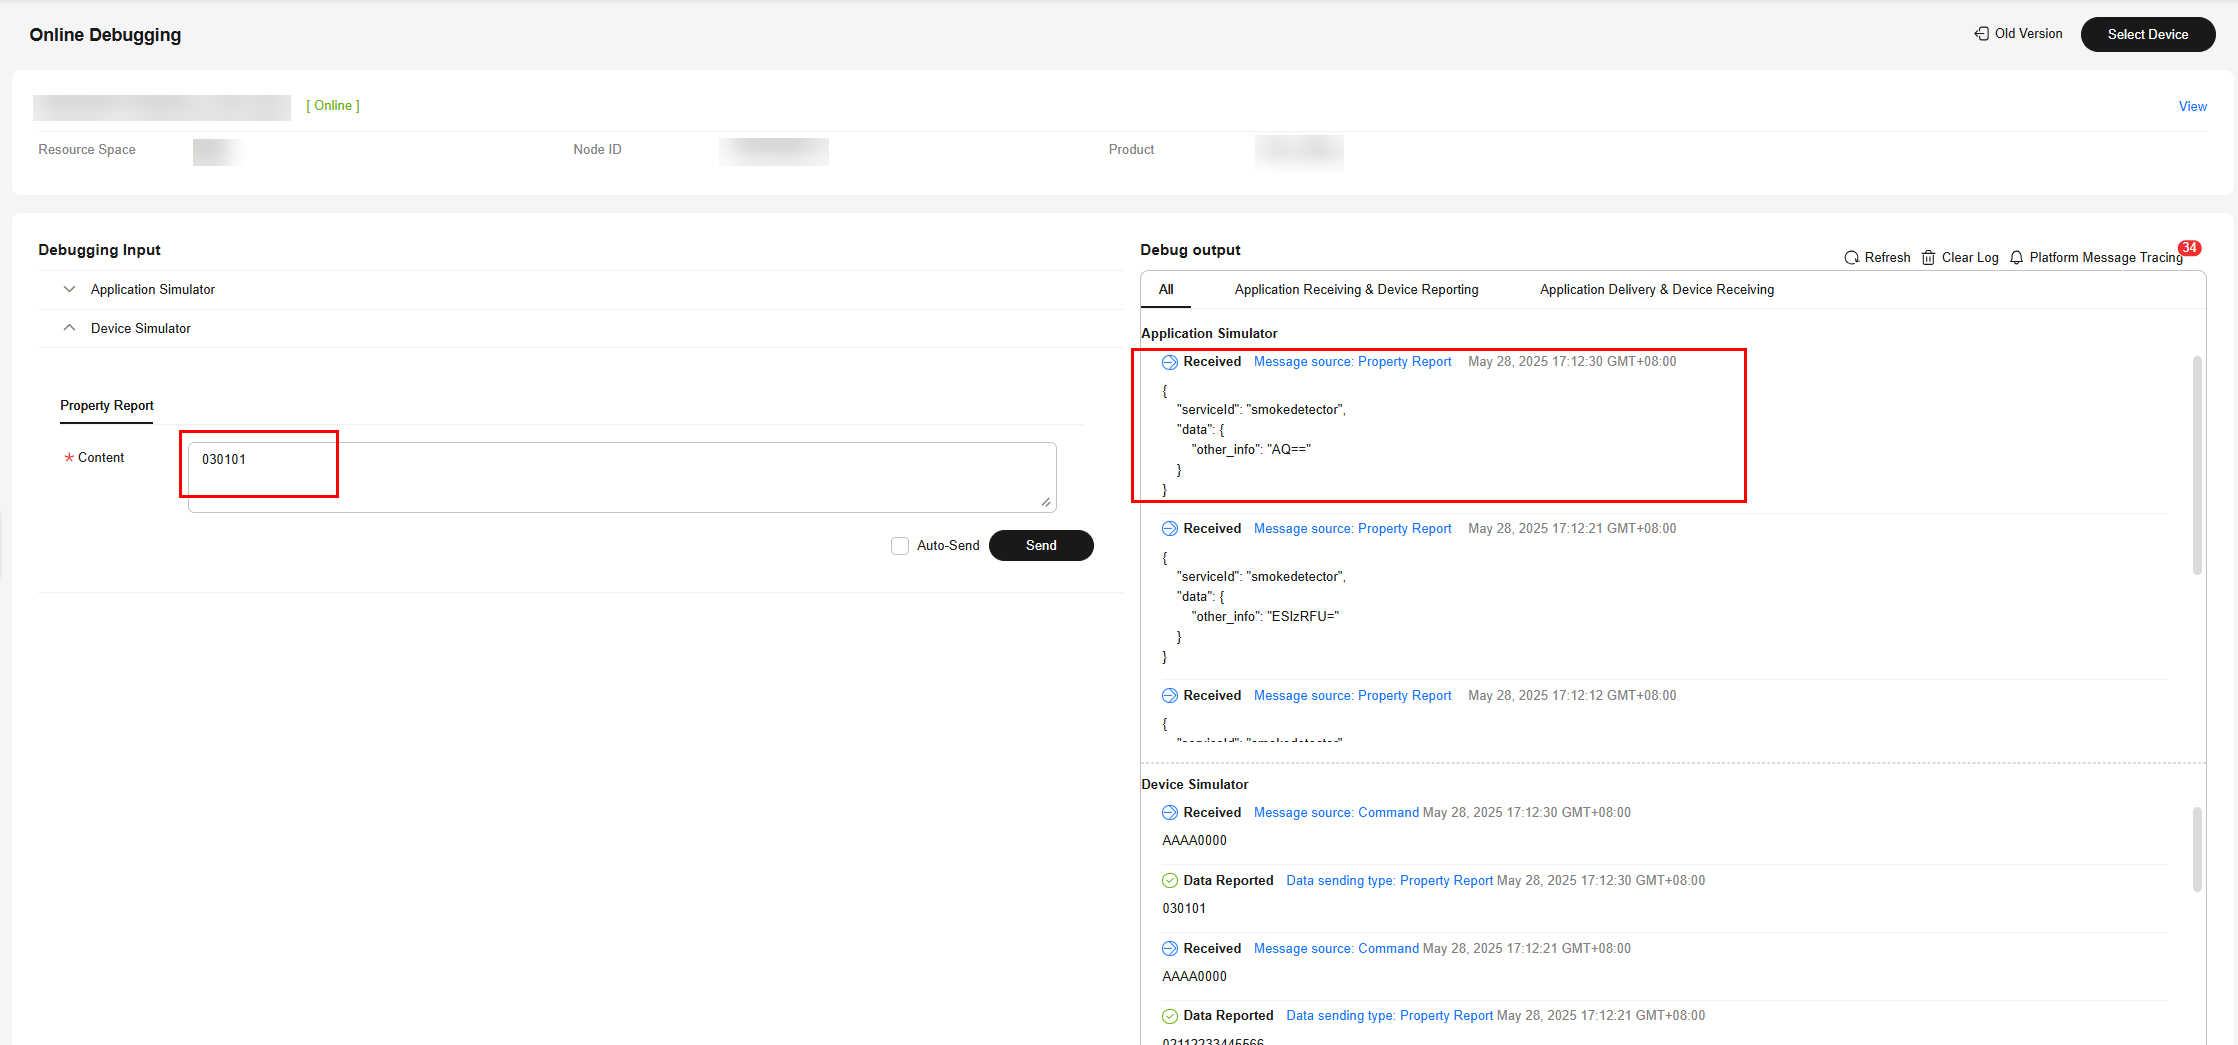
In the hexadecimal code stream example (03020102), 03 indicates the messageId field and specifies that this message reports the description of the variable-length array type. 02 indicates the length of the description (two bytes) and its length is one byte. 0102 indicates the description and its length is two bytes.
View the data reporting result ({serviceId: smokedetector, data: {"other_info":"AQI="}}) in Application Simulator. AQI= is the encoded value of 0102 using the Base64 encoding mode.
Figure 56 Simulating data reporting - other_info as variable-length array 2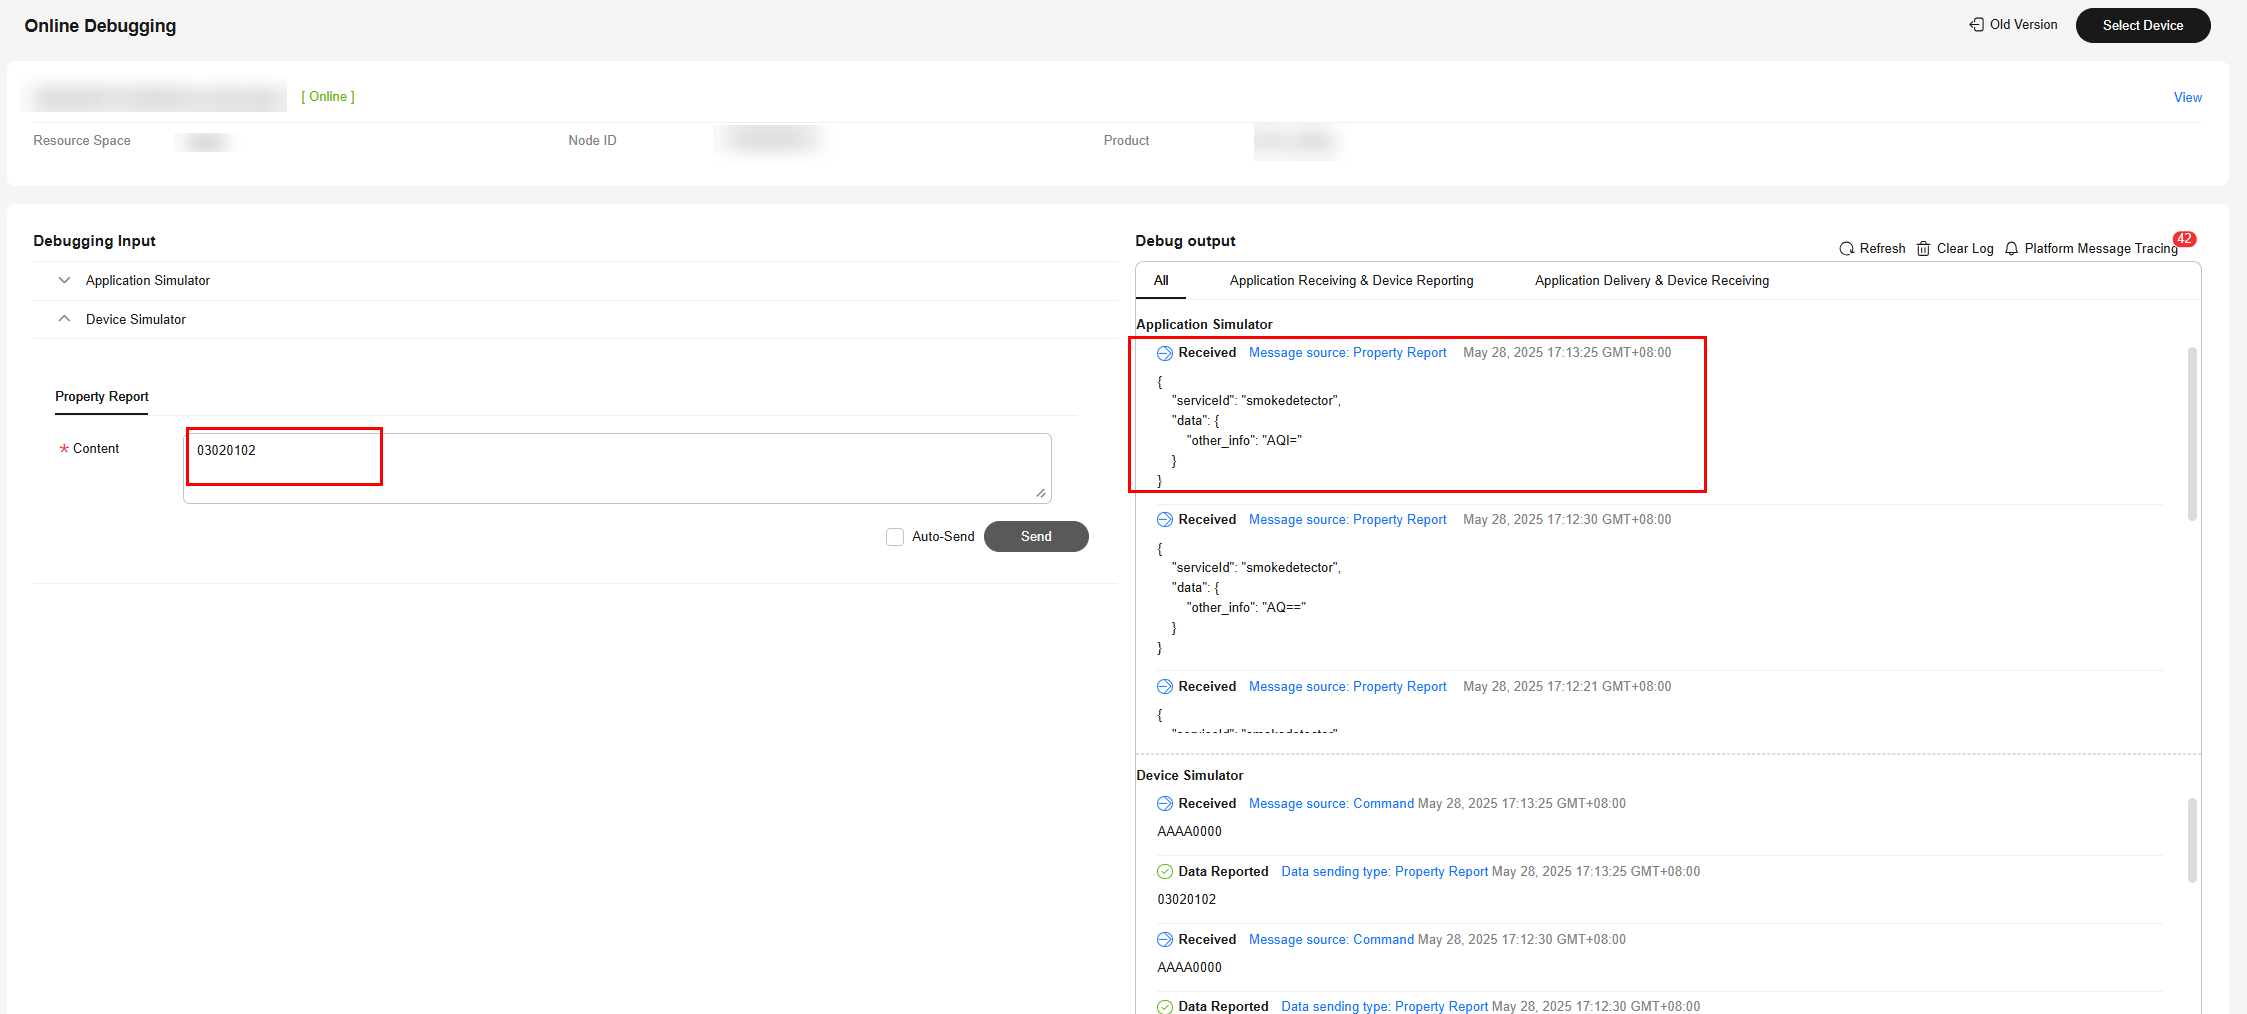
In the hexadecimal code stream example (03030102), 03 indicates the messageId field and specifies that this message reports the description of the variable-length array type. The second 03 indicates the length of the description (three bytes) and its length is one byte. 0102 indicates the description and its length is two bytes.
View the data reporting result ({other_info=null}) in Application Simulator. The length of the description is less than three bytes. The codec fails to parse the description.
Figure 57 Simulating data reporting - other_info as variable-length array 3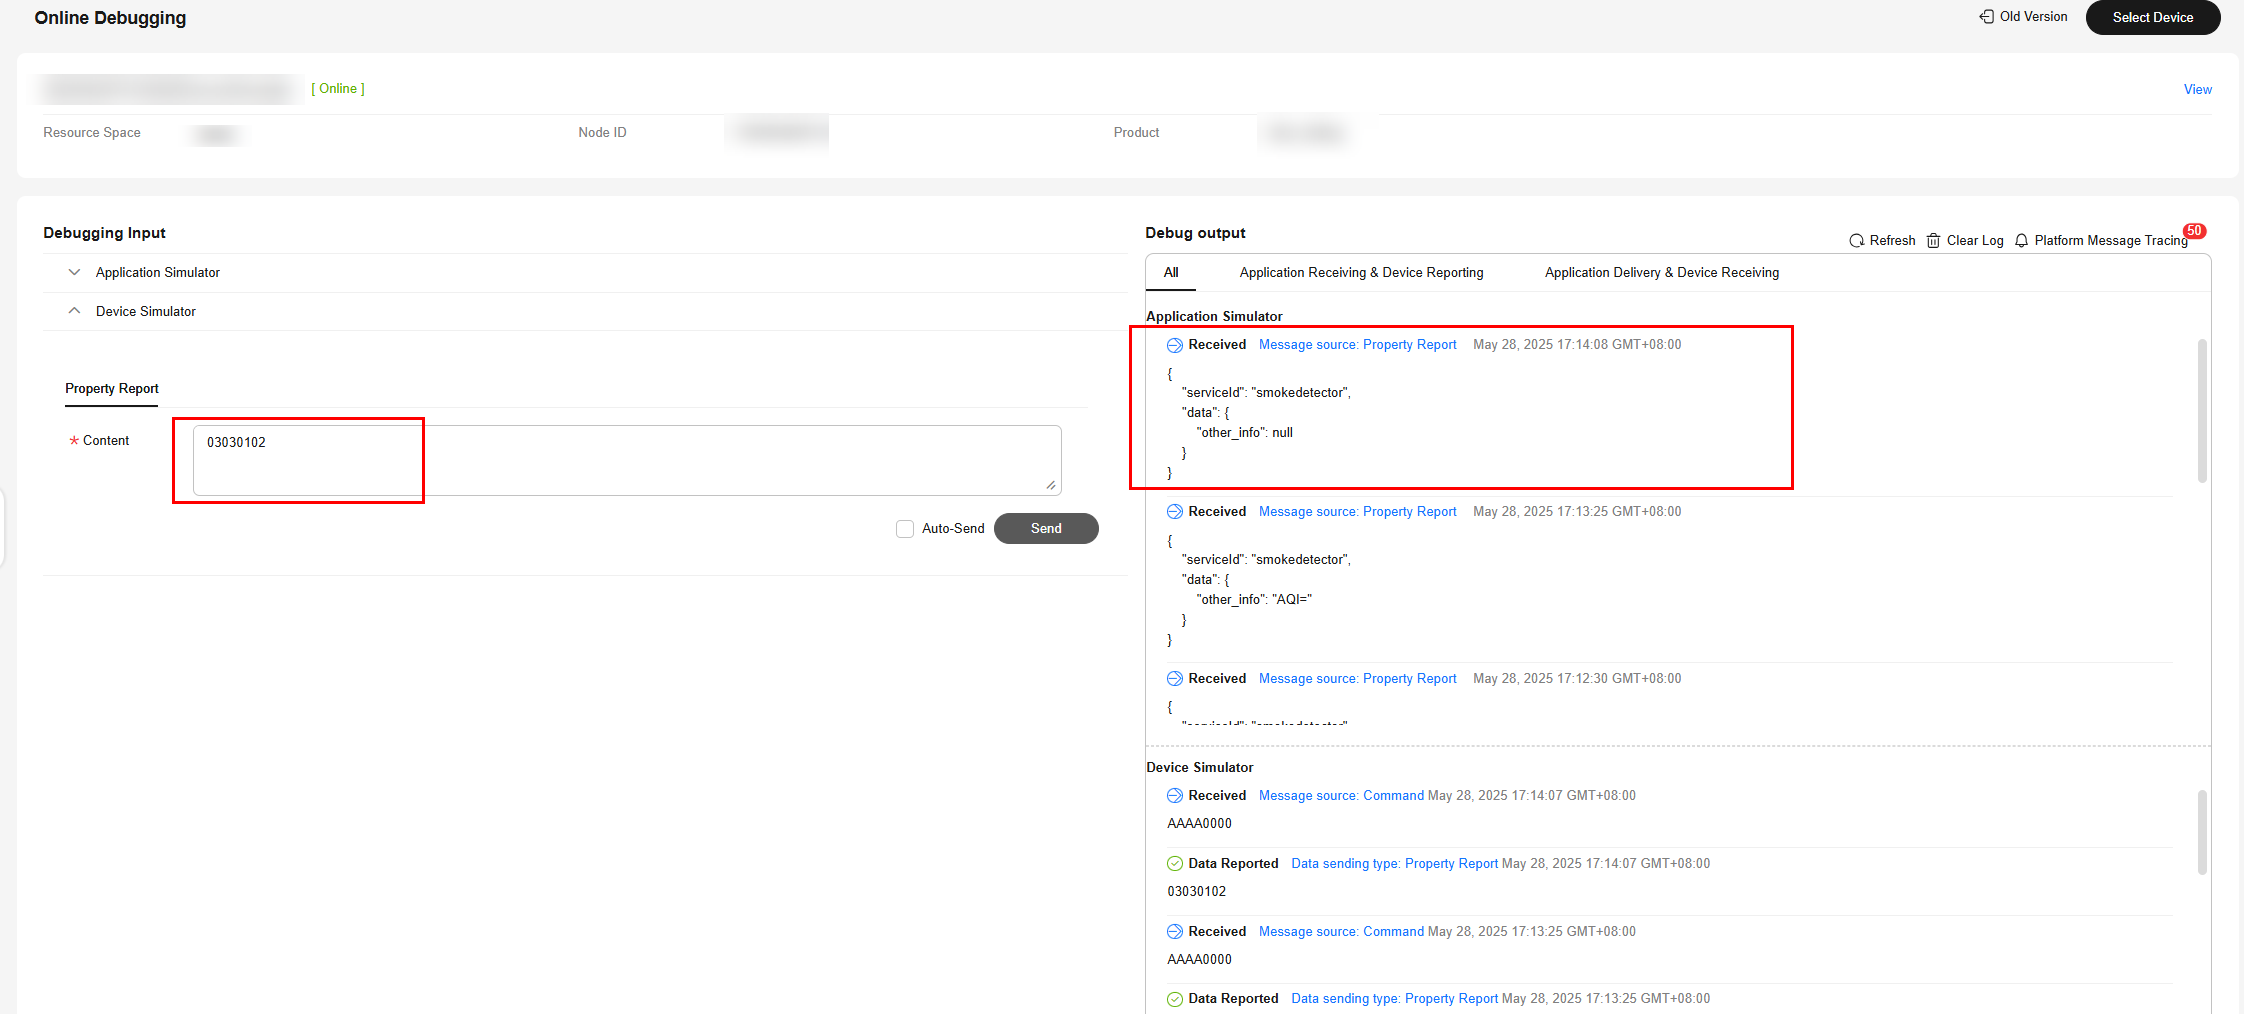
In the hexadecimal code stream example (0303010203), 03 indicates the messageId field and specifies that this message reports the description of the variable-length array type. The second 03 indicates the length of the description (three bytes) and its length is one byte. 010203 indicates the description and its length is three bytes.
View the data reporting result ({serviceId: smokedetector, data: {"other_info":"AQID"}}) in Application Simulator. AQID is the encoded value of 010203 using the Base64 encoding mode.
Figure 58 Simulating data reporting - other_info as variable-length array 4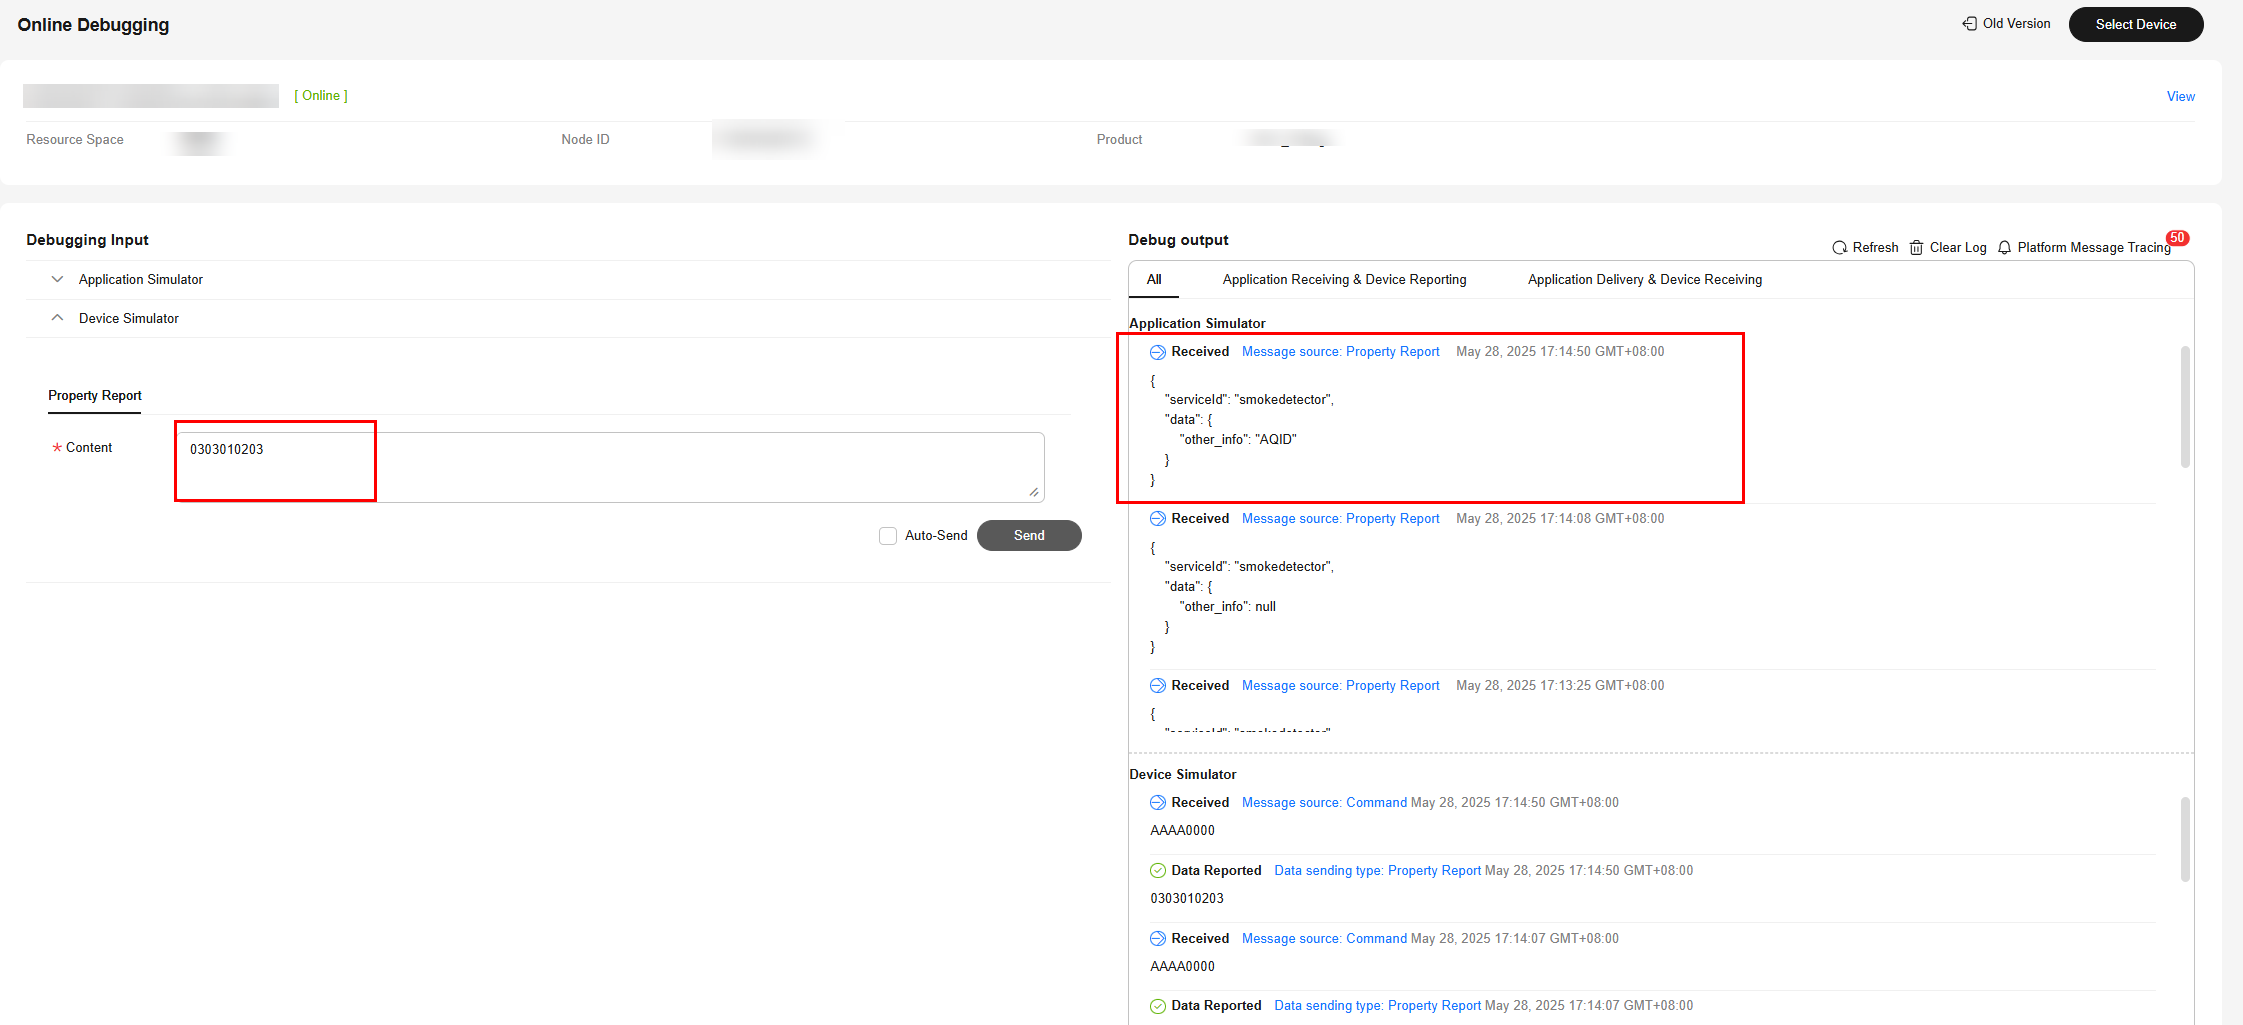
In the hexadecimal code stream example (030301020304), 03 indicates the messageId field and specifies that this message reports the description of the variable-length array type. The second 03 indicates the length of the description (three bytes) and its length is one byte. 01020304 indicates the description and its length is four bytes.
View the data reporting result ({other_info=AQID}) in Application Simulator. The length of the description exceeds three bytes. Therefore, the first three bytes are intercepted and parsed. AQID is the encoded value of 010203 using the Base64 encoding mode.
Figure 59 Simulating data reporting - other_info as variable-length array 5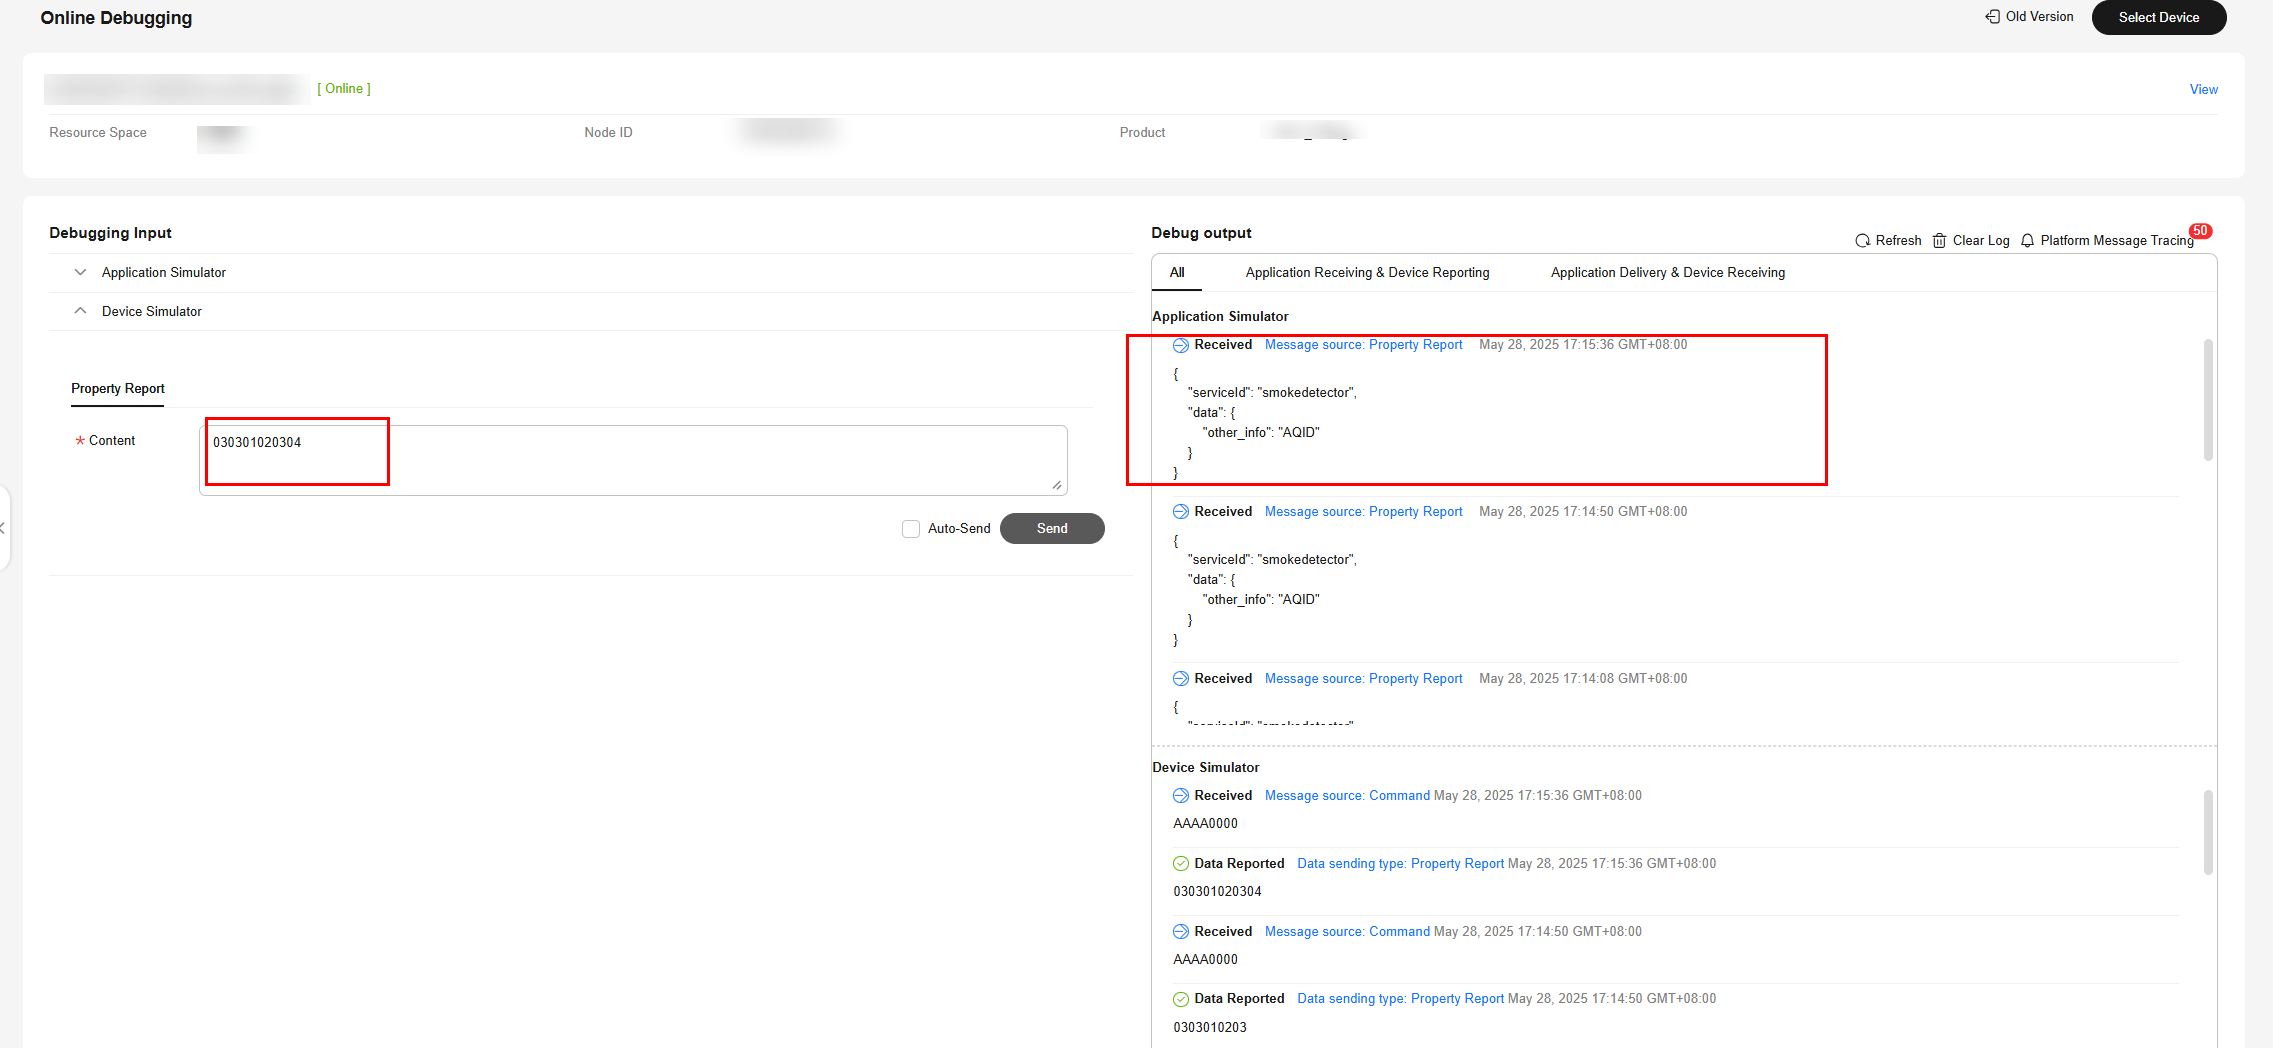
Description of Base64 Encoding Modes
In Base64 encoding mode, three 8-bit bytes (3 x 8 = 24) are converted into four 6-bit bytes (4 x 6 = 24), and 00 are added before each 6-bit byte to form four 8-bit bytes. If the code stream to be encoded contains less than three bytes, fill the code stream with 0 at the end. The byte that is filled with 0 is displayed as an equal sign (=) after it is encoded.
Developers can encode hexadecimal code streams as characters or values using the Base64 encoding modes. The encoding results obtained in the two modes are different. The following uses the hexadecimal code stream 01 as an example:
- Use 01 as the characters. 01 contains fewer than three characters. Therefore, add one 0 to obtain 010. Query the ASCII code table to convert the characters into an 8-bit binary number, that is, 0 is converted into 00110000 and 1 into 00110001. Therefore, 010 can be converted into 001100000011000100110000 (3 x 8 = 24). The binary number can be split into four 6-bit numbers: 001100, 000011, 000100, and 110000. Then, pad each 6-bit number with 00 to obtain the following numbers: 00001100, 00000011, 00000100, and 00110000. The decimal numbers corresponding to the four 8-bit numbers are 12, 3, 4, and 48, respectively. You can obtain M (12), D (3), and E (4) by querying the Base64 coding table. As the last character of 010 is obtained by adding 0, the fourth 8-bit number is represented by an equal sign (=). Finally, MDE= is obtained by using 01 as characters.
- Use 01 as a value (that is, 1). It contains fewer than three characters. Therefore, add 00 to obtain 100. Convert 100 into an 8-bit binary number, that is, 0 is converted into 00000000 and 1 is converted into 00000001. Therefore, 100 can be converted into 000000010000000000000000 (3 x 8 = 24). The binary number can be split into four 6-bit numbers: 000000, 010000, 000000, and 000000. Then, pad each 6-bit number with 00 to obtain 00000000, 00010000, 00000000, and 00000000. The decimal numbers corresponding to the four 8-bit numbers are 0, 16, 0, and 0, respectively. You can obtain A (0) and Q (16) by querying the Base64 coding table. As the last two characters of 100 are obtained by adding 0, the third and fourth 8-bit numbers are represented by two equal signs (==). Finally, AQ== is obtained by using 01 as a value.
Summary
- When the data is an array or a variable-length array, the codec encodes and decodes the data using Base64. For data reporting messages, the hexadecimal code streams are encoded using Base64. For example, 01 is encoded into AQ==. For command delivery messages, characters are decoded using Base64. For example, AQ== is decoded to 01.
- When the data type of a field is variant (variable-length array type), the field must be associated with the length field. The data type of the length field must be int.
- For variable-length arrays, the codecs for command delivery and data reporting are developed in the same way.
- When the codecs that are developed online encode data using Base64, hexadecimal code streams are encoded as values.
Feedback
Was this page helpful?
Provide feedbackThank you very much for your feedback. We will continue working to improve the documentation.See the reply and handling status in My Cloud VOC.
For any further questions, feel free to contact us through the chatbot.
Chatbot


