Using MQTT.fx to Simulate Communication Between the Smart Street Light and the Platform
Overview
This section describes how to use MQTT.fx to simulate a smart street light. You can connect the simulated light to IoTDA, report the light intensity data to the platform, and deliver a light-on command to the light.
Prerequisites
- You have registered a Huawei Cloud account.
- You have subscribed to IoTDA on the console.
Service Process
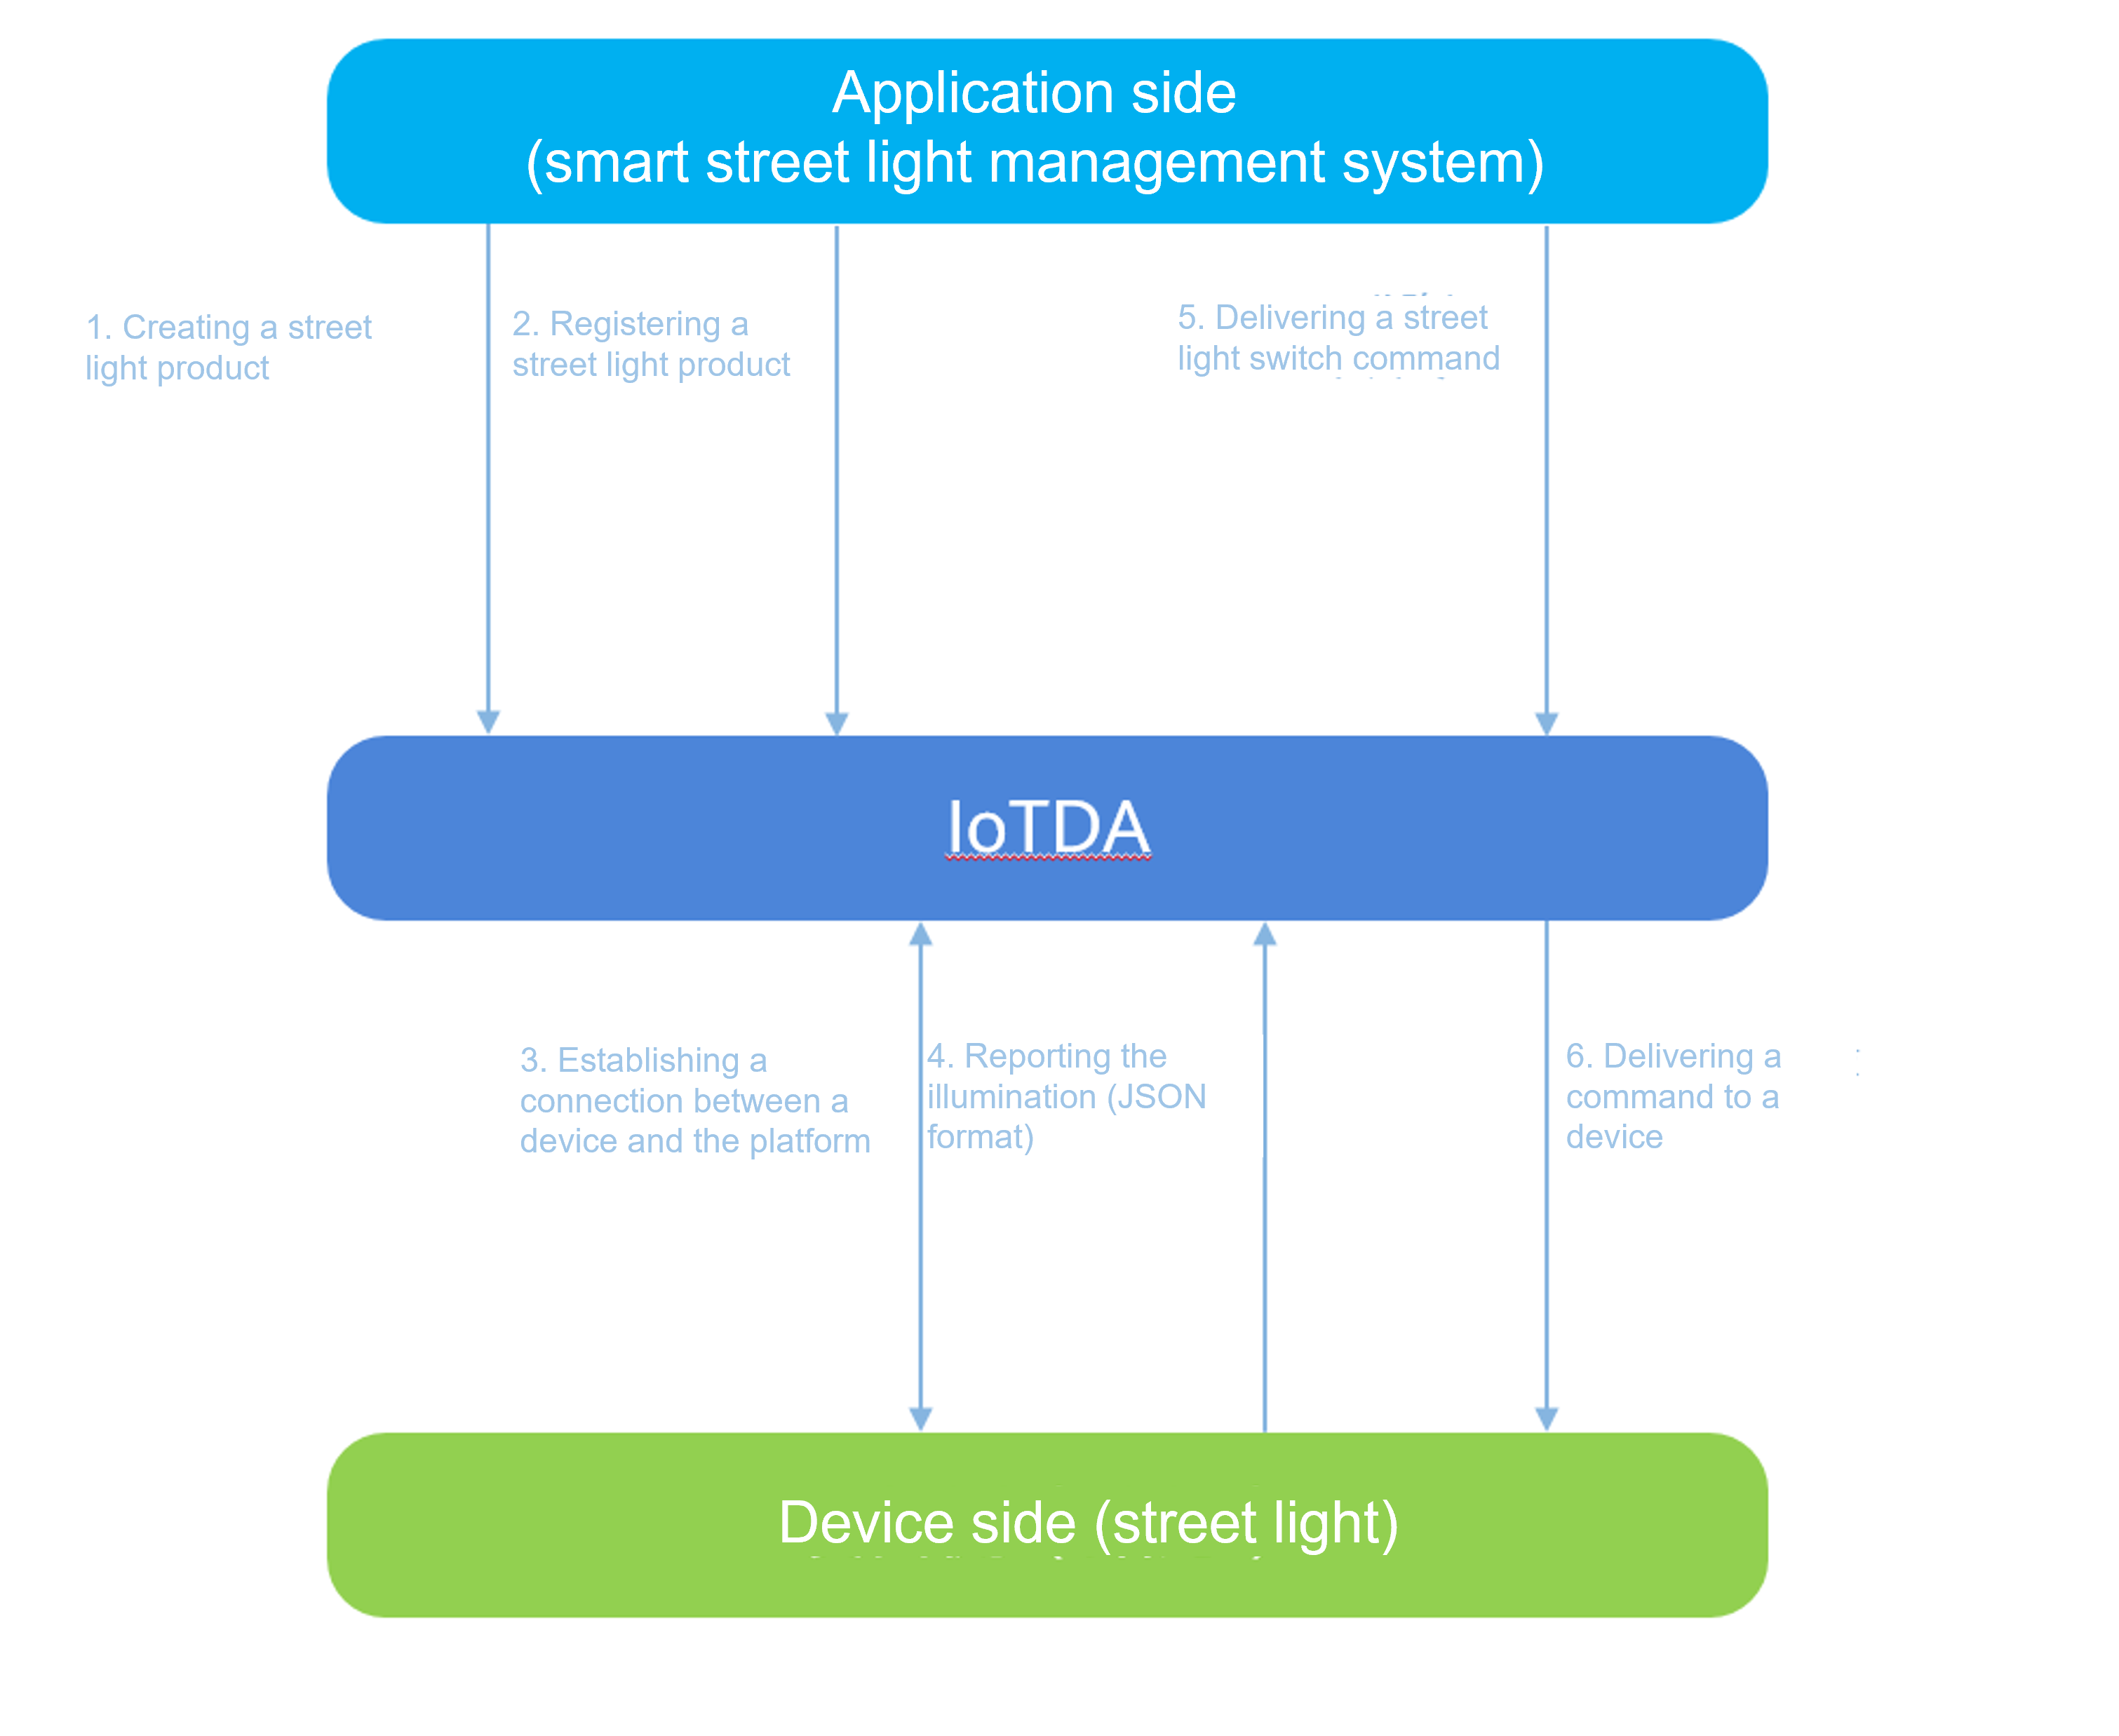
MQTT.fx is used as an example to describe data reporting and command delivery. Download MQTT.fx (64-bit OS) or MQTT.fx (32-bit OS) and install it. Overall service process:
- Product creation: Create an MQTT smart street light product on the console. Define a product model to develop a street light that supports light intensity reporting and status control commands.
- Device registration: Register an MQTT smart street light on the console.
- Device connection establishment: Use MQTT.fx to simulate a smart street light, complete connection authentication, and activate the device registered on the platform.
- Data reporting: Use MQTT.fx to simulate a smart street light to report light intensity data to the platform.
- Command delivery: Deliver a street light switch command on the console to remotely control MQTT.fx to simulate a smart street light.
Creating a Product
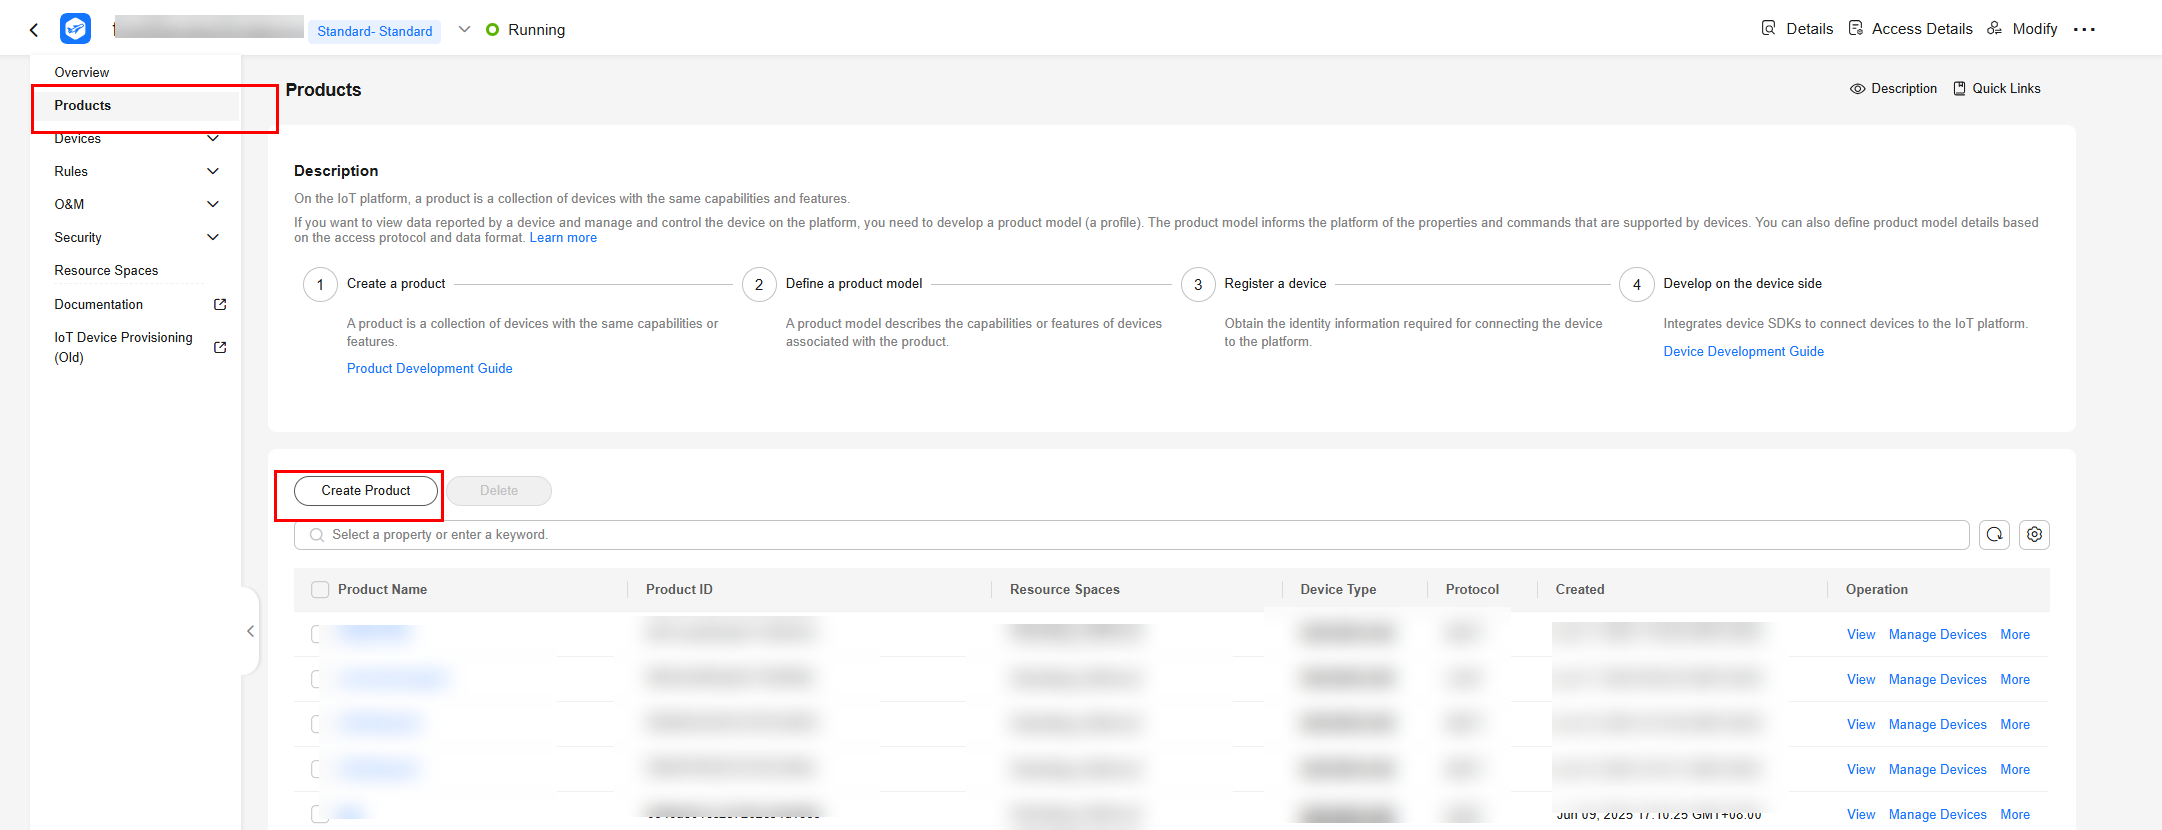
- Log in to the console and click the target instance card. Choose Products in the navigation pane and click Create Product.
Figure 2 Creating a product
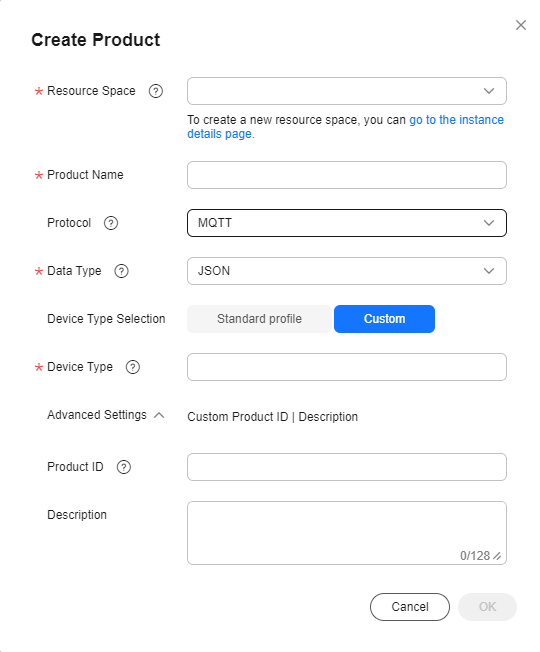
- Select MQTT for Protocol, select the custom device type option, set the Device Type to StreetLamp, set parameters as prompted, and click OK.
Figure 3 Creating a product - MQTT
Developing a Product Model
- Click the created product. The product details page is displayed.
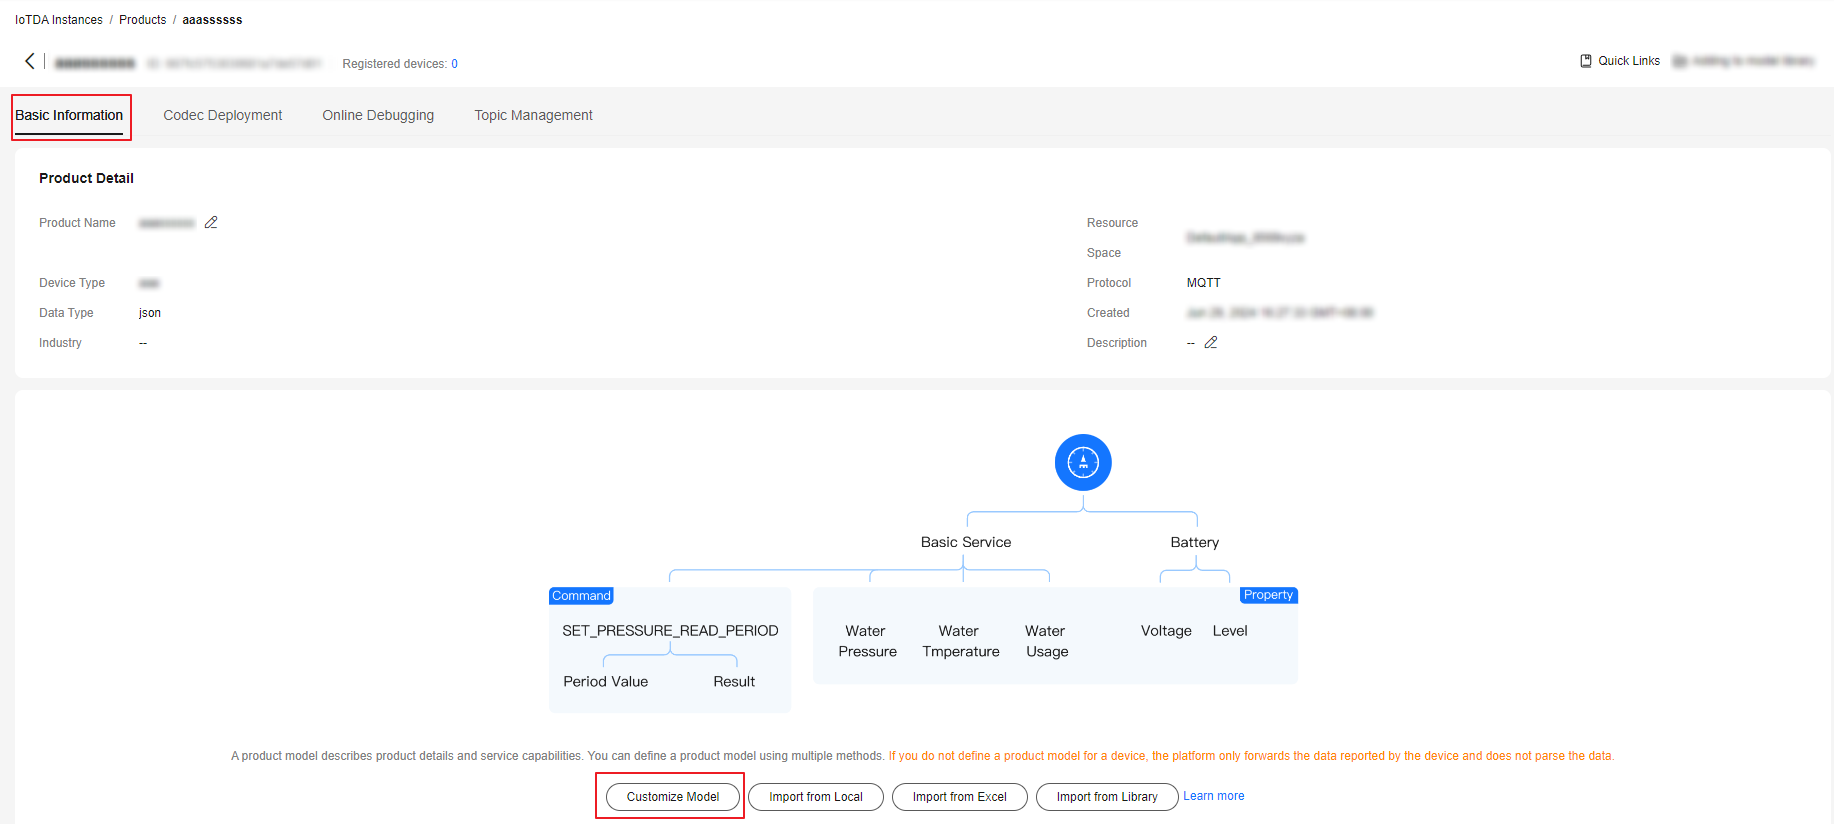
- On the Basic Information tab page, click Customize Model to add services of the product.
Figure 4 Custom model - MQTT
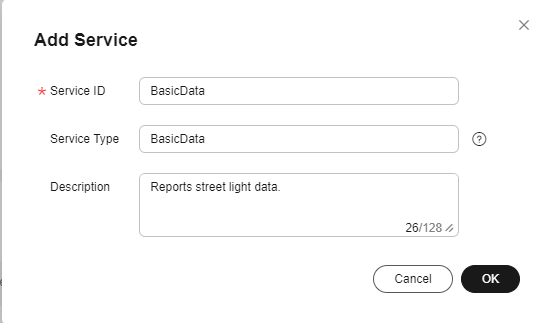
- Add the BasicData service.
- On the Add Service page, specify Service ID, Service Type, and Description, and click OK.
Figure 5 Adding a service - BasicData
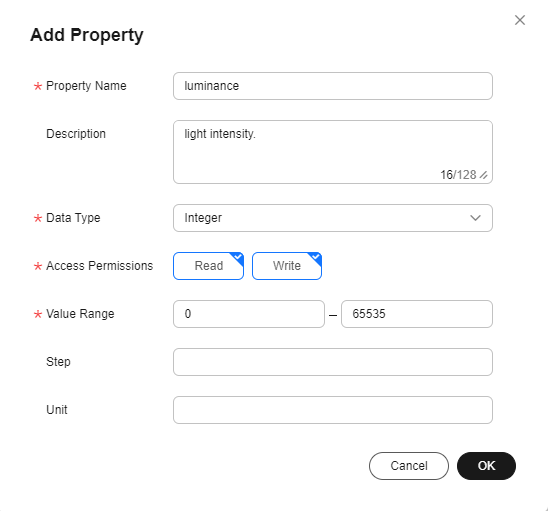
- In the BasicData service list on the right, click Add Property, enter related information, and click OK.
Figure 6 Adding a property - luminance
- On the Add Service page, specify Service ID, Service Type, and Description, and click OK.
- Add the LightControl service.
- Click Add Service on the Basic Information tab page, set parameters as prompted, and click OK.
- Service ID: Enter LightControl.
- Service Type: You are advised to set this parameter to the same value as Service ID.
- Description: Enter Controls the street light.
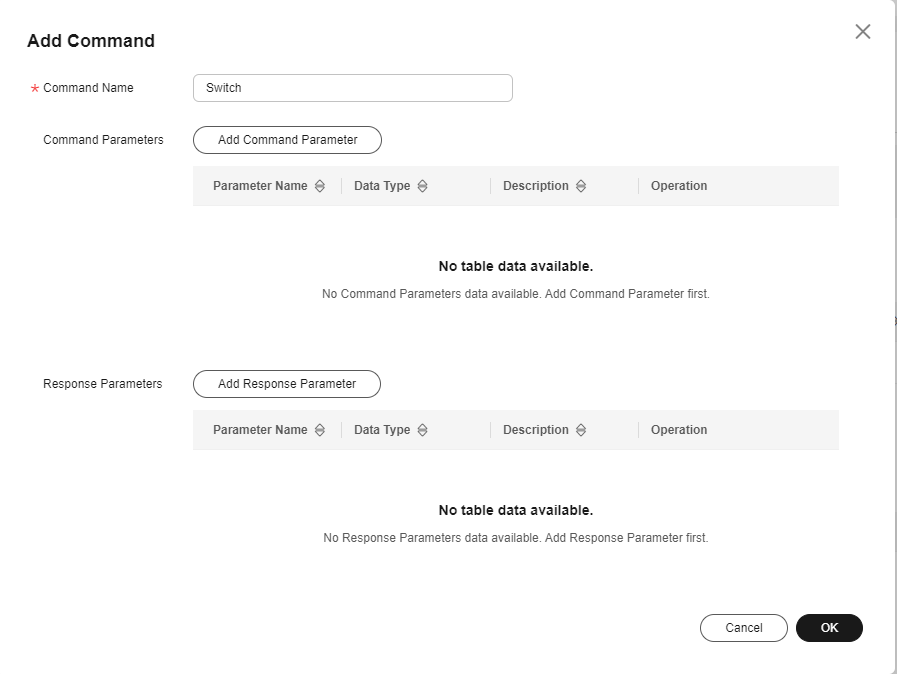
- Choose LightControl, click Add Command, and enter the command name Switch.
Figure 7 Adding a command - Switch
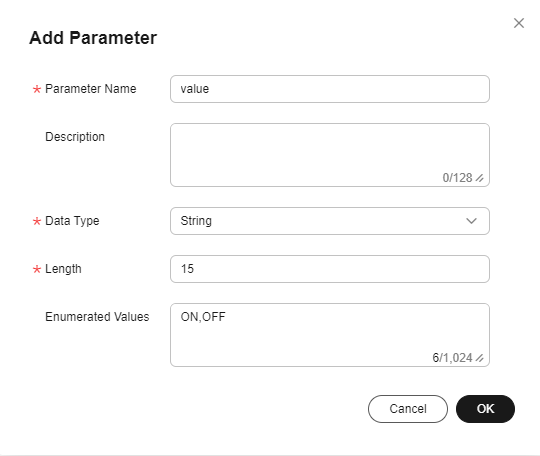
- Click Add Command Parameter, enter related information, and click OK.
Figure 8 Adding a command parameter - -value
- Click Add Service on the Basic Information tab page, set parameters as prompted, and click OK.
Registering a Device
- On the IoTDA console, click the target instance card. In the navigation pane, choose Devices > All Devices. Click Register Device.
Figure 9 Registering a device

- Set the parameters as prompted and click OK.
Parameter
Description
Resource Space
Ensure that the device and its associated product belong to the same resource space.
Product
Select a corresponding product.
Node ID
Customize a unique physical identifier for the device. Enter 4 to 64 characters. Use only letters, digits, underscores (_), and hyphens (-).
Device Name
Customize the device name.
Authentication Type
Select Secret.
Secret
If you do not set this parameter, IoTDA automatically generates a value.
Figure 10 Registering a device - MQTT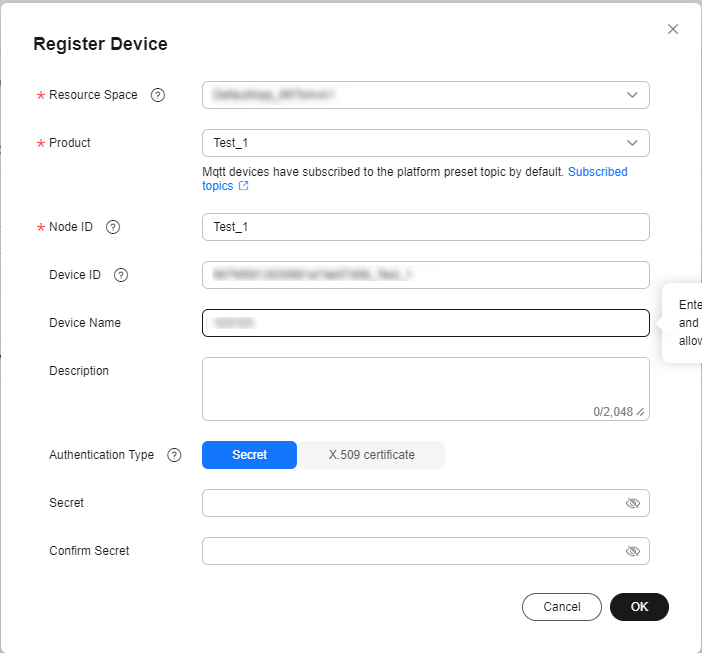
- After the device is registered, the platform automatically generates a device ID and secret. Save the device ID and secret for device access.
Figure 11 Device - Device registered

Connecting the Simulated Street Light to the Platform
Use MQTT.fx to activate the device registered on IoTDA.
- Download MQTT.fx (64-bit OS) or MQTT.fx (32-bit OS) and install it.
- Go to the device details page, find MQTT Connection Parameter, and click View to check the clientId, username, password, and hostname.
Figure 12 Device - Device details
 Figure 13 Device - Device details - MQTT connection parameters
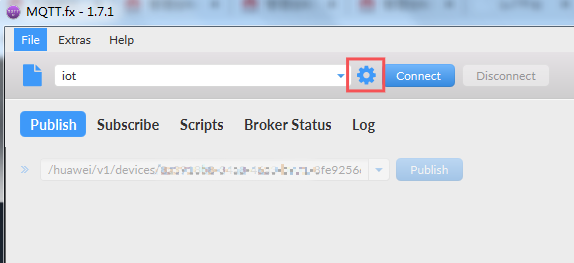
- Open MQTT.fx and click the setting icon.
Figure 14 MQTT.fx Settings
- Click the User Credentials tab and set authentication parameters by referring to the following table.
Figure 15 Configuring authentication parameters
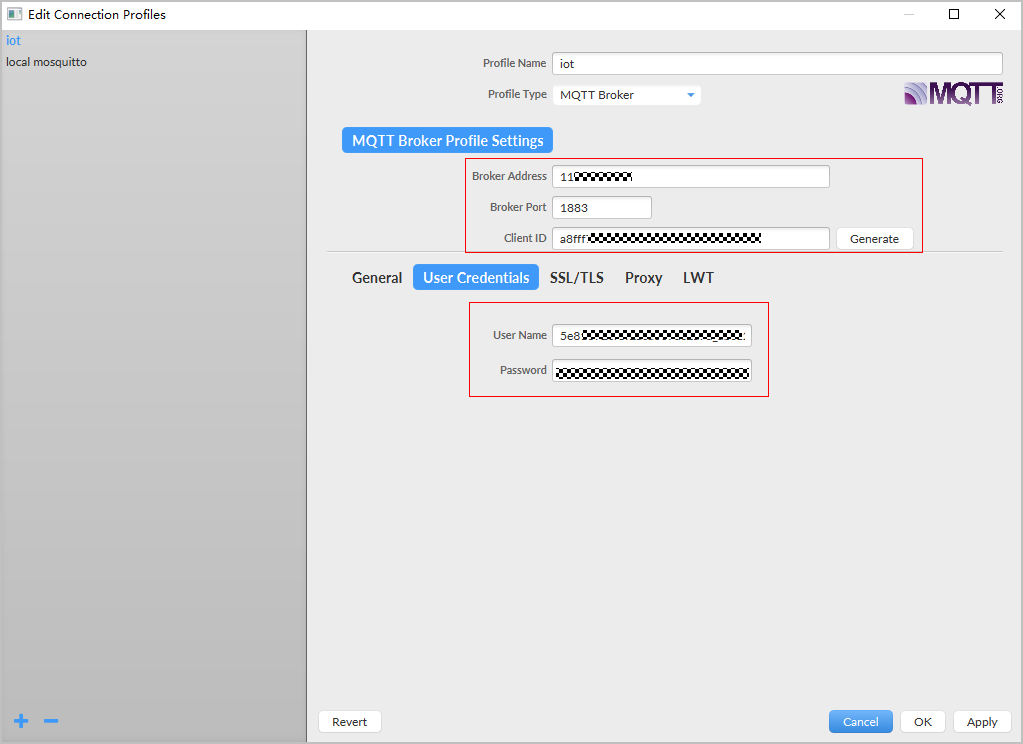
Table 1 Parameter description Parameter
Description
Broker Address
Host name, which is obtained in 2. The access address is a domain name. For devices that cannot be connected to the platform using a domain name, run the ping Domain name command in the CLI to obtain the IP address. The IP address is variable and needs to be set using a configuration item.
Broker Port
8883. In this example, port 8883 is used for secure connection.
Client ID
Enter the device client ID obtained in 2.
User Name
Enter the device ID obtained in 2.
Password
Enter the encrypted device secret obtained in 2.
- Click the SSL/TLS tab and then select Enable SSL/TLS. Recommended: Set Protocol to TLSv1.2. Click CA certificate file, go to the certificate resources page to download the certificate file of the corresponding region and instance version, and enter the complete local path of the certificate file in the text box. Click Apply, and then click Cancel to exit the configuration page.
Figure 16 Setting SSL/TLS parameters
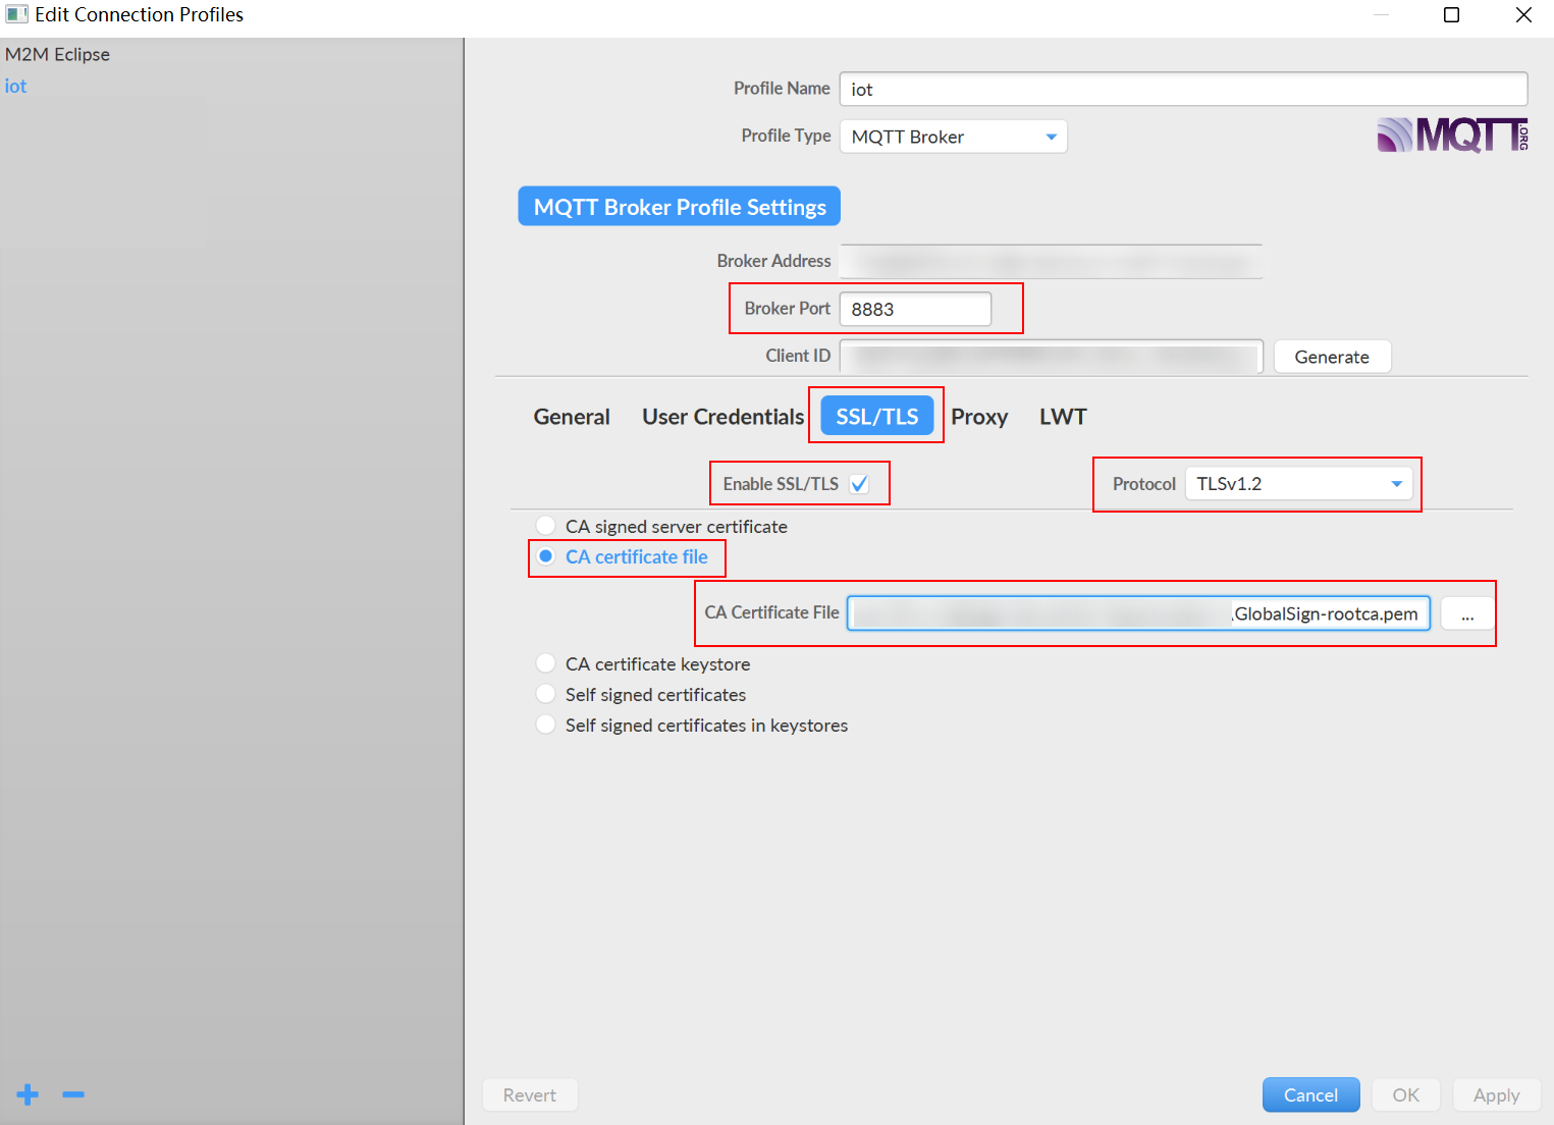
- Click Connect. If the icon in the upper right corner turns green, the device simulator has been authenticated and connected. The device status displayed on the platform is Online.
Figure 17 Device simulator connected
 Figure 18 Device online status
Reporting Light Intensity Data
Use MQTT.fx to report light intensity data to the IoT platform. If a device reports data through the MQTT channel, the data needs to be sent to a specific topic in the format $oc/devices/{device_id}/sys/properties/report. For devices that each has a different secret, set device_id to the device ID returned upon successful device registration.
- Enter the topic name, for example, $oc/devices/{device_id}/sys/properties/report.
Figure 19 Enter a topic name.
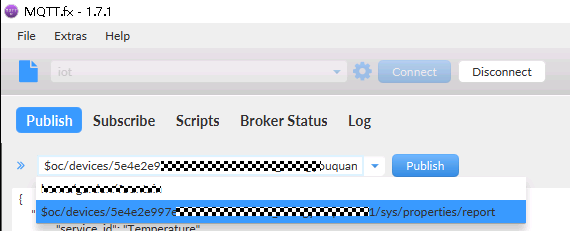
- Enter the data to report in the blank area in the middle of the tool and click Publish.
Table 2 Service data list Field
Mandatory/Optional
Type
Description
services
Mandatory
List<ServiceProperty>
Service data list. (For details, see the ServiceProperty structure below.)
Table 3 ServiceProperty structure Field
Mandatory/Optional
Type
Description
service_id
Mandatory
String
Service ID.
properties
Mandatory
Object
Service properties, which are defined in the product model associated with the device.
eventTime
Optional
String
UTC time when the device reports data. The format is yyyyMMddTHHmmssZ, for example, 20161219T114920Z.
If this parameter is not carried in the reported data or is in an incorrect format, the time when IoTDA receives the data is used.
Request example:
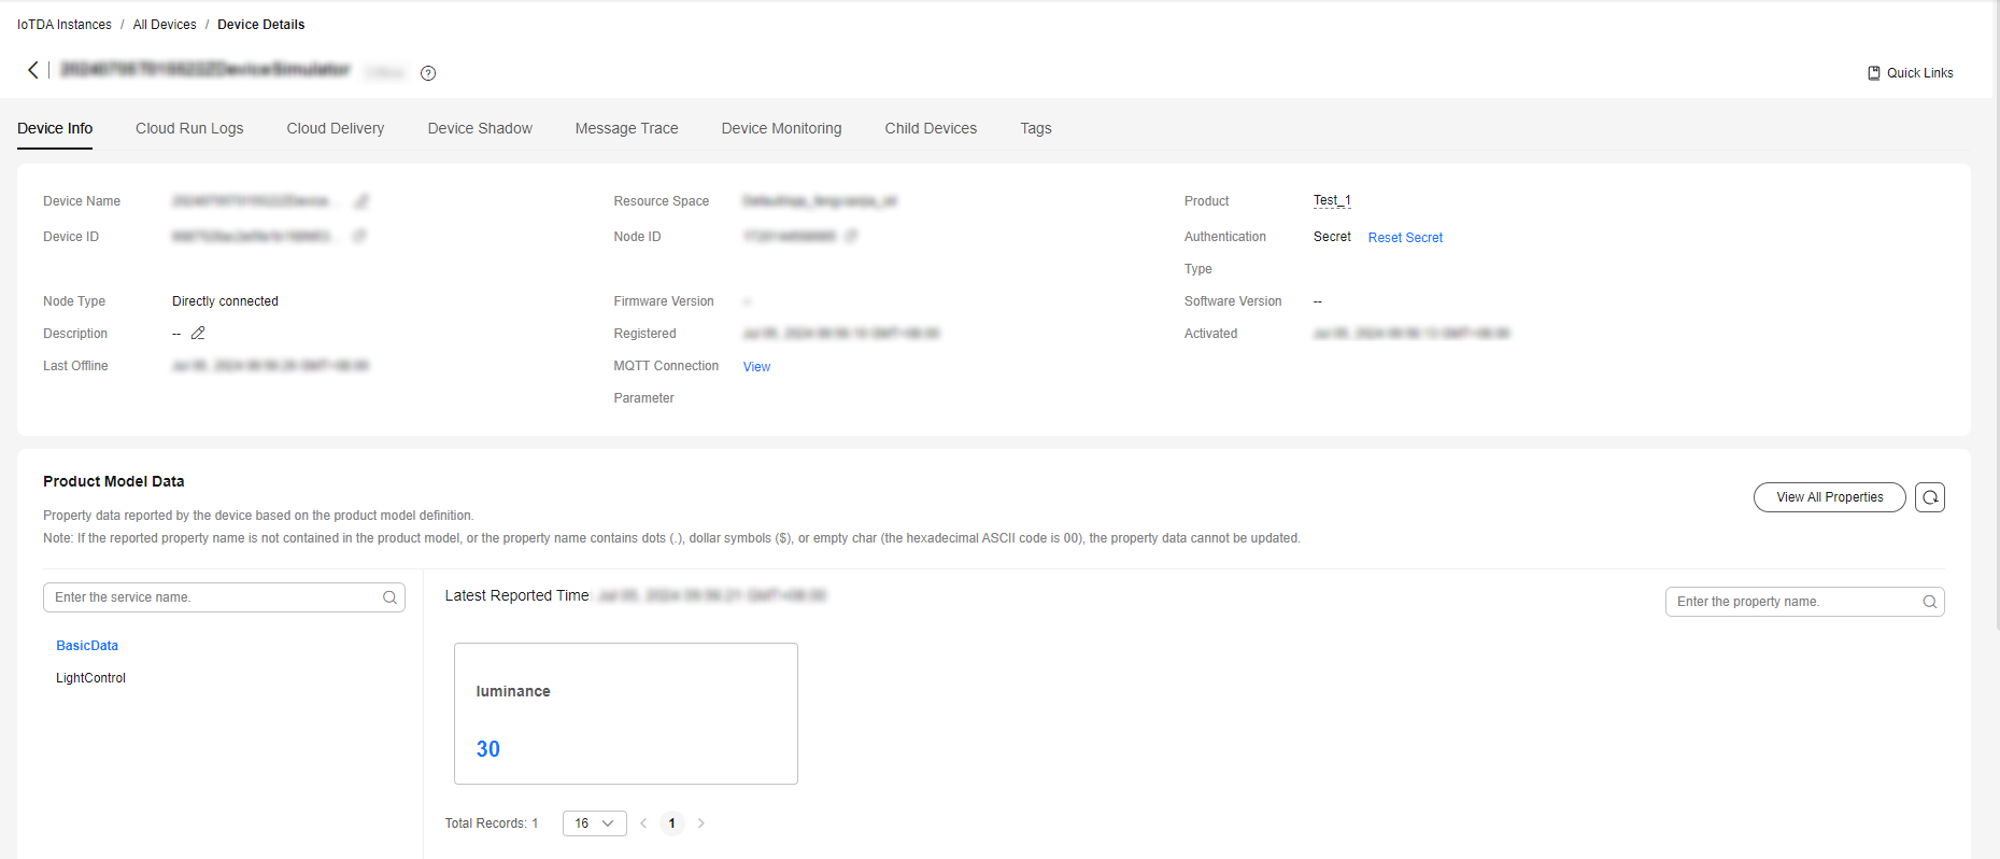
{ "services": [{ "service_id": "BasicData", "properties": { "luminance": 30 } } ] } - Check whether the device successfully reports data on the device details page. As shown in the following figure, the luminance is updated to 30.
Figure 20 Viewing reported data - MQTT
Remotely Delivering Commands for Turning On the Light
Deliver a command on the console to remotely control smart street lights.
- In the navigation pane, choose , locate the target device, and click View to access its details page.
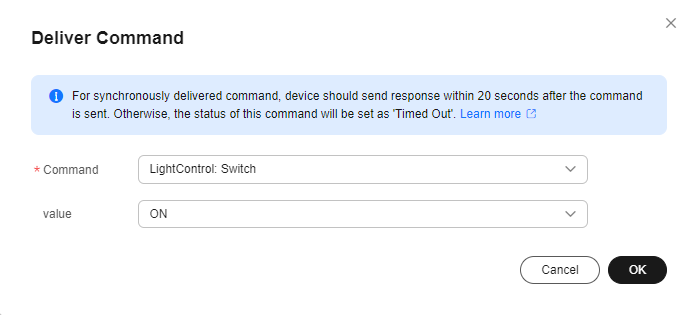
- Click the Cloud Delivery tab, click Deliver Command, set Command to LightControl: Switch, and set Value to ON to deliver a command for turning on the light.
Figure 21 Command delivery - Synchronous command delivery
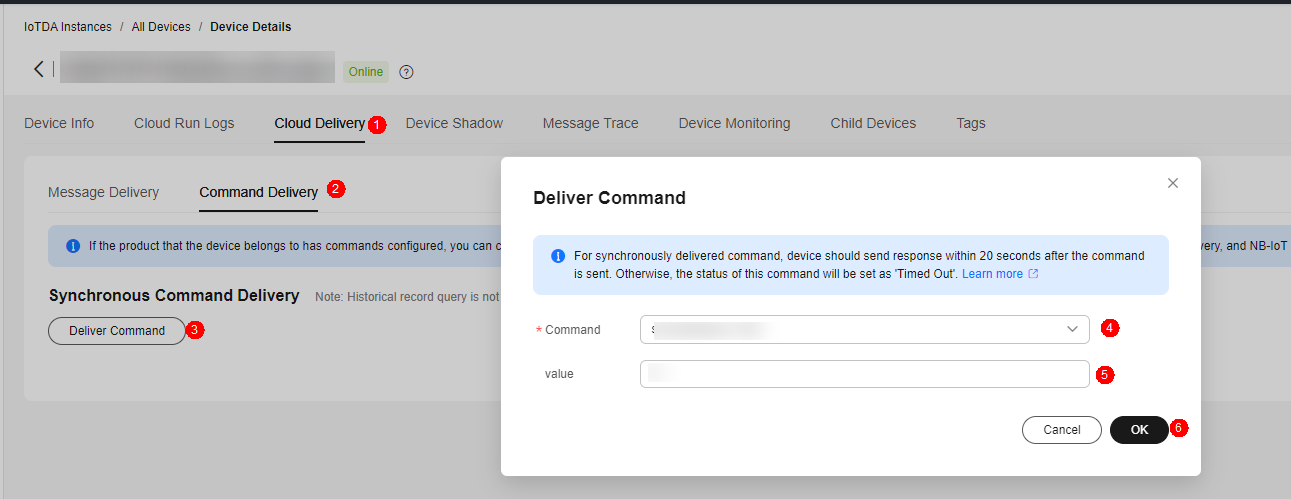 Figure 22 Command delivery - LightControl

MQTT devices support only synchronous command delivery. NB-IoT devices support only asynchronous command delivery.
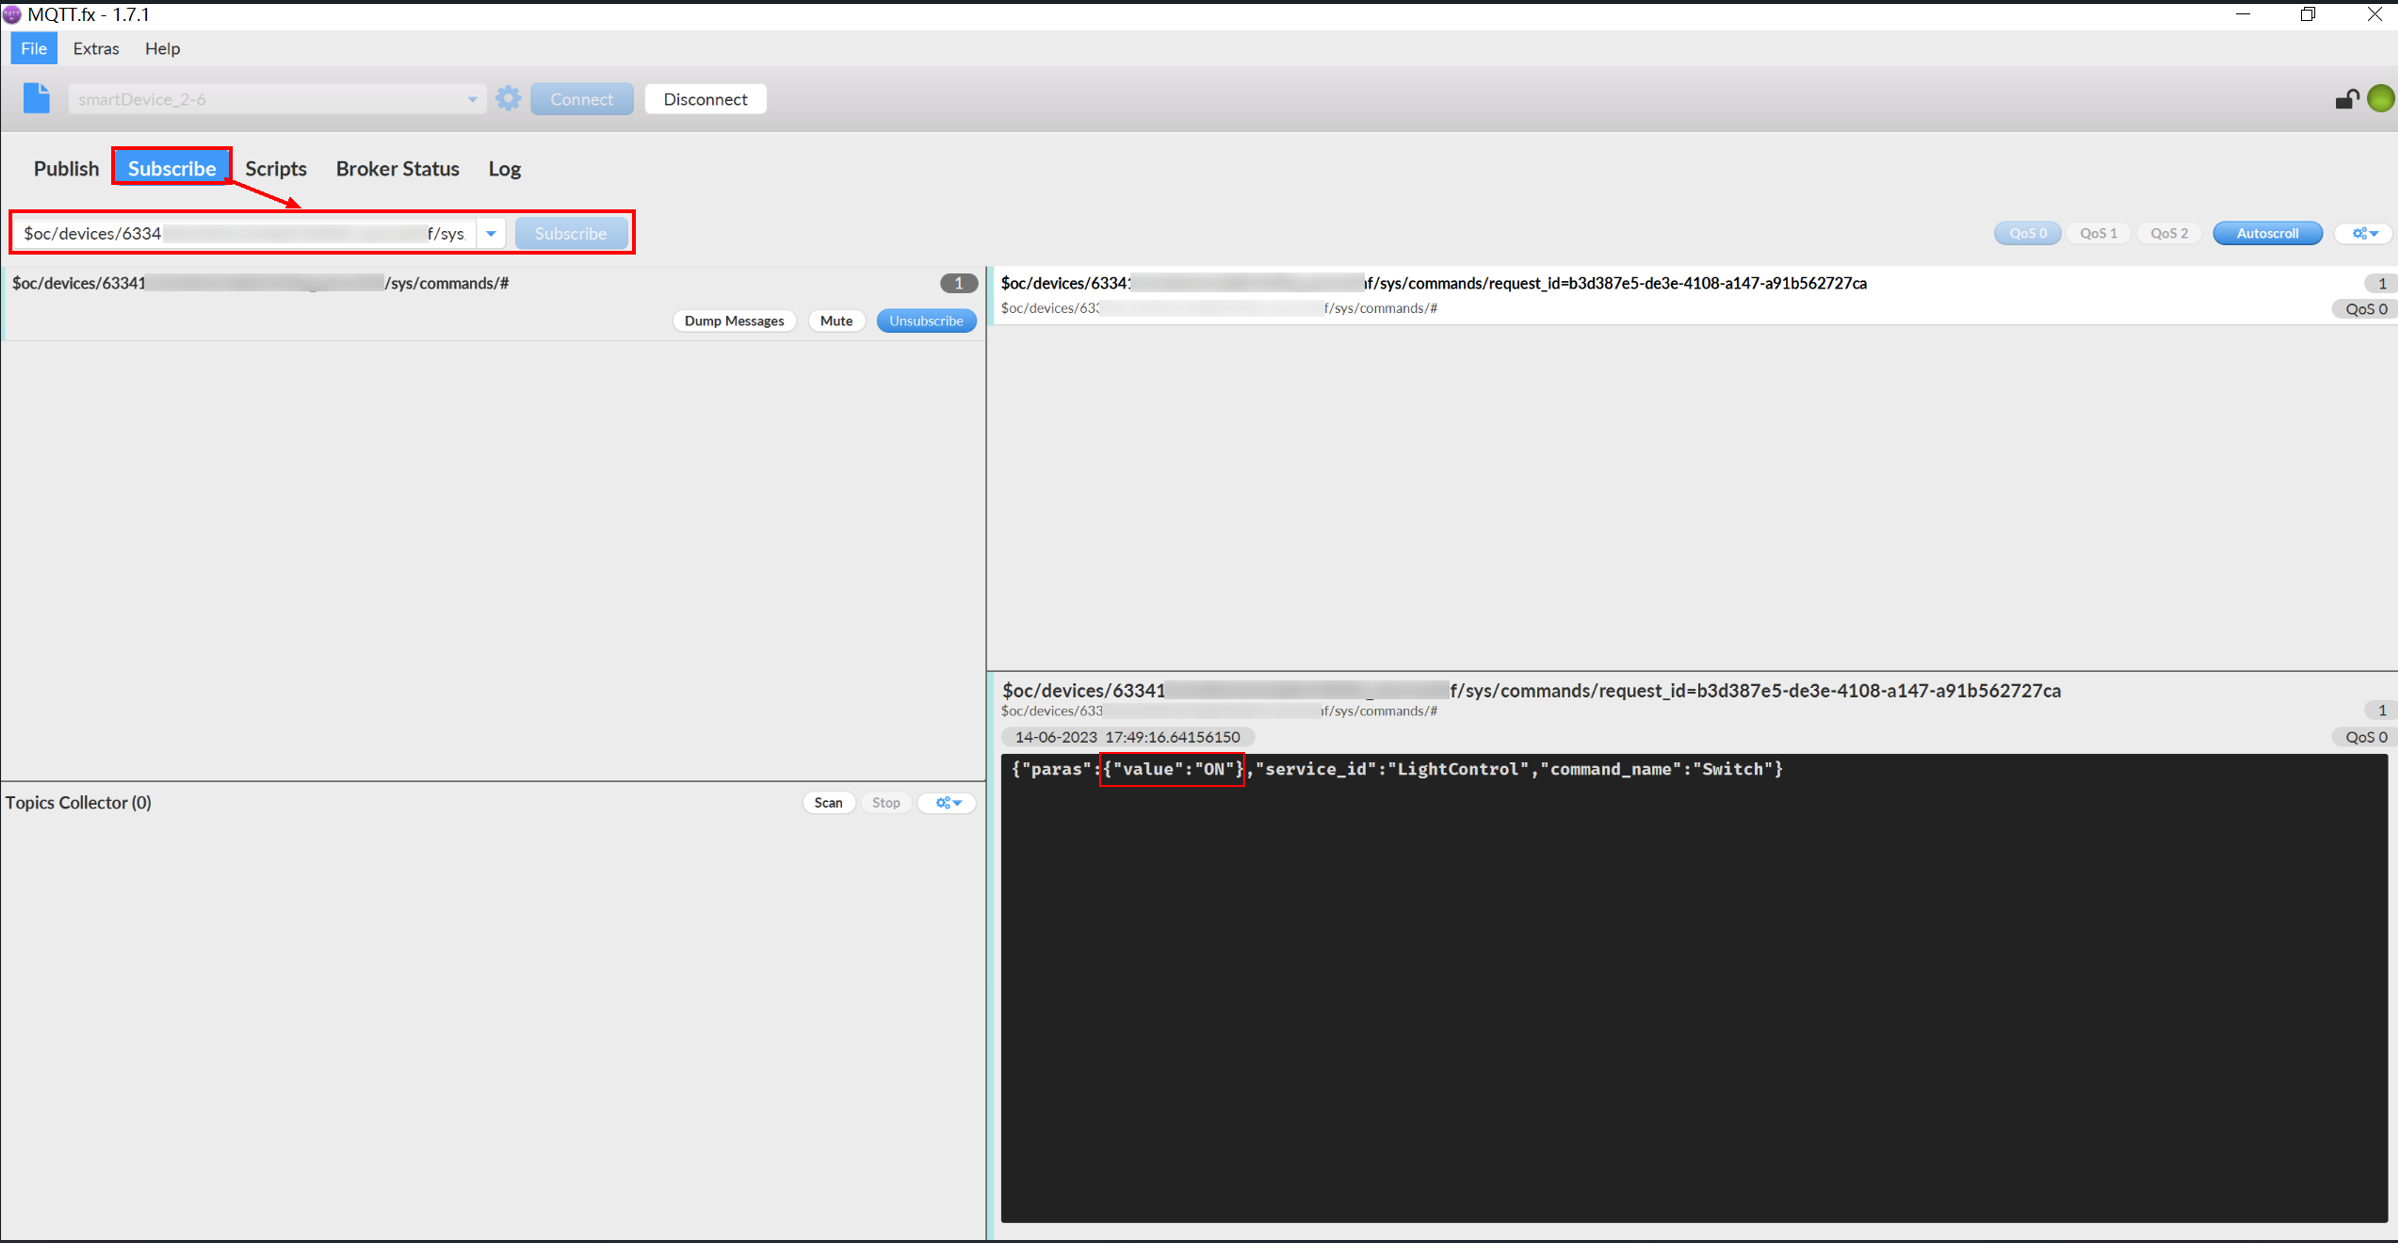
- In MQTT.fx, click the Subscribe tab and enter the command delivery topic. After the subscription, check the delivered command parameters. The format of the command delivery topic is $oc/devices/{device_id}/sys/commands/#. As shown in the following figure, MQTT.fx has received the command whose command_name is Switch and value is ON.
Figure 23 Checking the delivered command parameters

The device needs to respond to the delivered synchronous command in a timely manner. However, MQTT.fx does not automatically report the command response. Therefore, the console page may display a message indicating that the command request times out. For details about the command response, see Platform Delivering a Command.
Feedback
Was this page helpful?
Provide feedbackThank you very much for your feedback. We will continue working to improve the documentation.See the reply and handling status in My Cloud VOC.
For any further questions, feel free to contact us through the chatbot.
Chatbot


