Usage
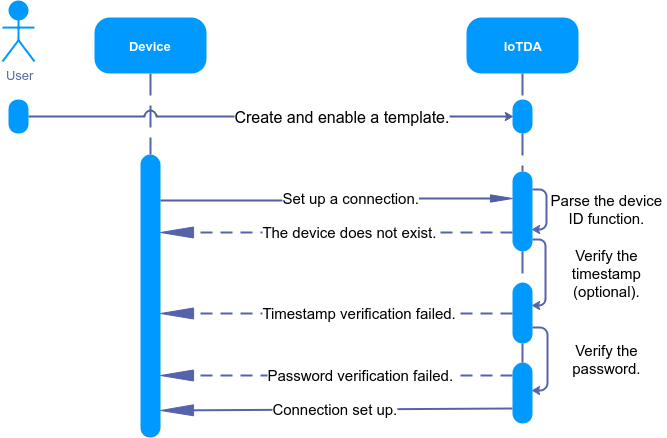
Process

Procedure
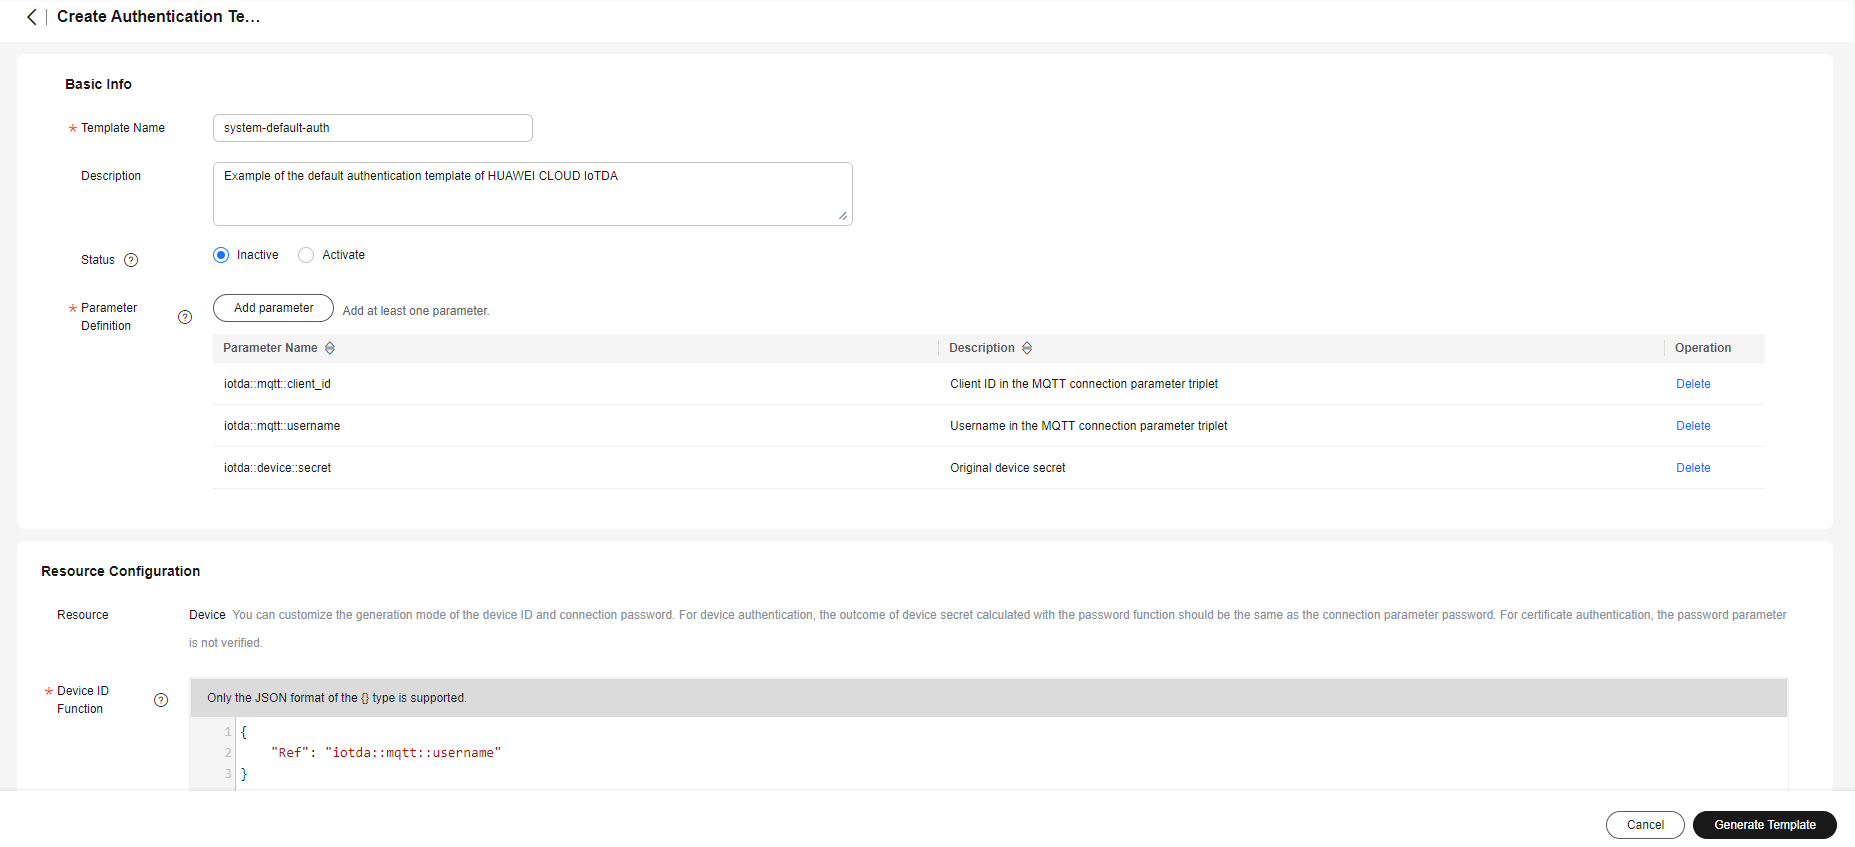
- Create an authentication template. Specifically, log in to the IoTDA console, in the navigation pane, choose Devices > Custom Authentication, click Custom Template, and click Create Template. The authentication template used in this example is the same as that used in the default authentication.
Figure 2 Custom authentication - Creating a template

The overall content of the template is as follows:
{
  "template_name": "system-default-auth",
  "description": "Example of the default authentication template of Huawei Cloud IoTDA",
  "status": "ACTIVE",
  "template_body": {
    "parameters": {
      "iotda::mqtt::client_id": {
        "type": "String"
      },
      "iotda::mqtt::username": {
        "type": "String"
      },
      "iotda::device::secret": {
        "type": "String"
      }
    },
    "resources": {
      "device_id": {
        "Ref": "iotda::mqtt::username"
      },
      "timestamp": {
        "type": "FORMAT",
        "pattern": "yyyyMMddHH",
        "value": {
          "Fn::SubStringAfter": [
            "${iotda::mqtt::client_id}",
            "_0_1_"
          ]
        }
      },
      "password": {
        "Fn::HmacSHA256": [
          "${iotda::device::secret}",
          {
            "Fn::SubStringAfter": [
              "${iotda::mqtt::client_id}",
              "_0_1_"
            ]
          }
        ]
      }
    }
  }
}
Table 1 Authentication template parameters Parameter
Name
Mandatory
Description
template_name
Template name
Yes
Definition: Name of the authentication template.
Range: The name must be unique for a single user. Max. length: 128 characters. Use only letters, digits, underscores (_), and hyphens (-).
description
Description
No
Definition: Description of an authentication template.
Range: Max. 2,048 characters. Use only letters, digits, and special characters (_?'#().,&%@!-).
status
Status
No
Definition: Template status. A user can only have one active template at a time.
Default Value: Inactive
parameters
Parameter
Yes
Definition: MQTT connection parameters predefined by the platform. When a device uses password authentication, the template must contain the original secret parameter (iotda::device:secret).
The platform predefines the following parameters:
iotda::mqtt::client_id: Client Id in the MQTT connection parameter triplet
iotda::mqtt::username: User Name in the MQTT connection parameter triplet
iotda::certificate::country: device certificate (country/region, C)
iotda::certificate::organization: device certificate (organization, O)
iotda::certificate::organizational_unit: device certificate (organization unit, OU)
iotda::certificate::distinguished_name_qualifier: device certificate (distinguishable name qualifier, dnQualifier)
iotda::certificate::state_name: device_certificate (province/city, ST)
iotda::certificate::common_name: device certificate (common name, CN)
iotda::certificate::serial_number: device certificate (serial number, serialNumber)
iotda::device::secret: original secret of the device
device_id
Device ID function
Yes
Definition: Function for obtaining the device ID, in JSON format. The platform parses this function to obtain the corresponding device information.
timestamp
Timestamp verification
No
Definition: Whether to verify the timestamp in the device connection information. Recommended: Enable this function if the device connection parameters (clientId and username) contain the timestamp. Verification process: The platform compares the timestamp carried by the device with the platform system time. If the timestamp plus 1 hour is less than the platform system time, the verification fails.
type
Timestamp type
No
Definition:
UNIX: Unix timestamp. Long integer, in seconds.
FORMAT: formatted timestamp, for example, 2024-03-28 11:47:39 or 2024/03/28 03:49:13.
pattern
Timestamp format
No
Definition: Time format template. Mandatory when the timestamp type is FORMAT.
y: year
M: month
d: day
H: hour
m: minute
s: second
S: millisecond
Example: yyyy-MM-dd HH:mm:ss and yyyy/MM/dd HH:mm:ss
value
Timestamp function
No
Definition: Function for obtaining the timestamp when the device establishes a connection. Mandatory when timestamp verification is enabled.
password
MQTT password function
No
Definition: Password function. Mandatory when the device authentication type is secret authentication. The template parameters must contain the original device secret parameter (iotda::device:secret). For details about the device authentication type, see Registering an Individual Device. Verification process: The platform uses parameters such as the original secret of the device in the function to calculate. If the result is the same as the password carried in the connection establishment request, the authentication is successful. Otherwise, the authentication fails.
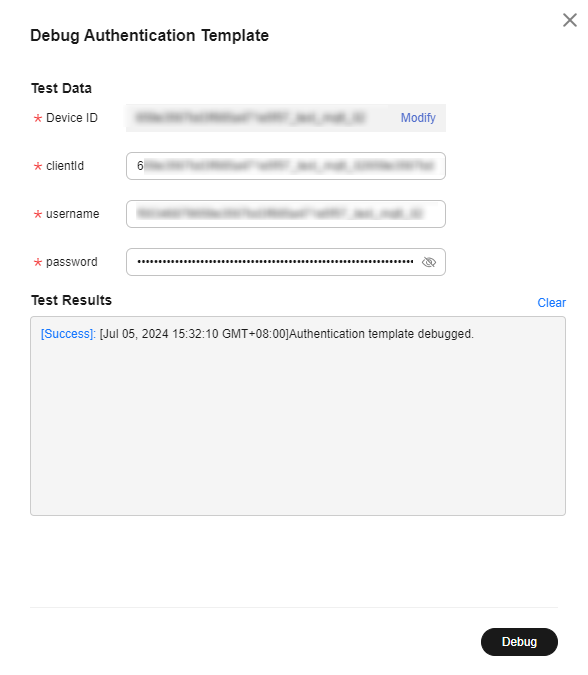
- Select a device debugging template. Specifically, click Debug, select a device for debugging, enter MQTT connection parameters, and click Debug to view the result. Note: If clientId in the standard format is used, the platform verifies whether the value of username is the same as the prefix of clientId.
Figure 3 Custom template - Debugging

After the device debugging is successful, click Enable to enable the template. Once the template is enabled, it will be used for authentication of all devices, and the enabled template cannot be modified. You are advised to create a backup template for debugging, and switch to the backup template only when the debugging succeeds.
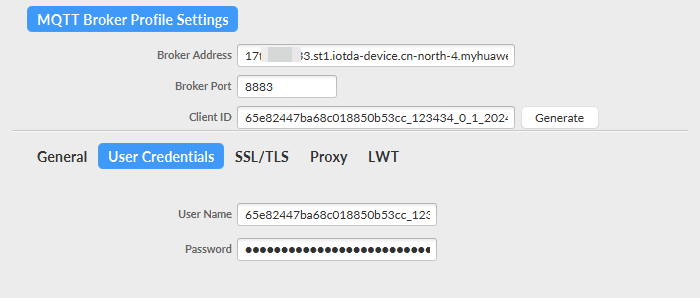
- Use MQTT.fx to simulate device connection setup. Set Broker Address to the platform access address, choose , and set port to 8883.
Figure 4 Device connection establishment
 Figure 5 Device list - Device online status
Feedback
Was this page helpful?
Provide feedbackThank you very much for your feedback. We will continue working to improve the documentation.See the reply and handling status in My Cloud VOC.
For any further questions, feel free to contact us through the chatbot.
Chatbot


