
- What's New
- Function Overview
- Product Bulletin
- Service Overview
-
GeminiDB Redis API
- Service Overview
- Billing
- Getting Started with GeminiDB Redis API
-
Working with GeminiDB Redis API
- Permission Management
- Buying a GeminiDB Redis Instance
-
Instance Connection and Management
- Connection Methods
- Connecting to a GeminiDB Redis Instance on the DAS Console
- Connecting to a GeminiDB Redis Instance Over a Private Network
- Connecting to a GeminiDB Redis Instance Over a Public Network
-
Connection Information Management
- Configuring a Private Domain Name for a GeminiDB Redis Instance
- Configuring a Public Domain Name for a GeminiDB Redis Instance
- Configuring Security Group Rules for a GeminiDB Redis Instance
- Viewing the IP Address and Port Number of a GeminiDB Redis Instance
- Binding an EIP to a GeminiDB Redis Instance
- Encrypting Data over SSL for a GeminiDB Redis Instance
- Connecting a GeminiDB Redis Instance over SSL
- Changing the Security Group of a GeminiDB Redis Instance
- Configuring Private Network Access to a GeminiDB Redis Instance
-
Data Migration
- Overview of the Redis Data Migration Solution
- (Recommended) Using DRS to Migrate Data from a GeminiDB Redis Instance to an Open-Source Redis Instance
- Migrating the Alibaba Cloud Database Redis/Tair To GeminiDB Redis
- (Recommended) Using DRS to Migrate Data from Open-source Redis or Redis Cluster to GeminiDB Redis API
- Migrating Data from Open-source Redis to GeminiDB Redis API Using Redis-Shake
- Using Redis-Shake to Import an RDB or AOF File to a GeminiDB Redis Instance
- (Recommended) Importing Data to Restore RDB Files to a GeminiDB Redis Instance
- From Kvrocks to GeminiDB Redis API
- From Pika to GeminiDB Redis API
- From SSDB to GeminiDB Redis API
- From LevelDB to GeminiDB Redis API
- From Kvrocks to GeminiDB Redis API
- Migration from an AWS ElastiCache for Redis Database to a GeminiDB Redis Instance
- Verifying Redis Data Consistency After Migration
- Instance Management
-
Modifying Instance Settings
- Upgrading a Minor Version
- Modifying a GeminiDB Redis Instance Name
- Changing the Administrator Password of a GeminiDB Redis Database
- Changing the CPU and Memory Specifications of an Instance
- Setting a Maintenance Window
- Scaling Instances
- Scaling Disk Space
- Performing a Primary/Standby Switchover for GeminiDB Redis Instances
- Data Backup
- Data Restoration
- Diagnosis Analysis
- Account and security
-
Parameter Management
- Modifying Parameters of GeminiDB Redis Instances
- Creating a Parameter Template
- Viewing Parameter Change History
- Exporting a Parameter Template
- Comparing Parameter Templates
- Replicating a Parameter Template
- Resetting a Parameter Template
- Applying a Parameter Template
- Viewing Application Records of a Parameter Template
- Modifying the Description of a Parameter Template
- Deleting a Parameter Template
- Logs and Audit
- Viewing Metrics and Configuring Alarms
- Tag Management
- Quota
- MySQL Memory Acceleration
-
Development Reference
- Development and O&M Rules
- Compatible Commands
-
Examples of Connecting to an Instance Using Programming Languages
- Connecting to an Instance Using Jedis
- Connecting to an Instance Using Redisson
- Connecting to an Instance Using Hiredis
- Connecting to an Instance Using Node.js
- Connecting to an Instance Using PHP
- Connecting to an Instance Using Python
- Connecting to an Instance Using Go
- Connecting to an Instance Using C#
- Connecting to an Instance Using Sentinel
- Lua Script Compilation Specifications
- Keyspace Notification
- EXHASH Commands
- Large Bitmap Initialization
- Configuring Parameters for a Client Connection Pool
- Using Parallel SCAN to Accelerate Full Database Scanning
- Accessing a GeminiDB Redis Instance Using a Pipeline
- Processing Transactions on a GeminiDB Redis Instance
- Retry Mechanism for GeminiDB Redis Clients
- GeminiDB Redis API Pub/Sub
- Implementing Distributed Locks Using Lua Scripts for GeminiDB Redis API
- Best Practices
- Performance White Paper
-
FAQs
-
About GeminiDB Redis API
- What Are the Differences Between GeminiDB Redis API, Open-Source Redis, and Other Open-Source Redis Cloud Services?
- How Is the Performance of GeminiDB Redis API Compared with Open-Source Redis?
- What Redis Versions and Commands Are Compatible with GeminiDB Redis API? Whether Application Code Needs to Be Refactored for Connecting to a Redis Client?
- Can Data Be Migrated from a Self-Built Redis Instance to a GeminiDB Redis Instance? What Are the Precautions?
- What Is the Availability of a GeminiDB Redis Instance?
- Are Total Memory and Total Capacity of a GeminiDB Redis Instance the Same? What Is the Relationship Between Memory and Capacity?
- How Do I Select Proper Node Specifications and Node Quantity When Purchasing a GeminiDB Redis Instance?
- Is a Primary/Standby or Cluster Deployment Mode Preferred for GeminiDB Redis Instances with Several GB of Storage Space?
- How Does GeminiDB Redis API Persist Data? Will Data Be Lost?
- What Is the Memory Eviction Policy of GeminiDB Redis API?
- Does GeminiDB Redis API Support Modules Such as a Bloom Filter?
- Billing
-
Database Usage
- Why Is the Key Not Returned Using Scan Match?
- How Do I Process Existing Data Shards After Migrating Workloads to GeminiDB Redis API?
- Does GeminiDB Redis API Support Fuzzy Queries Using KEYS?
- Does the GeminiDB Redis API Support Multiple Databases?
- Why the Values Returned by Scan Operations Are Different Between GeminiDB Redis API and Open-Source Redis 5.0?
- Why Are Error Messages Returned by Some Invalid Commands Different Between GeminiDB Redis API and Open-Source Redis 5.0?
- How Do I Resolve the Error "CROSSSLOT Keys in request don't hash to the same slot"?
- How Many Commands Can Be Contained in a GeminiDB Redis Transaction?
- Which Commands Require Hash Tags in GeminiDB Redis Cluster Instances?
- What Do I Do If the Error "ERR Unknown Command Sentinel" Is Displayed?
- Why Return Values of Blocking Commands Differ Between Primary/Standby GeminiDB Redis Instances and Open-Source Redis Instances?
- How Long Does It Take to Scale Up GeminiDB Redis Instance Storage? Will Services Be Affected?
- How Long Does It Take to Add GeminiDB Redis Nodes at the Same Time? What Are the Impacts on Services?
- What Are the Differences Between Online and Offline Specification Changes of GeminiDB Redis Nodes? How Long Will the Changes Take? What Are the Impacts on Services?
- What Are the Differences Between Online and Offline Patch Installation of GeminiDB Redis Nodes? How Long Will the Upgrades Take? What Are the Impacts on Services?
- Can I Download Backups of a GeminiDB Redis Instance to a Local PC and Restore Data Offline?
- What Is the Data Backup Mechanism of GeminiDB Redis API? What Are the Impacts on Services?
- Why Does the CPU Usage Remain High Despite Low Service Access Volume on a GeminiDB Redis Preferential Instance with 1 CPU and 2 Nodes?
- Why Does the Number of Keys Decrease and Then Become Normal on the Monitoring Panel on the GUI of GeminiDB Redis API?
- Why Is CPU Usage of GeminiDB Redis Nodes Occasionally High?
- How Do I Upgrade GeminiDB Redis API from 5.0 to 6.2?
- When Does a GeminiDB Redis Instance Become Read-Only?
-
Database Connection
- How Do I Connect to a GeminiDB Redis Instance?
- How Do I Use Multiple Node IP Addresses Provided by GeminiDB Redis API?
- How Does Load Balancing Work in GeminiDB Redis API?
- How Can I Create and Connect to an ECS?
- Can I Change the VPC of a GeminiDB Redis Instance?
- Why Can't I Connect to the Instance After an EIP Is Bound to It?
- How Do I Access a GeminiDB Redis Instance from a Private Network?
- Do I Need to Enable Private Network Access Control for a Load Balancer After Setting a Security Group?
- What Should I Do If the Client Connection Pool Reports Error " Could not get a resource from the pool"?
- Common Client Errors and Troubleshooting Methods
- Backup and Restoration
- Regions and AZs
-
Data Migration
- What Do I Do if the GeminiDB Redis Link Cannot Be Found on DRS?
- What Do I Do if the Error "ERR the worker queue is full, and the request cannot be executed" Is Displayed?
- What Do I Do If the Error "ERR the request queue of io thread is full, and the request cannot be executed" Is Displayed?
- What Do I DO If the Error "read error, please check source redis log or network" Is Displayed?
- What Do I Do If the Error "slaveping_thread.cc-ThreadMain-90: error: Ping master error" Is Displayed?
- What Do I Do If the Forward Migration Speed of the Synchronization Status Is Too Slow?
- What Do i Do When the Forward Migration Speed of the Synchronization Status Is Too Fast, and the Error Message "ERR Server Reply Timeout, Some Responses May Lose, but Requests Have Been Executed" Is Displayed?
- Can Data Be Migrated from Self-Built Redis 4.0, 5.0, and 6.2 to GeminiDB Redis API?
- How Do I Migrate Data from Self-Built Primary/Standby and Cluster Redis Instances to GeminiDB Redis Instances?
- Why Cannot DRS Migrate Data from Third-Party Redis Such as ApsaraDB for Redis and TencentDB for Redis?
- Which of the Following Factors Need to Be Considered When Data Is Migrated from Self-Built Primary/Standby Redis Instances to a GeminiDB Redis cluster?
- Only 20% to 30% of 100 GB of Data Was Migrated to GeminiDB Redis. Is the Migration Incomplete?
-
Memory Acceleration
- Will All Data Be Cached to GeminiDB Redis Instances After Memory Acceleration Is Enabled and MySQL Database Data Is Updated?
- If Memory Acceleration Is Enabled, GeminiDB Redis Instance Data Increases Continuously. Do I Need to Scale Out the Capacity? How Do I Manage Cached Data?
- Is Memory Acceleration Recommended When Customers' Service Data Can Be Synchronized Between MySQL and Redis? In Which Scenarios Can Memory Acceleration Be enabled?
- How Long Is the Latency of Synchronization from RDS for MySQL to GeminiDB Redis API? What Factors Affect the Latency?
- Will the Source MySQL Database Be Affected After Memory Acceleration Is Enabled?
- GeminiDB Redis Instances with Memory Acceleration Enabled Needs to Process a Large Number of Binlogs in a Short Period of Time. Will a Large Number of Resources Be Occupied and Online Services Be Affected?
- Instance Freezing, Release, Deletion, and Unsubscription
-
About GeminiDB Redis API
-
GeminiDB Influx API
- Service Overview
- Billing
- Getting Started with GeminiDB Influx API
-
Working with GeminiDB Influx API
- Permissions Management
- Buying an Instance
- Connecting to an Instance
- Instance Lifecycle Management
- Instance Modifications
- Migrating Data
- Database Commands
- Cold and Hot Data Separation
- Certificate Management
- Data Backup
- Data Restoration
- Exporting Data
-
Parameter Template Management
- Creating a Parameter Template
- Modifying Parameters of GeminiDB Influx Instances
- Viewing Parameter Change History
- Exporting a Parameter Template
- Comparing Parameter Templates
- Replicating a Parameter Template
- Resetting a Parameter Template
- Applying a Parameter Template
- Viewing Application Records of a Parameter Template
- Modifying a Parameter Template Description
- Deleting a Parameter Template
- Log Management
- Monitoring and Alarm Reporting
- CTS
- Managing Tags
- Quotas
- Best Practices
- Performance White Paper
-
FAQs
-
Product Consulting
- What Do I Need to Note When Using GeminiDB Influx API?
- What Does the Availability of GeminiDB Influx Instances Mean?
- Can GeminiDB Influx API Convert Multiple Columns to Multiple Rows?
- How Much Data Can a GeminiDB Influx Instance Hold?
- Can I Access GeminiDB Influx Instances Using Grafana?
- How Do I Use GeminiDB Influx Hints?
- What Do I Do If Error "select *" query without time range is not allowed Is Reported?
- What Do I Do If the Error Message "ERR: Max-select-series Limit Exceeded" Is Displayed?
- What Do I Do If "delete is forbidden" Is Reported?
- Billing
- Database Connection
- Backup and Restoration
- Regions and AZs
- Instance Freezing, Release, Deletion, and Unsubscription
-
Product Consulting
-
GeminiDB Cassandra API
- Service Overview
- Billing
- Getting Started with GeminiDB Cassandra API
-
Working with GeminiDB Cassandra API
- Permissions Management
- Buying a GeminiDB Cassandra Instance
-
Instance Connection and Management
- Connection Methods
- Connecting to a GeminiDB Cassandra Instance on the DAS Console
- Connecting to a GeminiDB Cassandra Instance over a Private Network
- Connecting to a GeminiDB Cassandra Instance over a Public Network
- Connecting to a GeminiDB Cassandra Instance Using Java
- Connecting to a GeminiDB Cassandra Instance Using Go
- Connecting to a GeminiDB Cassandra Instance Using Spark
-
Connection Information Management
- Setting Security Group Rules for a GeminiDB Cassandra Instance
- Binding an EIP to a GeminiDB Cassandra Instance
- Viewing the IP Address and Port Number of a GeminiDB Cassandra Instance
- Changing the Port of a GeminiDB Cassandra Instance
- Changing the Security Group of a GeminiDB Cassandra Instance
- Encrypting Data over SSL for a GeminiDB Cassandra Instance
- Downloading the SSL Certificate
- Data Migration
- Instance Lifecycle Management
- Instance Modifications
- Intra-region DR
- Cross-region Dual-active DR
- Data Backup
- Data Restoration
-
Parameter Management
- Modifying Parameters of GeminiDB Cassandra Instances
- Creating a Parameter Template
- Viewing Parameter Change History
- Exporting a Parameter Template
- Comparing Parameter Templates
- Replicating a Parameter Template
- Resetting a Parameter Template
- Applying a Parameter Template
- Viewing Application Records of a Parameter Template
- Modifying a Parameter Template Description
- Deleting a Parameter Template
- Log and Audit
- Viewing Metrics and Configuring Alarms
- Enterprise Project
- Managing GeminiDB Cassandra Instance Tags
- Managing User Resource Quotas of a GeminiDB Cassandra Instance
- Best Practices
- Performance White Paper
-
FAQs
- Product Consulting
- Billing
-
Database Usage
- Why Does the Overall Instance Performance Deteriorate When QPS Increases After the Batch Size Is Decreased?
- What Can I Do if Error "field larger than field limit (131072)" Is Reported During Data Import?
- What Should I Pay Attention to When Creating a GeminiDB Cassandra Table?
- How Do I Detect and Resolve BigKey and HotKey Issues?
- How Do I Set Up a Materialized View?
- How Do I Use a Secondary Index?
- How Can I Use the Search Index of Lucene?
- How Do I Set Paging Query with Java?
- How Do I Set Paging Query with Python?
- Database Connection
- Backup and Restoration
- Regions and AZs
- Instance Freezing, Release, Deletion, and Unsubscription
- GeminiDB (DynamoDB API Compatible) Instance
- HBase-Compatible Instance
-
GeminiDB Mongo API
- Service Overview
- Billing
- Getting Started with GeminiDB Mongo API
-
Working with GeminiDB Mongo API
- Permissions Management
- Migrating Data
- Instance Lifecycle
- Instance Modifications
- Connections
- Database Commands
- Data Backup
- Data Restoration
-
Parameter Template Management
- Creating a Parameter Template
- Modifying Parameters of GeminiDB Mongo Instances
- Viewing Parameter Change History
- Exporting a Parameter Template
- Comparing Parameter Templates
- Replicating a Parameter Template
- Resetting a Parameter Template
- Applying a Parameter Template
- Viewing Application Records of a Parameter Template
- Modifying a Parameter Template Description
- Deleting a Parameter Template
- Monitoring and Alarm Configuration
- Audit
- Log Management
- Billing Management
- Quotas
- Best Practices
- Performance White Paper
- FAQs
- Change History
- Technical White Paper
-
API Reference
- Before You Start
- API Overview
- Calling APIs
- Quick Start
-
APIs v3 (Recommended)
- API Versions
- Versions and Specifications
-
Instances
- Creating an Instance
- Deleting an Instance
- Querying Instances and Details
- Scaling Up Storage Space of an Instance
- Adding Nodes for an Instance
- Deleting Nodes from a Specified Instance
- Obtaining Sessions of a Node
- Querying Session Statistics of an Instance Node
- Closing Sessions of an Instance Node
- Querying Instance Specifications That Can Be Changed
- Changing Specifications of an Instance
- Resetting the Administrator Password of an Instance
- Editing the Name of an Instance
- Changing the Security Group of an Instance
- Upgrading Minor Version
- Patching Databases in Batches
- Creating Cold Storage
- Scaling Up Cold Storage
- Binding/Unbinding an EIP
- Enabling or Disabling SSL
- Restarting an Instance
- Configuring an Autoscaling Policy for Storage Space
- Changing a Database Port
- Checking Password Strength
- Configuring Access to a Replica Set Across CIDR Blocks
- Deleting the Node that Fails to Be Added
- Querying IP Addresses Required for Creating an Instance or Adding Nodes
- Querying the Autoscaling Policy of Storage Space
- Scaling Storage Space of an Instance
- Querying High-Risk Commands
- Modifying High-Risk Commands
- Querying Hot Keys of a Redis Instance
- Disabling Commands for a Redis Instance
- Querying Disabled Commands for a Redis Instance
- Deleting Disabled Commands for a Redis Instance
- Setting the Maintenance Period of an Instance
- Performing a Primary/Standby Switchover
- Starting or Stopping a Node
- Querying Big Keys of a GeminiDB Redis Instance
- Querying the Password-Free Configuration of a GeminiDB Redis Instance
- Modifying the Password-Free Configuration of a GeminiDB Redis Instance
- Querying the Memory Mapping List and Details
- Creating a Memory Acceleration Rule
- Deleting a Memory Mapping
- Creating a Memory Mapping
- Modifying a Memory Acceleration Rule
- Querying Memory Mapping Rules and Details
- Deleting a Memory Acceleration Rule
- Enabling or Disabling Instance Data Export
- Enabling or Disabling Second-Level Monitoring
- Querying Configurations of Second-Level Monitoring
- Connection Management
-
Backups and Restorations
- Querying Backups
- Querying Backups (Recommended)
- Querying an Automated Backup Policy
- Configuring an Automated Backup Policy
- Querying Instances that Can Be Restored
- Querying the Time Window When a Backup Can Be Restored
- Creating a Manual Backup
- Deleting a Manual Backup
- Restoring Data to an Existing Instance
- Querying the Recycling Policy
- Modifying the Recycling Policy
- Querying Instances in the Recycle Bin
- Obtaining GeminiDB Cassandra Instance Database Information That Is Restored Using Tables
- Obtaining GeminiDB Cassandra Instance Table Information That Is Restored Using Tables
- Restoring the Current Redis Instance to a Point in Time
- Setting the Policy for Restoring Redis Data to a Specified Time Point
- Querying the Policy for Restoring Redis Data to a Specified Time Point
- Querying the Restoration Time Range of a Redis Instance
- Querying the Storage Space Used for Restoring a Redis Instance to a Specified Time Point
- Stopping a Backup
- Deleting Manual Backups in Batches
-
Parameter Templates
- Obtaining Parameter Templates
- Creating a Parameter Template
- Modifying Parameters in a Parameter Template
- Applying a Parameter Template
- Resetting a Custom Parameter Template
- Modifying Parameters of a Specified Instance
- Querying Instance Parameter Settings
- Obtaining Parameters of a Specified Parameter Template
- Deleting a Parameter Template
- Querying Instances that a Parameter Template Can Be Applied To
- Viewing Parameter Change History of an Instance
- Viewing Application Records of a Parameter Template
- Comparing Parameter Templates
- Replicating a Parameter Template
- Querying API that Support Parameter Templates
- Managing Databases and Accounts
- Tags
-
Logs
- Querying Database Slow Logs
- Querying Slow Query Logs of a GeminiDB Redis Instance
- Querying Slow Query Logs of a GeminiDB Influx Instance
- Querying Slow Query Logs of a GeminiDB Cassandra Instance
- Querying Slow Query Logs of a GeminiDB Mongo Instance
- Querying Database Error Logs
- Querying Error Logs of a GeminiDB Mongo Instance
- Setting the Desensitization Status of Slow Query Logs
- Querying the Desensitization Status of Slow Query Logs
- Associating Instances with an LTS Log Stream
- Disassociating Instances from an LTS Log Stream
- Querying LTS Log Configurations
- Quotas
- Disaster Recovery
- Task Management
- Enterprise Projects
- Instance Load Balancing Management
- API v3 (Unavailable Soon)
- Permission Policies and Supported Actions
- Appendixes
- SDK Reference
- Videos
- General Reference
Copied.
Configuring a Private Domain Name for a GeminiDB Redis Instance
This section describes how to configure and resolve private domain names.
Creating a Private Domain Name
- Log in to the GeminiDB console.
- Click Service List. Under Network, click Domain Name Service.
- On the DNS console, choose Private Zones.
Figure 1 Private zones

- Click Create Private Zone.
Figure 2 Creating a private zone

- Set parameters as prompted.
Figure 3 Creating a private zone
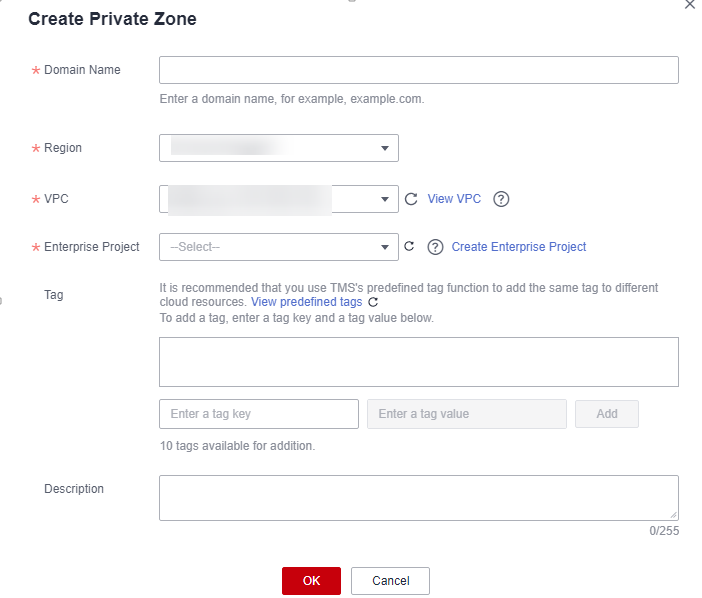
Table 1 Parameter description Parameter
Description
Example
Domain Name
Domain name of the private zone.
You can customize any correctly formatted domain names, even top-level ones.
For details about the domain name format, see Domain Name Format and DNS Hierarchy.
example.com
Region
Region where a tenant is located
CN East-Shanghai1
VPC
The VPC associated with the private domain name must be the same as the VPC where the GeminiDB Redis instance is located. Otherwise, the private domain name cannot be resolved.
-
Enterprise Project
Enterprise project associated with the private domain name. You can manage private domain names by enterprise project.
 NOTE:
NOTE:
This parameter is available and mandatory only when Account Type is set to Enterprise Account.
Configuration principles:
- If you do not manage domain names by enterprise project, select the default enterprise project.
- If you manage domain names by enterprise project, select an existing enterprise project.
default
Tags
(Optional) Identifier of a resource. Each tag contains a key and a value. You can add a maximum of 20 tags to a domain name.
The key and value naming rules are as follows:
Key:
- Cannot be left blank.
- Must be unique for each resource.
- Consists of a maximum of 36 characters.
- Cannot start or end with a space or contain special characters =*<>\,|/
Value:
- Cannot be left blank.
- Consists of a maximum of 43 characters.
- Cannot start or end with a space or contain special characters =*<>\,|/
example_key1
example_value1
Description
(Optional) Description of the zone, which cannot exceed 255 characters.
This is a zone example.
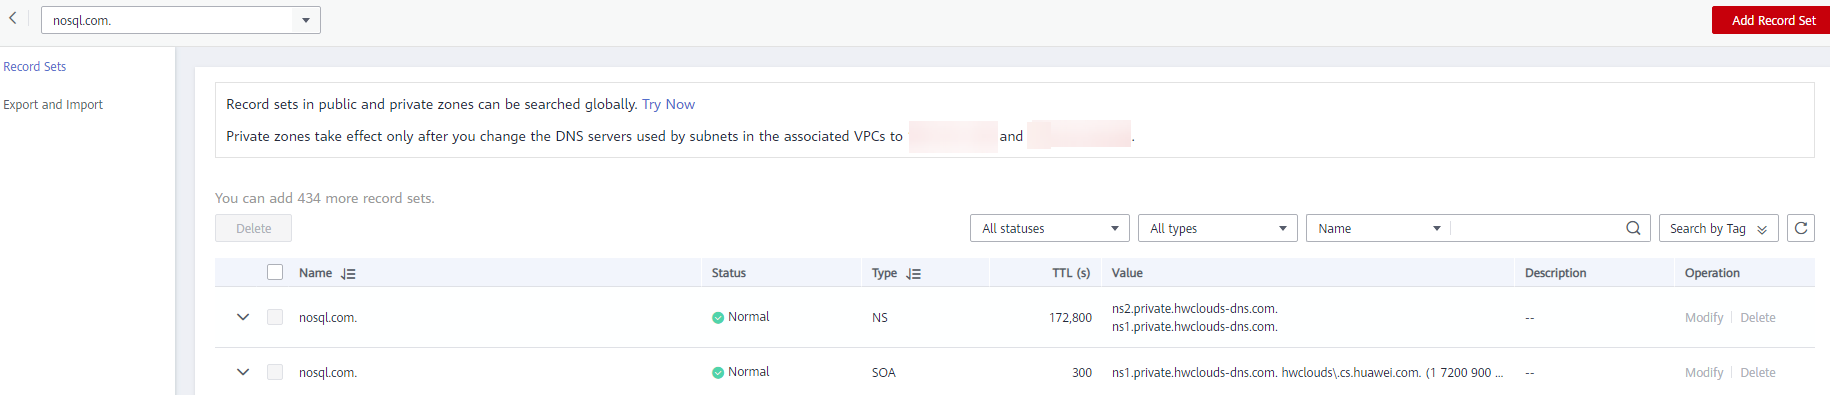
- Click OK. On the Private Zones page, view the created private domain name in the zone list.
If the status of the private domain name is Normal, the domain name has been successfully created.Figure 4 Viewing the private domain name status

Adding a Record Set for a Domain Name
After creating a private domain name, configure a record set for it so that you can access instances using the domain name.
- Click the private domain name you created. On the displayed page, click Add Record Set in the upper right corner.
Figure 5 Adding a record set
- In the displayed Add Record Set dialog box, configure the required parameters.
Value: Enter the load balancer IP address of the instance.
Figure 6 Adding a record set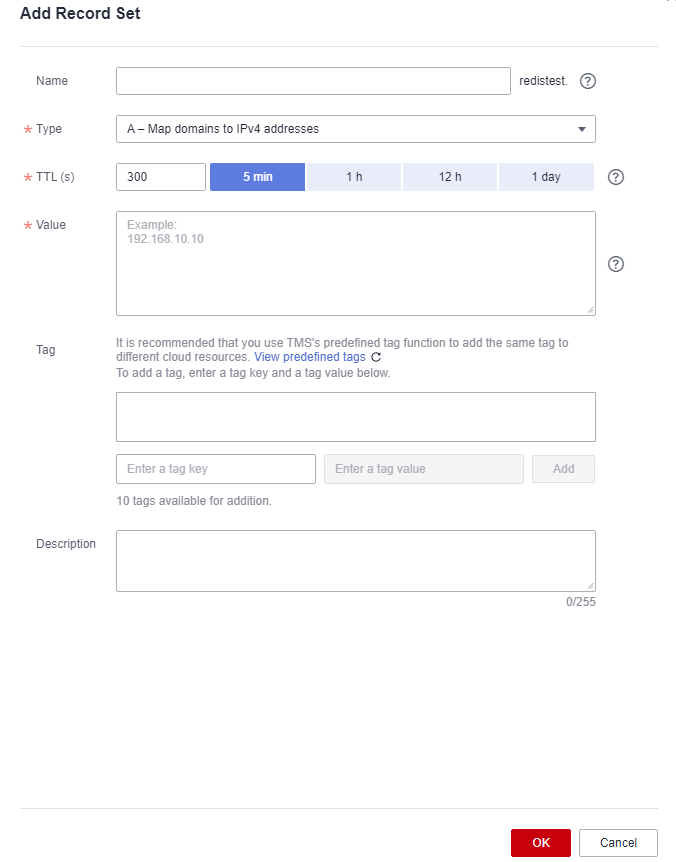
For details about how to configure parameters, see Adding an A Record Set.
- Click OK.
- Switch back to the Record Sets page.
- View the created record set in the record set list. If the status of the record set is Normal, the record set is added successfully.
Feedback
Was this page helpful?
Provide feedbackThank you very much for your feedback. We will continue working to improve the documentation.See the reply and handling status in My Cloud VOC.
For any further questions, feel free to contact us through the chatbot.
Chatbot


