ACL Account Management
Scenarios
GeminiDB Redis API provides the enterprise-grade multi-tenant capability. You can add read-only or read/write accounts in your instance to control access to each database to avoid misoperations on data of other tenants. This section describes how to manage accounts.
Precautions
- A maximum of 200 ACL accounts can be created for each GeminiDB Redis instance.
- Account change takes effect 10 seconds later after it is performed.
- If you use a backup to restore data to a new instance, the account information of the original instance will not be inherited.
- The account to be created must meet the requirements in Table 1.
Table 1 Parameter requirements Parameter
Requirement
Example Value
Account Name
- Cannot be left blank.
- Can contain a maximum of 36 characters.
- Must start with a letter and can contain only digits, letters, underscores (_), and hyphens (-).
Organization
Permission
- Read/Write
- Read-only
Read/Write
Database
- Authorize all databases
- Unauthorized
- Authorized
NOTE:
- You can add a database on the right of Database as required.
- You can select the databases to be authorized as required.
- Database refers to the DB of the open-source Redis.
Authorize all databases
Password
- Cannot be left blank.
- Can include 8 to 32 characters.
- Must contain at least two of the following types: uppercase letters, lowercase letters, digits, and special characters. The following special characters are allowed: ~!@#%^*-_=+?$()&
test123456
Creating an ACL Account
- Log in to the GeminiDB console.
- In the instance list, select an instance and click its name to go to the Basic Information page.
- In the navigation pane on the left, choose Accounts.
- On the displayed page, click Create Account.
Figure 1 Creating an account

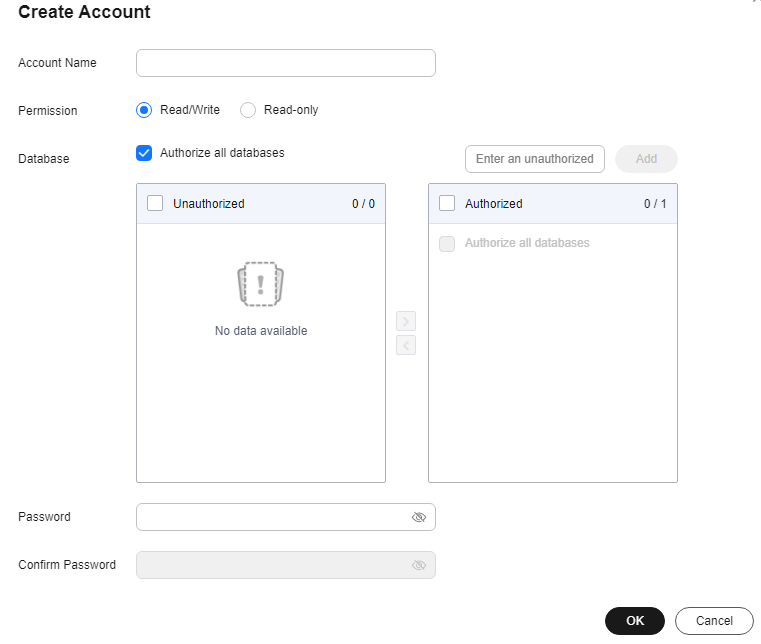
- In the displayed dialog box, enter a username, select permissions for databases, authorize required databases (DBs), enter a password, confirm the password, and click OK.
Figure 2 Configuring required parameters

- View and manage the created account in the account list.
Resetting a Password
- Log in to the GeminiDB console.
- In the instance list, locate the target instance and click its name to go to the Basic Information page.
- In the navigation pane on the left, choose Accounts.
- On the displayed page, select the account whose password needs to be reset and click Reset Password.
Figure 3 Resetting a password

- In the displayed dialog box, enter a new password, confirm the password, and click OK.
Figure 4 Resetting a password

- Run auth USER PWD or auth USER:PWD to log in to the instance again.
Changing Permissions of an Account
- Log in to the GeminiDB console.
- In the instance list, locate the target instance and click its name to go to the Basic Information page.
- In the navigation pane on the left, choose Accounts.
- On the displayed page, select the account whose permissions need to be modified and click Change Permission.
Figure 5 Changing permissions

- In the displayed dialog box, select the required permissions and database, and click OK.
Figure 6 Changing permissions

- Run auth USER PWD or auth USER:PWD to log in to the instance again.
Deleting an ACL Account
- Log in to the GeminiDB console.
- In the instance list, locate the target instance and click its name to go to the Basic Information page.
- In the navigation pane on the left, choose Accounts.
- On the displayed page, locate the account that you want to delete and click Delete. In the displayed dialog box, click OK.
Figure 7 Deleting an account

- Verify that the deleted account is no longer displayed.
How to Use a New Account to Access a Database
- Access the database by running auth USER PWD or auth USER:PWD.
- When you access the database using an SDK on your application, use the value of USER and PWD as the username and password, or use USER:PWD as the password parameter.
When you access the database by running auth argc, ensure that argc does not contain colons. If an incorrect password contains colons, the returned value is the same as that of auth argc1 argc2.
Feedback
Was this page helpful?
Provide feedbackThank you very much for your feedback. We will continue working to improve the documentation.See the reply and handling status in My Cloud VOC.
For any further questions, feel free to contact us through the chatbot.
Chatbot


