
Buying a Replica Set Instance
This section describes how to buy a replica set instance compatible with MongoDB. You can customize your replica set instance with appropriate computing capability and storage space.
Prerequisites
- You have created a Huawei Cloud account.
Procedure
- Log in to the Huawei Cloud console.
- In the service list, choose Databases > GeminiDB Mongo API.
- On the Instances page, click Buy DB Instance.
- On the displayed page, select a billing mode, specify instance specifications and click Next.
Figure 1 Billing mode and basic information

Table 1 Billing mode Parameter
Description
Billing Mode
Method that the instance is billed in. The value can be Yearly/Monthly or Pay-per-use.
- Yearly/Monthly
- In this mode, specify Required Duration at the bottom of the page. The system deducts the fees incurred from your account based on the service price.
- If you do not need such an instance any longer after it expires, change the billing mode to pay-per-use to optimize costs. For details, see Changing the Billing Mode from Yearly/Monthly to Pay-per-Use.
NOTE:
Yearly/Monthly instances cannot be deleted directly. If such an instance is no longer required, unsubscribe from it. For details, see Unsubscribing from a Yearly/Monthly DB Instance.
- Pay-per-use
- If you select this billing mode, you are billed based on how much time the instance is in use.
- If you expect to use an instance for a long period of time, change its billing mode to yearly/monthly to optimize costs. For details, see Changing the Billing Mode from Pay-per-Use to Yearly/Monthly.
Table 2 Basic information Parameter
Description
Region
Region where a tenant is located
NOTICE:To reduce network latency, select a region nearest from which you will access the instance. Instances deployed in different regions cannot communicate with each other through a private network. After you buy an instance, you cannot change its region.
DB Instance Name
The instance name:
- Can be the same as an existing instance name.
- Can include 4 to 64 bytes and must start with a letter. It is case-sensitive and allows only letters, digits, hyphens (-), and underscores (_).
After an instance is created, you can change its name. For details, see Modifying the Name of an Instance.
Compatible API
MongoDB
DB Instance Type
Replica set
DB Engine Version
4.0
AZ
Availability zone where the instance is created. An AZ is a part of a region with its own independent power supplies and networks. AZs are physically isolated but can communicate through an internal network.
An instance can be deployed in one or three AZs.
- If you want to deploy an instance in a single AZ, select one AZ.
- If you want to deploy an instance across AZs for disaster recovery, select three AZs. In this deployment mode, the nodes are evenly distributed across the three AZs.
Figure 2 Specifications and storage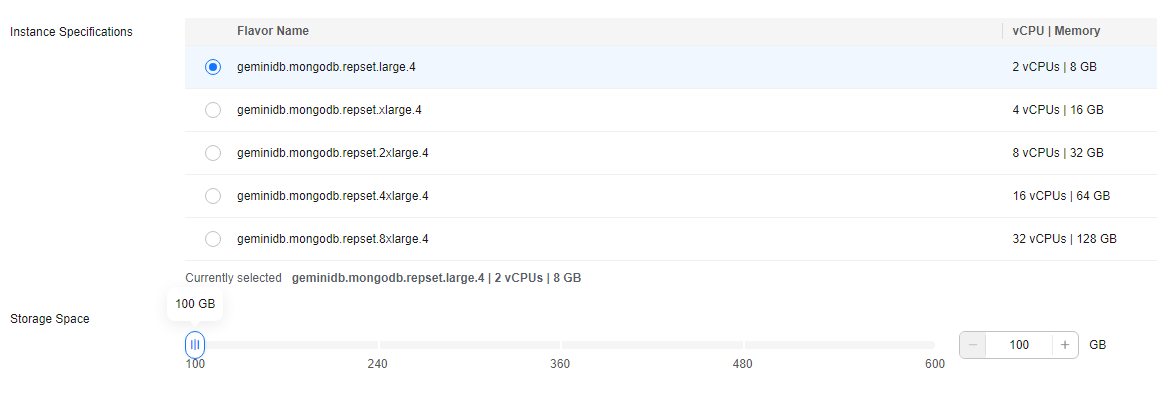
Table 3 Specifications and storage Parameter
Description
Instance Specifications
Instance CPU and memory
Different performance specifications support different numbers of connections and maximum IOPS.
Total Storage Space
Storage space depends on the instance specifications. The minimum storage space is 100 GB, and the value must be an integer.
Figure 3 Network and database configurations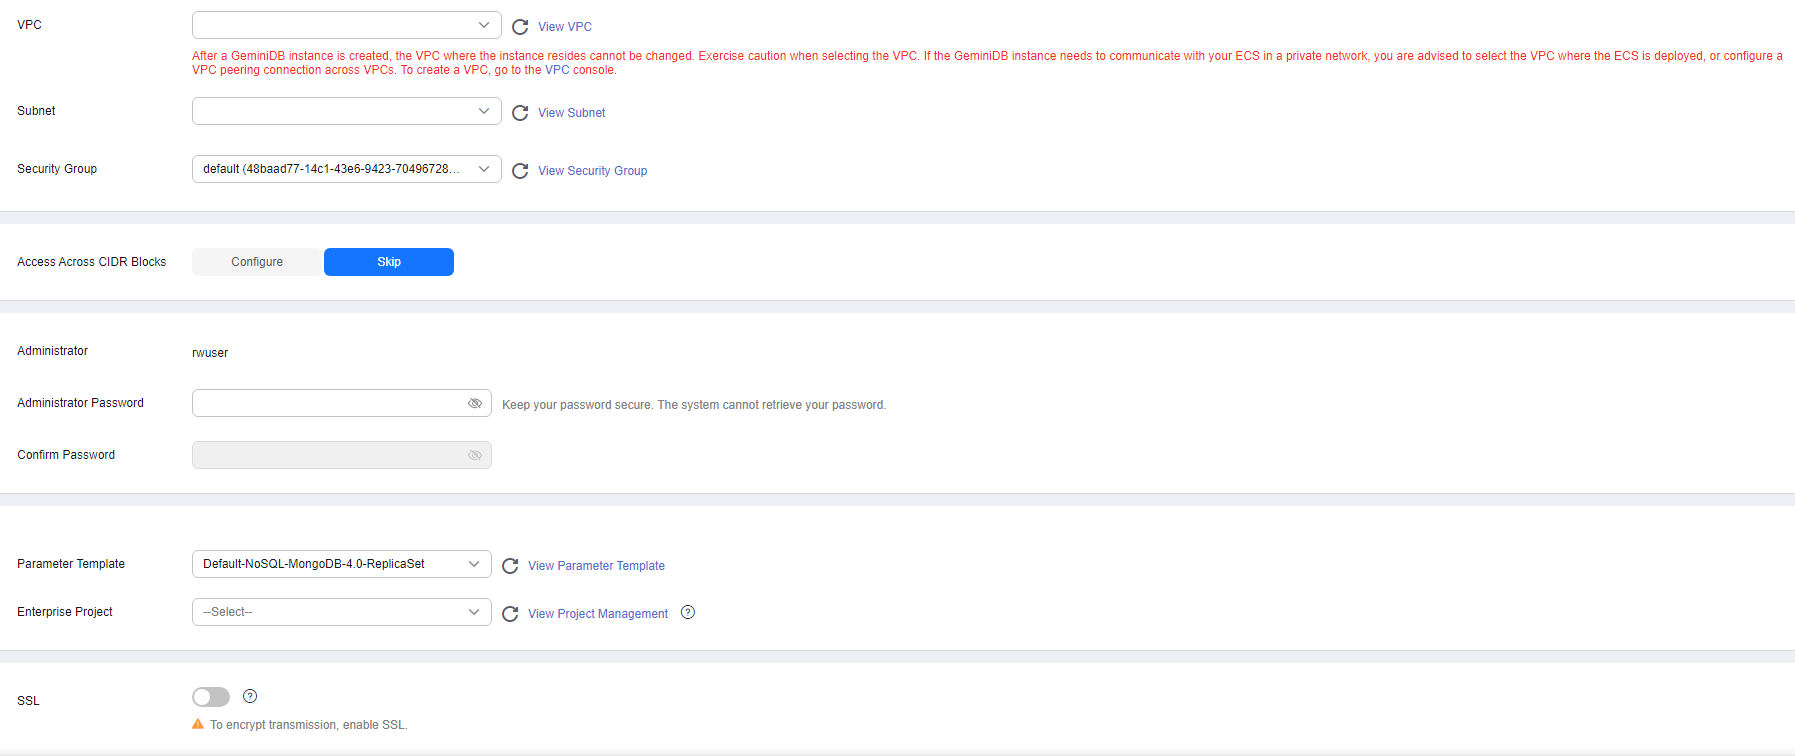
Table 4 Network Parameter
Description
VPC
Virtual private network where your instances are located. A VPC isolates networks for different services. You can select an existing VPC or create a VPC.
For details about how to create a VPC, see section "Creating a VPC" in the Virtual Private Cloud User Guide.
You can also use VPCs and subnets shared by other accounts.
VPC owners can share the subnets in a VPC with one or multiple accounts through Resource Access Manager (RAM), which ensures cost efficiency of network resources.
For more information about VPC subnet sharing, see VPC Sharing in Virtual Private Cloud User Guide.
If no VPC is available, the system creates one for you.
NOTE:- After the GeminiDB Mongo instance is created, its VPC cannot be changed.
- To connect a GeminiDB Mongo instance to an ECS over a private network, they must be in the same VPC. If they are not, you can create a VPC peering connection.
Subnet
A subnet where your instance is created. The subnet provides dedicated and isolated networks, improving network security.
NOTE:An IPv6 subnet cannot be associated with your instance. Select an IPv4 subnet.
Security Group
A security group controls access between GeminiDB Mongo instances and other services. Ensure that the security group you selected allows your client to access the instance.
If no security group is available, the system creates one for you.
SSL
Secure Sockets Layer (SSL) encrypts connections between clients and servers, preventing data from being tampered with or stolen during transmission.
You can enable SSL to improve data security. After an instance is created, you can connect to it using SSL.
NOTE:- This function is in the open beta test (OBT) phase. To use this function, contact customer service.
- If SSL is not enabled when you create an instance, you can enable it after the instance is created. For details, see Configuring an SSL Connection.
Access Across CIDR Blocks
Access across CIDR blocks is required only when the CIDR blocks of the client and the replica set instance are different. For example, if the client CIDR block is 192.168.0.0/16 and the replica set instance's CIDR block is 172.16.0.0/24, add the CIDR block 192.168.0.0/16 so that the client can access the replica set instance.
You can configure cross-CIDR block access when creating an instance or after the instance is created.
- Configure
When creating an instance, add the CIDR block of the source client (for example, the client that accesses the replica set instance). After the instance is created, you can connect to the instance from the source client.
If there are multiple CIDR blocks, click
 to add them in sequence. Up to 9 CIDR blocks can be configured, but you cannot insert duplicate blocks.NOTE:
- To ensure the ECS and instance can communicate with each other, configure the connection by following VPC Peering Connection Overview.
- Skip
Configure the CIDR block of the client later. After an instance is created, you can configure Access Across CIDR Blocks by following Configuring Access Across CIDR Blocks.
Table 5 Database configuration Parameter
Description
Administrator
Username of the administrator account. The default value is rwuser.
Administrator Password
Password set by a user
- The password contains 8 to 32 characters.
- The password contains uppercase letters, lowercase letters, digits, and any of the following special characters: ~!@#%^*-_=+?
- For security reasons, set a strong password. The system will verify the password strength.
Keep your password secure. The system cannot retrieve it if it is lost.
Confirm Password
Enter the administrator password again.
Parameter Template
A parameter template contains API configuration values that can be applied to one or more instances.
After an instance is created, you can modify its parameters to better meet your service requirements. For details, see Modifying Parameters of GeminiDB Mongo Instances.
NOTICE:When an instance is created, the system uses default values for specification parameters in your custom parameter template.
Enterprise Project
This parameter is provided for enterprise users.
An enterprise project groups cloud resources, so you can manage resources and members by project. The default project is default.
Select an enterprise project from the drop-down list. For more information about enterprise projects, see Enterprise Management User Guide.
Table 6 Tags Parameter
Description
Tags
This setting is optional. Adding tags helps you better identify and manage your instances. A maximum of 20 tags can be added for each instance.
A tag consists of a tag key and a tag value.
If your organization has configured tag policies for GeminiDB Mongo instances, you need to add tags based on the policies. If a tag does not comply with the policies, an instance may fail to be created. Contact your organization administrator to learn more about tag policies.
- Tag key: mandatory if the instance is going to be tagged.
Each tag key is unique for each instance. It can include up to 36 characters, including digits, letters, underscores (_), and hyphens (-).
- Tag value: optional if the instance is going to be tagged.
The value can contain a maximum of 43 characters, including digits, letters, underscores (_), periods (.), and hyphens (-).
After an instance is created, you can view its tag details on the Tags tab. In addition, you can add, modify, and delete tags for existing instances. For details, see Managing Tags.
Table 7 Required duration Parameter
Description
Required Duration
The length of your subscription if you select Yearly/Monthly billing. Subscription lengths range from one month to three years.
Auto-renew
- This option is not selected by default.
- If you select this option, the renew cycle is the same as the selected duration.
Table 8 Quantity Parameter
Description
Quantity
GaussDB(for Mongo) instances can be created in batches. Up to 50 instances can be created at a time.
- Yearly/Monthly
- On the displayed page, confirm the instance details.
- Yearly/Monthly
- To modify the configurations, click Previous.
- If you do not need to modify the settings, read and agree to the service agreement, click Pay Now, and complete the payment.
- Pay-per-use
- To modify the configurations, click Previous.
- If no modification is required, read and agree to the service agreement and click Submit.
- Yearly/Monthly
- On the Instances page, view and manage the created instance.
- Creating an instance takes about 5 to 9 minutes. During the process, the instance status becomes Creating.
- After the creation is complete, the status changes to Available.
You can click
 in the upper right corner to refresh the instance status.
 - During creation, an automated backup policy is enabled by default. A full backup is automatically triggered after the instance is created.
Feedback
Was this page helpful?
Provide feedbackThank you very much for your feedback. We will continue working to improve the documentation.See the reply and handling status in My Cloud VOC.
For any further questions, feel free to contact us through the chatbot.
Chatbot


