In a production environment, accessing a GeminiDB Redis instance from a single node over a public network can result in a single point of failure (SPOF), which reduces system availability and may interrupt service access. To improve system availability and stability, you can create a load balancer and bind an EIP to the instance to avoid SPOFs. For more information about ELB, see ELB.
To connect to a GeminiDB Redis instance over the public network, create a load balancer and bind an EIP to the instance.
This section describes how to access a GeminiDB Redis instance over a public network by creating a load balancer and binding an EIP.
Usage Notes
Redis Cluster GeminiDB Redis instances do not support this function.
Procedure
Creating and Configuring a Dedicated Load Balancer
- Purchase a dedicated load balancer. For details, see Creating a Dedicated Load Balancer. Pay attention to the following:
- When creating a flavor, you need to select the TCP/UDP network.
- In the network configuration, Cross-VPC Backend must be enabled so that backend IP addresses can be added to the load balancer.
- You need to use a new or existing EIP to support public network access.
- Locate the target load balancer and click Add Listener in the Operation column. For details, see Adding a TCP Listener. Pay attention to the following:
Figure 1 Adding a listener

- When configuring a listener, select the TCP protocol to and the 6379 port, which is commonly used by Redis.
- When adding a backend server, click the Cross-VPC Backend Servers tab and then click Add Cross-VPC Backend Server. Configure the load balancer address and port number of the GeminiDB Redis instance in the cross-VPC backend IP address.
- Enable the health check.
- If ELB and GeminiDB Redis instances are in the same VPC, go to 7. If they are not, go to 4 to create a VPC peering connection.
- In the navigation pane, choose Virtual Private Cloud > VPC Peering. On the VPC Peering page, click Create VPC Peering Connection and set Local VPC and Peer VPC.
Local VPC indicates the VPC where ELB is deployed.
- If the selected VPC and GeminiDB Redis instance are in the same VPC, set the peer VPC to a VPC where no ELB is deployed.
- If the selected VPC and GeminiDB Redis instance are not in the same VPC, set the peer VPC to the VPC where the GeminiDB Redis instance is deployed.
For details, see Creating a VPC Peering Connection to Connect Two VPCs in the Same Account.
- Go to the Summary page of the VPC peering connection.
- In the dialog box displayed after the VPC peering connection is created, if you click Add Now, the Summary page is displayed.
- In the dialog box displayed after the VPC peering connection is created, if you click Add Later, the VPC peering connection list is displayed. If you click the peering connection name, the Summary page is displayed.
Figure 2 VPC peering connection

- Click Add Route and configure the local and peer routes of the VPC peering connection.
Figure 3 Add Route

- Local route: In the displayed Add Route dialog box, set Destination to the value of Peer VPC CIDR Block of the VPC peering connection, set Next Hop Type to VPC peering connection, set Next Hop to the VPC peering connection created in 4, and click OK.
- Peer route: In the displayed Add Route dialog box, set Destination to the value of Local VPC CIDR Block of the VPC peering connection, set Next Hop Type to VPC peering connection, set Next Hop to the VPC peering connection created in 4, and click OK.
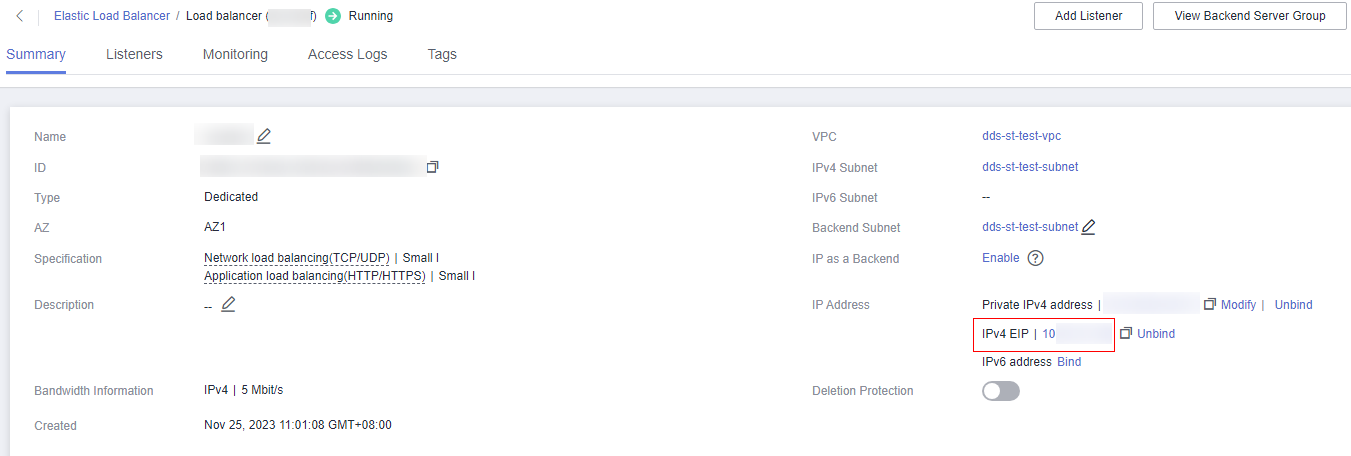
- Perform a health check on the added load balancer address. In the navigation pane on, choose Elastic Load Balance > Load Balancers. Click the target load balancer name and then click the Listeners tab. If Healthy in the health check result, the address is available. You can access the GeminiDB Redis instance using the IP address displayed on the Summary tab page.
Figure 4 IP address

Connecting to an Instance
- Log in to the ECS. For details, see Logging In to an ECS in Getting Started with Elastic Cloud Server.
- Obtain the Redis client.
Method 1
Run the following command to download the Redis client.
wget --no-check-certificate http://download.redis.io/releases/redis-6.2.0.tar.gz
Method 2
Download the Redis client and upload it to the ECS.
- Decompress the client package.
tar -xzf redis-6.2.0.tar.gz
- Open the src directory and connect to the instance.
cd redis-6.2.0
make
cd src
./redis-cli -h <DB_HOST> -p <DB_PORT> -a <DB_PWD>
Example:
./redis-cli -h 192.168.0.208 -p 6379 -a <DB_PWD>
Table 1 Parameter description
|
Parameter |
Description |
|
<DB_HOST> |
EIP bound to the instance to be connected.
To obtain the EIP, go to the Instances page and click the target instance name. In the navigation pane, choose Node Management. You can see the EIP in the Node Information area on the Basic Information page.
If the instance you bought has multiple nodes, you can bind the EIP to any node to connect to the instance.
If a message is displayed indicating that no EIP has been bound to the instance, bind an EIP to the instance by following Binding an EIP to or Unbinding an EIP from a GeminiDB Redis Instance Node. |
|
<DB_PORT> |
Port for accessing the target instance. Configure this parameter based on service requirements.
To obtain the port number, perform the following steps:
Click the instance name to go to the Basic Information page. In the Connection Information area, you can see the instance port. |
|
<DB_PWD> |
Administrator password set when you buy a GeminiDB Redis instance |
- Check the results. If the following information is displayed, the connection is successful.
IP:port>
Other Methods for Connecting to an Instance over a Public Network


