Setting Security Group Rules for a GeminiDB Redis Instance
Scenarios
It is a collection of access control rules for ECSs and GeminiDB Redis instances that have the same security requirements and are mutually trusted in a VPC. To ensure database security and reliability, you need to configure security group rules to allow only specific IP addresses and ports to access GeminiDB Redis instances. For more information about security groups, see Security Group Overview.
|
Scenario |
Description |
|---|---|
|
Connecting to an instance over a private network |
Configure security group rules as follows:
|
|
Connecting to an instance over a public network |
If you connect to a GeminiDB Redis instance through a public network, configure inbound rules for the security group associated with the GeminiDB Redis instance. For details, see Procedure. |
For details about the requirements for adding security group rules, see Adding a Security Group Rule in Virtual Private Cloud User Guide.
This section describes how to configure inbound rules for GeminiDB Redis instances over a private or public network.
Usage Notes
The default security group rule allows all outgoing data packets. ECSs and GeminiDB Redis instances can access each other if they are in the same security group. After a security group is created, you can define different access rules. Once a GeminiDB Redis instance is added to the security group, the instance is protected by these rules.
- Each account can create up to 500 security group rules by default.
- Too many security group rules will increase the first packet latency, so a maximum of 50 rules for each security group is recommended.
- One security group can be associated with only one GeminiDB Redis instance.
- For details about how to configure security group rules, see Table 1.
Procedure
- Log in to the GeminiDB console.
- On the Instances page, locate the instance that you want to configure security group rules for and click its name.
- Configure security group rules.
On the Basic Information page, choose Node Management in the navigation pane on the left. In the Security Group area on the right, click the name of the security group.
Figure 1 Security group
- Add Inbound Rule
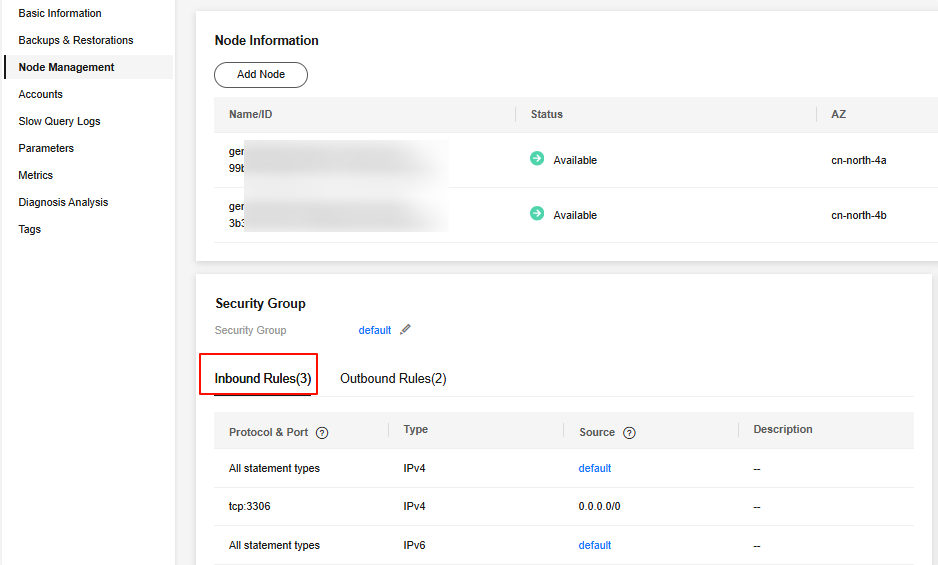
- Click the Inbound Rules tab.
Figure 2 Inbound rules

- Click Add Rule. The Add Inbound Rule dialog box is displayed.
Figure 3 Adding a rule

- Add a security group rule as prompted.
Table 2 Inbound rule settings Parameter
Description
Example Value
Protocol & Port
- Network protocol. Currently, GeminiDB Redis instances can be accessed only over TCP.
- Port: The port or port range that allows the access to the ECS. Range: 1 to 65535 Common ports are listed in Common Ports Used by ECS.
TCP
Type
IP address type. This parameter is available after IPv6 is enabled.
- IPv4
- IPv6
IPv4
Source
The IP address, IP address group, or security group that the rule applies to, which allows access from IP addresses or instances in another security group. Examples:- IPv4 single IP address: 192.168.10.10/32
- Subnet: 192.168.1.0/24
- All IP addresses: 0.0.0.0/0
- sg-abc (security group)
For more information about IP address groups, see IP Address Group.
0.0.0.0/0
Description
(Optional) Provides supplementary information about the security group rule.
The description can contain up to 255 characters and cannot contain angle brackets (<>).
-
- Click the Inbound Rules tab.
- Click OK.
Return to the Security Group area to view the added inbound rules.
Figure 4 Inbound rules
Feedback
Was this page helpful?
Provide feedbackThank you very much for your feedback. We will continue working to improve the documentation.See the reply and handling status in My Cloud VOC.
For any further questions, feel free to contact us through the chatbot.
Chatbot


