Developing Functions in Java (Using an IDEA Maven Project)
This section describes how to develop functions in Java using an IDEA Maven project. For details about the Java syntax, initializer and SDK APIs, see Function Development Overview.
Procedure
You can create a Java project and Java function following the steps in this section, or download the Maven sample project package and start from Step 3: Creating and Testing a Java Function.
Step 1: Creating a Maven Project Using IDEA
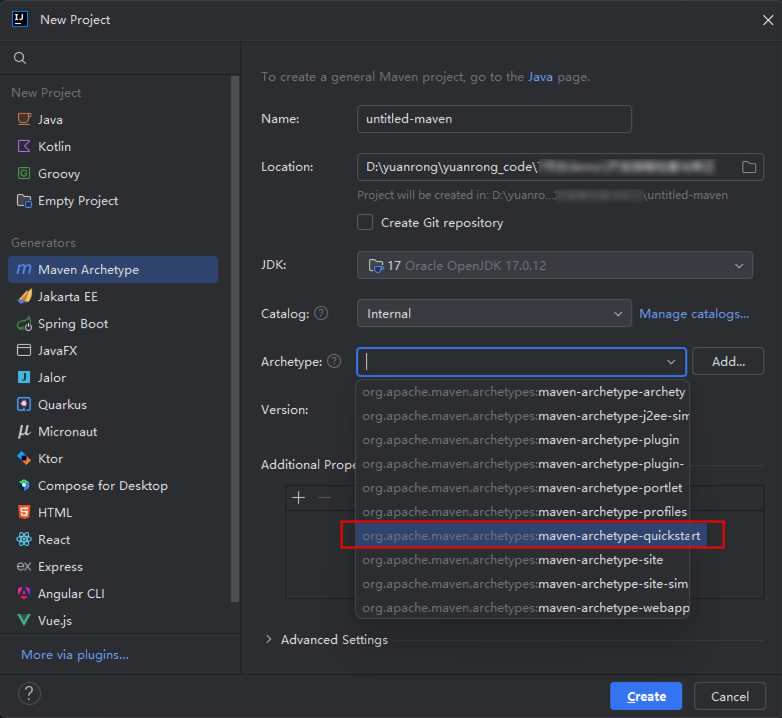
- Create a function project.
- Add dependencies to the project.
Download the Java SDK to a local development environment, and decompress the SDK package, as shown in Figure 2.
- Copy Runtime-2.0.5.jar in the package to a local directory, for example, d:\\runtime. Then, run the following command in the CLI to install the runtime to the local Maven repository:
mvn install:install-file -Dfile=d:\runtime\RunTime-2.0.5.jar -DgroupId=RunTime -DartifactId=RunTime -Dversion=2.0.5 -Dpackaging=jar
- Configure the dependency in the pom.xml file.
<dependency>
<groupId>Runtime</groupId>
<artifactId>Runtime</artifactId>
<version>2.0.5</version>
</dependency>
- Configure other dependencies. The following uses the OBS dependency as an example.
<dependency>
<groupId>com.huaweicloud</groupId>
<artifactId>esdk-obs-java</artifactId>
<version>3.21.4</version>
</dependency>
- Add a plug-in to pom.xml to pack the code and dependencies together. Replace mainClass with the actual class.
<build>
  <plugins>
    <plugin>
      <artifactId>maven-assembly-plugin</artifactId>
      <configuration>
        <descriptorRefs>
          <descriptorRef>jar-with-dependencies</descriptorRef>
        </descriptorRefs>
        <archive>
          <manifest>
            <mainClass>com.huawei.demo.TriggerTests</mainClass>
          </manifest>
        </archive>
        <finalName>${project.name}</finalName>
      </configuration>
      <executions>
        <execution>
          <id>make-assembly</id>
          <phase>package</phase>
          <goals><goal>single</goal>
          </goals>
        </execution>
      </executions>
    </plugin>
  </plugins>
</build>
- Copy Runtime-2.0.5.jar in the package to a local directory, for example, d:\\runtime. Then, run the following command in the CLI to install the runtime to the local Maven repository:
- Configure the function resources.
Create a package named com.huawei.demo, and then create a class named TriggerTests under the package, as shown in Figure 3.
- Configure the function code.
Define the function handler in TriggerTests.java.
 1
 2
 3
 4
 5
 6
 7
 8
 9
10
11
12
13
14
15
16
17
18
19
20
21
22
23
24
25
26
27
28
29
30
31
32
33
34
35
36
37
38
39
40
41
42
43
44
45
46
47
48
49
50
51
52
53
54
55
56
package com.huawei.demo;

import java.io.UnsupportedEncodingException;
import java.util.HashMap;
import java.util.Map;

import com.huawei.services.runtime.Context;
import com.huawei.services.runtime.entity.apig.APIGTriggerEvent;
import com.huawei.services.runtime.entity.apig.APIGTriggerResponse;
import com.huawei.services.runtime.entity.dis.DISTriggerEvent;
import com.huawei.services.runtime.entity.dms.DMSTriggerEvent;
import com.huawei.services.runtime.entity.lts.LTSTriggerEvent;
import com.huawei.services.runtime.entity.smn.SMNTriggerEvent;
import com.huawei.services.runtime.entity.timer.TimerTriggerEvent;
import com.huawei.services.runtime.entity.eventgrid.EventGridTriggerEvent;

public class TriggerTests {
    public APIGTriggerResponse apigTest(APIGTriggerEvent event, Context context){
        System.out.println(event);
        Map<String, String> headers = new HashMap<String, String>();
        headers.put("Content-Type", "application/json");
        return new APIGTriggerResponse(200, headers, event.toString());
    }

    public String smnTest(SMNTriggerEvent event, Context context){
        System.out.println(event);
        return "ok";
    }

    public String dmsTest(DMSTriggerEvent event, Context context){
        System.out.println(event);
        return "ok";
    }

    public String timerTest(TimerTriggerEvent event, Context context){
        System.out.println(event);
        return "ok";
    }

    public String disTest(DISTriggerEvent event, Context context) throws UnsupportedEncodingException{
        System.out.println(event);
        System.out.println(event.getMessage().getRecords()[0].getRawData());
        return "ok";
    }

    public String ltsTest(LTSTriggerEvent event, Context context) throws UnsupportedEncodingException {
        System.out.println(event);
        event.getLts().getData();
        System.out.println("raw data: " + event.getLts().getRawData());
        return "ok";
    }

    public String eventgridTest(EventGridTriggerEvent event, Context context){
        System.out.println(event);return "ok";
    }
}
There are multiple handler functions with different trigger event types. You can modify the handler on the FunctionGraph console to test different handler functions. For details about the constraints for the APIG event source, see Base64 Decoding and Response Structure.

Modifying the function handler:
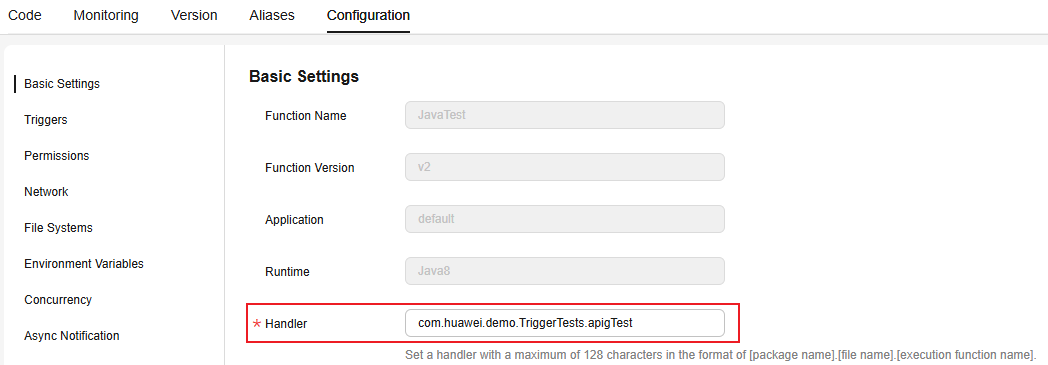
In the navigation pane on the left of the FunctionGraph console, choose Functions > Function List. Click the name of the function to be set. On the function details page that is displayed, choose Configuration > Basic Settings and set the Handler parameter, as shown in Figure 4. - Compile and pack the project file.
Run the following command to compile and pack the project file: After compilation is complete, the xx-jar-with-dependencies.jar file is generated in the target directory.
mvn package assembly:single
Step 2: Creating and Testing a Java Function
- Log in to the FunctionGraph console. In the navigation pane on the left, choose Functions > Function List. On the displayed page, click Create Function in the upper right corner. On the displayed page, select Create from scratch.
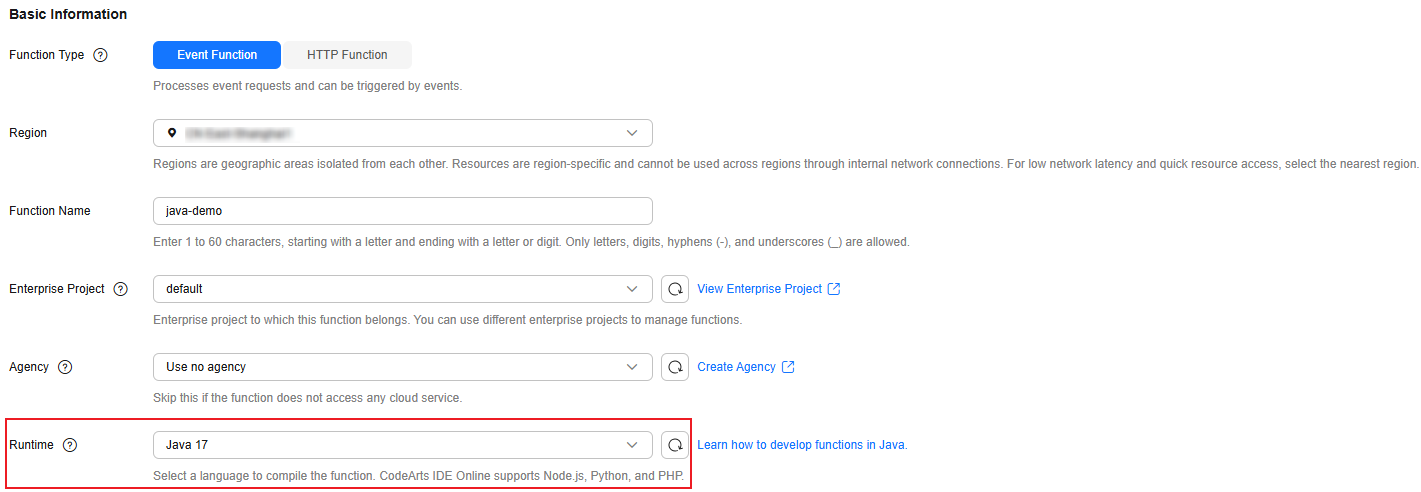
- Configure the basic function information, as shown in Figure 5. Then, click Create Function in the lower right corner.
- On the function details page, click the Code tab, and click Upload > Local JAR on the right to upload the JAR file exported in Step 1: Creating a Maven Project Using IDEA.
- After the upload is successful, choose Configuration > Basic Settings, modify the handler of the function to be tested, and click Save.
- Return to the Code tab page, click Test in the code editing area, and click Configure Test Event. In the cloud event template list, select the event template to be tested and click Create.
- Click Test and view the execution result.
The function execution result consists of three parts: function output (returned by callback), summary, and logs (output by using the console.log or getLogger() method). For details, see Table 1.
Table 1 Description of the execution result Parameter
Successful Execution
Failed Execution
Function Output
The defined function output information is returned.
A JSON file that contains errorMessage and stackTrace is returned. The format is as follows:
{ "errorMessage": "", "stackTrace": [] }errorMessage: Error message returned by the runtime.
stackTrace: Stack error information returned by the runtime.
Summary
Request ID, Memory Configured, Execution Duration, Memory Used, and Billed Duration are displayed.
Request ID, Memory Configured, Execution Duration, Memory Used, and Billed Duration are displayed.
Log Output
Function logs are printed. A maximum of 4 KB logs can be displayed.
Error information is printed. A maximum of 4 KB logs can be displayed.

To test other event source triggers in the sample code, such as SMN, change the handler to com.huawei.demo.TriggerTests.smnTest on the Basic Settings page, and create an SMN test event to test the function.
Feedback
Was this page helpful?
Provide feedbackThank you very much for your feedback. We will continue working to improve the documentation.See the reply and handling status in My Cloud VOC.
For any further questions, feel free to contact us through the chatbot.
Chatbot


