
Routing Traffic to Backend Servers in a Different VPC from the Load Balancer
Scenarios
You can use ELB to route traffic to backend servers in a VPC that is different from where the load balancer works.
Solution
- Dedicated load balancer ELB-Test is running in a VPC named VPC-Test-01 (172.18.0.0/24).
- An ECS named ECS-Test is running in VPC-Test-02 (172.17.0.0/24).
- IP as a Backend is enabled for ELB-Test, and ECS-Test in VPC-Test-02 (172.17.0.0/24) is added to the backend server group associated with ELB-Test in VPC-Test-01.

Advantages
You can enable IP as a Backend for a dedicated load balancer to route incoming traffic to servers in different VPCs from the load balancer.
Resource and Cost Planning
The actual cost shown on the Huawei Cloud console is used.
|
Resource Type |
Resource Name |
Description |
Quantity |
|---|---|---|---|
|
VPC |
VPC-Test-01 |
The VPC where ELB-Test is running: 172.18.0.0/24 |
1 |
|
VPC-Test-02 |
The VPC where ECS-Test is running: 172.17.0.0/24 |
1 |
|
|
VPC peering connection |
Peering-Test |
The connection that connects the VPC where ELB-Test is running and the VPC where ECS-Test is running. Local VPC: 172.18.0.0/24 Peer VPC: 172.17.0.0/24 |
1 |
|
Route table |
Route-VPC-Test-01 |
The route table of VPC-Test-01. Destination: 172.17.0.0/24 |
1 |
|
Route-VPC-Test-02 |
The route table of VPC-Test-02. Destination: 172.18.0.0/24 |
1 |
|
|
ELB |
ELB-Test |
The dedicated load balancer to distribute incoming traffic. |
1 |
|
EIP |
EIP-Test |
The EIP bound to ELB-Test: 119.3.233.52 |
1 |
|
ECS |
ECS-Test |
The ECS that is running in VPC-Test-02. Private IP address: 172.17.0.145 |
1 |
Operation Process

Step 1: Create VPCs
- Log in to the VPC console.
- Configure the parameters as described in Table 1 and click Create Now. For details on how to create a VPC, see the Virtual Private Cloud User Guide.
- Name: VPC-Test-01
- IPv4 CIDR Block: 172.18.0.0/24
- Configure other parameters as required.
- Create the other VPC.
- Name: VPC-Test-02
- IPv4 CIDR Block: 172.17.0.0/24
- Configure other parameters as required.
Figure 3 Viewing the two VPCs
Step 2: Create a VPC Peering Connection
- In the navigation pane on the left, click VPC Peering Connections.
- In the upper right corner, click Create VPC Peering Connection.
- Configure the parameters as follows and click Create Now. For details on how to create a VPC peering connection, see the Virtual Private Cloud User Guide.
- Name: Peering-Test
- Local VPC: VPC-Test-01
- Peer VPC: VPC-Test-02
- Configure other parameters as required.
Step 3: Add Routes for Peering-Test
- In the navigation pane on the left, click Route Tables.
- In the upper right corner, click Create Route Table.
- Configure the parameters as described in Table 1 and click OK. For details on how to create a route table, see the Virtual Private Cloud User Guide.
- Name: Route-VPC-Test-01
- VPC: VPC-Test-01
- Destination: 172.17.0.0/24
- Next Hop Type: VPC peering connection
- Next Hop: Peering-Test
- Repeat the preceding steps to create the other route table.
- Name: Route-VPC-Test-02
- VPC: VPC-Test-02
- Destination: 172.18.0.0/24
- Next Hop Type: VPC peering connection
- Next Hop: Peering-Test
Step 4: Create an ECS
- Under Compute, click Elastic Cloud Server.
- In the upper right corner, click Buy ECS.
- Select VPC-Test-02 as the VPC and set ECS Name to ECS-Test. Configure other parameters as required. For details, see Purchasing an ECS.
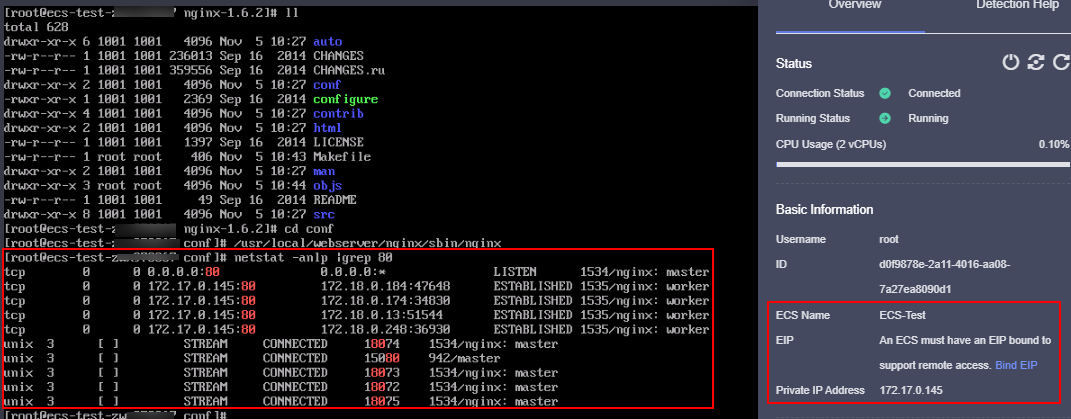
- Deploy Nginx on the ECS-Test.
Figure 4 Deploying Nginx on ECS-Test
Step 5: Create a Dedicated Load Balancer with an HTTP Listener and Associate a Backend Server Group
- Go to the Buy Elastic Load Balancer page.
- Configure the parameters as follows. For details, see Elastic Load Balance User Guide.
- Type: Dedicated load balancer
- VPC: VPC-Test-01
- Name: ELB-Test
- IP as a Backend: Enable it.
- Configure other parameters as required.
- Add an HTTP listener to ELB-Test and associate a backend server group with it.
Step 6: Add ECS-Test to the Backend Server Group
- Locate ELB-Test and click its name.
- On the Listeners tab, locate the HTTP listener added to ELB-Test and click its name.
- On the Default Backend Server Group area of the Summary tab, click View/Add Backend Server on the right.
- The page for adding backend servers is displayed.
- Click IP as Backend Servers on the lower part of the page. Click Add on the right, set parameters as required, and click OK. For details, see Elastic Load Balance User Guide.
- IP Address: Set it to the private IP address of ECS-Test (172.17.0.145).
- Backend Port: Set it as required.
- Weight: Set it as required.
- Click OK.
Step 7: Verify Traffic Routing
- Locate ELB-Test and click More in the Operation column.
- Select Bind IPv4 EIP to bind an EIP (EIP-Test: 119.3.233.52) to ELB-Test.
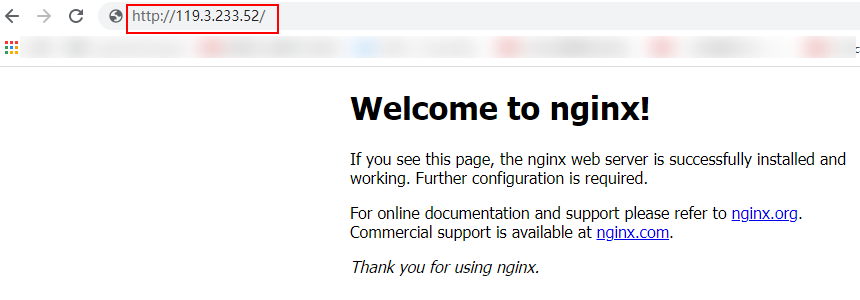
- Enter http://119.3.233.52/ in the address box of your browser to access ELB-Test. If the following page is displayed, ELB-Test routes the request to ECS-Test, which processes the request and returns the requested page.
Figure 5 Verifying that the request is routed to ECS-Test
Feedback
Was this page helpful?
Provide feedbackThank you very much for your feedback. We will continue working to improve the documentation.See the reply and handling status in My Cloud VOC.
For any further questions, feel free to contact us through the chatbot.
Chatbot


