
Migrating from Classic Load Balancers to Shared Load Balancers
Scenarios
Classic load balancers are no longer provided. It is recommended that you use shared load balancers instead because they provide comprehensive Layer 7 load balancing and better forwarding performance.
Prerequisites
You have the Tenant Administrator permission.
Impacts on Traffic Routing
Traffic routing over persistent connections will be interrupted during migration and rollback. For the impact on traffic routing over short connections, see the following table.
|
Scenario |
During Migration |
Before Finishing Migration |
Rollback |
|---|---|---|---|
|
Migrating a private network load balancer |
Not interrupted |
On a client that is on the same subnet as the load balancer, run the arping -b Private IP address of the classic load balancer command to refresh ARP entries to ensure service continuity. If ARP entries are not refreshed, traffic from this client will be interrupted. The interruption duration is the ARP aging period, which ranges from 30s to 300s, depending on parameter settings of the client.
NOTE:
The private IP address of the classic load balancer is bound to the shared load balancer. |
If ARP entries are not refreshed, traffic from the client is interrupted. The interruption duration is the ARP aging period, which ranges from 30s to 300s, depending on parameter settings of the client. To refresh ARP entries and shorten the interruption duration to a few seconds, run the arping -b Private IP address of the classic load balancer command on the client. |
|
Migrating a public network load balancer with the EIP changed |
Not interrupted |
Before you click Finish Migration, ensure that the domain name has been mapped to the new EIP of the newly created shared load balancer. If the new EIP has not been configured, traffic is still routed by the classic load balancer. After you click Finish Migration, traffic routing will be interrupted. |
Before you click Roll Back, map the domain name to the EIP of the classic load balancer. If the EIP is not configured, traffic is still routed by the shared load balancer. After you click Finish Migration, traffic routing will be interrupted. |
|
Migrating a public network load balancer without changing the EIP |
After the shared load balancer is created, traffic will be interrupted for about 5s, during which the EIP is released from the classic public network load balancer and bound to the shared load balancer. |
Not interrupted |
Not interrupted |
Migration Process
The following are migration processes for three scenarios:
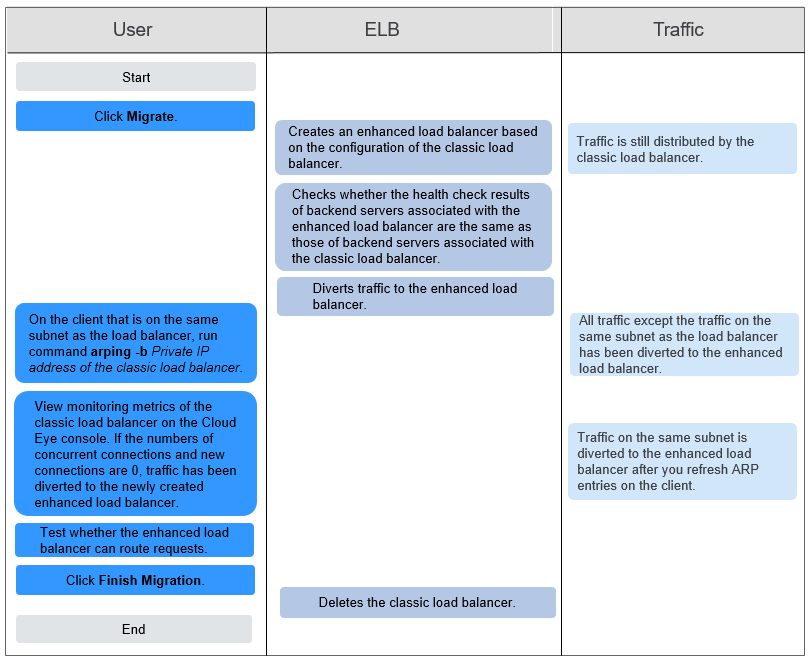
- Migrating a private network load balancer
Figure 1 Migration process
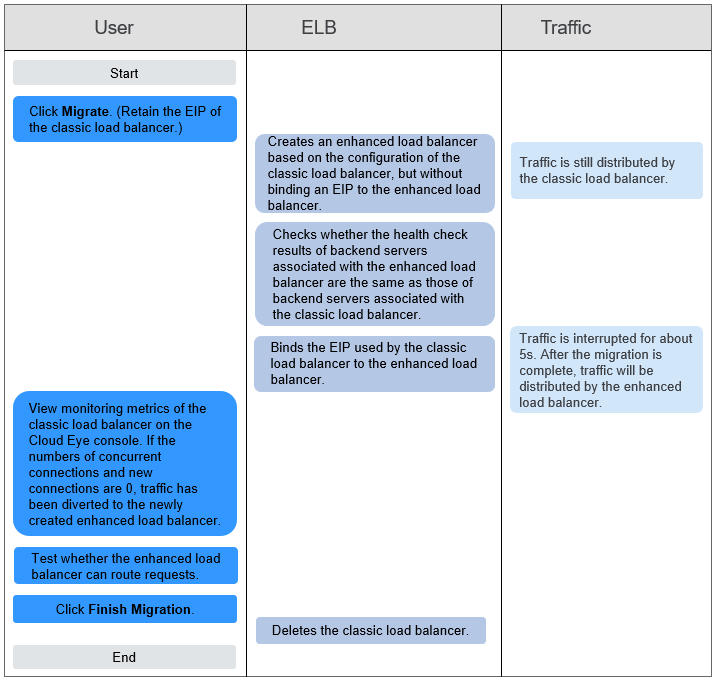
- Migrating a public network load balancer with the EIP changed
Figure 2 Migration process

- Migrating a public network load balancer without changing the EIP
Figure 3 Migration process
Migrating a Classic Load Balancer
- Log in to the management console.
- In the upper left corner of the page, click
 and select the desired region and project.
 - Click Service List. Under Network, click Elastic Load Balance.
- In the classic load balancer list, locate the load balancer you want to migrate and choose More > Migrate.
- Check whether the load balancer to be migrated is a private network load balancer.
- Run command arping -b Private IP address of the classic load balancer on the client that is on the same subnet as the load balancer to update the ARP entries. Then, go to 11.

The private IP address of the classic load balancer is bound to the shared load balancer.
- Determine whether you want to change the EIP.
- Modify the DNS configuration to map the domain name to the EIP bound to the shared load balancer.
- Switch to the Cloud Eye console, view monitoring data of the classic load balancer and then go to 11.
If both the number of concurrent connections and the number of new connections are 0, traffic is diverted to the shared load balancer.
- Send requests to the shared load balancer to test whether it can route requests to associated backend servers.
- Locate the classic load balancer that has been migrated and choose More > Finish Migration.
The classic load balancer will be automatically deleted.
- Switch to the load balancer list and view the newly created shared load balancer.
Rolling Back to a Classic Load Balancer
If you decide to roll back, the newly created shared load balancer will be deleted, and the original classic load balancer will be restored.
- Log in to the management console.
- In the upper left corner of the page, click and select the desired region and project.
- Click Service List. Under Network, click Elastic Load Balance.
- In the classic load balancer list, locate the load balancer you want to roll back and choose More > Roll Back.
Alternatively, select the load balancer you want to roll back and click Roll Back above the load balancer list.
Batch Migration or Rollback
- Log in to the management console.
- In the upper left corner of the page, click and select the desired region and project.
- Click Service List. Under Network, click Elastic Load Balance.
- In the classic load balancer list, select the load balancers and click Migrate or Roll Back.
- Perform subsequent operations as needed.
- If you choose Migrate, go to 6.
- If you choose Roll Back, no further operations are required.
- Check whether the load balancers to be migrated are private network load balancers.
- After the migration, run command arping -b Private IP address of each classic load balancer on the client that is on the same subnet as the load balancer to update the ARP entries. Then, go to 12.
The private IP address of the classic load balancer will be bound to the shared load balancer.
- Determine whether you want to change the EIP.
- Modify the DNS configuration to map the domain name to the EIP bound to each shared load balancer.
- Switch to the Cloud Eye console, view monitoring data of each classic load balancer and then go to 12.
If both the number of concurrent connections and the number of new connections are 0, traffic is diverted to the shared load balancers.
- Send requests to shared load balancers to test whether they can route requests to associated backend servers.
- Select all classic load balancers that have been migrated and click Finish Migration.
These classic load balancers will be automatically deleted.
- Switch to the load balancer list, view the newly created shared load balancers.
Causes of Migration Failure
The following are possible causes why a classic load balancer cannot be migrated:
- The quota of the shared load balancer, listener, backend server group, or certificate is insufficient.
- The classic load balancer is not in the Running state.
- The classic load balancer listener is not in the Running state.
- During the migration, the listeners and backend servers of the classic load balancer are also migrated. Your applications and data will not be affected. To ensure successful migration, ensure that backend servers can be accessed from 100.125.0.0/16.
- After the migration, the original classic load balancer will be deleted and cannot be restored, and its private IP address and EIP will be used by the newly created shared load balancer. If the classic load balancer does not have an EIP, you can bind one to the newly created shared load balancer.
- During batch migration of public network load balancers, ensure that the number of EIPs and the number of load balancers are the same. After the migration, the system automatically binds an EIP to each shared load balancer in sequence.
- Integration with the AS service becomes invalid after the migration. Configure AS if you want to scale the number of backend servers associated with each shared load balancer.
Feedback
Was this page helpful?
Provide feedbackThank you very much for your feedback. We will continue working to improve the documentation.See the reply and handling status in My Cloud VOC.
For any further questions, feel free to contact us through the chatbot.
Chatbot


