
Este conteúdo foi traduzido por máquina para sua conveniência e a Huawei Cloud não pode garantir que o conteúdo foi traduzido com precisão. Para exibir o conteúdo original, use o link no canto superior direito para mudar para a página em inglês.
Central de ajuda/ Document Database Service/ Guia de usuário/ Restaurações de dados/ Restauração de dados para um ponto no tempo/ Restauração de uma instância de cluster para um ponto no tempo
Atualizado em 2025-08-07 GMT+08:00
Restauração de uma instância de cluster para um ponto no tempo
DDS permite restaurar instâncias de cluster para um ponto no tempo.
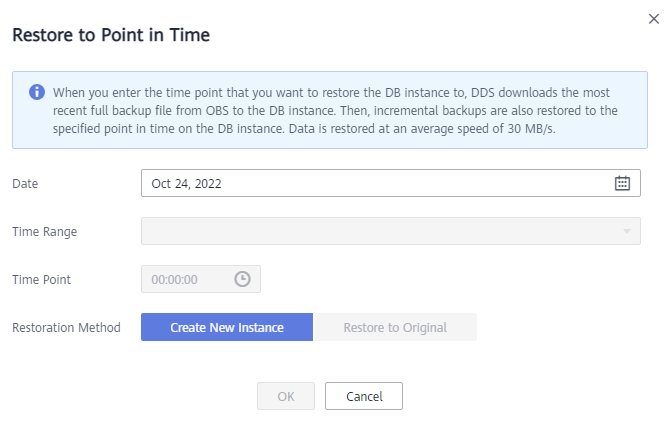
Quando você insere o ponto no tempo até o qual você deseja restaurar a instância, o DDS baixa o mais recente arquivo de backup completo do OBS nessa instância. Em seguida, os backups incrementais também são restaurados até o ponto no tempo especificado na instância de BD. Dados são restaurados a uma velocidade média de 30 MB/s.
Precauções
- Para usar essa função, entre em contato com o atendimento ao cliente para solicitar a permissão correspondente.
- Somente instâncias de cluster da versão 4.0 ou posterior podem ser restauradas para um ponto no tempo especificado.
- Os dados podem ser restaurados para um ponto específico no tempo somente depois que as políticas de backup automático e incremental forem ativadas.
- Os dados podem ser restaurados para uma nova instância ou para a instância original.
- Para garantir a segurança dos dados, a operação dropDatabase é bloqueada quando o backup incremental é restaurado para um ponto no tempo. Bancos de dados vazios ou vistas podem existir após a restauração. Você pode excluí-los.
- Os dados não podem ser restaurados para um ponto no tempo em nenhum dos seguintes cenários: operação de renomeação, operação de collmod, criação de um usuário, exclusão de um usuário, criação de uma função, exclusão de uma função, ativação de endereços IP de shard de uma instância de cluster, alteração da senha do usuário do nó shard, ativação de endereços IP de config de uma instância de cluster, alteração da senha do usuário do nó config e alteração da senha do usuário rwuser. Quando ocorre um cenário restrito, o backup incremental é interrompido. Após o próximo backup completo automatizado, o backup incremental é retomado.
- Se a janela de tempo do backup completo se sobrepuser à do backup incremental, o backup completo preferirá. O backup incremental é restrito para que alguns intervalos de tempo não estejam dentro da janela de tempo de recuperação.
- Se o tráfego incremental de oplog for maior que 250 GB/h, a velocidade incremental de backup poderá não acompanhar a velocidade de geração de oplog. Como resultado, alguns pontos de tempo de restauração podem não estar disponíveis.
Procedimento
- Faça logon no console de gerenciamento.
- Clique em
 no canto superior esquerdo e selecione uma região e um projeto.
 - Clique em
 no canto superior esquerdo da página e escolha Databases > Document Database Service.
 - Na página Instances, clique no nome da instância de cluster.
- No painel de navegação à esquerda, escolha Backups & Restorations.
- Na página Backups & Restorations, clique em Restore to Point in Time. Figura 1 Restaurar uma instância em cluster para um ponto no tempo

- Selecione o intervalo de datas e horas, selecione ou insira um ponto de tempo dentro do intervalo aceitável e selecione Create New Instance ou Restore to Original. Figura 2 Restauração para um ponto no tempo
- Na página exibida, a instância é restaurada com base no método de restauração selecionado em 7.
- Create New Instance
A página Create New Instance é exibida para que você crie uma instância usando os dados de backup. A nova instância é independente da original.
- Recomenda-se implementar a instância restaurada em uma AZ diferente para garantir que as aplicações não sejam afetadas negativamente pela falha em uma única AZ.
- O tipo de banco de dados, o tipo de instância de BD, a versão do MongoDB compatível, o mecanismo de armazenamento e o tipo de armazenamento devem ser os mesmos do original e não podem ser alterados.
- O espaço de armazenamento é o mesmo que o da instância original por padrão. Você pode aumentar o espaço de armazenamento, mas não pode reduzi-lo.
- Outras configurações podem ser modificadas. Para obter detalhes, consulte Compra de uma instância de cluster.
- Restore to Original Verifique se o status da instância na página Instances é Restoring.

- A restauração de dados de backup para a instância original substituirá os dados existentes na instância e fará com que a instância fique indisponível durante a restauração. Tenha cuidado ao realizar esta operação.
- A senha de administrador da instância permanece inalterada após a restauração.
- Create New Instance
Tópico principal: Restauração de dados para um ponto no tempo
Feedback
Esta página foi útil?
Deixar um comentário Obrigado por seus comentários. Estamos trabalhando para melhorar a documentação.
O sistema está ocupado. Tente novamente mais tarde.


