Pushing an Image
Scenarios
You can use either a container engine client or the SWR console to push your images to SWR for easier management.
- Method 1: Run docker push (Docker) or ctr push (containerd) on the server where the container engine client is installed to push an image to SWR. This method is a good choice for large images.

The push can be implemented over an intranet or the Internet. For details, see Configuring Access Network.
- Method 2: Upload an image on the SWR console. This method is suitable for small images.
Prerequisites
- An organization has been created in SWR. For details, see Creating an Organization.
- A container engine client is available.
- The image has been saved as a .tar or .tar.gz file. For details, see Creating an Image Package.
Constraints
- If a Docker container engine client is used to push images, the Docker version is 18.06 or later.
- The size of each image layer cannot exceed 50 GB.
- A single tenant can push up to 20 image layers concurrently.
- If you use the console, up to 10 files can be uploaded at a time. The size of a single file (including each decompressed file) cannot exceed 2 GB. If the image package to be uploaded is created using a Docker container engine client, the Docker version must be 18.06 or later.
- Images that comply with the Open Container Initiative (OCI) specifications (v1.0 and v1.1) cannot be uploaded. You can use SWR Enterprise Edition to upload images.
- A single tenant can push up to 500 images and 300 tags for each image. If the quotas are exceeded, the push will fail.
Methods
- For small images, upload them on the console. Resumable upload is not supported. For large images, push them using a container engine client.
Procedure
- Log in to the SWR console.
- In the navigation pane, choose My Images. Then click Upload Through SWR.
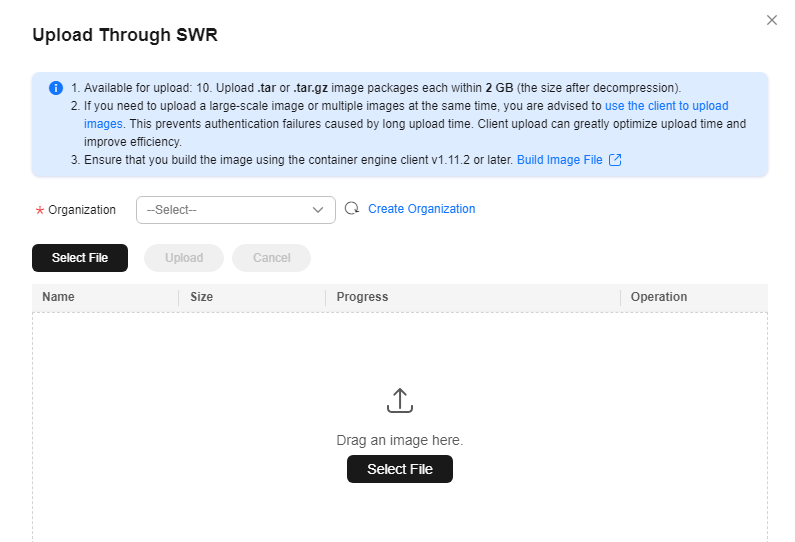
- In the displayed dialog box, select an organization. Then, click Select File to upload an image file.

If you select multiple images, they will be uploaded one by one. Concurrent upload is not supported.
Figure 1 Uploading an image on the SWR console
- Click Upload.
If Completed is displayed, the image is uploaded successfully.

- If the number of pushed images reaches the quota, new images cannot be pushed. However, if there are existing images but the number of image tags does not reach the quota, more images can be pushed.
- If the number of tags of an image reaches the quota, the image cannot be pushed, but other images can still be pushed.
- When images or image tags are pushed concurrently, the number of pushed images or image tags may exceed the quota. To release the quota, you need to delete all images or image tags that exceed the quota and then delete unused images or image tags.
FAQ
Why Does an Image Fail to Be Uploaded Through the SWR Console?
Feedback
Was this page helpful?
Provide feedbackThank you very much for your feedback. We will continue working to improve the documentation.See the reply and handling status in My Cloud VOC.
For any further questions, feel free to contact us through the chatbot.
Chatbot


