Buying a CCE Standard/Turbo Cluster
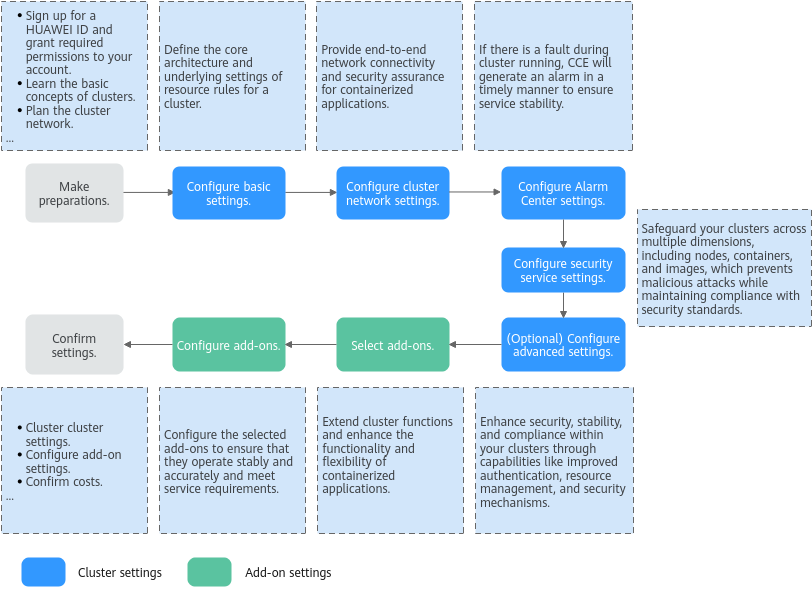
CCE standard and Turbo clusters provide enterprise-class Kubernetes cluster hosting service that supports full lifecycle management of containerized applications. They offer a highly scalable, high-performance solution for deploying and managing cloud native applications. On the CCE console, you can easily create CCE standard and Turbo clusters. After a cluster is created, CCE hosts the master nodes. You only need to create worker nodes. In this way, you can implement cost-effective O&M and efficient service deployment. For details about how to buy a cluster, see Figure 1.
Before purchasing a CCE standard or Turbo cluster, you are advised to learn about What Is CCE, Basic Concepts, Networking Overview, and Planning CIDR Blocks for a Cluster.
Preparations
- Before you start, sign up for a HUAWEI ID. For details, see Signing Up for a HUAWEI ID and Enabling Huawei Cloud Services.
- If you are using CCE for the first time, grant required permissions to your account in advance. For details, see Enable CCE and Perform Authorization.
Step 1: Configure Basic Settings
Basic settings define the core architecture and underlying resource rules of a cluster, providing a framework for cluster running and resource allocation.
- Log in to the CCE console. In the upper left corner of the page, click
 and select a region for your cluster. The closer the selected region is to the region where resources are deployed, the lower the network latency and the faster the access.
Then click Buy Cluster. If you use CCE for the first time, you need to create an agency following instructions.
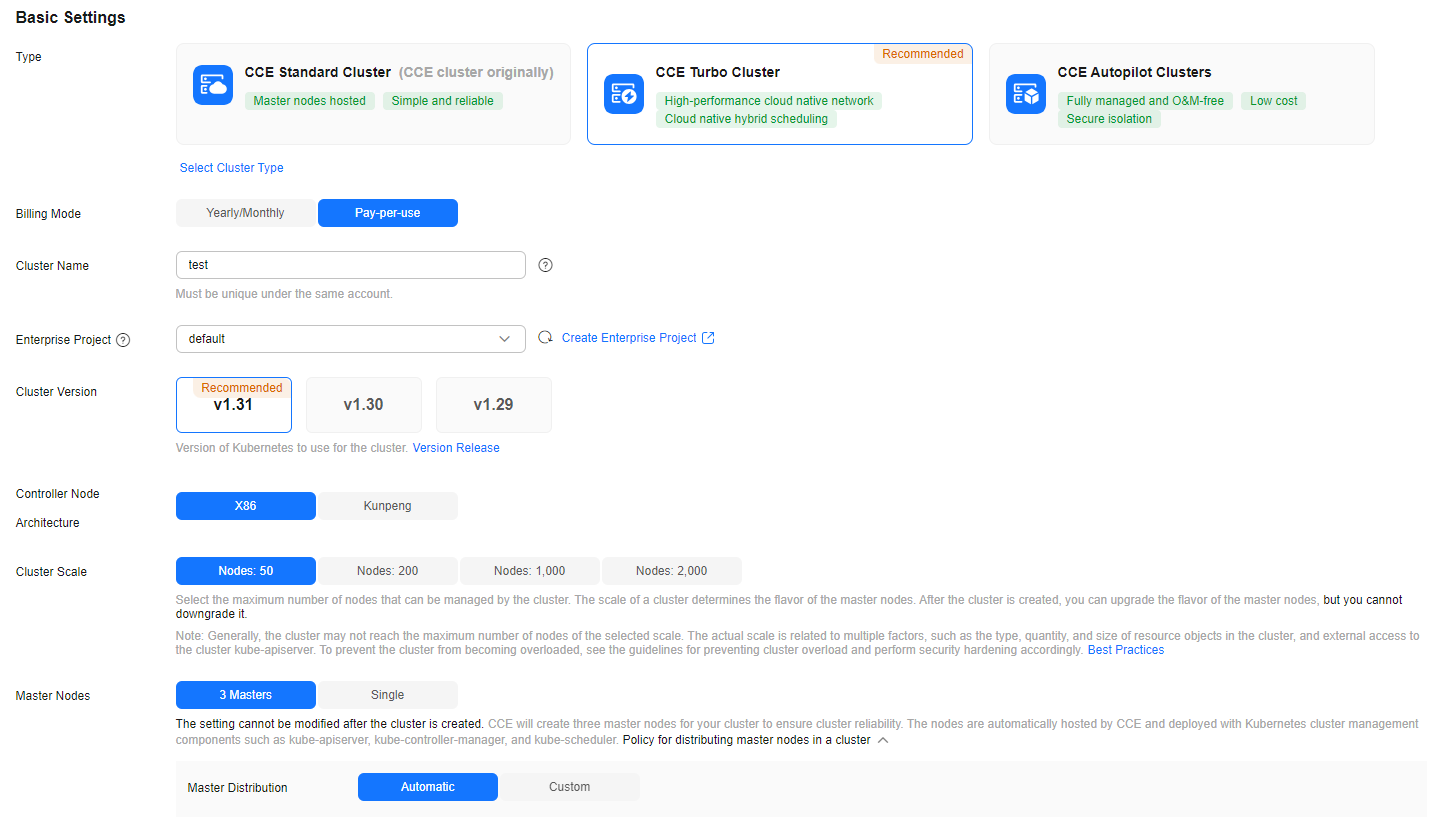
- Configure the basic settings of the cluster. For details, see Figure 2 and Table 1.
Table 1 Basic settings of a cluster (applicable to standard and Turbo clusters) Parameter
Description
Modifiable After Cluster Creation
Type
Select CCE Turbo Cluster or CCE Standard Cluster as required.
- CCE standard clusters provide highly reliable and secure containers for commercial use.
- CCE Turbo clusters use the high-performance cloud native network. Such clusters provide cloud native hybrid scheduling, achieving higher resource utilization and wider scenario coverage.
For details, see Comparison Between Cluster Types.
No
Billing Mode
Select a billing mode for the cluster as needed.- Yearly/Monthly: a prepaid billing mode. Resources will be billed based on the service duration. This cost-effective mode is ideal when the duration of resource usage is predictable.
If you choose this billing mode, configure the required duration and determine whether to automatically renew the subscription. (If you purchase a monthly subscription, the automatic renewal period is one month. If you purchase a yearly subscription, the automatic renewal period is one year.)
- Pay-per-use: a postpaid billing mode. It is suitable for scenarios where resources will be billed based on usage frequency and duration. You can provision or delete resources at any time.
Yes
Cluster Name
Enter a cluster name. Each cluster name in the same account must be unique.
Enter 4 to 128 characters. Start with a lowercase letter and do not end with a hyphen (-). Only lowercase letters, digits, and hyphens (-) are allowed.
Yes
Enterprise Project
This parameter is available only for enterprise users who have enabled enterprise projects.
After an enterprise project is selected, clusters and their security groups will be created in that project. To manage clusters and other resources like nodes, load balancers, and node security groups, you can use the Enterprise Project Management Service (EPS). For more details, see Enterprise Center Overview.
Yes
Cluster Version
Select a Kubernetes version. The latest commercial version provides you with more stable, reliable features and is recommended.
Yes
Controller Node Architecture
Select an option as required. This parameter specifies the hardware platform type of the control plane nodes.- X86: enables high performance and strong versatility. It is suitable for complex computing and high-throughput scenarios, such as data centers, cloud computing platforms, and high-performance computing.
- Kunpeng: enables low power consumption and high energy efficiency. It is suitable for scenarios such as edge computing, IoT, and embedded systems.
No
Cluster Scale
Select a cluster scale as required. This parameter controls the maximum number of worker nodes that a cluster can manage.
Yes
The cluster that has been created can only be scaled out. For details, see Changing a Cluster Scale.
Master Nodes
Select the number of master nodes. The master nodes are automatically hosted by CCE and deployed with Kubernetes cluster management components such as kube-apiserver, kube-controller-manager, and kube-scheduler.
- 3 (HA): Three master nodes will be created for high cluster availability.
- Single: Only one master node will be created in your cluster.
NOTE:
If there are multiple master nodes and more than half of the master nodes in a CCE cluster are faulty, the cluster cannot function properly.
You can also select AZs for deploying the master nodes of a specific cluster. By default, AZs are allocated automatically for the master nodes.- Automatic: Master nodes are randomly distributed in different AZs for cluster DR. If there are not enough AZs available, CCE will prioritize assigning nodes in AZs with enough resources to ensure cluster creation. However, this may affect AZ-level DR.
- Custom: Master nodes are deployed in specific AZs.
If there is one master node in a cluster, select an AZ for the master node as needed. If there are multiple master nodes in a cluster, you can select multiple AZs.
- AZ: Master nodes are deployed in different AZs for cluster DR.
- Host: Master nodes are deployed on different hosts in the same AZ for cluster DR.
- Custom: Master nodes are deployed in the AZs you specified.
No
After the cluster is created, the number of master nodes and the AZs where they are deployed cannot be changed.
Step 2: Configure Network Settings
Network configuration follows a hierarchical management system. It ensures end-to-end network connectivity and security assurance for containerized applications through collaborative configuration of the cluster networks, container networks, and Service networks.
- Cluster network: handles communication between nodes, transmitting pod and Service traffic while ensuring cluster infrastructure connectivity and security.
- Container network: assigns each pod an independent IP address, enabling direct container communication and cross-node communication.
- Service network: establishes a stable access entry, supports load balancing, and optimizes traffic management for Services within a cluster.
Before configuring the network settings, you are advised to learn the concepts and relationships of the three types of networks. For details, see Networking Overview.
- Configure cluster network parameters. For details, see Figure 3 and Table 2.
Table 2 Cluster network settings Parameter
Description
Modifiable After Cluster Creation
VPC
Select a VPC for the cluster.
If no VPC is available, click Create VPC to create one. After the VPC is created, click the refresh icon. For details about how to create a VPC, see Creating a VPC with a Subnet.
No
Default Node Subnet
Select a subnet. Once selected, all nodes in the cluster will automatically use the IP addresses assigned within that subnet. During node or node pool creation, the subnet settings can be reconfigured.
No
Default Node Security Group
Select Auto generate. CCE will automatically create a security group for the cluster. You can also select an existing security group.
The security group must allow traffic over certain ports to ensure normal communication. Otherwise, the nodes cannot be created. For details, see How Can I Configure a Security Group Rule in a Cluster?
Yes
IPv6
After this function is enabled, the cluster supports the IPv4/IPv6 dual-stack, meaning each worker node can have both an IPv4 address and an IPv6 address. Both IP addresses support private and public network access. Before enabling this function, ensure that Default Node Subnet includes an IPv6 CIDR block. For details, see Create a VPC.
- CCE standard clusters (using tunnel networks): IPv6 is supported for clusters v1.15 and later versions. Since clusters v1.23, IPv6 has been GA.
- CCE standard clusters (using VPC networks): IPv6 is not supported.
- CCE Turbo clusters: IPv6 is supported for clusters v1.23.8-r0, v1.25.3-r0, and later versions.
For details, see Creating an IPv4/IPv6 Dual-Stack Cluster in CCE.
No
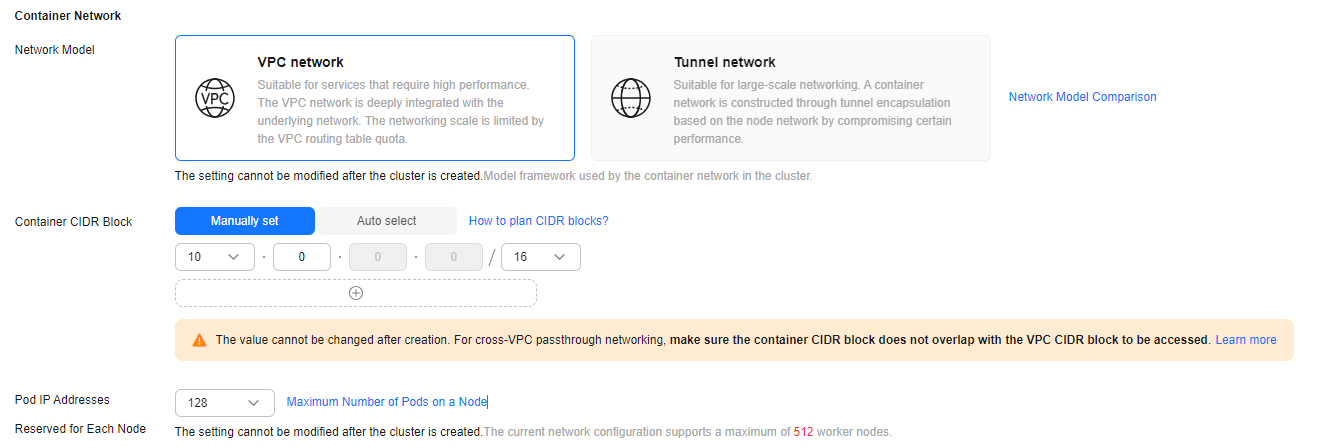
- Configure container network parameters. For details, see Figure 4 and Table 3.
Table 3 Container network settings Parameter
Description
Modifiable After Cluster Creation
Network Model
The network model used by the container network in a cluster.- Tunnel network: applies to large clusters (with up to 2,000 nodes) and scenarios that do not demand high performance such as web applications and data middle- and back-end services with low access traffic.
- VPC network: applies to small clusters (with 1,000 nodes or fewer) and scenarios that demand high performance such as AI and big data computing.
For more details about their differences, see Overview.
No
DataPlane V2 (supported by clusters using the VPC networks)
eBPF is used at the kernel layer for Kubernetes network acceleration, enhancing high-performance service communication through ClusterIP Services, precise traffic control via network policies, and intelligent bandwidth management with egress bandwidth. For details, see DataPlane V2 Network Acceleration.
This function has the restrictions below. You can also view the restrictions in DataPlane V2 Network Acceleration.
- Restrictions on clusters: This function can be enabled only for clusters v1.27.16-r30, v1.28.15-r20, v1.29.13-r0, v1.30.10-r0, v1.31.6-r0, or later that use VPC networks.
- Restrictions on memory: After this function is enabled, CCE will automatically deploy the cilium-agent on every node in a cluster. Each cilium-agent will use 80 MiB of memory, and the memory usage will increase by 10 KiB whenever a new pod is added.
- Restrictions on OSs: After a node is created, it can only use Huawei Cloud EulerOS 2.0 and cannot use the guaranteed egress network bandwidth (Guaranteed Egress Network Bandwidth) in cloud native hybrid deployment.
NOTE:CCE DataPlane V2 is released with restrictions. To use this feature, submit a service ticket to CCE.
No
Network Policies (supported by clusters using the tunnel networks)
Policy-based network control for a cluster. For details, see Configuring Network Policies to Restrict Pod Access.
After this function is enabled, if the CIDR blocks of a customer's service conflict with the on-premises CIDR blocks, the link to a newly added gateway may not be established.
For example, if a cluster uses a Direct Connect connection to access an external address, the external switch does not support ip-option. Enabling network policies in this scenario could result in network access failure.
Yes
Container CIDR Block
CIDR block used by containers. This parameter determines the maximum number of containers in the cluster. CCE standard clusters support:
- Manually set: You can customize the container CIDR blocks as needed. For cross-VPC passthrough networking, make sure the container CIDR block does not overlap with the VPC CIDR block to be accessed to prevent conflicts. For details, see Planning CIDR Blocks for a Cluster. The VPC network model allows you to configure multiple CIDR blocks, and container CIDR blocks can be added even after the cluster is created. For details, see Expanding the Container CIDR Block of a Cluster That Uses a VPC Network.
- Auto select: CCE will randomly allocate a non-conflicting CIDR block from the ranges 172.16.0.0/16 to 172.31.0.0/16, or from 10.0.0.0/12, 10.16.0.0/12, 10.32.0.0/12, 10.48.0.0/12, 10.64.0.0/12, 10.80.0.0/12, 10.96.0.0/12, and 10.112.0.0/12. Since the allocated CIDR block cannot be modified after the cluster is created, you are advised to manually configure the CIDR blocks, especially in commercial scenarios.
NOTE:
After a cluster using a container tunnel network is created, the container CIDR block cannot be expanded later. To prevent IP address exhaustion, it is advised to set the container CIDR block with a maximum mask length of 19 bits.
No
After a cluster using a VPC network is created, you can add container CIDR blocks to the cluster but cannot modify or delete the existing ones.
Reserved Pod IP Per Node (supported by clusters using the VPC networks)
The number of pod IP addresses that can be allocated in the container network (alpha.cce/fixPoolMask). This parameter determines the maximum number of pods that can be created on each node. Pods that use the host networks do not occupy the reserved IP addresses.
In a container network, each pod is assigned a unique IP address. If the number of pod IP addresses reserved for each node is insufficient, pods cannot be created. For details, see Number of Reserved Pod IP Addresses Per Node.
No
- Configure Service network parameters. For details, see Figure 5 and Table 4.
Table 4 Service network settings Parameter
Description
Modifiable After Cluster Creation
Service CIDR Block
Configure an IP address range for ClusterIP Services in a cluster. This parameter controls the maximum number of ClusterIP Services in a cluster. ClusterIP Services enable communication between containers in a cluster. The Service CIDR block cannot overlap with the node subnet or container CIDR block.
No
Request Forwarding
Configure load balancing and route forwarding of Service traffic in a cluster. iptables and IPVS are supported. For details, see Comparing iptables and IPVS.
- iptables: the traditional kube-proxy mode. It applies to the scenario where the number of Services is small or a large number of short connections are concurrently established with the client. IPv6 clusters do not support iptables.
- IPVS: allows higher throughput and faster forwarding. It is suitable for large clusters or when there are a large number of Services.
No
- Configure cluster network parameters. For details, see Figure 6 and Table 5.
Table 5 Cluster network settings Parameter
Description
Modifiable After Cluster Creation
VPC
Select a VPC for the cluster.
If no VPC is available, click Create VPC to create one. After the VPC is created, click the refresh icon. For details about how to create a VPC, see Creating a VPC with a Subnet.
No
Default Node Subnet
Select a subnet. Once selected, all nodes in the cluster will automatically use the IP addresses assigned within that subnet. During node or node pool creation, the subnet settings can be reconfigured.
No
Default Node Security Group
Select Auto generate. CCE will automatically create a security group for the cluster. You can also select an existing security group.
The security group must allow traffic over certain ports to ensure normal communication. Otherwise, the nodes cannot be created. For details, see How Can I Configure a Security Group Rule in a Cluster?
Yes
IPv6
After this function is enabled, the cluster supports the IPv4/IPv6 dual-stack, meaning each worker node can have both an IPv4 address and an IPv6 address. Both IP addresses support private and public network access. Before enabling this function, ensure that Default Node Subnet includes an IPv6 CIDR block. For details, see Create a VPC.
- CCE standard clusters (using tunnel networks): IPv6 is supported for clusters v1.15 and later versions. Since clusters v1.23, IPv6 has been GA.
- CCE standard clusters (using VPC networks): IPv6 is not supported.
- CCE Turbo clusters: IPv6 is supported for clusters v1.23.8-r0, v1.25.3-r0, and later versions.
For details, see Creating an IPv4/IPv6 Dual-Stack Cluster in CCE.
No
- Configure container network parameters. For details, see Figure 7 and Table 6.
Table 6 Container network settings Parameter
Description
Modifiable After Cluster Creation
Network Model
The network model used by the container network in a cluster. Only Cloud Native Network 2.0 is supported.
For more details about this network model, see Overview.
No
DataPlane V2
eBPF is used at the kernel layer for Kubernetes network acceleration, enhancing high-performance service communication through ClusterIP Services, precise traffic control via network policies, and intelligent bandwidth management with egress bandwidth. For details, see DataPlane V2 Network Acceleration.
This function has the restrictions below. You can also view the restrictions in DataPlane V2 Network Acceleration.
- Restrictions on clusters: The cluster version must be v1.27.16-r10, v1.28.15-r0, v1.29.10-r0, v1.30.6-r0, or later.
- Restrictions on memory: After this function is enabled, CCE will automatically deploy the cilium-agent on every node in a cluster. Each cilium-agent will use 80 MiB of memory, and the memory usage will increase by 10 KiB whenever a new pod is added.
- Restrictions on OSs: After a node is created, it can only use Huawei Cloud EulerOS 2.0 and cannot use the guaranteed egress network bandwidth (Guaranteed Egress Network Bandwidth) in cloud native hybrid deployment.
NOTE:CCE DataPlane V2 is released with restrictions. To use this feature, submit a service ticket to CCE.
No
Pod Subnet
Select the subnet to which the pod belongs. If no subnet is available, click Create Subnet to create one. The pod subnet determines the maximum number of containers in a cluster. You can add pod subnets after a cluster is created.
Yes
Default Security Group
Select the security group automatically generated by CCE or select an existing one. This parameter controls inbound and outbound traffic to prevent unauthorized access.
The security group of containers must allow access over specified ports to ensure normal communication between containers in the cluster. For details about how to configure ports in the security group rules, see How Can I Configure a Security Group Rule in a Cluster?
Yes
- Configure Service network parameters. For details, see Figure 8 and Table 7.
Table 7 Service network settings Parameter
Description
Modifiable After Cluster Creation
Service CIDR Block
Configure an IP address range for ClusterIP Services in a cluster. This parameter controls the maximum number of ClusterIP Services in a cluster. ClusterIP Services enable communication between containers in a cluster. The Service CIDR block cannot overlap with the node subnet or container CIDR block.
No
Request Forwarding
Configure load balancing and route forwarding of Service traffic in a cluster. iptables and IPVS are supported. For details, see Comparing iptables and IPVS.
- iptables: the traditional kube-proxy mode. It applies to the scenario where the number of Services is small or a large number of short connections are concurrently established with the client. IPv6 clusters do not support iptables.
- IPVS: allows higher throughput and faster forwarding. It is suitable for large clusters or when there are a large number of Services.
No
IPv6 Service CIDR Block
Configure IPv6 addresses for Services. This parameter is only available after IPv6 is enabled. For details, see How Do I Configure the IPv6 Service CIDR Block When Creating a CCE Turbo Cluster?
No
Step 3: Configure the Alarm Center Settings
The alarm center offers comprehensive cluster alarm functions. When an issue arises during cluster operation, CCE will promptly trigger an alarm. This helps maintain service stability. For details, see Configuring Alarms in Alarm Center.

|
Parameter |
Description |
Modifiable After Cluster Creation |
|---|---|---|
|
Enable Alarm Center |
After this option is selected, Alarm Center is automatically enabled for the cluster and the default alarm rule is created. For details, see Table 1 Default alarm rules. Metric alarm rules rely on the Cloud Native Cluster Monitoring add-on to report data to AOM. If this add-on is not installed or connected to AOM, Alarm Center will not create such alarm rules. |
Yes |
|
Contact Group |
Select one or more contact groups to manage alarm notifications by group. After a contact group is selected, CCE automatically pushes alarms to the contact group based on alarm rules. Alarm notifications are billed. For details, see Simple Message Notification Billing. |
Yes |
Step 4: Enable Security Service
CCE offers a comprehensive security service that safeguards clusters. Through capabilities like runtime monitoring and vulnerability detection, it ensures the security of clusters across multiple dimensions, including nodes, containers, and images, proactively preventing malicious attacks while maintaining compliance with security standards. This function is in the initial rollout stage. For details about the regions where this function is available, see the console.
|
Parameter |
Description |
Modifiable After Cluster Creation |
|---|---|---|
|
Security Service |
After this function is enabled, the cluster management permissions are granted to the HSS agency, and CCE will automatically install the agent on the nodes in the cluster. However, this will use certain resources.
NOTE:
After HSS is enabled, CCE will automatically grant cluster management permissions to the HSS agency hss_policy_trust. For details, see hss_policy_trust. |
Yes |
(Optional) Step 5: Configure Advanced Settings
Advanced settings extend and strengthen previous settings, enhancing security, stability, and compliance within clusters. This is achieved through capabilities like improved authentication, resource management, and security mechanisms.
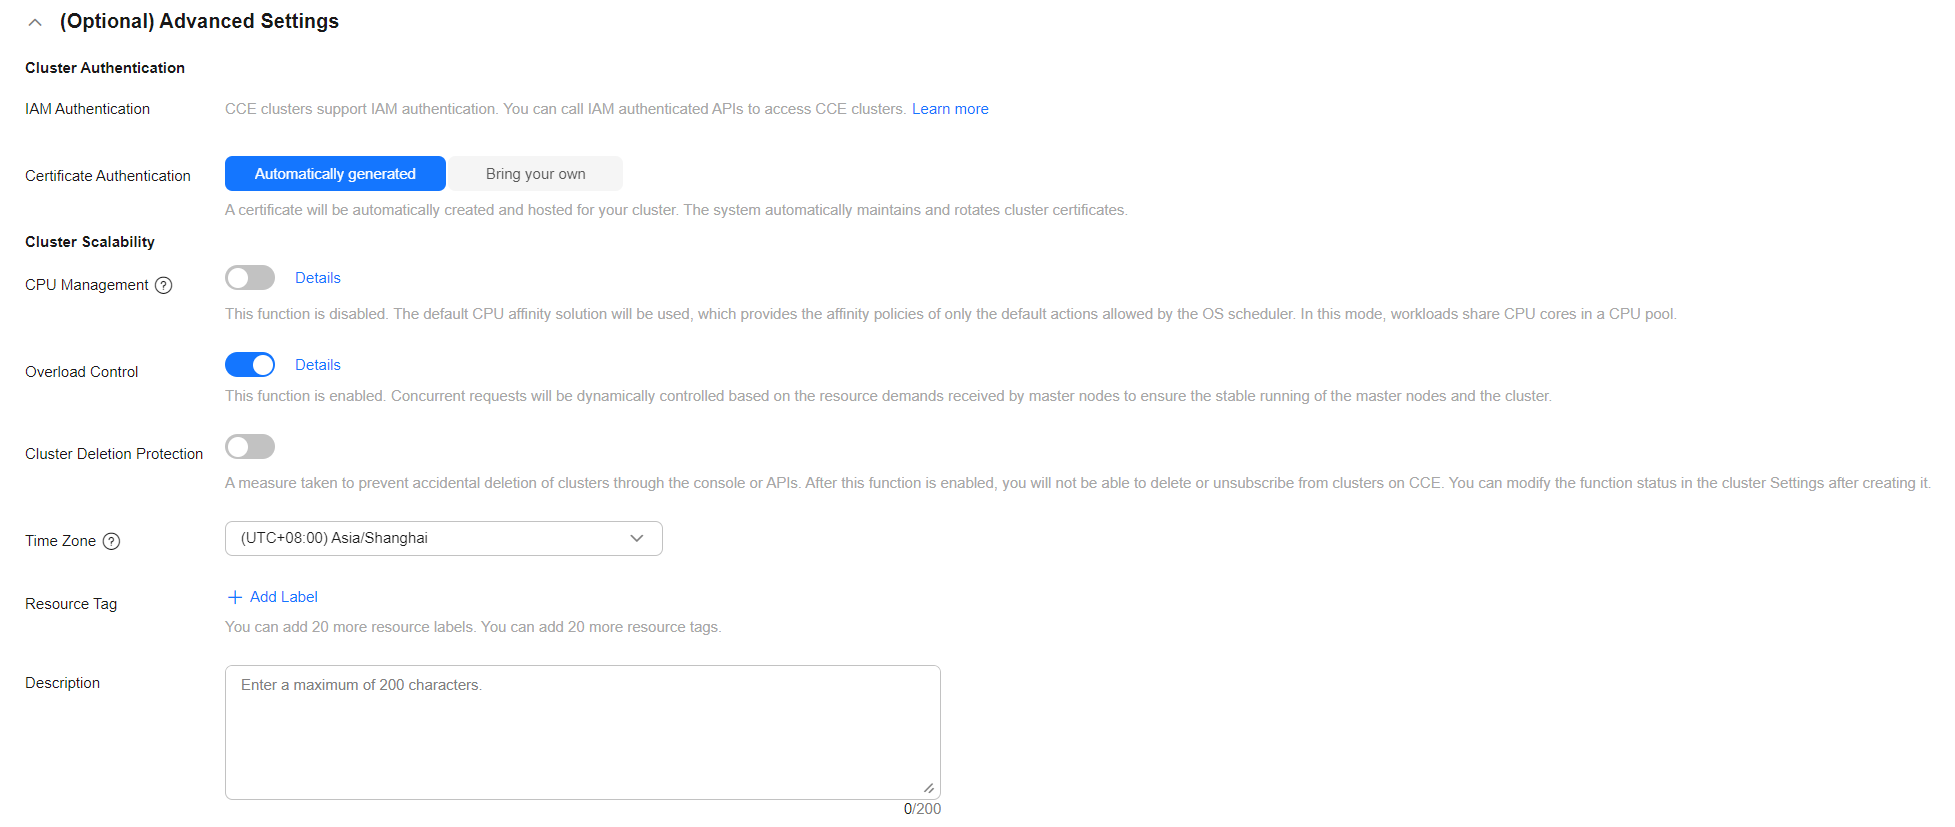
|
Parameter |
Description |
Modifiable After Cluster Creation |
|---|---|---|
|
IAM Authentication |
CCE clusters support IAM authentication. You can call IAM authenticated APIs to access CCE clusters. |
No |
|
Certificate Authentication |
Certificate authentication is used for identity authentication and access control. It ensures that only authorized users or services can access specific cluster.
|
No |
|
CPU Management |
CPU management policies allow precise control over CPU allocation for pods. For details, see CPU Policy.
|
Yes |
|
Secret Encryption |
Secret encryption determines the encryption mode of secrets in a CCE cluster.
This feature is in the initial rollout stage. To view the regions where this feature is available, see the console. |
No |
|
Overload Control |
After this function is enabled, concurrent requests will be dynamically controlled based on the resource demands received by master nodes, ensuring stable running of the master nodes and the cluster. For details, see Enabling Overload Control for a Cluster. |
Yes |
|
Distributed Cloud (HomeZones/CloudPond) (supported by CCE Turbo clusters) |
If enabled, the cluster can centrally manage computing resources in data centers and at the edge. This allows you to deploy containers in proper regions based on service needs. To use this function, register an edge site beforehand. For details, see Using Edge Cloud Resources in a Remote CCE Turbo Cluster. |
No |
|
Cluster Deletion Protection |
A measure taken to prevent accidental deletion of clusters through the console or APIs. After this function is enabled, you will not be able to delete or unsubscribe from clusters on CCE. You can modify the function status in Settings after creating the clusters. |
Yes |
|
OIDC |
The cluster provisions an OpenID Connect (OIDC) provider that delegates Kubernetes authentication to an external, professional identity provider (IdP), for example, the identity authentication service of a cloud service provider (such as Huawei Cloud IAM), or any open-source authentication solution (such as Keycloak or Dex). You can download the cluster public key based on the OIDC provider URL automatically generated by the cluster and use the public key to bind the identity provider for remote authentication. For details, see Configuration Suggestions on CCE Workload Identity Security. For clusters v1.27.16-r50, v1.28.15-r40, v1.29.15-r0, v1.30.14-r0, v1.31.10-r0, v1.32.6-r0, v1.33.1-r0, or later, if this function is not enabled during cluster creation, you can enable it on the Overview page after the cluster creation. |
Yes |
|
Time Zone |
The cluster's scheduled tasks and nodes are subject to the chosen time zone. |
No |
|
Resource Tag |
Adding tags to resources allows for custom classification and organization. A maximum of 20 resource tags can be added.
NOTE:
If your account belongs to an organization and the organization has configured with CCE tag policies, you need to add tags to the cluster based on these policies. If a tag does not comply with the tag policies, cluster creation may fail. Contact your administrator to learn more about tag policies. You can create predefined tags on the TMS console. These tags are available to all resources that support tags. You can use these tags to improve the tag creation and resource migration efficiency. For details, see Creating Predefined Tags.
|
Yes |
|
Description |
Cluster description helps users and administrators quickly understand the basic settings, status, and usage of a cluster. The description can contain a maximum of 200 characters. |
Yes |
Step 6: Select Add-ons
CCE provides a variety of add-ons to extend cluster functions and enhance the functionality and flexibility of containerized applications. You can select add-ons as required. Some basic add-ons are set as mandatory by default. If non-basic add-ons are not installed during cluster creation, they can still be added later on the Add-ons page after the cluster is created.
- Click Next: Select Add-on. On the page displayed, select the add-ons to be installed during cluster creation.
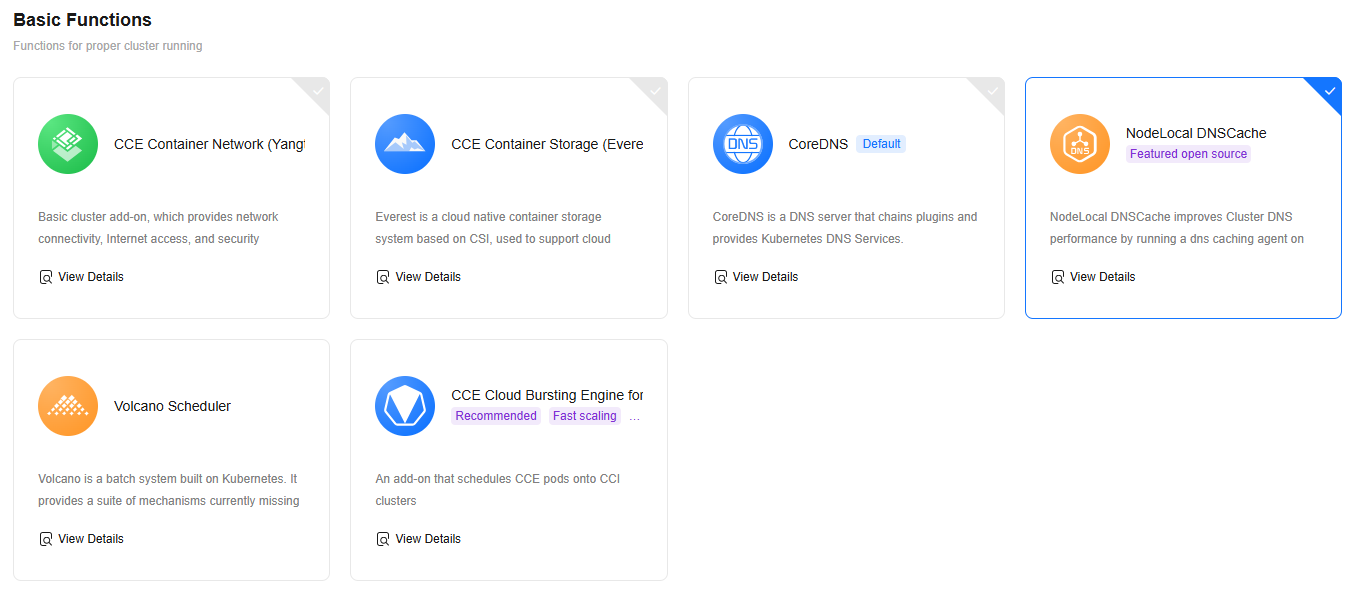
- Select basic add-ons to ensure the cluster can run normally. For details, see Figure 11 and Table 11.
Table 11 Basic add-ons Add-on
Description
CCE Container Network (Yangtse CNI)
This is a basic cluster add-on. It provides network connectivity, public access, and security isolation for pods in your cluster.
This add-on is installed by default. It is a cloud native container storage system based on CSI and supports cloud storage services such as EVS.
This add-on is installed by default. It provides DNS resolution for your cluster and can be used to access the in-cloud DNS server.
(Optional) After you select this add-on, CCE will automatically install it. NodeLocal DNSCache improves cluster DNS performance by running a DNS cache proxy on cluster nodes.
(Optional) After you select this add-on, CCE will automatically install it and set the default scheduler of the cluster to Volcano. This will enable you to access advanced scheduling capabilities for batch computing and high-performance computing.
(Optional) After you select this add-on, CCE will automatically install it. When there is a sudden increase in workload, the pods deployed on CCE will be dynamically created on CCI to handle the added workload.
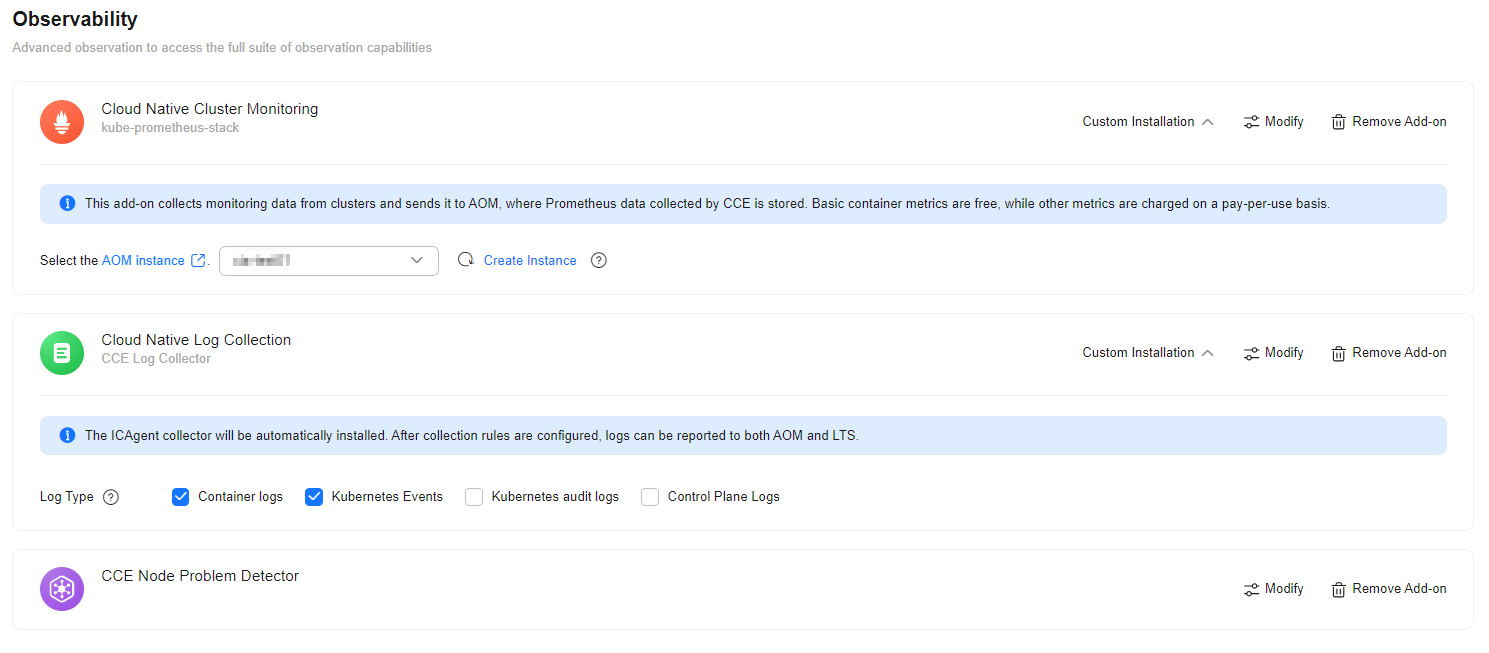
- Select the observability add-ons to experience the full observability function. For details, see Figure 11 and Table 11.
Figure 12 Selecting observability add-ons

Table 12 Observability add-ons Add-on
Description
(Optional) After you select this add-on, CCE will automatically install it. This add-on collects monitoring metrics for your cluster and reports the metrics to AOM. The agent mode does not support HPA based on custom Prometheus statements. If related functions are required, install this add-on manually after the cluster is created.
Collecting basic metrics is free of charge. Collecting custom metrics is billed by AOM. For details, see Pricing Details. For details about how to collect custom metrics, see Monitoring Custom Metrics Using Cloud Native Cluster Monitoring.
(Optional) After you select this add-on, CCE will automatically install it. This add-on helps report logs to LTS. After the cluster is created, you are allowed to obtain and manage collection rules on the Logging page of the CCE cluster console.
LTS does not charge you for creating log groups and offers a free quota for you to collect logs every month. You pay only for the log volume exceeding the quota. For details, see Price Calculator.
(Optional) After you select this add-on, CCE will automatically install it to detect faults and isolate nodes for prompt cluster troubleshooting.
Step 7: Configure Add-ons
Configure the selected add-ons to ensure they operate stably and accurately and meet service requirements.

Add-ons consume certain resources after being installed. Ensure that node resources are sufficient. For details about the resource consumption, see the console.
- Click Next: Configure Add-on.
- Configure the basic add-ons. For details, see Table 13.
Table 13 Basic add-on settings Add-on
Description
CCE Container Network (Yangtse CNI)
This add-on is unconfigurable.
CCE Container Storage (Everest)
This add-on is configurable. You can click Modify on the right of the add-on.
CoreDNS
This add-on is configurable. You can click Modify on the right of the add-on.
NodeLocal DNSCache
This add-on is configurable. You can click Modify on the right of the add-on.
Volcano Scheduler
This add-on is configurable. You can click Modify on the right of the add-on.
CCE Cloud Bursting Engine for CCI
To modify the add-on settings, click Modify on the right of the add-on.
After workload pods are scheduled to CCI, they will be billed according to CCI billing requirements. For details, see Billing Items.
- Configure the observability add-ons. For details, see Figure 13 and Table 14. To modify the add-on settings, click Modify on the right of the add-on.
Table 14 Observability add-on settings Add-on
Description
Cloud Native Cluster Monitoring
Select an AOM instance for Cloud Native Cluster Monitoring to report metrics. If no AOM instance is available, click Create Instance to create one.
Collecting basic metrics is free of charge. Collecting custom metrics is billed by AOM. For details, see Pricing Details. For details about how to collect custom metrics, see Monitoring Custom Metrics Using Cloud Native Cluster Monitoring.
Cloud Native Log Collection
Select the logs to be collected. If enabled, a log group named k8s-log-{Cluster ID} will be automatically created, and a log stream will be created for each selected log type.
- Container log: Standard output logs of containers are collected. The corresponding log stream is named in the format of stdout-{Cluster ID}.
- Kubernetes Events: Kubernetes logs are collected. The corresponding log stream is named in the format of event-{Cluster ID}.
- Kubernetes Audit Logs: Audit logs of the master nodes are collected. The log streams are named in the format of audit-{Cluster ID}.
- Control Plane Logs: Logs from critical components such as kube-apiserver, kube-controller-manage, and kube-scheduler that run on the master nodes are collected. The log streams are named in the format of kube-apiserver-{Cluster ID}, kube-controller-manage-{Cluster ID}, and kube-scheduler-{Cluster ID}, respectively.
If log collection is disabled, choose Logging in the navigation pane of the cluster console after the cluster is created and enable this option.
LTS does not charge you for creating log groups and offers a free quota for you to collect logs every month. You pay only for the log volume exceeding the quota. For details, see Price Calculator. For details, see Collecting Container Logs Using the Cloud Native Log Collection Add-on.
CCE Node Problem Detector
-
Step 8: Confirm Settings
Click Next: Confirm Settings. The cluster resource list is displayed. Confirm the information and click Submit.
It takes about 5 to 10 minutes to create a cluster. You can click Back to Cluster Management to perform other operations on the cluster or click Go to Cluster Events to view the cluster details.
Helpful Links
- Accessing a cluster: You can use kubectl to access a cluster and perform cluster management tasks on the CLI. For details, see Accessing a Cluster Using kubectl and Connecting to Multiple Clusters Using kubectl.
- Adding a node: After a cluster is created, you can add nodes to the cluster. For details, see Creating a Node.
- Managing a cluster: After a cluster is created, you can configure resource scheduling policies, security control rules, and lifecycle management to meet service requirements. For details, see Cluster Management Overview.
- Creating an IPv4/IPv6 dual-stack cluster: Creating an IPv4/IPv6 Dual-Stack Cluster in CCE
- If a cluster fails to be created, rectify the fault by referring to Why Can't I Create a CCE Cluster?
Feedback
Was this page helpful?
Provide feedbackThank you very much for your feedback. We will continue working to improve the documentation.See the reply and handling status in My Cloud VOC.
For any further questions, feel free to contact us through the chatbot.
Chatbot

