

Migrating a Windows Server
Scenarios
Server Migration Service (SMS) is a P2V/V2V migration service that helps you migrate x86 physical servers or VMs in on-premises, private, or public cloud environments to Huawei Cloud. You can use Elastic Cloud Servers (ECSs) or Flexus instances as the target servers.
This section describes how to quickly create a task for migrating a Windows server on the SMS console.
Video Tutorial
Procedure
| Step | Description |
|---|---|
| |
| Install and start the Agent on the source server. | |
| Configure the target server on the SMS console. | |
| Replicate all data from the source server to the target server. | |
| Synchronize incremental data from the source server to the target server. | |
| After the migration is complete, delete the cutover and synchronization snapshots generated during the migration to stop further billing. |
Preparations
Before using SMS, complete the following preparations:
- Sign up for a Huawei Cloud account.
- Obtain the required permissions.
If you use a Huawei Cloud account for migration, you have the required permissions by default. If you use an IAM user for migration, you need to obtain the required permissions. For more information, see Creating a User Group and Assigning Permissions.
- Obtain an AK/SK pair for your target account.
The AK/SK pair is used for authentication during the migration. To learn how to obtain an AK/SK pair, see How Do I Obtain an AK/SK Pair for an Account? or How Do I Obtain an AK/SK Pair for an IAM User?

SMS does not support AK/SK-based authentication for federated users (virtual users).
- Ensure that the source server OS is supported by SMS.
- Ensure that the following network requirements are met:
- The source server can connect to the Huawei Cloud API Gateway over port 443. For more information, see Connecting the Source Server to Huawei Cloud API Gateway.

It is recommended that all outbound ports on source servers be opened.
- If you want to migrate over an IPv6 network, the source server must support IPv4/IPv6 dual-stack networks.
- The source server can connect to the target server. For more information, see Connecting the Source Server to the Target Server.
- To migrate over the Internet, purchase an EIP in the target region.
- To migrate over a private network, request a Direct Connect or VPN connection.
- The security group that you use to protect the target server must allow access to TCP ports 8899, 8900, and 22.
For more information, see How Do I Configure Security Group Rules for Target Servers?
- For security purposes, you are advised to only allow traffic from the source server over these ports.
- The firewall of the target server must allow traffic to these ports.
- The source server can connect to the Huawei Cloud API Gateway over port 443. For more information, see Connecting the Source Server to Huawei Cloud API Gateway.
- Ensure that the following source server requirements are met:
- There is at least 320 MB of space available on every partition not smaller than 600 MB, and at least 40 MB of space available on every partition smaller than 600 MB
- The system time of the source server must be consistent with the local standard time to avoid Agent registration failures.
Step 1: Install and Start the Agent on the Source Server
Download the Agent from the SMS console, install it on the source server, and start the Agent. Enter the AK/SK pair for the Huawei Cloud account that you are migrating to and the SMS domain name. After the Agent is started, it reports information about the source server to SMS.
There are two options for Windows. Select the one that matches the source server OS.
| OS Version | SMS-Agent version | Description |
|---|---|---|
| Windows Server 2012, Windows Server 2016, Windows Server 2019, Windows Server 2022, Windows Server 2025, Windows 8.1, Windows 10, and Windows 11 | GUI-based Windows Agent (Python 3) | Windows Agent (Python 2) can run on Windows of later versions. |
| Windows Server 2008 and Windows 7 | CLI-based Windows Agent (Python 2) |
- Download the Agent installation file.
- Sign in to the SMS console.
- In the navigation pane, choose Agents.
- Select the Windows card, locate the Agent that matches the source server OS, and click the
 icon next to Agent.
- Read and agree to the service agreement, and click Yes to download the Agent installation file.
- Install the Agent. The following describes how to install the Windows Agent (Python 3). For details about how to install the Windows Agent (Python 2), see Installing the Windows Agent (Python 2).
- Transmit the SMS-Agent-Py3.exe file to the source server.
- Log in to the source server as user Administrator and double-click the SMS-Agent-Py3.exe file to open the SMS-Agent installation interface.
- Click Install and wait for the installation to complete.
- Click Finish to open the SMS-Agent GUI.
- Enter the AK/SK pair for the Huawei Cloud account that you are migrating to and the SMS domain name. You can obtain the SMS domain name on the Agents page of the SMS console.

- (Optional) If the EPS service has been enabled for your Huawei Cloud account, after you enter the AK/SK pair, the Agent will list all enterprise projects your account is allowed to access. You can select the enterprise project you would like to migrate the source server to. This enables you to isolate permissions, resources, and finance during the migration. For details, see Migrating a Server into an Enterprise Project.
- Click start.
- Carefully review the Privacy Statement and click Yes if you want to continue. If Upload success. Waiting for the SMS instruction is displayed, the Windows Agent starts. You can then proceed to configure the target server on the SMS console.

Step 2: Configure the Target Server
You can configure the target server on the SMS console only if the source server meets the following conditions:
- The source server is Connected to SMS.
- The migration is in the Migration Feasibility Check stage.
- The migration is in the Pending target configuration status.
- Sign in to the SMS console.
- In the navigation pane, click Servers.
- In the server list, locate the source server to be migrated, and click Configure Target in the Migration Stage/Status column or choose More > Configure Target in the Operation column.
If the source server record is not found in the server migration list, see Why Wasn't My Source Server Added to the SMS Console After I Configured the Agent?
- On the Configure Basic Settings page, configure parameters by referring to Table 2.
Table 2 Parameter description Parameter
Sub-Parameter
Description
Target Region
-
Select the region for the target server.
Target Port
-
By default, ports 22, 8900, and 8899 are enabled for Windows.
NOTE:Open ports are used for the following purposes:
- Port 22: The initialization port of the transmission link. It is used to establish the transmission channel and can be modified in some regions.
- Port 8899: The control port for data transmission. It is used to transmit task control signals. It cannot be modified.
- Port 8900: The port for block data transmission. It cannot be modified.
Network Type
Public
(Default) Migration over the Internet requires that the target server has an EIP bound.
Private
A Direct Connect connection, VPN connection, VPC peering connection, VPC subnet, or Cloud Connect connection must be provisioned. The private IP address of the target server will be used for migration.
For details about the network scenarios and solutions for migration over a private network, see Setting Up an SMS Migration Network Using VPN, Direct Connect, and Cloud Connect.
IP Version
IPv4
IPv4 is used for data migration by default.
IPv6
On a dual-stack network, IPv6 can be used for migration. For details about migration over IPv6, see Migrating Servers over an IPv6 Network.
CAUTION:If IPv6 is selected, you can only select an existing server as the target end, instead of creating one.
- Configure target server specifications. There are two methods for configuring target servers.
- Use existing: Select a server created on Huawei Cloud as the target server.
To ensure that the target server can start properly after the migration is complete, its disks will be formatted, and its registry and network settings will be updated. You are advised to back up data before the migration.
In the list of existing servers, select one that meets the specifications requirements displayed in the Recommended Target row. If no existing server meets the requirements, click Elastic Cloud Server (ECS) above the list and purchase an ECS based on the recommended specifications. For details, see Purchasing an ECS in Custom Config Mode. You can select a pay-per-use or yearly/monthly ECS.
- Create new: SMS automatically purchases a target server based on the configured specifications.
If you select Create new, the system automatically recommends server specifications, including the server name, AZ, VM specifications, disk information, EIP, VPC, subnet, and security group. You can modify these settings as needed.
- If you select Recommend for Server Template, the system automatically creates the AZ, instance specifications, disk type, VPC, subnet, and security group during the migration. You can adjust the settings.
- If Create new is selected for VPC, the system automatically creates a VPC for the target server based on the following rules:
- If the source server's IP address is 192.168.X.X, the system creates a VPC and a subnet that both belong to network range 192.168.0.0/16.
- If the source server's IP address is 172.16.X.X, the system creates a VPC and a subnet that both belong to network range 172.16.0.0/12.
- If the source server's IP address is 10.X.X.X, the system creates a VPC and a subnet that both belong to network range 10.0.0.0/8.
- If Create new is selected for Security Group, the system automatically creates a security group for the target server and allows traffic to the target server over certain ports:
- Windows: ports 8899, 8900, and 22
- Linux: port 22 for file-level migration
- Linux: ports 8900 and 22 for block-level migration
- If Create new is selected for VPC, the system automatically creates a VPC for the target server based on the following rules:
- If you select Custom Template for Server Template, the system automatically sets the AZ, instance specifications, disk type, VPC, subnet, and security group based on the template. You can adjust the settings. For details about how to create a custom template, see Creating a Server Template.
- Configure advanced disk settings.
- Data disks must be either VBD or SCSI. VBD is the default device type for data disks. For details about disk device types, see Device Types.
- Data disks can be created as shared disks. For details about shared disks, see Managing Shared EVS Disks.
- For target servers newly created by the system, system and data disks can be encrypted. For details about shared disks, see Managing Shared EVS Disks. To enable disk encryption, you need to create an agency to authorize EVS to access KMS. After the authorization is successful, set KMS Encryption to one of the following values:
- Select an existing key
Select a key from the drop-down list. You can select one of the following keys:
Default keys: After the KMS access permissions have been granted to EVS, the system automatically creates a default key and names it evs/default.
Custom keys: You can choose an existing key or create one. For details about how to create a key, see Creating a Key.
- Enter a key ID
Enter the ID of a key shared from another user. Ensure that the key is in the target region. For details, see Creating a Grant.
- Before the migration is complete, do not disable or delete the key used, or the migration will fail.
- The encryption attribute of a disk cannot be modified after the disk is created.
- Keys can be shared with accounts, not IAM users.
- If KMS encryption is used, you will be billed for what you use beyond the free quota given by KMS. For details, see DEW Billing Overview.
- Select an existing key
- If you select Recommend for Server Template, the system automatically creates the AZ, instance specifications, disk type, VPC, subnet, and security group during the migration. You can adjust the settings.
For details about the requirements on target servers, see Target Server Requirements.
- Use existing: Select a server created on Huawei Cloud as the target server.
- (Optional) Set the resource limits.
Set the parameters according to Table 3.
Table 3 Resource limit parameters Parameter
Description
Migration Rate Limit
You can limit the migration rate based on the source bandwidth and service requirements. If you do not want to limit the migration rate, set this parameter to 0.
Traffic limiting is unavailable if:
- The migration uses an IPv6 network.
- Traffic Control (TC) is missing from the source server.
- The TC module is available, but the Class-Based Queuing (CBQ) or Hierarchy Token Bucket (HTB) module is missing.
- Enable the migration drill.
Migration drills help you fully assess the feasibility and identify potential risks of a migration task beforehand. The system verifies if security group ports are set correctly, domains connect normally, and necessary permissions are available. If issues are identified, the system offers remediations to minimize risks and disruptions during migration.
After this function is enabled, the system automatically launches a migration drill before starting the full replication. The entire migration drill takes 5 to 15 minutes, and pay-per-use resources incur costs during this period. For details, see Billing. A migration drill does not transmit source data, so the fee incurred in the drill is low.
You can review the drill results in the task details. For details, see Checking the Migration Drill Status and Report.
- Configure migration parameters.
Set the parameters according to Table 4.
Table 4 Migration settings Parameter
Sub-Parameter
Description
Start Target Upon Launch
No
The target server will be stopped after the migration is complete.
Yes
The target server will be started after the migration is complete.
Migration Method
Windows block-level
Migration and synchronization are performed by block. Block-level migration is used by default and cannot be changed.
Enable Continuous Synchronization
-
Disabled: After full replication is complete, the system automatically starts the target server without synchronizing incremental data from the source server. You need to choose More > Synchronize in the Operation column to synchronize incremental data to the target server.
Enabled: After full replication is complete, the system automatically starts to synchronize incremental data from the source end to the target end periodically. In this case, the target server is not started and cannot be operated. To exit this phase, click Start Target in the Migration Stage/Status column of the migration task to start the target server.
Verify Data Consistency
-
Disabled: Data consistency is not verified after full replication is complete. You can choose whether to perform data consistency check during incremental synchronization.
Enabled: Data consistency is automatically verified after full replication is performed. This is a quick verification, and only the file size and last modification time will be verified. You can modify the verification policy when you launch an incremental synchronization. Note that consistency verification cannot be performed for servers with Btrfs file systems. The following describes the parameters for data consistency verification:
- Enable Hash Verification: If this option is enabled, the system will generate and compare hash values for each file to be verified. Hash verification is recommended when individual files are large and important. Enabling this option will increase CPU and disk I/O overheads for the source server and extend the verification time. CAUTION:
- Hash values cannot be calculated for files in use, so these files will be skipped during the verification.
- Enabling this option requires you to specify the verification scope, and only files in the specified scope will be verified.
- Verification Scope
- Under Exclude paths, enter the paths you want to exclude from the verification. A maximum of 30 paths can be entered. Use commas (,) to separate the paths. For example, /root/data,/var. Leaving it empty will initiate a full verification.
- Under Include paths, enter the paths you want to verify.
CAUTION:- If the entered paths are incorrect or empty, 0 will be displayed for them in the verification results.
- The more data you need to verify, the longer the verification will take. It is wise to narrow the verification scope to only key paths.
- The following paths will be excluded from consistency verification by default:
- Linux: /bin, /boot, /dev, /home, /etc, /lib, /media, /proc, /sbin, /selinux, /sys, /usr, /var, /run, and /tmp
- Windows: top-level directories of partitions, for example, C:\ and O:\
If you need to include any of the preceding excluded paths in the verification, refer to Modifying the Default Excluded Paths.
Resize Disks and Partitions
-
Disabled: The number of disks and partition size of the target server are the same as those of the source server.
Enabled: You can adjust the number of target disks and partition size. For details, see Resizing Disks and Partitions on Windows.
Transit IP Address
-
This parameter is available only for private line migration. It is used to set the transit IP address of the target server. For details about how to configure the network in this scenario, see For a Scenario Where the Source Server Has No Internet Access and Cannot Communicate with the Target Server.
- Enable Hash Verification: If this option is enabled, the system will generate and compare hash values for each file to be verified. Hash verification is recommended when individual files are large and important. Enabling this option will increase CPU and disk I/O overheads for the source server and extend the verification time.
- Save the settings and start migration.
After configuring the target server settings, review them in the summary panel and choose whether to start the migration now or later.
- Saving the settings and starting the task immediately
- Click Save and Start.
- In the displayed dialog box, read the migration conditions and click OK. Return to the migration server list. The task status becomes Running, indicating that the migration has started.
- Saving the settings and starting the task later
- After you confirm that the settings are correct, click Save.
- In the displayed dialog box, read the migration conditions and click OK. Return to the migration server list. The task status becomes To be started, indicating that the migration is not started.
To start the migration, click Start in the Migration Stage/Status column.
- Saving the settings and starting the task immediately
Step 3: Start Full Replication
A full replication replicates all data from the source server to the target server. The replication speed depends on the outbound bandwidth of the source server or the inbound bandwidth of the target server, whichever is smaller.
- In the server list, locate the server to be migrated and start the migration in either of the following ways:
- Click Start in the Migration Stage/Status or Operation column. In the displayed Start Migration dialog box, click OK to start full replication.
- Select the source server and click Start above the server list. In the displayed Start Migration dialog box, click OK to start full replication. Figure 1 Starting a full replication

During the full replication, the target server stays locked to prevent any operations. After the migration is complete, it will be automatically unlocked.
- Click the source server name to view the migration progress.
- If you set Enable Continuous Synchronization to No when configuring the target server, the system automatically launches the target server after the full replication is complete. If Finished and Migration completed show in the Migration Stage/Status column, the target server has been launched.
- If you set Enable Continuous Synchronization to Yes when configuring the target server, the task stage and status change to Continuous sync after the full replication is complete. In this state, the system automatically synchronizes any new or modified disk data from the source server to the target server. If you want to stop continuous synchronization and launch the target server, perform the operations described in Launching a Target Server.

- After the target server is launched, if there are data changes on the source server, you can synchronize the incremental data to the target server.
- After the migration and service cutover are complete, you need to adjust the configurations of the target server based on service requirements. For details, see What Configuration Items Do I Need to Modify for the Target Server After the Migration Is Complete?
Step 4: Synchronize Incremental Data
After the target server is launched, if there are data changes on the source server, you can synchronize the incremental data to the target server.
The data changes on the target server will be overwritten by the data synchronized from the source server. For details, see Will an Incremental Synchronization Overwrite the Existing Data on a Launched Target Server?
- In the server list, locate the source server you want to synchronize, and click Sync above the list, or choose More > Sync in the Operation column.
- In the Sync Incremental Data dialog box, carefully read the tips and enable Verify Data Consistency if needed. For details about this option, see How Do I Verify Data Consistency Between the Source and Target Servers? Then click OK.

Step 5: Clear Resources
After the migration is complete, if you confirm that no additional incremental synchronizations are required, you can delete the snapshots generated for cutover and synchronization during the migration.
Once these snapshots are deleted, incremental data synchronization will no longer be possible. Confirm that no additional synchronizations are required before performing this action.
- Select a server whose task status is Completed and for which incremental synchronization is no longer required. Click Delete Resources in the Migration Stage/Status column. Figure 2 Deleting resources

- In the displayed Delete Resources dialog box, enter DELETE in the text box or click Auto Enter and then click OK. Figure 3 Confirm the deletion

Resizing Disks and Partitions on Windows
- In the Migration Settings area, enable Resize Disks and Partitions and click Resize Disks and Partitions.
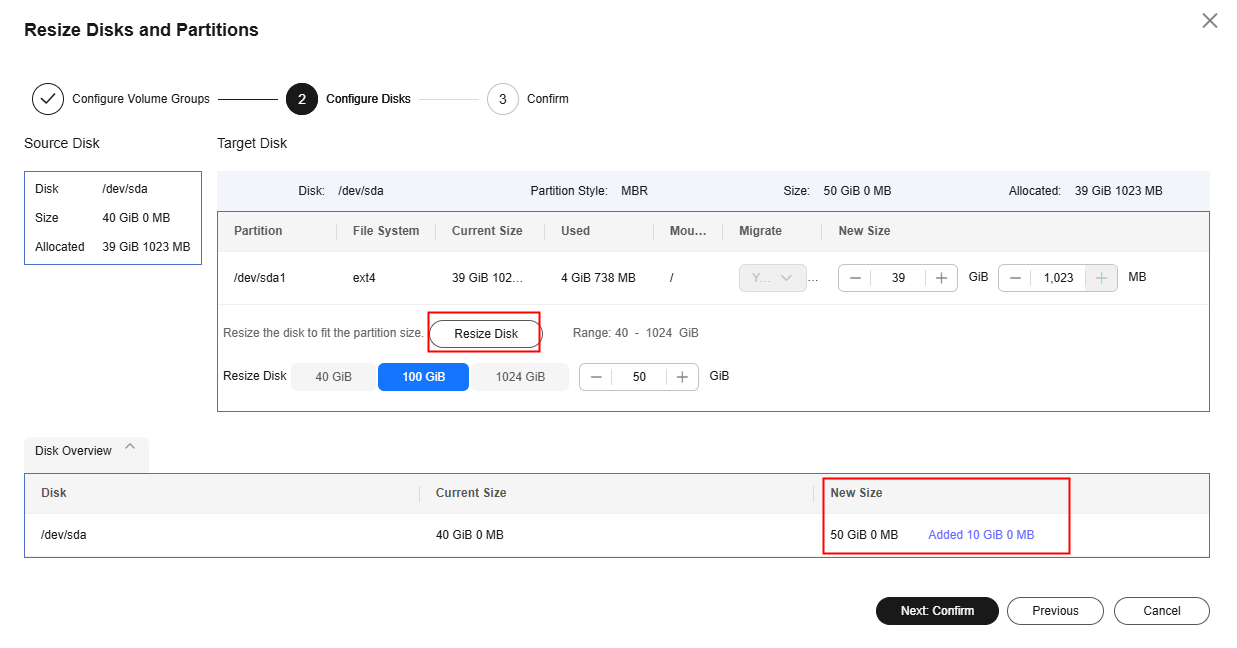
- Click Resize Disk and adjust the size of each disk as required. As shown in Resizing disks and partitions on Windows, you can view the resized disks at the bottom of the window.
- If the total partition size after resizing is larger than the disk size, you need to expand the disk capacity to fit the partition size.
- If the total partition size after resizing is much smaller than the disk size, you can downsize the disk.
- Click Next: Confirm. Confirm the configurations and click OK.
Once disks and partitions are resized, this function cannot be undone directly. To restore your original settings, locate the resizing task and choose More > Delete in the Operation column, and then restart the Agent on the source server to reconfigure your target server parameters.
Checking the Migration Drill Status and Report
If Migration Drill is enabled when you configure a migration task, you can check the migration drill status and report.
- In the server list, click the name of the source server to expand the migration task details.
- On the Task Progress tab, check the status and progress of the migration drill.
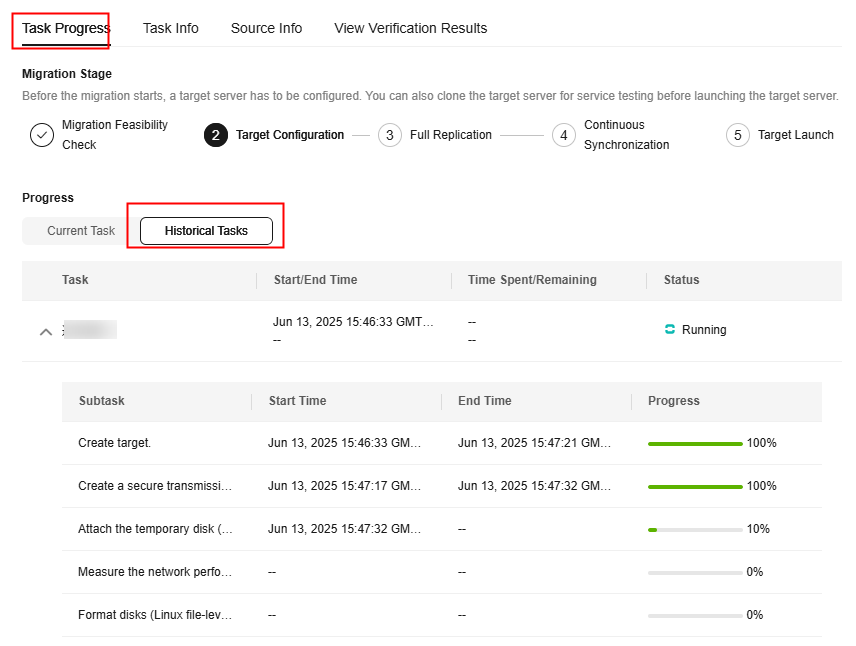
- In the upper part of the task details page, click View Report next to Drill Status. In the report displayed on the right, check the drill details, check items, and check results.

Helpful Links
If an error is reported during the migration, rectify the fault by referring to Error Codes and Solutions.
What is your overall rating for this page?
Thank you very much for your feedback. We will continue working to improve the documentation.See the reply and handling status in My Cloud VOC.
For any further questions, feel free to contact us through the chatbot.
Chatbot


