Getting Started with VOD
This section describes how to quickly get started with VOD.
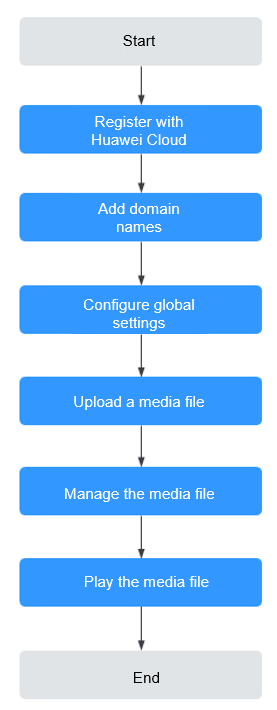
Process Flow

Registering with Huawei Cloud

If you subscribe to VOD not through the VOD console and a message is displayed prompting you to subscribe to VOD, you can perform the following operations.
- Register an account on the Registration page.
- Complete real-name authentication by referring to Individual Real-Name Authentication.
- Top up your account (≥ $0.15 USD) on this page to subscribe to and use VOD.
- Log in to the VOD console and subscribe to VOD as prompted.
Adding Domain Names
All domain names of the system have been assigned. If you do not have an assigned domain name after subscribing to VOD, you need to add licensed domain names to VOD for media file distribution acceleration.
- Log in to the VOD console.
- In the navigation pane, choose Domain Name Management.
- Click Add Domain Name. The Add Domain Name page is displayed.
Table 1 describes the required parameters.
Table 1 Adding a domain name Parameter
Description
Domain Name
Enter a licensed domain name.
- You can add a maximum of five domain names. Wildcard domains such as *.example.com are not allowed.
- You are advised to use a domain name higher than second level, for example, example.yourdomain.com.
Enterprise Project
If you have enabled the enterprise project function, you need to select Enterprise Project to categorize new domain names.
Service Scope
Service scope of the current domain name.
The options are as follows:
- Chinese mainland: Only users in the Chinese mainland can access the VOD content of the current domain name.
- Outside China: Only users outside the Chinese mainland can access the VOD content of the current domain name.
- Global: Global users can access the VOD content of the current domain name.
NOTICE:If the Service Scope you select involves cross-border data transfer, you shall be responsible for such transfer. For details, see section 2.3 "Processing Your Content Data" of Service Agreement.
- Click OK.
A domain name whose Status is Configuring is displayed in the domain name list. If Status becomes Enabled in 3 to 5 minutes, the domain name has been added.
After a domain name is added, the system assigns a CNAME value to the domain name.
- Configure the CNAME resolution at your DNS provider and check whether the CNAME takes effect. For details, see Configuring CNAME.
If the CNAME has not been configured and the domain name is enabled by default after it is added, media files in VOD may fail to be played and the thumbnail may fail to be displayed.
- Click Set as Default next to an added domain name to set the domain name to the default one.
Each account can only have one default domain in the Enabled state. After the setting, you need to enable HTTPS secure acceleration for the domain name and upload the HTTPS certificate so that the domain name can be used on the VOD console.
(Optional) Configuring Global Settings
If you need to transcode, watermark, and encrypt media files or receive notifications, configure related settings before uploading these files to VOD and then select a template to process these files during or after upload.
- Create a transcoding template.
By default, the system template group is used for transcoding during media file upload. If you want to use a custom template, create a template by referring to Transcoding Settings.
- Create a watermark template.
Watermarks are added to a video during transcoding. If you want this, create a watermark template by referring to Watermark Settings.
If a watermark template is created and set as default, the watermark is added to your uploaded video by default. To disable watermarking, go back to the Global Settings page and cancel it.
- Configure security settings.
VOD provides encryption to protect your videos. If you need this, configure encryption parameters by referring to Security Settings. Switch on Encryption when creating a transcoding template. For details, see Transcoding Settings.
- Configure category settings.
If you need to categorize uploaded videos, configure video categories by referring to Category Settings.
- Configure event notifications.
If you want to receive task status, configure event notifications by referring to Notification Settings.
Uploading a Media File
Local upload is used as an example to describe how to upload media files to VOD.
- Log in to the VOD console.
- In the navigation pane, choose Audio and Video Uploads > Local Upload.
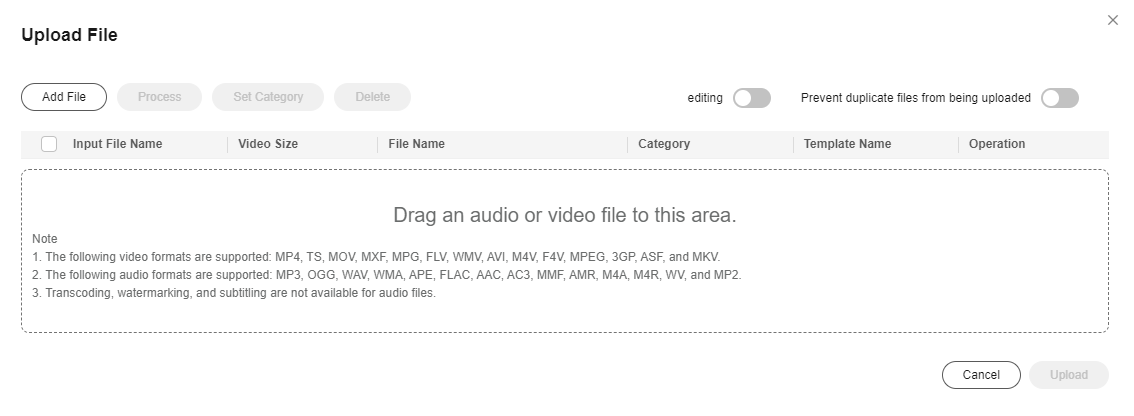
- Click Upload File. The Upload File dialog box is displayed.
- Click Add File to add a local media file, or directly drag a file to the file area.
Figure 1 Local upload

- Switch on Preventing Duplicate File Uploads to avoid waste of time and storage space.
Set this parameter based on your needs. If you add an existing media file, an error message is displayed in the upper right corner.
- Categorize uploaded files, change the file name, or process them.
Figure 2 Processing media files

- If audio and video processing is not required, retain the default settings.
- If audio and video processing is required, click Process and configure parameters according to the following table.
Method
Transcoding Template/Workflow
Transcoding template group
Select a preset template group or create a template group by referring to Transcoding Settings.
Workflow
Select an existing workflow or create a workflow by referring to Workflow Settings.
- Click Upload.

The upload duration depends on the file size and network conditions. During the upload, do not refresh the page, clear the browser cache, or close the browser. If you do not perform any operation for a long time when uploading a large number of files, you will be logged out. As a result, the upload fails.
- View media file information on the Audio and Video Management page.
After a video file is uploaded, the system selects the first frame as the thumbnail by default. If a transcoding template group or workflow was configured during media file upload, the configured parameters will automatically apply to the media file processing.
Managing the Media File
- On the Audio and Video Management page, you can view media status and perform operations such as transcoding, pre-loading, categorizing, and exporting information.
Figure 3 Media file processing

- Click Details in the row containing your media file to view and modify file details, including the streaming URL, thumbnail URL, subtitle URL, label, description, category, and name. For details, see Audio and Video Management.
Figure 4 Media file details

Playing the Media File
You can preview a media file on the VOD console or play it using a third-party player.
- Preview on the console: On the Audio and Video Management page, click the video thumbnail to preview a video.

To preview a media file on the console, ensure that HTTPS secure acceleration has been enabled for the domain name and the HTTPS certificate has been uploaded.
- Play a video using a player: Click Details on the right of the video row, click the Playback tab, click the copy icon in the Operation column to copy the streaming URL, and enter the copied streaming URL in the player such as VLC to play the video.
Feedback
Was this page helpful?
Provide feedbackThank you very much for your feedback. We will continue working to improve the documentation.See the reply and handling status in My Cloud VOC.
For any further questions, feel free to contact us through the chatbot.
Chatbot


