

Transcoding Settings
You can transcode an audio/video file during or after upload using one of the four system templates or a custom template. To receive notifications about transcoding results, configure notifications before you start transcoding.
Scenarios
Audio and video distributed by VOD may be referenced by product websites and video websites or be played on devices like PCs and smartphones. VOD provides transcoding to change the audio/video encoding format, container format, resolution, and bitrate to adapt to different scenarios, devices, and network environments.
The transcoding function helps you achieve:
- Compatible with different devices. You can transcode the source audio/video into formats such as MP4 for playback on a wide range of devices.
- Adaptation to different network environments. You can set the output bitrate based on the network bandwidth.
- Low distribution costs. H.265 codec and low-bitrate HD can reduce the bitrate by about 20% without changing the resolution, thereby reducing media file distribution costs.
- HLS encryption. You can enable HLS encryption during transcoding to prevent secondary distribution if a media file is stolen.
- Copyright protection. You can add watermarks such as logos to your video.
- Audio extraction. Audio files can be extracted during transcoding. This function is used for those requiring audio only, such as radio stations and audio apps.
- Video extraction. You can disable audio and output video only.
Transcoding Template Introduction
- non_transcoding_template_group: This template does not transcode audios/videos. If you do not select any transcoding template, this template takes effect by default.
- system_template_group: In this template, resolution, bitrate, and frame rate are preconfigured. If you are not familiar with these parameters, you are advised to use this template.
- original_template_group: This template only changes the audio/video container format.
- adaptive_template_group: With image enhancement preconfigured, this template is ideal for repairing corrupt videos.
If you are familiar with audio/video parameters and system templates cannot meet your requirements, you can create a transcoding template.
Notes
- Input audios/videos of the following formats can be transcoded:
- Supported input audio formats: MP4, TS, MOV, FLV, MPG, MXF, WMV, ADTS, AVI, MKV, MPEG, VOB, RM, and MTS
- Supported input video codecs: H.264, H.265, MPEG-2, MPEG-4, MJPEG, WMV1/2/3, and ProRes 422
- Supported input audio codecs: AAC, AC3, EAC3, HE-AAC, MP2, MP3, PCM (s16le, s16be, s24le, s24be, DVD), and WMA
- To retain transcoded outputs of different formats, you need to submit a service ticket.
- If the source file is transcoded successfully but the output video is shorter than the original, this is related to the current transcoding mechanism.
- If the source contains a short abnormal segment, that segment is dropped. For example, if in a 10-minute video, the content becomes abnormal after minute 9, the transcoded video will be 9 minutes long, with the abnormal final minute removed.
- If the source contains a long abnormal segment, for example, more than 3 minutes, transcoding will fail.
- If the audio bitrate is set too high when the source file is transcoded to HLS, a black screen will be displayed during playback on iOS devices. You are advised to customize a transcoding template and set a lower audio bitrate to ensure that the audio-to-video bitrate ratio is 1:3.
Editing a System Template
A system template has common parameters such as video resolution and codec preconfigured. Before using a system template, you are advised to check whether the settings of the system template meet your requirements. If the settings do not, you can edit the system template.
- Log in to the VOD console.
- In the navigation pane, choose Global Settings > Transcoding Templates.
- Find the desired system template and click Edit. On the page displayed, modify template parameters.
The editable parameters vary depending on system templates.
- System template (system_template_group)
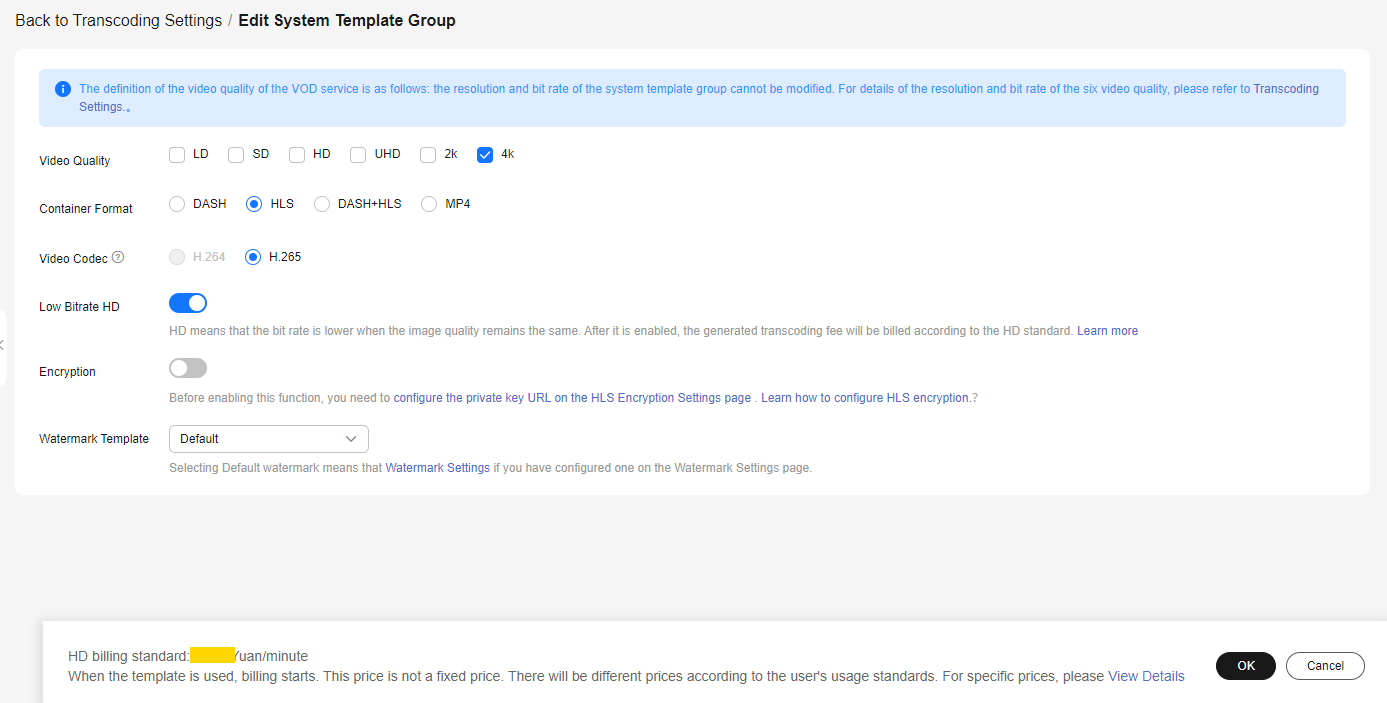
You can change the video quality, container format, video codec, and watermark template, and enable low-bitrate HD and encryption. Video Quality has six options: LD, SD, HD, UHD, 2K, and 4K, as shown in Table 3.
Figure 1 System template
- Container template (original_template_group)
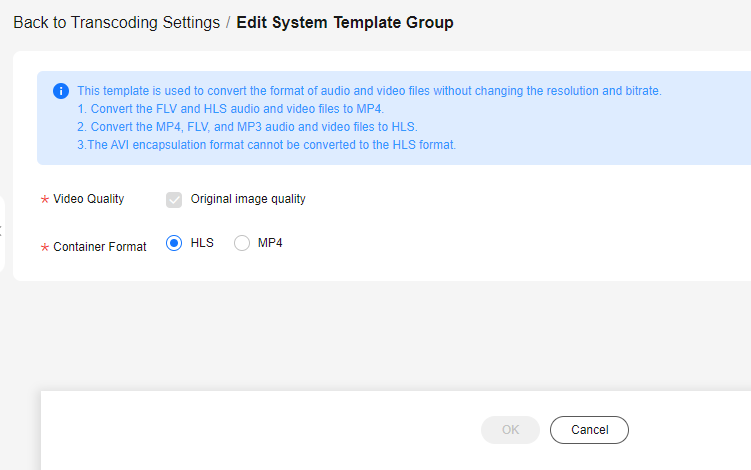
You can change the format from FLV/HLS to MP4, or from MP3/MP4/FLV to HLS.
Figure 2 Container template
- Adaptive template (adaptive_template_group)
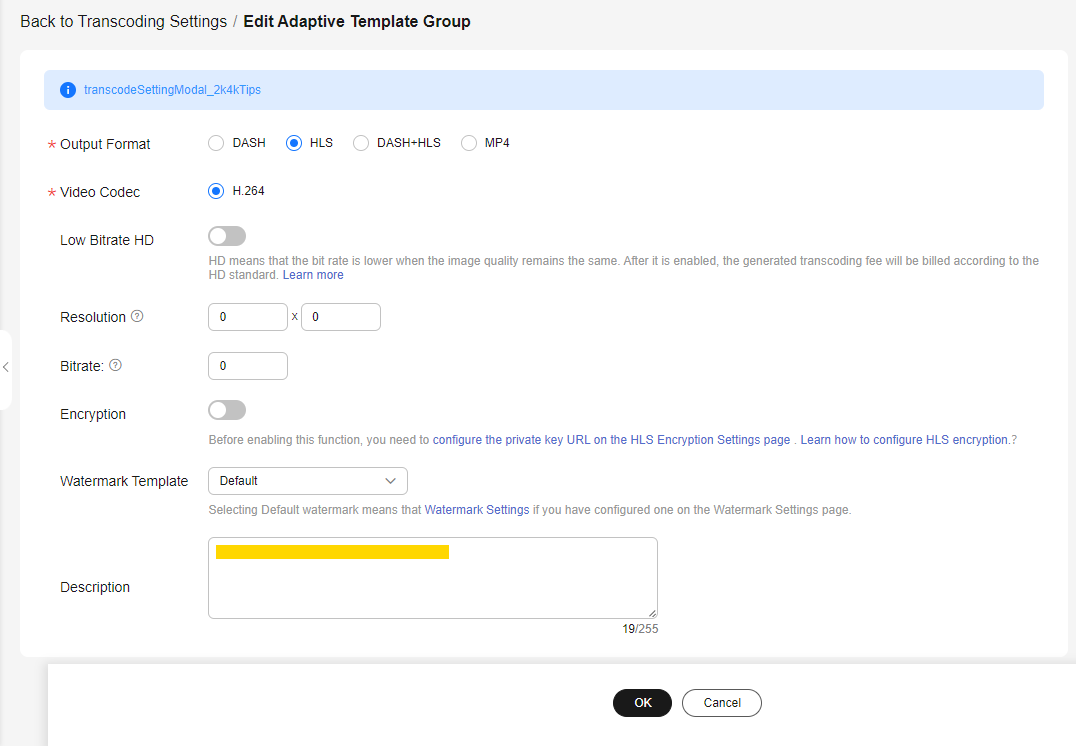
Video codec can only be H.264. You can change the resolution. If the resolution is not set, the input resolution is used by default. After enabling low-bitrate HD, you can use video enhancement.
Figure 3 Adaptive template
- System template (system_template_group)
- Click OK.
Creating a Template Group
If the preset templates cannot meet your requirements, you can create a template based on your needs. To customize an audio transcoding template, select MP3 or ADTS for Output Format.
- Log in to the VOD console.
- In the navigation pane, choose Global Settings > Transcoding Templates.
- Click Create Custom Template Group. In the dialog box displayed, specify related parameters.
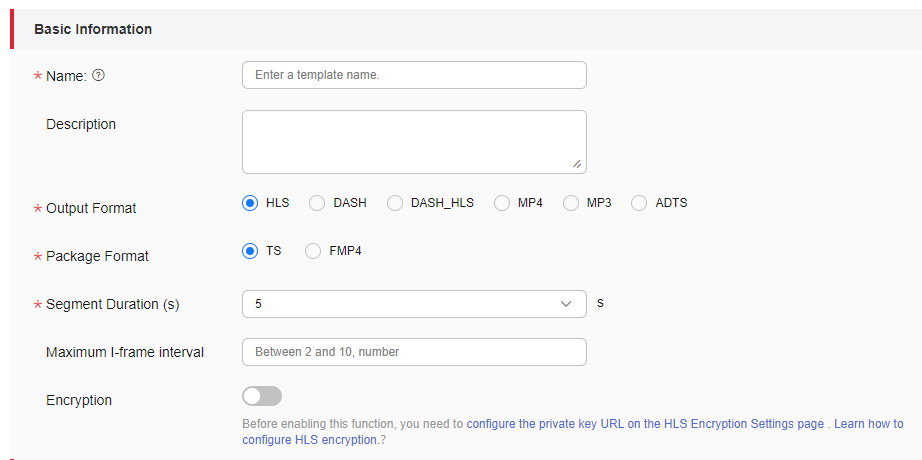
- Set Basic Information by referring to Figure 4 and Table 1.
Table 1 Parameters Parameter
Description
Name
A template name can contain a maximum of 128 characters in letters, underscores (_), and digits.
Example: MP4_H264
Description
Description of a custom template.
Output Format
- Supported video formats: MP4, HLS, DASH_HLS, and DASH
- Supported audio formats: ADTS and MP3
Note: If an audio format is selected, video parameters are disabled.
Package Format
Video container format.
This parameter is available only when Output Format is set to HLS or DASH_HLS.
Options:
- TS
- FMP4
Segment Duration (s)
HLS segment length. This parameter is available only when Output Format is set to HLS or DASH_HLS.
Different Segment Durations
Whether to enable variable-length segmentation, which controls playback startup time after transcoding.
This parameter is available only when Output Format is set to HLS or DASH_HLS.
If this function is enabled, you also need to set the following parameters:
- Initial Short Segments: specifies the number of segments before a video starts to play. The value is an integer ranging from 1 to 10.
- Short Segment Duration: specifies the duration of each initial short segment. The value is an integer ranging from 1 to 10, in seconds.
After these parameters are configured, playback can start more quickly.
Maximum I-Frame Interval
Maximum I-frame interval.
The value ranges from 1 to 10, in seconds.
Default value: 5
Encryption
Whether to encrypt output media files. Input audio/video files are not encrypted. This parameter is available only when Output Format is set to HLS. That is, only HLS audio/video files can be encrypted and output. Before enabling this function, obtain the key URL by referring to HLS Encryption Settings.
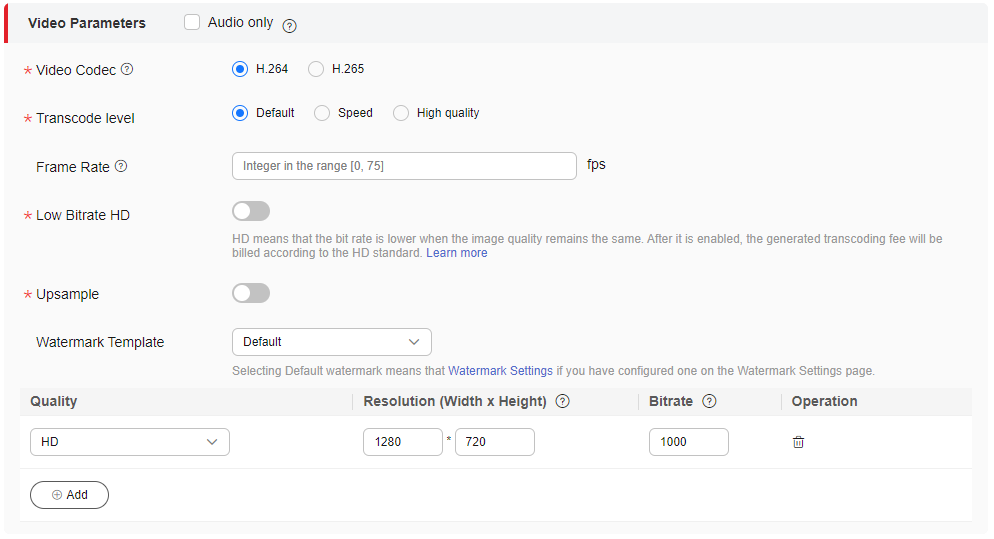
- Configure Video Parameters by referring to Figure 5 and Table 2.

If Audio only is selected, the output files do not contain any video information. Use this option to extract audio from a video file. Then perform 7 to configure audio parameters.
Table 2 Video parameters Parameter
Description
Video Codec
H.264 and H.265 are available.
Transcode level
Video encoding quality level.
Options:
- Default: The default mode is used.
- Speed: Efficiency is prioritized.
- High quality: Transcoded video quality is prioritized.
Frame Rate
Number of frames displayed per second.
The value is an integer ranging from 0 to 75. If the value is set to 0 or 1, the transcoded and input videos have the same frame rate.
Low Bitrate HD
Whether to enable low-bitrate HD.
Low-bitrate HD means achieving the same image quality with a lower output bitrate. If this function is enabled, the transcoding fee will be charged based on the low-bitrate HD standard. For details, see VOD Pricing Details.
Upsample
Enabling this function improves video resolution and increases the number of sampling points.
Watermark Template
Select the default watermark template or a custom watermark template.
- Select Default to use the default watermark template set in Watermark Settings.
- Select a custom watermark template to be used during transcoding.
Stream Name
Stream name of a transcoded video.
Quality
Video quality. The options are 4K, 2K, UHD, HD, SD, and LD.
Resolution (Width x Height)
The default value is the recommended resolution for your selected video quality. You can change it based on your needs.
- If the width or height is set to 0, the side set to 0 is scaled in proportion to the other side.
- When the width is 0 and the height is not, the width is scaled proportionally.
- When the height is 0 and the width is not, the height is scaled proportionally.
- If both the width and height are 0, the transcoded file uses the resolution of the input file.
Bitrate
The default value is the recommended bitrate for your selected video quality. You can change it based on your needs.
If the bitrate is set to 0, the recommended bitrate for your input file is used for output.
- There can be up to six outputs at different resolutions.
- If you change the default resolution for an output stream, you are billed based on the configured resolution. For details, see VOD Pricing Details.
You are advised to use the recommended resolutions and bitrates. For details, see Table 3.
Table 3 Recommended resolutions and bitrates Video Quality
Recommended Resolution
Recommended Bitrate for H.265 (kbit/s)
Recommended Bitrate for H.264 (kbit/s)
4K
3840 x 2160
5,600
8,000
2K
2560 x 1440
4,900
7,000
UHD
1920 x 1080
2,100
3,000
HD
1280 x 720
700
1,000
SD
854 x 480
500
600
LD
480 x 270
200
300
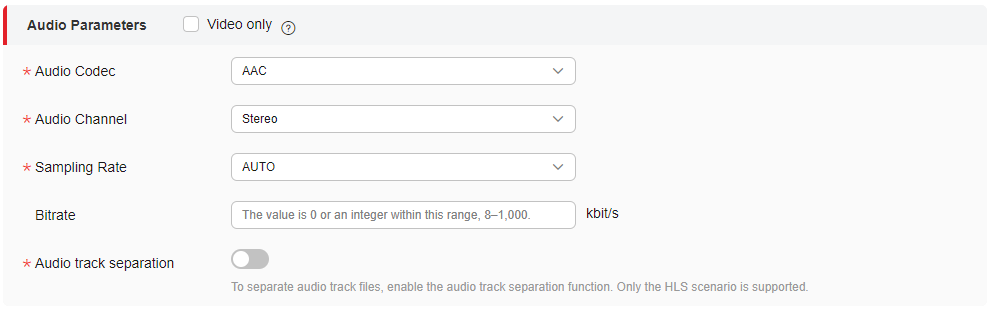
- Configure Audio Parameters by referring to Figure 6 and Table 4.
If Video only is selected, the output file does not contain any audio information. This option is used for video extraction from a media file.
Table 4 Audio parameters Parameter
Description
Audio Codec
Audio codec. AAC and HEAAC1 are available.
The default value is AAC.
Audio Channel
Number of audio sources during audio recording or number of speakers during audio playback. Stereo and Mono are available.
The default value is Stereo.
Sampling Rate
Number of times per second that the audio signal is sampled.
AUTO, 22050, 32000, 44100, 48000, and 96000 are available.
The default value is AUTO, and the unit is Hz.
Bitrate
Bitrate of an output audio, in kbit/s.
The value is 0 or an integer ranging from 8 to 1,000.
If this parameter is set to 0, the audio bitrate is an adaptive value. As a result, the audio bitrate of the transcoded file may be greater than that of the input video. So set this parameter to a proper value other than 0.
CAUTION:If the audio bitrate is set too high when the source file is transcoded to HLS, a black screen will be displayed during playback on iOS devices. You are advised to customize a transcoding template and set a lower audio bitrate to ensure that the audio-to-video bitrate ratio is 1:3.
Audio track separation
If the audio track file needs to be separated from the video file, toggle on this switch. This function is applicable only to HLS. The audio in the transcoded file is stored separately.
NOTICE:The Audio track separation and Customize the primary index file options are mutually exclusive. You can configure only one of them.
- Customize the primary index file, as shown in Figure 7. Table 5 describes the parameters you need to configure.

- If Disable the file name extension of the primary index is selected, you do not need to set the parameters.
- You can customize the primary index file only when Output Format is set to HLS.
- The Audio track separation and Customize the primary index file options are mutually exclusive. You can configure only one of them.
- Click OK.
You can view the created template on the Transcoding Settings page.

Editing or Deleting a Custom Template
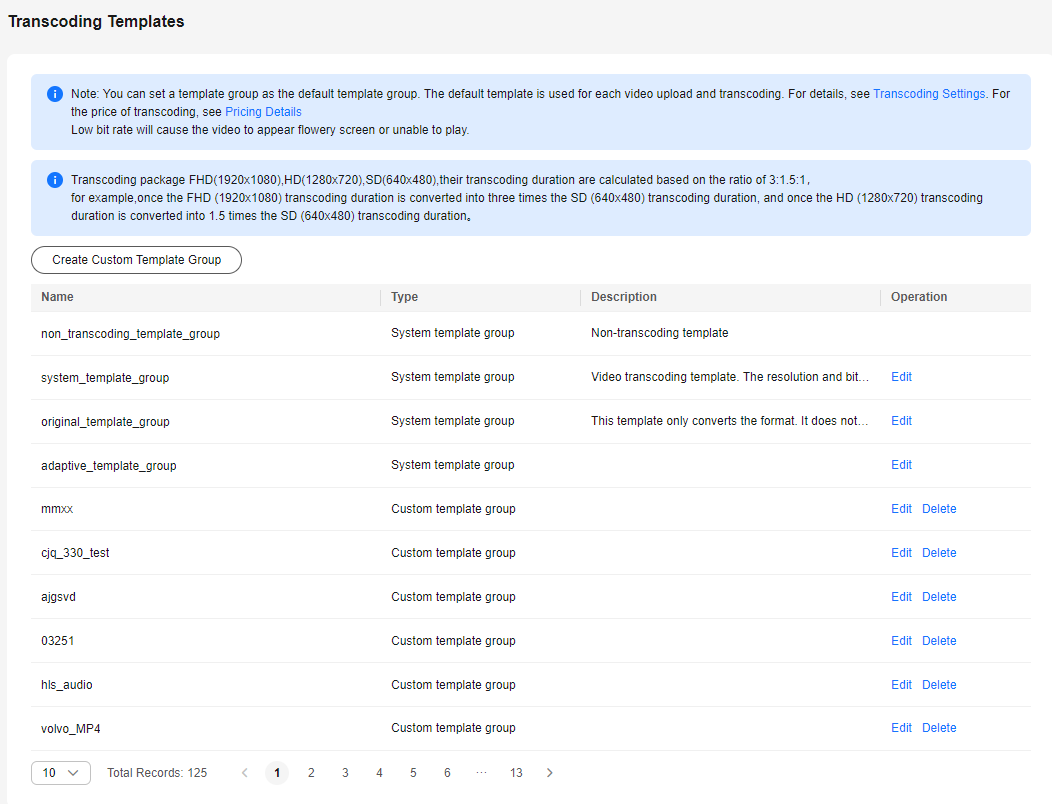
After a custom template is created, you can click Edit in the template list to modify the template. You can also click Delete to delete templates that you no longer need. If a template is deleted, audio/video using this template will not be deleted.
What is your overall rating for this page?
Thank you very much for your feedback. We will continue working to improve the documentation.See the reply and handling status in My Cloud VOC.
For any further questions, feel free to contact us through the chatbot.
Chatbot


