

Migrating Servers from Alibaba Cloud to Huawei Cloud
This best practice describes the detailed procedure and precautions for migrating servers from Alibaba Cloud to Huawei Cloud.
Precautions
Before creating a server migration workflow, read and understand the items below.
| Item | Remarks |
|---|---|
| Source download bandwidth | Used to download the SMS-Agent to source servers.
|
| Migration bandwidth |
|
| Available CPUs and memory |
|
| OS compatibility | For details, see Supported OSs. |
| Server migration statements | For details about the important statements you need to understand before the migration, see What Are the Important Statements of SMS? |
| Constraints | For details about the notes and constraints for server migration, see Notes and Constraints. |
| Billing | For details about the costs that may be incurred during the migration, see Billing. |
| Permissions configuration | IAM is used for fine-grained permissions management. For details, see Permissions Management. |
| Migration network and ports | For details about the requirements for the migration network and ports, see How Do I Set Up a Secure Migration Network for Using SMS? |
| Changes in server configurations before and after migration | For details about the configurations that may change after the migration, see What Are the Differences Between the Source and Target Servers After the Migration? |
Preparations
To ensure a smooth migration, you need to make the following preparations.
- Preparing a Huawei Cloud Account
Before using MgC, prepare a Huawei Cloud account or an IAM user that can access MgC and obtain an AK/SK pair for the account or IAM user. For details, see Preparations.
- Obtain an AK/SK pair for your Alibaba Cloud account. Check whether your Alibaba Cloud account has an AK/SK pair and has the AliyunECSReadOnlyAccess permission. If it does not have one, perform the following steps to generate an AK/SK pair and add the required permissions for it:
- Sign in to the RAM console using your Alibaba Cloud account.
- In the navigation pane on the left, choose Identities > Users.
- On the Users tab, click Create User.
- On the Create User page, in the User Access Key area, click Create Access Key.
- Assign permissions to the RAM user.
On the Users page, click Add Permissions in the Operation column and grant the AliyunECSReadOnlyAccess permissions to the RAM user.

- Create an application migration project.
Create a migration project on the MgC console. For details, see Managing Migration Projects. Set Project Type to Application migration.
Step 1: Install the MgC Agent
Install the MgC Agent on the prepared Windows server in the source network, connect it to the MgC console, and add the source server credentials for migration. The procedure is as follows.
3. Connecting to the MgC Console
- Sign in to the MgC Agent console.
- On the Overview page, click Connect to MgC in the upper right corner.
- In the Step 1: Select Connection Method area, select Huawei Cloud Access Key. Select the region where the project is created on MgC, enter an AK/SK pair of your Huawei Cloud account, and click List Migration Projects. After the MgC Agent is authenticated using the entered AK/SK pair, you can go to the next step. If the system displays a message indicating that the AK/SK pair is incorrect, try to rectify the fault by following the instructions in What Can I Do If the AK/SK Verification Fails?

If your source servers need to be migrated, the entered AK/SK pair must have permissions to use SMS. For details, see SMS Custom Policies.
- In Step 2: Select MgC Migration Project, select a migration project from the project drop-down list. The MgC Agent will report the collected information about your source resources to this project.
- In Step 3: Preset MgC Agent Name, specify a name for the MgC Agent, which will be displayed on the MgC console, and click Connect. Confirm the connection to MgC, and click OK.

After the MgC Agent is connected to MgC, the name you specified here cannot be modified.
- If Connected shows up on the overview page, the connection to MgC is successful.

4. Adding Credentials of the Source Servers
The following describes how to add credentials for each source server. This approach is recommended for a small number of servers. For large-scale environments, bind credentials during the migration readiness check.
- In the navigation pane, choose Credentials.
- Click Add Credential above the list. Figure 1 Adding a credential

- Configure credential parameters based on Table 1.
Table 1 Parameters for adding server credentials Parameter
Description
Resource Type
Select Server.
Type
Select the OS type of the server.
Credential Name
Enter a custom credential name.
Authentication Method
Select Username/Password.
Username
Enter the username and password for logging in to the server. The credential you provided must have sufficient permissions, so the MgC Agent can collect necessary server details. The requirements for server credentials are as follows:
- Linux: root and its password
- Windows: administrator and its password
Password
IP Addresses
Set it to a single IP address or an IP address segment based on the source network configuration.
- Set a credential validity period. The options for setting the validity period include:
- Custom: Set the validity period of the credential, in days. The validity period starts when you click OK to save the credential. After this period ends, the credential becomes invalid. The default period is 60 days. You can specify an integer ranging from 1 to 365. If needed, you can extend the validity period for the credential when it is in the Unexpired, Expire soon, or Expired state.
- Unlimited: The credential remains valid permanently. You can manually delete the credential when it is no longer needed.
- Click OK to save the credential. If the MgC Agent is connected to MgC, the added credential will be automatically synchronized to MgC.
Step 2: Discover Alibaba Cloud ECSs
- Sign in to the MgC console. In the navigation pane, under Project, select your application migration project from the drop-down list.
- In the navigation pane, click Resource Survey.
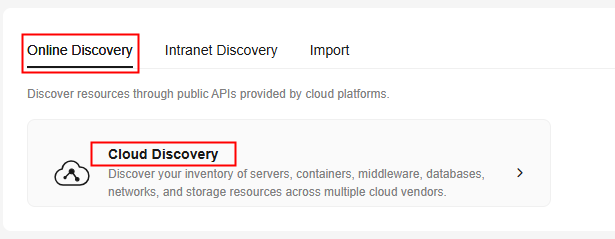
- Under Online Discovery, click Cloud Discovery. Figure 2 Cloud discovery
- Configure the parameters based on Table 2.
Table 2 Parameters for creating an Internet-based discovery task Area
Parameter
Description
Task Settings
Source
Select Alibaba Cloud.
Credential
Select the credential for accessing Alibaba Cloud. If the credential has not been added, click Add Credential to add it.
NOTICE:When adding the credential, select AK/SK for Authentication and enter the AK/SK pair of your Alibaba Cloud account. Your account must have the AliyunECSReadOnlyAccess permissions.
Region
Select the region where the source servers are located. You can select multiple regions.
Resource Type
Select Servers from the drop-down list.
Basic Information
Task Name
The default name format is <task type>-<current-time>. You can also specify a name.
Task Description (Optional)
Describe the task.
Application (Optional)
An application is a group of resources that need to be migrated together. You can add resources to or remove resources from an application as needed. You can use the application to get recommendations for target resources and create a workflow to migrate the source resources.
- If an application is available, select the application from the Application drop-down list.
- If no application is available, click Create Application. In the displayed dialog box, enter an application name and description, select a business scenario, environment, and region (where you are migrating to), and click OK.
- Click Confirm. After the online discovery task is created, MgC starts discovering source resources.
- If the task succeeds, return to the Source Resources page and view the list of discovered source resources and their details.
- If the task fails, click the task name to view the data source that fails to be collected. Hover over the collection status to view the failure cause.
Step 3: Create a Migration Task
- Sign in to the MgC console. In the navigation pane, under Project, select your application migration project from the drop-down list.
- In the navigation pane, choose Server Migration > Bulk Servers.
- Click Create Migration Task.
- Use the default task name or create one. Enter the task description (optional).
- Click OK to complete the task creation.
Step 4: Configure the Migration Task
This step includes five phases.
Phase 1: Select Source Resources
- On the Select Source Resources page, select a platform from the Source Platform drop-down list.

- The subsequent procedure depends on the source platform. Ensure that all servers included in the task come from the same platform.
- If you want to collect server resources using SMS, set Source Platform to SMS Agent.
- Click Add under Source Servers.
- Select the source servers to be migrated and click Confirm.
All servers in a migration task share the same settings (e.g., VPC, subnet, and security group). Verify your server selection before proceeding.
- Click Next to access the Check Migration Readiness page.
Phase 2: Check the Migration Readiness
- Configure server credentials. There are two methods for you to do this.
The credentials you provide must have sufficient permissions, so the MgC Agent can collect necessary server details. The requirements for server credentials are as follows:
- Linux: root and its password
- Windows: administrator and its password
- Manual addition: You can choose this method if you configure credentials for a small number of servers. For more information, see Adding Resource Credentials.
- Batch addition: You can choose this method if you configure credentials for a large number of servers.
- On the Check Migration Readiness page, click Associate Credentials above the list of servers to be migrated to download the template for configuring credentials in batches. Open the template file, enter the credential information (username and password) of all servers in the current migration plan, and save the file.

- Import the saved template file to the MgC Agent you connected to MgC. The system automatically configures the MgC Agent and credentials for the servers.
- On the Check Migration Readiness page, click Associate Credentials above the list of servers to be migrated to download the template for configuring credentials in batches. Open the template file, enter the credential information (username and password) of all servers in the current migration plan, and save the file.
- On the Check Migration Readiness page, in the list of servers to be migrated, click Configure in the MgC Agent column to configure an MgC Agent for each server.
- Configure the parameters based on Table 3.
Table 3 Parameters for configuring migration readiness check Parameter
Configuration
OS Type
Set this parameter based on the source server OS type.
MgC Agent
Select the MgC Agent installed in the source environment.
Access IP Address
Select the IP address for accessing the source server. It can be a public or private IP address. After the migration readiness check is passed, the IP address you specify here will be used for migration.
Access Port
Enter the accessible port of the source server. This port is used for deep collection and subsequent migration.
- The port defaults to 5985 for Windows. You can change it to any port that is accessible on the source server.
- The port defaults to 22 for Linux. You can change it to any port that is accessible on the source server. NOTE:
To change the connection ports of source servers in batches, use the Change Port button above the list.
Credential
Select the server credential added to the MgC Agent. If batch credential association is performed, the system automatically fills in the credential, and you do not need to select it.
- Click Confirm. The system checks whether the source server can be accessed using the information you provide and whether the server can be migrated. If Completed shows up in the Migration Readiness Check column, the source server can be migrated.
If the check fails, move the cursor to Check failed in the Migration Readiness Check column to view the failure cause. After rectifying the fault, click Check Again.

- After all the source servers pass the readiness check, click Next to configure target servers.

Phase 3: Configure Target Servers
There are two methods for configuring target servers.
- Associating source servers with target servers:
If you have ECSs on Huawei Cloud, you can associate them with source servers for receiving migrated data.
These ECSs should meet the following requirements:
- It must be stopped. If the target server is running, stop it first.
- It can be formatted. During the migration, the target server must be formatted, so it can receive data migrated from the source server.
- It can access the Internet if you are migrating over the Internet.
- On the Configure Target page, select Associate existing target servers for Configuration Method.
- In the Target Region drop-down list, select the region where the existing target servers are located. For Project, the default IAM project in the selected region is used.
- Locate a source server and click Associate Target in the Operation column.
- Select the desired target server and click Confirm.
- Purchasing new target servers:
The system automatically purchases target servers based on the configured specifications. However, if the source servers have dynamic disks, you need to purchase target Huawei Cloud ECSs in advance, and bind the source servers to the target servers.
- On the Configure Target page, select Purchase new target servers for Configuration Method.
- Select a method for configuring target servers.
- Method 1: Generating target recommendations. You can choose to let the system recommend you right-sized Huawei Cloud servers based on the source server specifications. In the migration process, the system will automatically purchase target servers based on your settings.
- In the source server list, select the ones for which you want to generate target recommendations. Then click Generate Target Recommendations above the list.
- Configure an assessment policy based on Table 4.
Table 4 Settings used for computing target recommendations Parameter
Description
AZ
Select an AZ for your target server. The system will provide a recommendation based on your selection.
Priority
Preferences
Configure your preferences for target servers. The system will prioritize your preferences and try to match them first during the recommendation process. For details about how the system recommends appropriate target resources, see How Does MgC Generate Target Server Recommendations?
- Server Types (Optional)
- Server Series (Optional)
Select the server series you prefer. The system will generate recommendations based on your preferred server types and series.
NOTICE:If you select Display only series allowed on DeHs, the server series allowed on DeHs in the target region will be listed, and Server Types will be dimmed.
- System Disk (Optional)
- Data Disk (Optional)
- Sizing Criteria
Choose the criteria that the system will use to generate server recommendations. If the source servers are from the SMS Agent source platform, this function is not supported.
- If you select As-in on source, the system will recommend target servers with the same or similar CPU and memory capacities as the source servers.
- If you select Performance-based, you need to perform a performance collection for the source servers, and then set assessment parameters. The system will then recommend target servers with your desired CPU and memory capacity. NOTICE:
The more performance data is collected, the more accurate the recommendations are. It is recommended that the server performance data be collected for at least seven days.
- Click Confirm. If Configured shows up in the Target Configuration column, the target recommendations are generated. You can check the recommended configurations in the next two columns.
- Method 2: Defining target server specifications in batches. You can manually configure target server specifications. Before proceeding with this method, carefully assess any associated risks. It is also essential to ensure that the chosen specifications meet your system requirements and compatibility standards.
- In the source server list, select the servers for which you want to manually configure target server specifications. Then, click Configure Target above the list or click Configure Target in the Operation column of a specific server. The Configure Target page is displayed on the right pane.
- On the Target Specifications page, select the target AZ. Servers under the AZ will be displayed. Then, select the target server specifications as required.
- (Optional) Apply images instantly. The system disk size of the target server must be greater than the minimum disk size (minDisk) required by the image. To configure images and system disk specifications for multiple servers, you can use the function of applying images instantly to apply the same image and system disk specifications to selected servers. During batch configuration, the system automatically verifies whether each server meets the minimum disk size requirement. If a server does not meet the requirement, the system automatically adjusts the system disk size. Data disk settings remain unchanged. This operation requires manual review. You are responsible for assessing any associated risks. Before applying an image, ensure that it meets your system requirements and compatibility expectations.
- Click Apply. The Apply Image Instantly page is displayed.
- The system automatically sets the system disk size based on the value of minDisk. You can also manually adjust the size. After confirming that the system disk specifications of all servers meet the requirements, click Confirm to apply the current image to all selected servers instantly.
- In the Target Disks area, select a storage type and size for each target server disk.
- Click Confirm. Manual will appear in the Target Configuration column.
- Method 3: Importing target server configurations. You can export the server records, configure target server flavors, disks, and images, and then import the records back. Some technical expertise is needed for this process.
- In the list of source servers, choose Export/Import Target Configuration > Export Target Configuration to download the server records as an Excel file to the local PC.
- Open the exported file. On the first sheet named servers, the blue columns (A to G) indicate the source server information, which does not need to be modified. The yellow columns (H to K) indicate the target server information, which needs to be configured.
- Configure the target server information (in columns H to K) according to Table 5.
Table 5 Parameters in columns H to K Parameter
Configuration
flavor
Specify a flavor for each target server. The second sheet flavors lists the flavors in S (general-purpose) and C (computing-plus) server series available in the target region. Choose a proper flavor and copy the flavor name to this cell.
NOTE:If a source server has been assessed, the recommended flavor is included in the exported file. If a source server has not been assessed, its flavor field is empty.
disks(name,osDisk,type,capacity;)
Enter the information about all disks. Separate multiple disks with semicolons (;). You must specify the name, function (system disk or not), type, and size for each disk. Separate these items with commas (,). Specify a disk size as a numeric value without a unit. The default unit is GiB.
Example: /dev/sda,true,SAS,1024;/dev/sdb,false,SAS,2046
NOTE:If a source server has been assessed, the recommended disk specifications show up in the exported file. If a source server has not been assessed, the source disk specifications remain in this column, but the disk type changes to SAS by default.
image_type
Enter an image type. The options are:
- public: public image
- private: private image
- shared: shared image
image
Enter an image name. You can view all images available in the target region on the third sheet images.
- After configuring a target server for each source server, save the Excel file. Return to the MgC console. Choose Export/Import Target Configuration > Import Target Configuration above the list of source servers.
- In the displayed dialog box, click Access OBS.
- Select a bucket and upload the Excel file to the bucket.
- After the upload is successful, return to the MgC console. In the Import Target Configuration dialog box, select the file stored in the OBS bucket from the drop-down list.
- Click Confirm to import the target server configurations.
- If the flavor field is empty in a row, this row will be ignored during the import.
- If the disk or image field is left empty in a row, the source server's disk and image information is used during the import.
- If the number in the disk field in a row is inconsistent with what the source server actually has, an error message is reported, indicating that the disk numbers are inconsistent.
- If in a row, the disk type conflicts with the flavor, an error message will be reported, indicating that the disk type is incorrect.
- Method 1: Generating target recommendations. You can choose to let the system recommend you right-sized Huawei Cloud servers based on the source server specifications. In the migration process, the system will automatically purchase target servers based on your settings.
- (Optional) Configure the target network. If the target network has access restrictions or requires a transit node for communication, you can use the target transit IP address and port configuration function to specify the transit IP address and SSH port range (22 to 65535). The configuration information will be integrated into the migration task through the dynamic parameter transfer mechanism to ensure network path reachability and migration task continuity during the migration.
After a migration task is created, the transit IP address and SSH port cannot be changed.
- In the upper right corner of the source server list, enable Configure target network. After this function is enabled, the Transit IP Address and SSH Port columns are added to the list of source servers.
- In the Transit IP Address column, enter the IP address of the transit proxy server.
- In the SSH Port column, enter the migration port of the target server. It defaults to 22. If port 22 is occupied, you can use one from 22 to 65535.
The functions of the port are as follows:
- For Linux servers, this port is used to establish transmission channels and transmit data.
- For Windows servers, this port is used to establish transmission channels.
- (Optional) Configure a DeH to receive applications and data migrated from source servers. After the binding, the target server will be automatically created on the DeH you bound during the migration.
- In the upper right corner of the source server list, enable Use DeH.
- Select the source servers and choose DeH Configuration > Associate DeH above the list.
- Select the target DeH to be associated from the drop-down list and click Confirm. Associated will show up in the DeH column. You can click Details to view the associated DeH.
- Configure a target environment based on Table 6.
Table 6 Parameters for configuring a target environment Parameter
Configuration
VPC
Select a VPC for the target servers from the drop-down list. For details about how to create a VPC, see Creating a VPC.
- If the source IP address is 192.168.X.X, you are advised to create a VPC and a subnet that both belong to network range 192.168.0.0/16.
- If the source IP address is 172.16.X.X, you are advised to create a VPC and a subnet that both belong to network range 172.16.0.0/12.
- If the source IP address is 10.X.X.X, you are advised to create a VPC and a subnet that both belong to network range 10.0.0.0/8.
Subnet
The subnet has to be in the same network segment as the VPC.
Security Group
The selected security group must:
- Allow inbound ports 8899, 8900, and 22 required for Windows migrations.
- Allow inbound port 22 required for Linux file-level migrations. CAUTION:
- For security purposes, you are advised to only allow traffic from the source servers on these ports.
- These ports must also be opened on the firewalls of target servers.
For details about how to create a security group, see Creating a Security Group.
Disk Encryption
- If this option is not selected, the system and data disks of target servers created during the migration will remain unencrypted.
- If this option is selected, the system and data disks of target servers created during the migration will be automatically encrypted. NOTE:
- This setting applies to all target servers newly created in the migration task. Their disks will be encrypted using the same key.
- Once a disk is created, the encryption attribute of the disk cannot be modified.
- Keys can be shared with accounts, not IAM users.
To enable disk encryption, you need to create an agency to authorize EVS to access KMS. If you have the right to grant the permissions, grant the KMS access permissions to EVS directly. Once the authorization succeeds, you no longer need to perform the authorization again. If you do not have the right to grant the permissions, contact a user with the Security Administrator permissions to grant you the right and then repeat the preceding operations. After the authorization is successful, configure the following parameters:
- Select an existing key. Only enabled keys generated using the AES_256 encryption algorithm are supported.
Select a key from the drop-down list. You can select one of the following keys:
- Default keys: After the KMS access permissions have been granted to EVS, the system automatically creates a default key and names it evs/default.
- Custom keys: You can choose an existing key or create a new one. For details about how to create a key, see Creating a Key.
- Enter a key ID
Enter the ID of a key shared from another user. Ensure that the key is in the target region. For details, see Creating a Grant.
Enterprise Project
Select the enterprise project you want to migrate to. The enterprise project default is selected by default. For details about enterprise projects, see What Is Enterprise Project Management Service?
Tags
You can add tags to the target servers automatically created by the system to facilitate resource management.
Click Add Tag and enter a tag key and tag value. For details about tags and tag naming rules, see Tag Overview.
To add the same tag to multiple servers or other types of resources, you can create a predefined tag on the TMS console and then select it for the servers or resources. This frees you from repeatedly entering tag keys and values. For details, see Creating Predefined Tags.
Step 5: Track the Migration Task
| Scenario | Operation |
|---|---|
| Checking migration details | Click a resource name. On the Resource Details page displayed on the right, check the basic information, migration status, and migration progress. |
| Checking a target server | After the step CreateTargetServer is completed for a resource, choose More > View Target Resource in the Operation column to review details about the target server. |
| Checking an SMS task | After the step StartUpAgent is completed for a resource, a migration task is automatically created on the SMS console. To check the details on the SMS task, click View Migration Task in the Operation column. |
| Resizing disks and partitions | When the workflow on a resource reaches the ResizeDiskPartition step, the system identifies whether the target server's disk capacity has been reduced.
|
| Pausing a resource migration | You can pause the migration of a single resource in a migration task. During the migration, when the resource reaches the full or incremental replication step, you can click Pause in the Operation column to pause the migration of the resource. To resume the migration, click Run in the Operation column. NOTICE: After the migration of a resource is paused, do not perform any operations on the corresponding migration task on the SMS console. |
| Repeating incremental synchronization | The StartSynchronization step can be repeated. When a resource reaches the BusinessValidation step and the resource status is Not confirmed, select the resource and click Run Previous Step above the resource list. Alternatively, choose More > Run Previous Step in the Operation column of the resource to repeat incremental synchronization. CAUTION: You are not advised to perform incremental synchronization on the SMS console. Otherwise, the migration task status on the MgC console may differ from that on the SMS console, causing abnormal task running. |
| Verifying services | When the workflow on a resource reaches the BusinessValidation step and there is no more incremental synchronization, verify services on the target server. After services pass the verification, click Confirm in the Operation column of the corresponding resource to enter the Complete cutover stage. |
| Switching traffic | The workflow moving to the Cutover step means that the target server has been verified and you can transfer services to the target server. After the switchover is complete, return to the task details page and click Confirm in the Operation column. The system automatically performs the subsequent SourceClear and MigrationTaskClear steps. |
Step 6: Verify Services
When the migration task reaches the service verification step for a server resource, log in to the target server to verify data consistency with the source server and start services to ensure proper operation. After completing verification, click Confirm in the Operation column of the server resource to proceed to the migration cutover phase.
- Log in to the target server using Virtual Network Computing (VNC). References:
The username and password for logging in to the target server are the same as those of the source server.
- Check whether the file list of the source server is the same as that of the target server.
- Start the applications or services on the target server and check whether they are running properly.
Step 7: Perform a Service Cutover
MgC does not provide the service cutover function.
When the migration reaches the service cutover step, services on the target server have been verified. At this point, you can redirect the service access layer to the target server to resume user services. The cutover mode varies with the application scope:
- One-off cutover: for small and medium-sized services
- Batch cutover: for large-scale services. Different from one-off cutover, this mode groups servers based on their complexity, and then migrates each batch at a time.
What is your overall rating for this page?
Thank you very much for your feedback. We will continue working to improve the documentation.See the reply and handling status in My Cloud VOC.
For any further questions, feel free to contact us through the chatbot.
Chatbot


