

Ingesting ECS Text Logs to LTS
ECSs are core computing resources that host many service applications. These applications generate text log data, including application and system logs. Such logs are essential for monitoring system health, optimizing performance, and troubleshooting. To better manage and analyze ECS text logs, you can ingest them to LTS. This centralizes log storage, enabling efficient log query, alarm reporting, and analysis.
Follow these steps to complete the ingestion configuration:
Step 1: Select a Log Stream: Store various log types in separate log streams for better categorization and management.
Step 2: (Optional) Select Host Groups: Define the range of hosts for log ingestion. Host groups are virtual groups of hosts. They help you organize and categorize hosts, making it easier to configure log ingestion for multiple hosts simultaneously. You can add one or more hosts whose logs are to be collected to a single host group, and associate it with the same ingestion configuration.
Step 3: Configure the Collection: Configure the log collection details, including collection paths and policies.
Step 4: Configure Indexing: An index is a storage structure used to query log data. Configuring indexing makes log searches and analysis faster and easier.
Step 5: Complete the Ingestion Configuration: After a log ingestion configuration is created, manage it in the ingestion list.
Setting Multiple Ingestion Configurations in a Batch: Select this mode to collect logs from multiple scenarios.
Constraints
- For constraints on ICAgent, see ICAgent Constraints.
- If a collection path of a host has been configured in AOM, do not configure it again in LTS. For details, see Configuring VM Log Collection Paths.
- When configuring log ingestion, you can select multiple host groups and add multiple hosts to a host group. This flexibility allows you to control log ingestion by setting different paths for various hosts and selecting multiple host groups.
- After LTS delivers the collection configuration, ICAgent collects files according to the following rules:
- New files (collected for the first time): If the last modification time of a file is more than 6 hours earlier than the current time, the file is not collected.
- Old files (not collected for the first time): If the last modification time of a file is more than 3 minutes earlier than the current time, the file is not collected.
- LTS cannot collect logs of PostgreSQL (database) instances.
- The maximum number of cursor files is 50,000. If this threshold is crossed, ICAgent stops adding new collection tasks.
Prerequisites
- You have the LTS operation permissions. For details, see Using IAM to Grant Access to LTS.
- A log group and a log stream have been created. For details, see Managing Log Groups and Managing Log Streams.
- An ECS (host) to collect logs from has been created. If you already have an available ECS, skip this step. For details, see Purchasing an ECS in Custom Config Mode.
- ICAgent has been installed on the host. For details, see Installing ICAgent (Intra-Region Hosts) or Installing ICAgent (Extra-Region Hosts) according to the location of your host.
- The host with ICAgent installed has been added to a host group. For details, see Managing Host Groups.
- To ensure that the host can properly report log data and use metrics, its security group must allow inbound ports 8149, 8102, 8923, 30200, 30201, and 80. For details, see Adding a Security Group Rule.
- Before configuring log ingestion, ensure that ICAgent collection is enabled by referring to Setting LTS Log Collection Quota and Usage Alarms.
- This function is enabled by default. If you do not need to collect logs, disable this function to reduce resource usage.
- After this function is disabled, ICAgent will stop collecting logs, and the log collection function on the AOM console will also be disabled.
Step 1: Select a Log Stream
- Log in to the LTS console.
- In the navigation pane, choose Log Ingestion > Ingestion Center. On the displayed page, select Running environments or Cloud services under Types. Hover the cursor over the Elastic Cloud Server(ECS) card and click Ingest Log (LTS) to access the configuration page. Figure 1 Accessing the ECS log ingestion configuration page
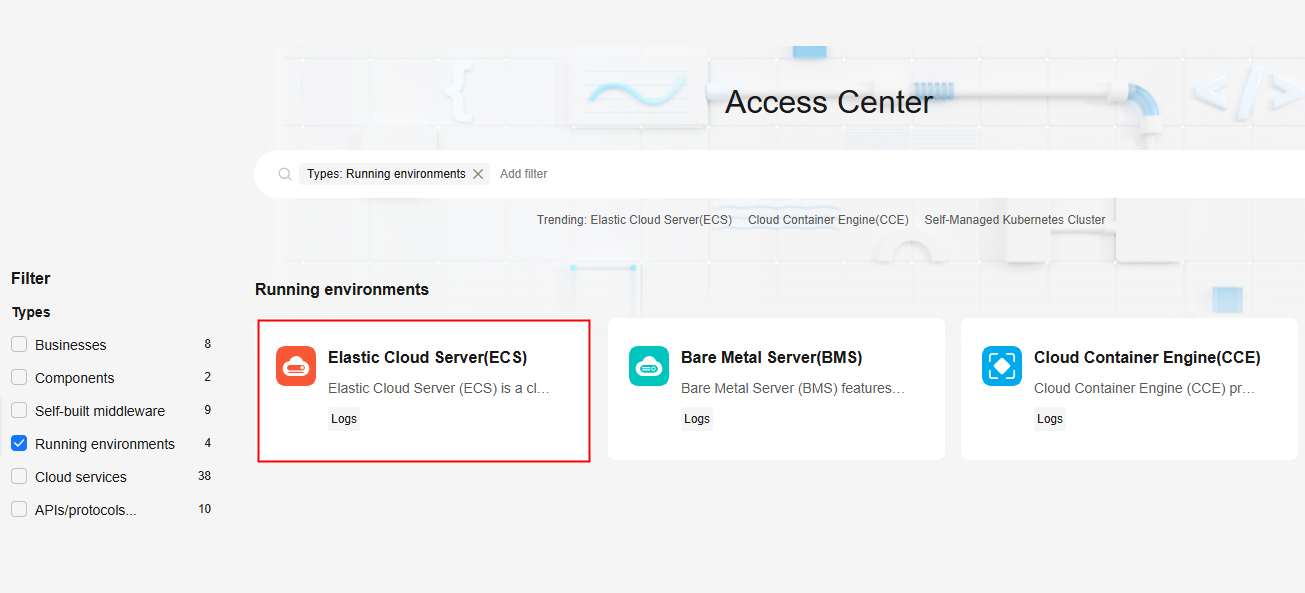
Alternatively, choose Log Ingestion > Ingestion Management in the navigation pane. Click Create. On the displayed page, select Running environments or Cloud services under Types. Hover the cursor over the Elastic Cloud Server(ECS) card and click Ingest Log (LTS) to access the configuration page.
- Select a log group.
- To use an existing log group: Select a log group from the Log Group drop-down list.
- To use a new log group: If there is no desired log group, click Create Log Group to create one. For details, see Managing Log Groups.
- Select a log stream.
- To use an existing log stream: Select a log stream from the Log Stream drop-down list.
- To use a new log stream: If there is no desired log stream, click Create Log Stream to create one. For details, see Managing Log Streams.
- Click Next: (Optional) Select Host Group.
Step 2: (Optional) Select Host Groups
A host group is a virtual group of hosts, allowing you to configure host log collection efficiently. Ensure that ICAgent has been installed on hosts where logs are to be collected and the hosts have been added to a host group.
- Select one or more host groups.
- To select existing host groups: In the host group list, select one or more host groups to collect their logs.

You can skip this step by not selecting any host group and clicking Next: Configurations, and then Skip in the subsequent dialog box. However, if you skip this step, the collection configuration will not take effect. It is advised to select host groups during the initial ingestion configuration.
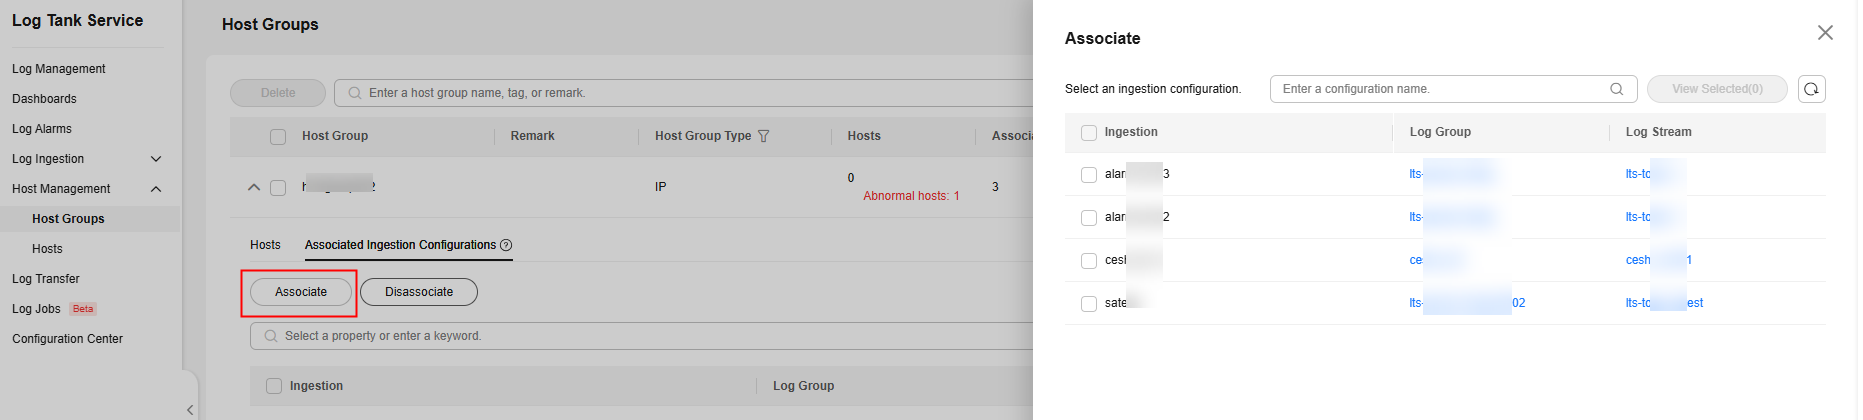
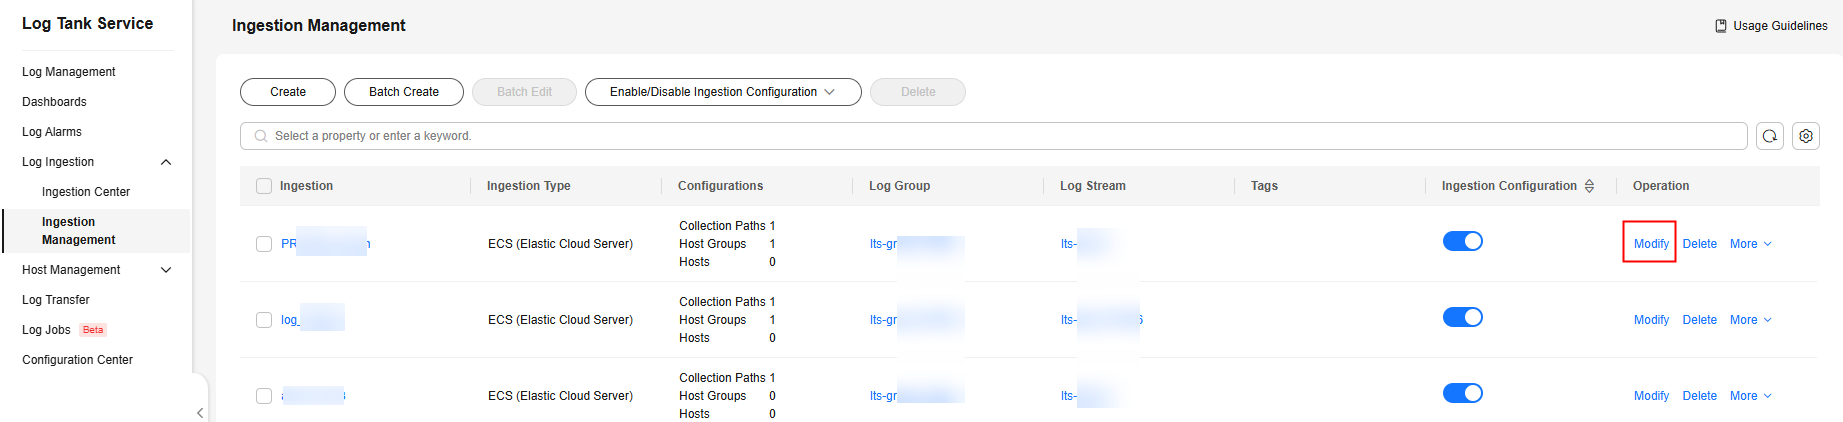
If you initially skip host group selection, you can associate host groups later using either method:
- Choose Host Management > Host Groups in the navigation pane and associate host groups with the desired ingestion configuration. For details, see Figure 2.
- After the ingestion configuration is created, choose Log Ingestion > Ingestion Management in the navigation pane. Click Modify in the Operation column of the desired ingestion configuration and associate it with host groups. For details, see Figure 3.
- If there are no desired host groups, click Create above the host group list. On the Create Host Group page, add hosts based on their ICAgent installation status.
- If ICAgent is already installed: Select the hosts with ICAgent installed under Add Host. For details, see Managing Host Groups.
- If ICAgent is not yet installed: Click Install ICAgent under Add Host. Select Intra-region hosts or Extra-region hosts based on the host location and proceed with the ICAgent installation. For details, see Installing ICAgent (Intra-Region Hosts) and Installing ICAgent (Extra-Region Hosts). After ICAgent is installed on the desired host, return to the ECS log ingestion page, click Create above the host group list again. The desired host will now be displayed under Add Host on the Create Host Group page.
Figure 4 Creating a host group

- To select existing host groups: In the host group list, select one or more host groups to collect their logs.
- Click Next: Configurations.
Step 3: Configure the Collection
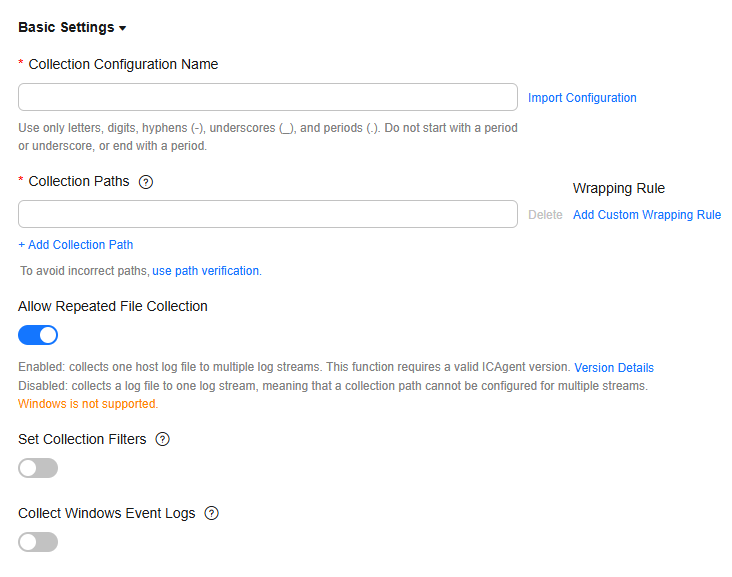
Collection configuration items include the log collection scope, collection mode, and format processing. Configure them as follows.

Protect your privacy and sensitive data. You are advised not to transmit privacy or sensitive data through fields involved in access logs. Encrypt the data if necessary.
Procedure
- Collection Configuration Name: Enter 1 to 64 characters. Only letters, digits, hyphens (-), underscores (_), and periods (.) are allowed. Do not start with a period or underscore, or end with a period.
- If you want to reuse existing collection configurations, click Import Configuration next to the text box. On the Import Configuration page, select a configuration and click OK.
- Import Old-Edition Configuration: Import the host ingestion configuration of the old version to the log ingestion of the new version.
- If LTS is newly installed and Import Old-Edition Configuration is not displayed, you can directly create a configuration without importing the old one.
- If LTS is upgraded, Import Old-Edition Configuration is displayed. Import the old configuration or create one as required.
- Collection Paths: Specify the paths from which LTS will collect logs. You can add up to 30 paths. The rules for setting collection paths are as follows:
- Logs can be collected recursively. A double asterisk (**) can represent up to 5 directory levels in a path.
For example, /var/logs/**/a.log will match the following logs:
/var/logs/a.log
/var/logs/1/a.log
/var/logs/1/2/a.log
/var/logs/1/2/3/a.log
/var/logs/1/2/3/4/a.log
/var/logs/1/2/3/4/5/a.log
- /1/2/3/4/5/ indicates the 5 directory levels recursively nested within the /var/logs directory. All the a.log files found in all these levels of directories will be collected.
- Only one double asterisk (**) can be contained in a collection path. For example, /var/logs/**/a.log is acceptable but /opt/test/**/log/** is not.
- A collection path cannot begin with a double asterisk (**), such as /**/test, to avoid collecting system files.
- You can use an asterisk (*) as a wildcard for fuzzy match. The wildcard (*) can represent one or more characters of a directory or file name.
If a log collection path is similar to C:\windows\system32 but logs cannot be collected, enable Web Application Firewall (WAF) and configure the path again.
- Example 1: /var/logs/*/a.log will match all a.log files found in all directories under the /var/logs/ directory:
/var/logs/1/a.log
/var/logs/2/a.log
- Example 2: /var/logs/service-*/a.log will match files as follows:
/var/logs/service-1/a.log
/var/logs/service-2/a.log
- Example 3: /var/logs/service/a*.log will match files as follows:
/var/logs/service/a1.log
/var/logs/service/a2.log
- Example 1: /var/logs/*/a.log will match all a.log files found in all directories under the /var/logs/ directory:
- If the collection path is set to a file name, the corresponding file is collected. Only text files can be collected.
- Add Custom Wrapping Rule: ICAgent determines whether a file is wrapped based on the file name rule. If your wrapping rule does not comply with the built-in rules, you can add a custom wrap rule to prevent log loss during repeated collection and wrapping.
The built-in rules are {basename}{connector}{wrapping identifier}.{suffix} and {basename}.{suffix}{connector}{wrapping identifier}. Connectors can be hyphens (-), periods (.), or underscores (_), wrapping identifiers can contain only non-letter characters, and the suffix can contain only letters.
A custom wrapping rule consists of {basename} and the feature regular expression of the wrapped file. Example: If your log file name is test.out.log and the names after wrapping are test.2024-01-01.0.out.log and test.2024-01-01.1.out.log, configure the collection path to /opt/*.log, and add a custom wrapping rule for Linux: {basename}\.\d{4}-\d{2}-\d{2}\.\d{1}.out.log, and a wrapping rule for Windows: {basename}.[0-9]{4}-[0-9]{2}-[0-9]{2}.[0-9]{1}.out.log.
- You can verify collection paths to ensure that logs can be properly collected. Click use path verification, enter the collection paths and absolute paths of the log files, and click OK. You can add up to 30 collection paths. If the paths are correct, a success message will be displayed.
- You can verify wrapping rules to ensure that logs can be properly collected. Click wrapping rule verification, enter the name of the collected file, file name after wrapping, and wrapping rule, and click OK. If the wrapping rule is correct, a success message will be displayed.
- Logs can be collected recursively. A double asterisk (**) can represent up to 5 directory levels in a path.
- Allow Repeated File Collection
After you enable this function, one host log file can be collected to multiple log streams. This function is available only to certain ICAgent versions. For details, see Checking the ICAgent Version.
After you disable this function, each collection path must be unique. That is, the same log file in the same host cannot be collected to different log streams.
- Set Collection Filters: Blacklisted directories or files will not be collected.
Blacklist filters can be exact matches or wildcard pattern matches. For details, see Collection Paths.
- If you blacklist a file or directory that has been set as a collection path in the previous step, the blacklist settings will be used and the file or files in the directory will be filtered out.
- If a log has been added to the blacklist, it cannot be collected even if you create a log ingestion task. You can collect it again only after you delete the collection path from the blacklist.
- If you specify a directory, all files in the directory are filtered out, but log files in the folders in the directory cannot be filtered out.
- Collection filters cannot be set for Windows hosts.
- Collect Windows Event Logs: To collect logs from Windows hosts, enable this option. Up to 500 Windows event logs can be collected per minute. Configure the parameters by referring to Table 1.
Table 1 Parameters for collecting windows event logs Parameter
Description
Log Type
You can select from the following log types:
- System: records events generated by Windows OS components, including drivers, system services, and hardware faults.
- Application: records events generated by user applications or third-party software.
- Security: records events related to system security, such as login attempts, permission changes, and audit policy triggers.
- Startup: records events that occur during Windows OS startup.
First Collection Time Offset
If you set this parameter to 7, logs generated within the seven days before the collection start time are collected. This offset takes effect only for the first collection to ensure that the logs are not repeatedly collected. The maximum value is seven days.
Event Level
You can filter and collect Windows events based on their severity (information, warning, error, critical, and verbose). This function is available only to Windows Vista or later.
- Structuring Parsing:
LTS offers various log parsing rules, including Single-Line - Full-Text Log, Multi-Line - Full-Text Log, JSON, Delimiter, Single-Line - Completely Regular, Multi-Line - Completely Regular, and Combined Parsing. Select a parsing rule that matches your log content. Once collected, structured logs are sent to your specified log stream, enabling field searching.
- If you enable Structuring Parsing, configure it by referring to Configuring ICAgent Structuring Parsing. Figure 6 ICAgent structuring parsing configuration

- If you disable Structuring Parsing, log data will not be structured. Raw logs will be sent to the specified log stream, allowing only keyword-based searches.
- If you enable Structuring Parsing, configure it by referring to Configuring ICAgent Structuring Parsing.
- Other: After setting the collection paths, you can also set log splitting, binary file collection, and custom metadata. Figure 7 Other configurations

- Configure the log format and time by referring to Table 3. Parameters under Unrecommended Configurations are no longer recommended due to design limitations. LTS provides the ICAgent structuring parsing function to replace them. If Structuring Parsing is enabled, these parameters are unavailable.
Table 3 Log collection settings Parameter
Description
Log Format
- Single-line: Each log line is displayed as a single log event.
- Multi-line: Multiple lines of exception logs can be displayed as a single log event and each line of regular logs is displayed as a log event. This is helpful when you check logs to locate problems.
Log Time
System time: log collection time by default. It is displayed at the beginning of each log event.
- Log collection time is the time when logs are collected and sent by ICAgent to LTS.
- Log printing time is the time when logs are printed. ICAgent collects and sends logs to LTS every second.
- Restriction on log collection time: Logs are collected within 24 hours before and after the system time.
Time wildcard: You can set a time wildcard so that ICAgent will look for the log printing time as the beginning of a log event.
- If the time format in a log event is 2019-01-01 23:59:59.011, the time wildcard should be set to YYYY-MM-DD hh:mm:ss.SSS.
- If the time format in a log event is 19-1-1 23:59:59.011, the time wildcard should be set to YY-M-D hh:mm:ss.SSS.
If a log event does not contain year information, ICAgent regards it as printed in the current year.
Example:
YY   - year (19)
YYYY - year (2019)
M    - month (1)
MM   - month (01)
D    - day (1)
DD   - day (01)
hh   - hours (23)
mm   - minutes (59)
ss   - seconds (59)
SSS - millisecond (999)
hpm     - hours (03PM)
h:mmpm    - hours:minutes (03:04PM)
h:mm:sspm  - hours:minutes:seconds (03:04:05PM)
hh:mm:ss ZZZZ (16:05:06 +0100)
hh:mm:ss ZZZ  (16:05:06 CET)
hh:mm:ss ZZ   (16:05:06 +01:00)
Log Segmentation
This parameter needs to be specified if the Log Format is set to Multi-line. By generation time indicates that a time wildcard is used to detect log boundaries, whereas By regular expression indicates that a regular expression is used.
By regular expression
You can set a regular expression to look for a specific pattern to indicate the beginning of a log event. This parameter needs to be specified when you select Multi-line for Log Format and By regular expression for Log Segmentation.
The time wildcard and regular expression will look for the specified pattern right from the beginning of each log line. If no match is found, the system time, which may be different from the time in the log event, is used. In general cases, you are advised to select Single-line for Log Format and System time for Log Time.
ICAgent supports only RE2 regular expressions. For details, see Syntax.
- Click Next: Index Settings.
Step 4: Configure Indexing
An index is a storage structure used to query log data. Configuring indexing makes log searches and analysis faster and easier. Different index settings generate different query and analysis results. Configure index settings to fit your service requirements.
- If you do not want to query or analyze logs using specific fields, you can skip configuring indexing when configuring log ingestion. This will not affect log collection. You can also configure indexing after creating the log ingestion configuration. However, index settings will only apply to newly ingested logs. For details, see Configuring Log Indexing. If you choose to skip this step, retain the default settings on the Index Settings page and click Skip and Submit. The message "Logs ingested" will appear.
- To query or analyze logs using specific fields, configure indexing on the Index Settings page when creating an ingestion configuration. For details, see Configuring Log Indexing.
On this page, click Auto Configure to have LTS generate index fields based on the first log event in the last 15 minutes or common system reserved fields (such as hostIP, hostName, and pathFile). You can also manually add structured fields. After completing the settings, click Submit. The message "Logs ingested" will appear. You can also adjust the index settings after the ingestion configuration is created. However, the changes will only affect newly ingested logs.
Step 5: Complete the Ingestion Configuration
The created ingestion configuration will be displayed.

- Click its name to view its details.
- Click Modify in the Operation column to modify the ingestion configuration.
You can quickly navigate and modify settings by clicking Select Log Stream, (Optional) Select Host Group, Configurations, or Index Settings in the navigation tree at the top of the page. After making your modifications, click Submit to save the changes. This operation is available for all log ingestion modes except CCE logs, ServiceStage containerized application logs, and self-built Kubernetes cluster logs.
- Click More > Configure Tag in the Operation column to add a tag.
- Click More > Copy in the Operation column to copy the ingestion configuration.
- Click Delete in the Operation column to delete the ingestion configuration.
Deleting an ingestion configuration may lead to log collection failures, potentially resulting in service exceptions related to user logs. In addition, the deleted ingestion configuration cannot be restored. Exercise caution when performing this operation.
- To stop log collection of an ingestion configuration, toggle off the switch in the Ingestion Configuration column to disable the configuration. To restart log collection, toggle on the switch in the Ingestion Configuration column.
Disabling an ingestion configuration may lead to log collection failures, potentially resulting in service exceptions related to user logs. Exercise caution when performing this operation.
- Click More > ICAgent Collect Diagnosis in the Operation column of the ingestion configuration to monitor the exceptions, overall status, and collection status of ICAgent. If this function is not displayed, enable ICAgent diagnosis by referring to Setting ICAgent Collection.
Setting Multiple Ingestion Configurations in a Batch
You can set multiple ingestion configurations for multiple scenarios in a batch, avoiding repetitive setups.
- On the Ingestion Management page, click Batch Create to go to the configuration details page.
- Ingestion Type: Select ECS (Elastic Cloud Server).
- Rule List:
- Enter the number of ingestion configurations in the text box and click Add.
- Enter a rule name under Configuration Items on the right. You can also double-click the name of the ingestion configuration on the left to replace it with a custom name after setting the configuration items. Enter 1 to 64 characters, including only letters, digits, hyphens (-), underscores (_), and periods (.). Do not start with a period or underscore or end with a period.
- To copy an ingestion configuration, move the cursor to it and click
 .
. - To delete an ingestion configuration, move the cursor to it and click
 . In the displayed dialog box, click OK.
- Configuration Items:
- The ingestion configurations are displayed on the left. You can add up to 99 more configurations.
- The ingestion configuration items are displayed on the right. Set them by referring to Step 3: Configure the Collection.
- After an ingestion configuration is complete, you can click Apply to Other Configurations to copy its settings to other configurations.
- Click Check Parameters. After the check is successful, click Submit.
The added ingestion configurations will be displayed on the Ingestion Management page after the batch creation is successful.
- (Optional) Perform the following operations on ingestion configurations:
- Select multiple existing ingestion configurations and click Edit. On the displayed page, select an ingestion type to modify the corresponding ingestion configurations.
- Select multiple disabled ingestion configurations, click Enable/Disable Ingestion Configuration, and select Enable to enable them in a batch.
- Select multiple enabled ingestion configurations, click Enable/Disable Ingestion Configuration, and select Disable. Logs will not be collected for disabled ingestion configurations. Exercise caution when disabling these configurations.
- Select multiple existing ingestion configurations and click Delete.
Tagging an Ingestion Configuration
You can add tags to existing ingestion configurations for easy identification, searching, and management. Each tag consists of a tag key and a tag value. Adding, changing, or removing tags of an ingestion configuration does not affect other ingestion configurations.
- In the navigation pane, choose Log Ingestion > Ingestion Management.
- Click More > Configure Tag in the Operation column of the desired ingestion configuration.
- On the displayed page, click Add and enter a tag key and value. To add more tags, repeat this step. A maximum of 20 tags can be added. Figure 9 Editing ingestion configuration tags
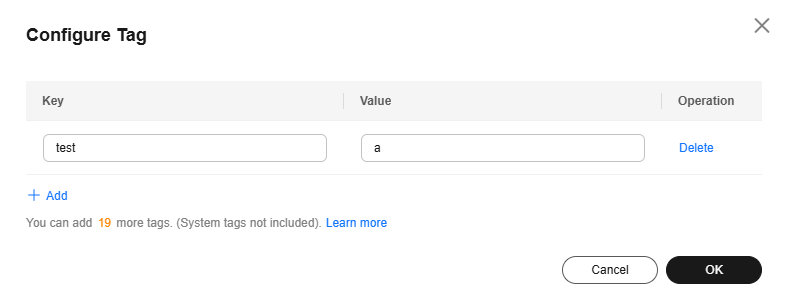
Tag key restrictions:
- A tag key can contain letters, digits, spaces, and special characters (_.:=+-@), but cannot start or end with a space or start with _sys_.
- A tag key can contain up to 128 characters.
- Each tag key must be unique.
Tag value restrictions:
- A tag value can contain letters, digits, spaces, and the following special characters: _.:=+-@
- A tag value can contain up to 255 characters.
Tag policies:
If your organization has configured tag policies for LTS, follow the policies when adding tags to log groups, log streams, log ingestion configurations, host groups, and alarm rules. Non-compliant tags may cause the creation of these resources to fail. Contact your administrator to learn more about the tag policies. For details about tag policies, see Overview of a Tag Policy. For details about tag management, see Managing Tags.
Deleting a tag:
On the Configure Tag page, click Delete in the Operation column of the tag.
If a tag is used by a transfer task, you need to modify the task configuration after deleting the tag.
- Click OK. On the Ingestion Management page, you can view the added tags in the Tags column of the ingestion configuration. Figure 10 Ingestion configuration tags

Helpful Links
- After logs are ingested to LTS, you can use the search and analysis functions of LTS to quickly gain insights into log data. For details, see Log Search and Analysis (SQL Analysis Offline Soon).
- You can use LTS's log alarm function to set alarm rules to notify you of exceptions in the ingested logs. For details, see Configuring Log Alarm Rules.
- If you have any questions when installing ICAgent, see Host Management in the FAQ.
- If you have any questions when configuring log ingestion, see Log Ingestion in the FAQ.
- You can call APIs to create, query, and delete log ingestion configurations. For details, see Log Ingestion.
- You are advised to learn several best practices of data collection. For details, see Log Ingestion in the Best Practices.
- To collect logs across clouds or regions, see Collecting Host Logs from Third-Party Clouds, Internet Data Centers, and Other Huawei Cloud Regions to LTS.
- To collect data from multiple channels, see Collecting Logs from Multiple Channels to LTS.
- To implement cross-account log ingestion, see Implementing Cross-Account Ingestion.
What is your overall rating for this page?
Thank you very much for your feedback. We will continue working to improve the documentation.See the reply and handling status in My Cloud VOC.
For any further questions, feel free to contact us through the chatbot.
Chatbot


