Configuring Log Alarm Rules
LTS allows you to set alarm rules for log data in log streams to monitor service status in real time. Currently, a maximum of 200 alarm rules can be created for each account.
You can create multiple alarm rules in a batch. For details, see Configuring Multiple Alarm Rules.
Prerequisites
- A log group and stream have been created. For details, see Managing Log Groups and Managing Log Streams.
- To use field indexing for searching, analyzing, and collecting statistics on logs ingested to LTS, ensure that index settings are properly configured. For details, see Configuring Log Indexing. Correct index settings help you efficiently query and analyze log data and configure log alarm rules based on specific fields, such as the log severity, error code, and response time.
Configuring an Alarm Rule
You can choose the following alarm rule type: search and analysis (pipe character), by keyword, and by SQL.
Configuring an Alarm Rule with a Search | Analysis Statement
LTS allows you to configure alarm rules using its new SQL engine. This engine supports the combination of search and analysis statements with the pipe character (search | analysis) to periodically query structured data and trigger an alarm when the alarm rule's condition expression returns true. You can then view these SQL alarms on the LTS console.
- Log in to the LTS console and choose Log Alarms in the navigation pane.
- Click the Alarm Rules tab.
- Click Create. The Create Alarm Rule right panel is displayed.
- Configure alarm rule parameters by referring to Table 1.
Table 1 Parameters of a search | analysis alarm rule Category
Parameter
Description
Basic Info
Rule Name
Define a name for your alarm rule based on service requirements. After the rule is created, move the cursor to the rule name in the rule list to view both the rule name and the original rule name. You can modify the rule name, but cannot modify the original rule name (defined during rule creation).
Naming rules:
Use only letters, digits, hyphens (-), and underscores (_). Do not start or end with a hyphen or underscore. Enter 1 to 128 characters.
Basic Info
Enterprise Project Name
Select the required enterprise project. The default value is default. You can click View Enterprise Projects to view all enterprise projects.
- You can use enterprise projects only after enabling the enterprise project function. For details, see Enabling the Enterprise Project Function.
- You can remove resources from an enterprise project to another. For details, see Removing Resources from an Enterprise Project.
Basic Info
Description
Brief description of the rule. Enter up to 128 characters.
Statistical Analysis
Statistics
Search Analysis: Configure alarm rules using the new SQL engine, which supports the combination of search and analysis statements with a pipe character (search | analysis).
After an alarm rule is created, the statistics type cannot be changed. Plan the statistics type based on service requirements.
Query Condition (Up to three query statements are supported.)
Log Group Name: Select a log group.
Log Stream Name: Select a log stream.
Query Time Range: Specify the query period of the statement. It is one period earlier than the current time. For example, if Query Time Range is set to one hour and the current time is 9:00, the query statement period is 8:00–9:00.
- The value ranges from 1 to 60 in the unit of minutes.
- The value ranges from 1 to 24 in the unit of hours.
Query Statement: Enter a statement in the following format.
Search statement | SQL analysis statement
LTS monitors logs in the log stream based on the configured statement. After entering the query statement, click Preview to preview the query result. Set the check rule based on the fields in the preview result.
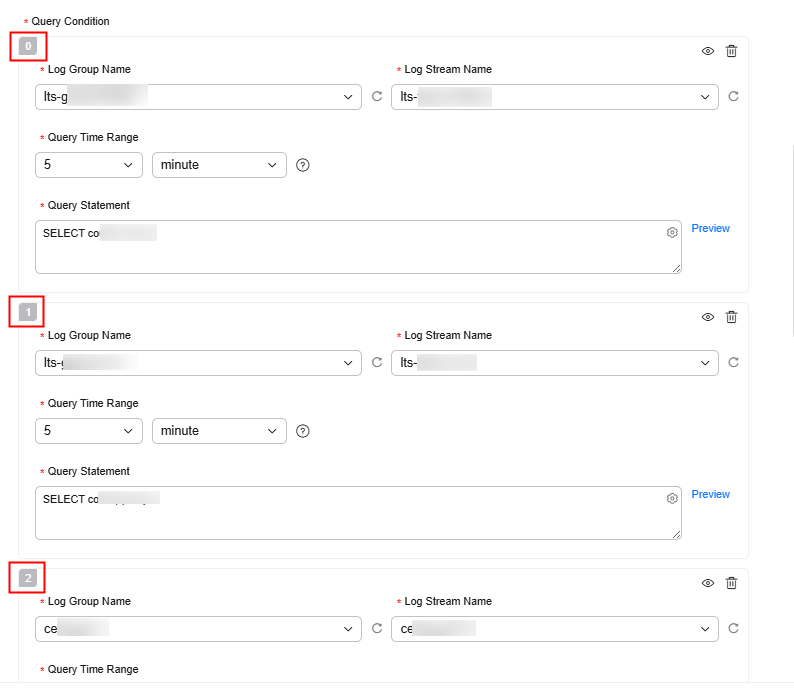
To add multiple query conditions, repeat the preceding steps. For details about the IDs of multiple query conditions, see Figure 1. (The screenshot is for reference only.)
The number of the first query condition is 0, the number of the second condition is 1, and the number of the third condition is 2.
Check Rule
When the condition expression is met for the specified times in the specified queries, an alarm of the critical, major, minor, or info severity will be triggered.
Enter a specific condition expression. When the expression execution result is true, an alarm is generated.
- Condition expressions can contain Chinese characters. They cannot contain only digits or start with a digit.
- The alarm severity can be Critical (default), Major, Minor, or Info.
- Specify the number of queries and the number of times the condition must be met to trigger the alarm. The number of queries must be greater than or equal to the number of times the condition must be met. Number of queries: 1–10
Click + to add a condition expression with an OR relationship. A maximum of 20 condition expressions can be added.
Click
 to delete a condition expression.
Basic syntax and cross-chart combination syntax are supported. When multiple query conditions are associated, the following format must be used to reference fields in condition expressions:
${Query condition No.}.{Query statement field}For example, to reference the pv field in the query statement * | select count(*) as pv of the first chart (chart 0), enter $0.pv.
CAUTION:If multiple charts are used, condition expressions must contain $0, which indicates the first chart (chart 0).
- Basic syntax:
- Basic arithmetic operators: addition (+), subtraction (–), multiplication (*), division (/), and modulo (%). Example: x * 10 + y > 100
- Comparison operators: greater than (>), greater than or equal to (>=), less than (<), less than or equal to (<=), equal to (==), and not equal to (!=). Example: x >= 100.
- Logical operators: && (and) and || (or). Example: x > 0 && y < 200
- Logical negation (!). Example: !(x < 1 && x > 100)
- Numeric constants: They are processed as 64-bit floating point numbers. Example: x > 10
- String constants. Example: str =="string"
- Boolean constants: true and false. Example: (x < 100)!=true
- Parentheses: used to change the order of operations. Example: x *(y + 10) < 200
- contains function: used to check whether a string contains a substring. For example, if you run contains(str, "hello") and true is returned, the string contains the hello substring.
- Cross-chart combination syntax:
- Basic arithmetic operators: addition (+), subtraction (–), multiplication (*), division (/), and modulo (%).
- Comparison operators: greater than (>), greater than or equal to (>=), less than (<), less than or equal to (<=), equal to (==), and not equal to (!=).
- Logical operators: && (and) and || (or).
- Logical negation (!)
- contains function
- Parentheses ()
Example:
$0.pv > 10 && $1.uv < 2
$0.pv indicates the pv field in the query statement * | select count(*) as pv of the first chart (chart 0), and $1.uv indicates the uv field in the query statement * | select count(*) as uv of the second chart (chart 1). The two conditions must be met at the same time.
Advanced Settings
Query Frequency
Options:
- Hourly: The query is performed at the top of each hour.
- Daily: The query is performed at a specific time every day.
- Weekly: The query is performed at a specific time on a specific day every week.
- Custom interval: You can specify the interval from 1 minute to 60 minutes or from 1 hour to 24 hours. For example, if the current time is 9:00 and the Custom interval is set to 5 minutes, the first query is at 9:00, the second query is at 9:05, the third query is at 9:10, and so on.
When the query time range is larger than 1 hour, the custom interval must be at least 5 minutes.
- CRON: The query task is executed according to Cron Expression. Cron expressions use the 24-hour format and are precise down to the minute.
Alarm Restored When
Configure a policy for sending an alarm restoration notification.
If alarm restoration notification is enabled and the trigger condition has not been met for the specified number of last queries, an alarm restoration notification is sent.
Number of last queries: 1–10
Notify When
- Alarm triggered: Specify whether to send a notification when an alarm is triggered. If this option is enabled, a notification will be sent when the trigger condition is met. If disabled, no notifications will be sent, even if the trigger condition is met.
- Alarm restored: Specify whether to send a notification when an alarm is restored. If this option is enabled, a notification will be sent when the restoration policy is met. If disabled, no notifications will be sent, even if the restoration policy is met.
Frequency
You can select Immediate, Every 5 minutes, Every 10 minutes, Every 15 minutes, Every 30 minutes, Every hour, Every 3 hours, or Every 6 hours to send alarms.
Immediate indicates that a notification is sent once an alarm is generated. Every 10 minutes indicates that the minimum interval between two notifications is 10 minutes, preventing alarm storms.
Alarm Notification Rule
Select a desired rule from the drop-down list.
If no rule is available, click Create Alarm Notification Rule on the right. For details, see Creating an Alarm Notification Rule.
Language
Select the alarm language.
Tag
Tag alarm rules as required. Click Add and enter a tag key and value.
To add more tags, repeat this step. A maximum of 20 tags can be added.
Tag key restrictions:
- A tag key can contain letters, digits, spaces, and special characters (_.:=+-@), but cannot start or end with a space or start with _sys_.
- A tag key can contain up to 128 characters, and a tag value can contain up to 255 characters.
- Each tag key must be unique.
Tag value restrictions:
- A tag value can contain letters, digits, spaces, and the following special characters: _.:=+-@
- A tag value can contain up to 255 characters.
Deleting a tag:
WARNING:Deleted tags cannot be recovered.
To delete a tag, click Delete in the Operation column of the tag.
- Click OK.
After an alarm rule is created, its status is Enabled by default. After the alarm rule is disabled, the alarm status is Disabled. After the alarm rule is disabled temporarily, the alarm status is Temporarily closed to May 30, 2023 16:21:24.000 GMT+08:00. (The time is for reference only.)
When the alarm rule is enabled, an alarm will be triggered if the alarm rule is met. When it is disabled, an alarm will not be triggered even if the alarm rule is met.
Configuring a Keyword Alarm Rule
LTS allows you to collect statistics on log keywords in log streams and set alarm rules to monitor them. By checking the number of keyword occurrences in a specified period, you can have a real-time view of the service running.
- Log in to the LTS console.
- Choose Log Alarms in the navigation pane.
- Click the Alarm Rules tab.
- Click Create. The Create Alarm Rule right panel is displayed.
- Configure alarm rule parameters.
Table 2 Keyword alarm rule parameters Category
Parameter
Description
Basic Info
Rule Name
Define a name for your alarm rule based on service requirements. After the rule is created, move the cursor to the rule name in the rule list to view both the rule name and the original rule name. You can modify the rule name, but cannot modify the original rule name (defined during rule creation).
Naming rules:
Use only letters, digits, hyphens (-), and underscores (_). Do not start or end with a hyphen or underscore. Enter 1 to 128 characters.
Basic Info
Enterprise Project Name
Select the required enterprise project. The default value is default. You can click View Enterprise Projects to view all enterprise projects.
- You can use enterprise projects only after enabling the enterprise project function. For details, see Enabling the Enterprise Project Function.
- You can remove resources from an enterprise project to another. For details, see Removing Resources from an Enterprise Project.
Basic Info
Description
Description of the rule. Enter up to 128 characters.
Statistical Analysis
Statistics
By keyword: applicable to scenarios where keywords are used to search for and configure log alarms.
After an alarm rule is created, the statistics type cannot be changed. Plan the statistics type based on service requirements.
Query Condition
Log Group Name: Select a log group.
Log Stream Name: Select a log stream.
If a log group contains more than one log stream, you can select multiple log streams when creating a keyword alarm rule.
Query Time Range: Specify the query period of the statement. It is one period earlier than the current time. For example, if Query Time Range is set to one hour and the current time is 9:00, the query statement period is 8:00–9:00.
- The value ranges from 1 to 60 in the unit of minutes.
- The value ranges from 1 to 24 in the unit of hours.
Keywords: Enter log keywords that can be queried on the Log Search tab page. LTS monitors logs in the log stream based on these keywords.
Exact and fuzzy matches are supported. Enter up to 1,024 characters. For details about how to set keyword search, see Using Search Syntax.
In the index settings, Case-Sensitive is disabled by default. This means that keywords are case insensitive. If you enable this option, alarm keywords you enter will be case-sensitive for matching. For details, see Configuring Log Indexing.
Check Rule
Configure a condition that will trigger the alarm.
- Matching Log Events: When the number of log events that contain the configured keywords reaches the specified value, an alarm is triggered. Four comparison operators are supported: greater than (>), greater than or equal to (>=), less than (<), and less than or equal to (<=).
- The alarm severity can be Critical (default), Major, Minor, or Info.
- The number of queries refers to the number of occurrences of the Query Frequency set in Advanced Settings. The number of times the condition is met refers to the number of times that the keyword appears. The number of queries must be greater than or equal to the number of times the condition must be met. Number of queries: 1–10
Click + to add a condition expression with an OR relationship. A maximum of 20 condition expressions can be added.
Click
 to delete a condition expression.
Advanced Settings
Query Frequency
Options:
- Hourly: The query is performed at the top of each hour.
- Daily: The query is performed at a specific time every day.
- Weekly: The query is performed at a specific time on a specific day every week.
- Custom interval: You can specify the interval from 1 minute to 60 minutes or from 1 hour to 24 hours. For example, if the current time is 9:00 and the Custom interval is set to 5 minutes, the first query is at 9:00, the second query is at 9:05, the third query is at 9:10, and so on.
When the query time range is larger than 1 hour, the custom interval must be at least 5 minutes.
- CRON: The query task is executed according to Cron Expression. Cron expressions use the 24-hour format and are precise down to the minute.
Advanced Settings
Alarm Restored When
Configure a policy for sending an alarm restoration notification.
If alarm restoration notification is enabled and the trigger condition has not been met for the specified number of last queries, an alarm restoration notification is sent.
Number of last queries: 1–10
Advanced Settings
Notify When
- Alarm triggered: Specify whether to send a notification when an alarm is triggered. If this option is enabled, a notification will be sent when the trigger condition is met. If disabled, no notifications will be sent, even if the trigger condition is met.
- Alarm restored: Specify whether to send a notification when an alarm is restored. If this option is enabled, a notification will be sent when the restoration policy is met. If disabled, no notifications will be sent, even if the restoration policy is met.
Advanced Settings
Frequency
You can select Immediate, Every 5 minutes, Every 10 minutes, Every 15 minutes, Every 30 minutes, Every hour, Every 3 hours, or Every 6 hours to send alarms.
Immediate indicates that a notification is sent once an alarm is generated. Every 10 minutes indicates that the minimum interval between two notifications is 10 minutes, preventing alarm storms.
Advanced Settings
Alarm Notification Rule
Select a desired rule from the drop-down list.
If no rule is available, click Create Alarm Notification Rule on the right.
Advanced Settings
Language
Select the alarm language.
Advanced Settings
Tag
Tag alarm rules as required. Click Add and enter a tag key and value.
To add more tags, repeat this step. A maximum of 20 tags can be added.
Tag key restrictions:
- A tag key can contain letters, digits, spaces, and special characters (_.:=+-@), but cannot start or end with a space or start with _sys_.
- A tag key can contain up to 128 characters.
- Each tag key must be unique.
Tag value restrictions:
- A tag value can contain letters, digits, spaces, and the following special characters: _.:=+-@
- A tag value can contain up to 255 characters.
Deleting a tag:
WARNING:Deleted tags cannot be recovered.
To delete a tag, click Delete in the Operation column of the tag.
- Click OK. For detailed examples, see Example: Alarms Triggered by a Keyword.
After an alarm rule is created, its status is Enabled by default. After the alarm rule is disabled, the alarm status is Disabled. After the alarm rule is disabled temporarily, the alarm status is Temporarily closed to May 30, 2023 16:21:24.000 GMT+08:00. (The time is for reference only.)
When the alarm rule is enabled, an alarm will be triggered if the alarm rule is met. When it is disabled, an alarm will not be triggered even if the alarm rule is met.
Configuring a SQL Alarm Rule
LTS can regularly run the SQL queries that you specify on structured logs and trigger an alarm when the alarm rule is met. You can view SQL alarms on the LTS console. Each SQL alarm rule can be associated with one to three charts. Each chart contains a SQL statement for querying a log stream.
The old SQL engine will soon be unavailable. You are advised to select Search Analysis to use the new SQL engine , which is a more powerful option. The new SQL engine is compatible with the SQL92 standard. If a query fails, you need to manually modify the SQL statement.
This function is available to all users in regions CN South-Guangzhou, CN North-Beijing4, CN East-Shanghai1, CN-Hong Kong, CN Southwest-Guiyang1, CN North-Beijing1, and AP-Singapore. It is also available to whitelisted users in regions CN East-Shanghai2, CN South-Shenzhen, AP-Bangkok, ME-Riyadh, and AP-Jakarta.
- Log in to the LTS console and choose Log Alarms in the navigation pane.
- Click the Alarm Rules tab.
- Click Create. The Create Alarm Rule right panel is displayed.
- Configure alarm rule parameters by referring to Table 3.
Table 3 SQL alarm rule parameters Category
Parameter
Description
Basic Info
Rule Name
Define a name for your alarm rule based on service requirements. After the rule is created, move the cursor to the rule name in the rule list to view both the rule name and the original rule name. You can modify the rule name, but cannot modify the original rule name (defined during rule creation).
Naming rules:
Use only letters, digits, hyphens (-), and underscores (_). Do not start or end with a hyphen or underscore. Enter 1 to 128 characters.
Basic Info
Enterprise Project Name
Select the required enterprise project. The default value is default. You can click View Enterprise Projects to view all enterprise projects.
- You can use enterprise projects only after enabling the enterprise project function. For details, see Enabling the Enterprise Project Function.
- You can remove resources from an enterprise project to another. For details, see Removing Resources from an Enterprise Project.
Basic Info
Description
Description of the rule. Enter up to 128 characters.
Statistical Analysis
Statistics
By SQL: Use SQL analysis to configure an alarm rule.
After an alarm rule is created, the statistics type cannot be changed. Plan the statistics type based on service requirements.
Charts
Configure alarm-related charts.
You can add a chart in these following two ways. If the logs in the log stream have not been structured, configure log structuring first. Up to three charts can be added. The chart and the SQL query statement in the chart cannot be left blank.
- Configure from Scratch
Click Configure from Scratch and set parameters as follows:
- Log Group Name: Select a log group that has logs reported from the drop-down list.
- Log Stream Name: Select a log stream of the log group from the drop-down list.
- Query Time Range: Set this parameter to 1 to 60 minutes or 1 to 24 hours.
- Query Statement: Enter a query statement. For details, see Using SQL Analysis Syntax.
- Import Configuration
Click Import Configuration. On the displayed Custom page, select a log group and stream, select a chart, and click OK.
If there are no charts available or the charts do not fit your needs, click Create Chart. Configure the chart parameters, click OK, and click Save and Back in the upper right corner to return to the Create Alarm Rule right panel. You can see that the chart you just created has been selected, and the query statement has been filled in.
Specify the query time range (1 to 60 minutes or 1 to 24 hours). When the query frequency is set to every 1 to 4 minutes, the query time range can only be set to a value no larger than 1 hour.
- Click
 to go to the visualization page of the log stream.
 - Click
 to delete an added chart.
 - Click Preview to view the data after visual analysis. You must click Preview; otherwise, the alarm rule cannot be saved.
- Click
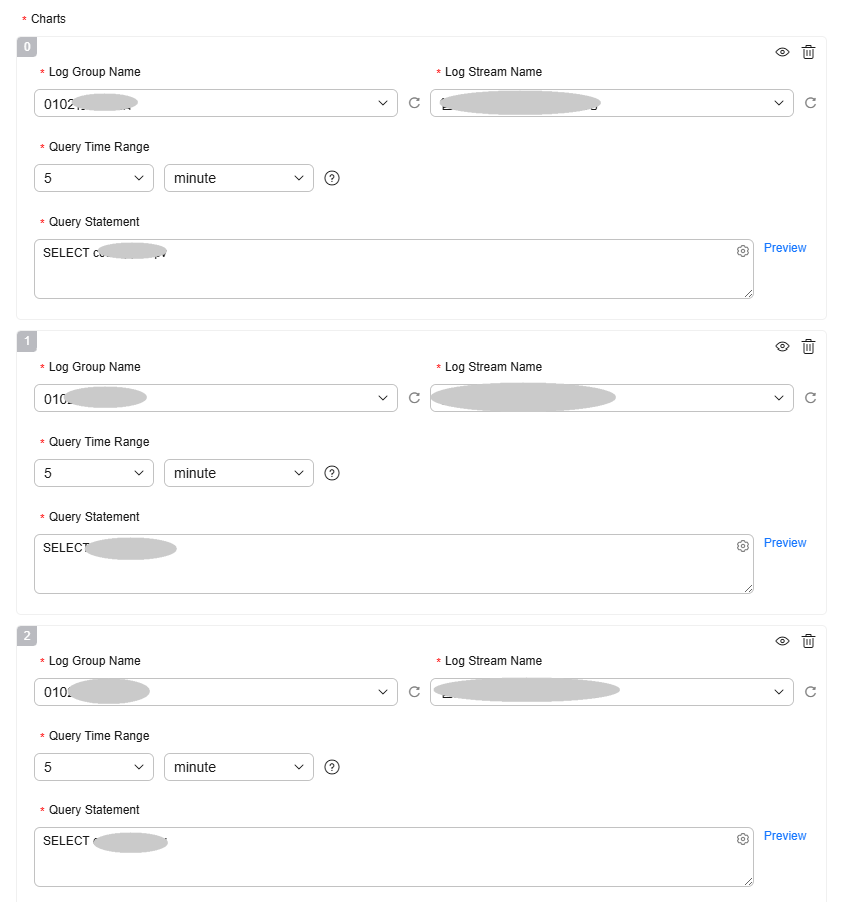
To add more charts, repeat the preceding steps. For details about the numbers of multiple charts, see Figure 2.
The number of the first chart is 0, the number of the second chart is 1, and the number of the third chart is 2.
Check Rule
Enter a specific condition expression. When the expression execution result is true, an alarm is generated.
- Condition expressions can contain Chinese characters. They cannot contain only digits or start with a digit.
- The alarm severity can be Critical (default), Major, Minor, or Info.
- Specify the number of queries and the number of times the condition must be met to trigger the alarm. The number of queries must be greater than or equal to the number of times the condition must be met. Number of queries: 1–10
Click + to add a condition expression with an OR relationship. A maximum of 20 condition expressions can be added.
Click
 to delete a condition expression.
Basic syntax and cross-chart combination syntax are supported. When multiple charts are associated, the following format must be used to reference fields in condition expressions:
${Chart No.}.{Query statement field}For example, to reference the pv field in the query statement select count(*) as pv of the first chart (chart 0), enter $0.pv.
CAUTION:If multiple charts are used, condition expressions must contain $0, which indicates the first chart (chart 0).
- Basic syntax:
- Basic arithmetic operators: addition (+), subtraction (–), multiplication (*), division (/), and modulo (%). Example: x * 10 + y > 100
- Comparison operators: greater than (>), greater than or equal to (>=), less than (<), less than or equal to (<=), equal to (==), and not equal to (!=). Example: x >= 100.
- Logical operators: && (and) and || (or). Example: x > 0 && y < 200
- Logical negation (!). Example: !(x < 1 && x > 100)
- Numeric constants: They are processed as 64-bit floating point numbers. Example: x > 10
- String constants. Example: str =="string"
- Boolean constants: true and false. Example: (x < 100)!=true
- Parentheses: used to change the order of operations. Example: x *(y + 10) < 200
- contains function: used to check whether a string contains a substring. For example, if you run contains(str, "hello") and true is returned, the string contains the hello substring.
- Cross-chart combination syntax:
- Basic arithmetic operators: addition (+), subtraction (–), multiplication (*), division (/), and modulo (%).
- Comparison operators: greater than (>), greater than or equal to (>=), less than (<), less than or equal to (<=), equal to (==), and not equal to (!=).
- Logical operators: && (and) and || (or).
- Logical negation (!)
- contains function
- Parentheses ()
Example:
$0.pv > 10 && $1.uv < 2
$0.pv indicates the pv field in the query statement select count(*) as pv of the first chart (chart 0), and $1.uv indicates the uv field in the query statement select count(*) as uv of the second chart (chart 1). The two conditions must be met at the same time.
Advanced Settings
Query Frequency
Options:
- Hourly: The query is performed at the top of each hour.
- Daily: The query is performed at a specific time every day.
- Weekly: The query is performed at a specific time on a specific day every week.
- Custom interval: You can specify the interval from 1 minute to 60 minutes or from 1 hour to 24 hours. For example, if the current time is 9:00 and the Custom interval is set to 5 minutes, the first query is at 9:00, the second query is at 9:05, the third query is at 9:10, and so on.
When the query time range is larger than 1 hour, the custom interval must be at least 5 minutes.
- CRON: The query task is executed according to Cron Expression. Cron expressions use the 24-hour format and are precise down to the minute.
Advanced Settings
Alarm Restored When
Configure a policy for sending an alarm restoration notification.
If alarm restoration notification is enabled and the trigger condition has not been met for the specified number of last queries, an alarm restoration notification is sent.
Number of last queries: 1–10
Advanced Settings
Notify When
- Alarm triggered: Specify whether to send a notification when an alarm is triggered. If this option is enabled, a notification will be sent when the trigger condition is met. If disabled, no notifications will be sent, even if the trigger condition is met.
- Alarm restored: Specify whether to send a notification when an alarm is restored. If this option is enabled, a notification will be sent when the restoration policy is met. If disabled, no notifications will be sent, even if the restoration policy is met.
Advanced Settings
Frequency
You can select Immediate, Every 5 minutes, Every 10 minutes, Every 15 minutes, Every 30 minutes, Every hour, Every 3 hours, or Every 6 hours to send alarms.
Immediate indicates that a notification is sent once an alarm is generated. Every 10 minutes indicates that the minimum interval between two notifications is 10 minutes, preventing alarm storms.
Advanced Settings
Alarm Notification Rule
Select a desired rule from the drop-down list.
If no rule is available, click Create Alarm Notification Rule on the right. For details, see Creating an Alarm Notification Rule.
Advanced Settings
Language
Specify the language (Chinese (simplified) or English) in which alarms are sent.
Advanced Settings
Tag
Tag alarm rules as required. Click Add and enter a tag key and value. To add more tags, repeat this step. A maximum of 20 tags can be added.
Tag key restrictions:
- A tag key can contain letters, digits, spaces, and special characters (_.:=+-@), but cannot start or end with a space or start with _sys_.
- A tag key can contain up to 128 characters.
- Each tag key must be unique.
Tag value restrictions:
- A tag value can contain letters, digits, spaces, and the following special characters: _.:=+-@
- A tag value can contain up to 255 characters.
Deleting a tag:
WARNING:Deleted tags cannot be recovered.
To delete a tag, click Delete in the Operation column of the tag.
- Click OK. For detailed examples, see Example: Alarms Triggered by the Keyword Frequency.
Configuring Multiple Alarm Rules
You can create multiple alarm rules in a batch.
- On the Alarm Rules tab page, import alarm rules in a batch.
- Click Import/Export > Import. The Import Alarm Rule dialog box is displayed.
- Click Download Alarm Template.xlsx to download the template to the local PC and fill in the template.
- Click Select File and select the file that has been filled in.
- Check the imported rule information and click Import.
- After the import is successful, view the alarm rule details in the rule list.
- Click Batch Create/Edit. The Create or Edit Alarm Rules page is displayed.
- Under Rule List, enter the number of alarm rules and click Add.
- A maximum of 200 alarm rules can be added, including the one already exists under Rule List by default. Therefore, you can add up to 199 more.
- Enter a rule name under Configuration Items on the right. You can also double-click the name of the alarm rule on the left to replace it with a custom name after setting the configuration items. A rule name can contain 1 to 128 characters, including only letters, digits, hyphens (-), and underscores (_). It cannot start or end with a hyphen or underscore.
- To copy an alarm rule, move the cursor to it and click
 .
. - To delete an alarm rule, move the cursor to it and click
 . In the displayed dialog box, click OK.
 - If you enter an original rule name already in use, after you click Submit, the modification will apply to the existing rule, instead of creating a new one. After a rule is created, its statistics type cannot be modified. The modification will fail if you try to modify the statistics type.
- To import alarm rules in a batch, click Import under Rule List. On the Import Alarm Rule page that is displayed, download the alarm rule template. Fill in the template on your PC. Back to the Import Alarm Rule page, click Select File, select the template, and click Import.
- Under Configuration Items, set the alarm rules.
- Click Check Parameters.
- After the check is successful, click Submit.
- After setting an alarm rule, you can click Apply to Other Rules to copy its settings to other alarm rules.
- The created alarm rules will be displayed on the Alarm Rules tab page after the batch creation is successful.
Follow-up Operations on Alarm Rules
After creating an alarm rule, you can modify, enable, disable, copy, or delete it. Exercise caution when performing these operations.
- You can perform the following operations on a single alarm rule.
Modifying an alarm rule: Click Modify in the Operation column of the target alarm rule. On the displayed page, modify the rule name, query condition, and check rule, and click OK.
Temporarily disabling an alarm rule: Click More > Disable Temporarily in the Operation column of the target alarm rule, and click OK.
Copying an alarm rule: Click More > Copy in the Operation column of the target alarm rule.
Deleting an alarm rule: Click Delete in the Operation column of the target alarm rule. In the displayed dialog box, click OK.

Deleted alarm rules cannot be recovered. Exercise caution when performing this operation.
- Restoration Notification: If this option is enabled, a notification will be sent when the restoration policy is met. If disabled, no notifications will be sent, even if the restoration policy is met.
- Rule Status: An alarm rule takes effect only when the switch in this column is toggled on. If this switch is toggled off, the alarm rule is invalid.
- Configure Tag: In the Operation column of the target alarm rule, choose More > Configure Tag. On the displayed page, add tags.
- After selecting multiple alarm rules, you can perform the following operations on them: Enable, Disable, Disable Temporarily, Re-Enable, Enable Restoration Notification, Disable Restoration Notification, Delete, Import, Export selected data to an XLSX file, and Export all data to an XLSX file.
- You can hover over a rule name to see both the current and original names. The original rule name cannot be changed.
Cron Expression
- The query starts from 00:00 and is performed every 10 minutes at 00:00, 00:10, 00:20, 00:30, 00:40, 00:50, 01:00, and so on. * indicates any value of the field, and / indicates the interval between specified time points.
0/10 * * * *
For example, if the current time is 16:37, the next query is at 16:50.
- The query starts from 00:00 and is performed every 5 hours at 00:00, 05:00, 10:00, 15:00, 20:00, and so on. * indicates any value of the field, and / indicates the interval between specified time points.
0 0/5 * * *
For example, if the current time is 16:37, the next query is at 20:00.
- The query is performed at 14:00 every day.
0 14 * * *
- The query is performed at 00:00 on the 10th day of every month.
0 0 10 * *
Example: Alarms Triggered by a Keyword
If you want to trigger an alarm upon the detection of a specific keyword in a log, follow this example to set a query statement and a keyword alarm rule. The example is for reference only.
Ensure that the keyword you specify exists in the log stream. In this example, the key word is Error.

- Query statement: Set the query time range to 15 minutes and run the following statement to query logs containing the keyword Error. For more search syntax, see Using Search Syntax.
Figure 4 Query statement

- Alarm notification: After creating the preceding alarm rule, you will receive an alarm in the alarm list as long as the keyword Error appears in a log. You can also click an alarm name to view the alarm details and sources.
Figure 5 Alarm notification

Example: Alarms Triggered by the Keyword Frequency
If you want to trigger an alarm when the number of occurrences of a specified keyword reaches a specified value in a specified period, follow this example to set a query analysis statement and SQL alarm rule. The example is for reference only.
SQL statement:
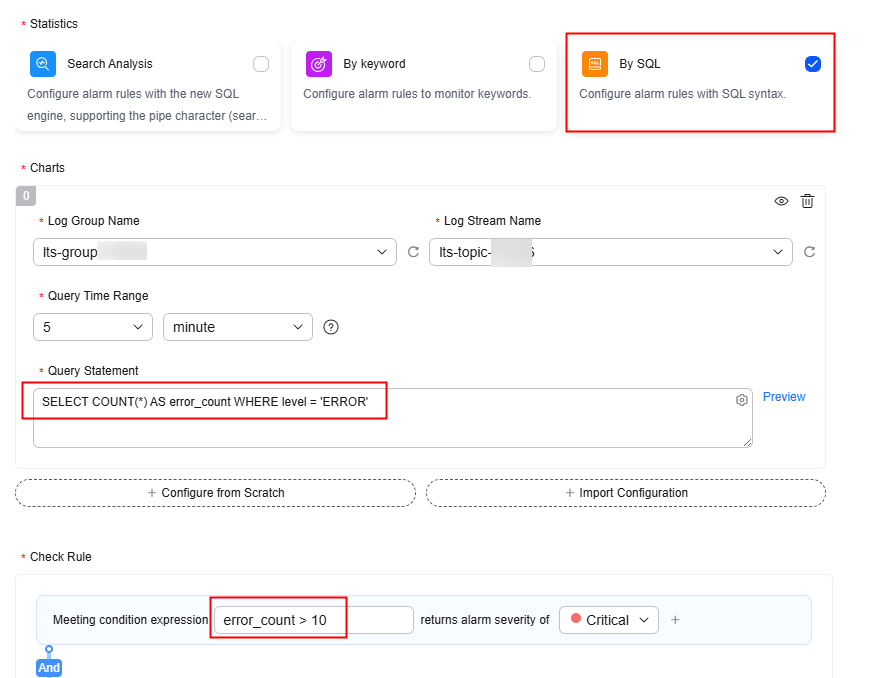
SELECT COUNT(*) AS error_count WHERE level = 'ERROR'
The following query result indicates that the log level ERROR appeared 26 times in the target log stream.

- Query statement: Set the query time range to 5 minutes and run the statement SELECT count(*) as Error to collect statistics on the number of times that the keyword Error appears within 5 minutes. For more search syntax, see Using SQL Analysis Syntax.
Figure 7 Query statement
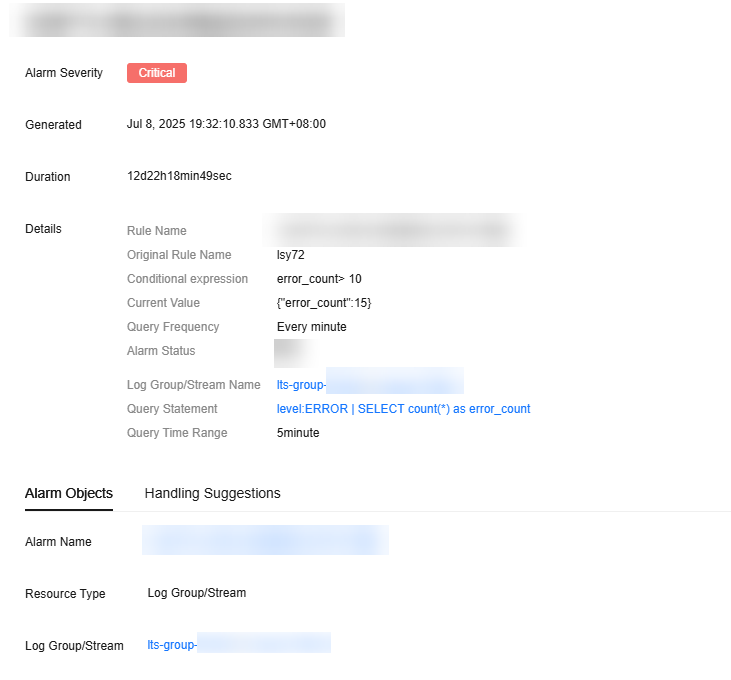
- Alarm notification: After creating the preceding alarm rule, you will receive an alarm in the alarm list as long as the keyword Error appears 10 or more times in your logs. You can also click an alarm name to view the alarm details and sources.
Figure 8 Alarm notification
Example: Setting an Alarm Rule Using a Search | Analysis Statement
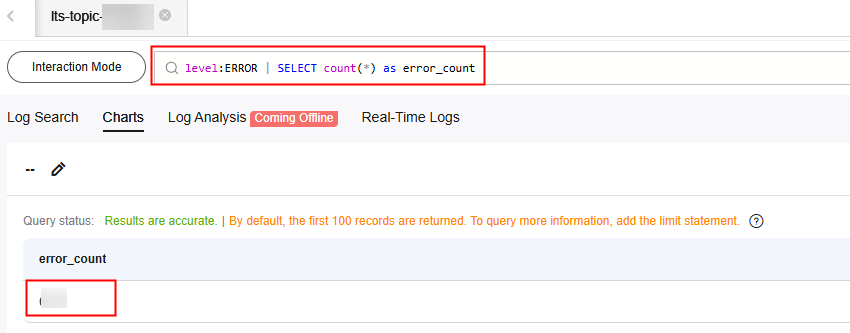
This example guides you through setting up an alarm rule with a pipe-character-based statement (search | analysis statement) to trigger an alarm when the number of logs with an ERROR level reaches a specified threshold within a defined time range. This example is for reference only.
Search | analysis statement:
level:ERROR | SELECT count(*) as error_count
The following query result indicates that the log level ERROR appeared 123 times in the target log stream.
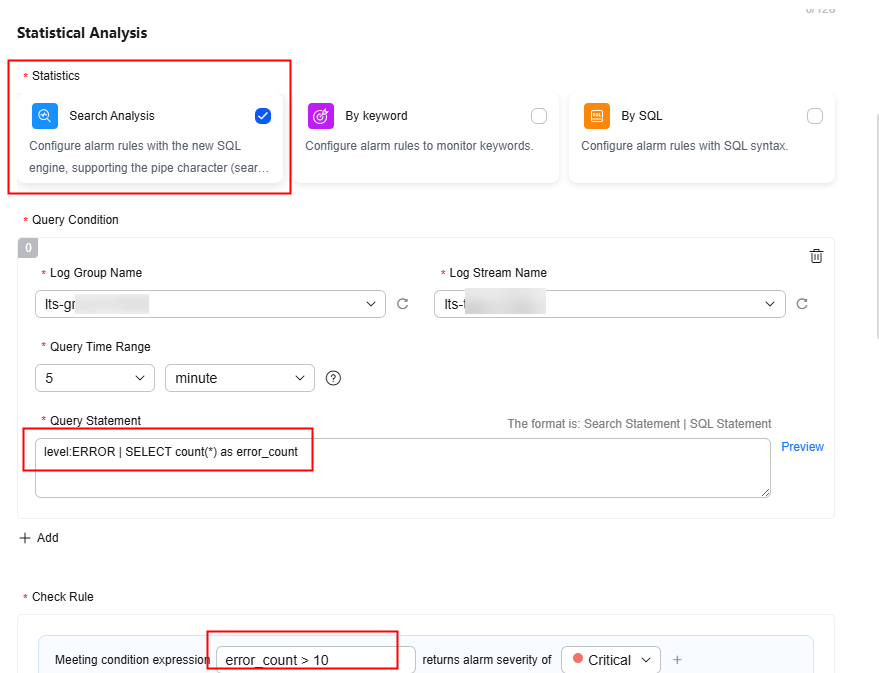
- Query statement: Set the query time range to 5 minutes and execute the search | analysis statement to count ERROR level logs within that period. For details about the pipe character statement syntax, see Log Search and Analysis (Pipe Character).
Figure 10 Query statement
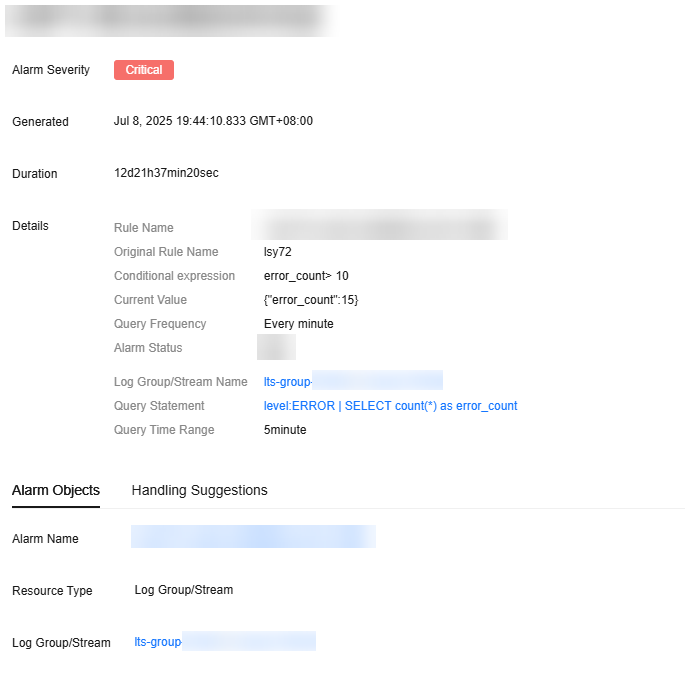
- Alarm notification: After creating the preceding alarm rule, you will receive an alarm in the alarm list as long as the keyword Error appears 10 or more times in your logs. You can also click an alarm name to view the alarm details and sources.
Figure 11 Alarm notification
Helpful Links
- LTS allows you to create, query, and delete keyword alarm rules by calling APIs. For details, see Keyword Alarm Rules.
- LTS allows you to create, query, and delete SQL alarm rules by calling APIs. For details, see SQL Alarm Rules.
Feedback
Was this page helpful?
Provide feedbackThank you very much for your feedback. We will continue working to improve the documentation.See the reply and handling status in My Cloud VOC.
For any further questions, feel free to contact us through the chatbot.
Chatbot

