
Getting Started with VOD
This section describes how to quickly get started with VOD.
Process Flow

Registering with Huawei Cloud

- If you are a Huawei Cloud (International) user, you must complete real-name authentication when you:
Purchase and use cloud services in Huawei Cloud regions in the Chinese mainland. In this case, real-name authentication is required by the laws and regulations of the Chinese mainland. Plan to use VOD in Huawei Cloud regions in the Chinese mainland.
- If you are a Huawei Cloud (Chinese Mainland) user, you must complete real-name authentication before purchasing and using VOD in regions outside the Chinese mainland.
- If your account is restricted, you are unable to purchase or use any VOD functions, including media asset upload, URL-based ingestion, media asset publishing, video snapshot management, and media asset transcoding.
- If you delete a project that had VOD enabled and then try to use VOD in a different project within the same region, you must re-enable VOD for that new project. This action does not affect any media files that already exist in that new project. For details about how to obtain a project ID, see Obtaining a Project ID.
Deleting a project will also delete the media files and domain names associated with VOD in that project.
- New users cannot enable VOD in the AP-Bangkok region. You are advised to use the AP-Singapore region. To enable the service in the AP-Bangkok region, send submit a service ticket to us. Huawei Cloud will reply to you after internal review.
- If you have already enabled VOD (not through the VOD console) and the system displays a message indicating that you need to enable the service again, perform the operations below.
- Register a HUAWEI ID.
- Complete real-name authentication.
- Top up your account (by at least $0.15 USD) in Billing Center.
- Log in to the VOD console and enable VOD as instructed.
Adding Domain Names
All domain names of the system have been assigned. If you do not have an assigned domain name after subscribing to VOD, you need to add licensed domain names to VOD for media file distribution acceleration.
- Log in to the VOD console.
- In the navigation pane, choose Domain Name Management.
- Click Add Domain Name. The Add Domain Name page is displayed.
Table 1 describes the required parameters.
Table 1 Adding a domain name Parameter
Description
Domain Name
Enter a licensed domain name.
- You can add a maximum of five domain names. Wildcard domains such as *.example.com are not allowed.
- You are advised to use a third-level or deeper domain name, for example, example.yourdomain.com.
Enterprise Project
If you have enabled the Enterprise Project Management Service (EPS), you need to select an enterprise project for easy domain management.
Service Scope
Service scope of the current domain name.
The options are as follows:
- Chinese mainland: Only users in the Chinese mainland can access the VOD content of the current domain name.
- Outside China: Only users outside the Chinese mainland can access the VOD content of the current domain name.
- Global: Global users can access the VOD content of the current domain name.
NOTICE:If the Service Scope you select involves cross-border data transfer, you shall be responsible for such transfer. For details, see section 2.3 "Processing Your Content Data" of Service Agreement.
- Click OK.
A domain name whose Status is Configuring is displayed in the domain name list. If Status becomes Enabled in 3 to 5 minutes, the domain name has been added.
After a domain name is added, the system assigns a CNAME value to the domain name.
- Configure the CNAME resolution at your DNS provider and check whether the CNAME takes effect. For details, see Configuring CNAME.
Since the domain is enabled by default after being added to VOD, if the CNAME record is not configured, VOD media playback may fail and thumbnails may not display.
- Click Set as Default next to an added domain name to set the domain name to the default one.
Each account can only have one default domain in the Enabled state. After that, you need to enable HTTPS secure acceleration for the domain name and upload the HTTPS certificate so that the domain name can be used on the VOD console.
(Optional) Configuring Global Settings
If you need to transcode, watermark, and encrypt media files or receive notifications, configure related settings before uploading these files to VOD and then select a template to process these files during or after upload.
- Create a transcoding template.
By default, the system template group is used for transcoding during media file upload. If you want to use a custom template, create a template by referring to Transcoding Settings.
- Create a watermark template.
Watermarks are added to a video during transcoding. If you want this, create a watermark template by referring to Watermark Settings.
If a watermark template is created and set as default, the watermark is added to your uploaded video by default. If you do not want to add the watermark to newly uploaded videos, go to the Global Settings page and disable that template.
- Configure security settings.
VOD provides encryption to protect your videos. If you need this, configure encryption parameters by referring to Security Settings. Switch on Encryption when creating a transcoding template. For details, see Transcoding Settings.
- Configure category settings.
If you need to categorize uploaded videos, configure video categories by referring to Category Settings.
- Configure event notifications.
To receive updates on task progress, configure event notifications by referring to Notification Settings.
Uploading a Media File
Local upload is used as an example to describe how to upload media files to VOD.
- Log in to the VOD console.
- In the navigation pane, choose Audio and Video Uploads > Local Upload.
- Click Upload File. The Upload File dialog box is displayed.
- Click Add File to add a local media file, or directly drag a file to the file area, as shown in Figure 1.
- Toggle on the Prevent duplicate files from being uploaded switch to avoid waste of time and storage space.
Configure this parameter as required. If you add a duplicate media file, an error message is displayed in the upper right corner.
- Categorize uploaded files, change the file names, or process these files. If audio/video processing is not required, retain the default settings. If audio/video processing is required, click Process and configure the parameters by referring to Table 2.Figure 2 Processing media files

Table 2 Parameters Parameter
Description
Transcoding template group
Select a preset template group or customize a template group by referring to Transcoding Settings.
Workflow
Select an existing workflow or create one by referring to Workflow Settings.
- Click Upload.
Note:
- The upload duration depends on the file size and network conditions. During the upload, do not refresh the page, clear the browser cache, or close the browser.
- If there is no activity for an extended period during the upload, you may be logged out and the upload will fail.
- View media file information on the Audio and Video Management page.
After a video file is uploaded, the first frame at the first second is used as the thumbnail by default. If a transcoding template group or workflow was configured during media file upload, the configured parameters will automatically apply to the media file processing.

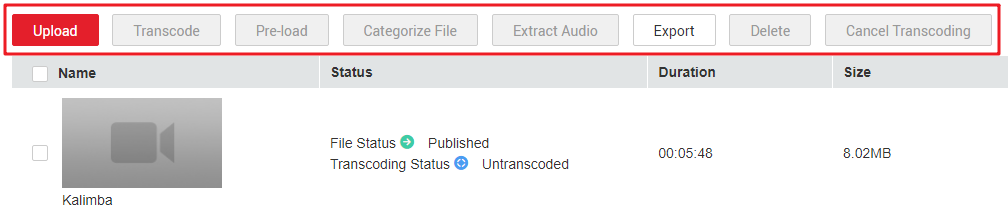
Managing the Media File
- On the Audio and Video Management page, you can view the processing status of media files and perform operations on uploaded files, such as transcoding, preheating, CDN cache refreshing, and changing the storage class. Figure 3 Media file processing
- Click Details in the row containing your media file to view and modify file details, including the streaming URL, thumbnail URL, subtitle URL, label, description, category, and name. For details, see Audio and Video Management. Figure 4 Media file details

Playing the Media File
You can preview a media file on the VOD console or play it using a third-party player.
- Preview on the console: On the Audio and Video Management page, click the video thumbnail to preview a video.

To preview a media file on the console, ensure that HTTPS secure acceleration has been enabled for the domain name and the HTTPS certificate has been uploaded.
- Playback using a player: On the Audio and Video Management page, locate the desired video and click Details on the right. On the Playback tab, click the copy icon in the Operation column to copy the playback URL to the player such as VLC to play the video.
Feedback
Was this page helpful?
Provide feedbackThank you very much for your feedback. We will continue working to improve the documentation.See the reply and handling status in My Cloud VOC.
For any further questions, feel free to contact us through the chatbot.
Chatbot


