
Interconnecting with OBS Instances
Object Storage Service (OBS) is a secure and cost-effective cloud storage service. With OBS, you can easily create, modify, and delete buckets, as well as upload, download, and delete objects. In Huawei Cloud Astro Zero, you can connect applications to OBS to store objects or widgets.
Prerequisites
- To access OBS, you need a HUAWEI ID or an IAM user. This involves registering with Huawei Cloud, completing real-name authentication, creating an IAM user, funding your account, and purchasing the necessary resource packages. For details, see Using OBS Console.
- Obtain the AK and SK to sign the request content. For details, see Access Keys.
- Create a bucket (for example, bing.testonly.1) in OBS. For details, see Creating a Bucket. Record the region selected during bucket creation.
To minimize cross-region network latency, it's recommended to use an OBS bucket in the same region as your Huawei Cloud Astro Zero instance (for example, CN North-Beijing4). If you need to use the OBS bucket across regions, ensure that the bucket has cross-region access permissions and that the network connection is properly configured.
Billing
OBS is billed independently. For details, see Huawei Cloud Pricing. After the application is disabled, OBS is still billed based on the specified billing rules. If you do not need to use OBS, unsubscribe from the instance in a timely manner by referring to Billing Termination to avoid extra fees.
Creating an OBS connector
- Log in to the application designer by referring to Logging In to the Application Designer.
- In the navigation pane, choose Integrations.
- Click Connector Instance under Connector.
- In the navigation pane, choose Storage > OBS.
- In the right pane, click + and set OBS interconnection parameters. Figure 1 Setting OBS interconnection parameters

Table 1 Parameters for creating an OBS connector Parameter
Description
Name
Name of the connector to be created, for example, TestOBS. The naming requirements are as follows:
- The value cannot exceed 64 characters, including the prefix namespace.
To prevent duplicate data names among different tenants, each tenant must define a unique namespace when first creating an application. A tenant can create only one namespace. After being created, the namespace cannot be modified.
- Start with a letter and can contain only letters, digits, and underscores (_). Do not end with an underscore (_).
Auth Mode
Select an authentication mode.
- AK/SK: You need to obtain the access key and manually enter the AK/SK.
- Agency: Select the agency authorization mode. You do not need to enter the access key.
Access Key
Set this parameter to the value obtained in Prerequisites.
Secret Key
Set this parameter to the value obtained in Prerequisites.
CDN
Address of the CDN server. After you configure this parameter, you can access uploaded static resources through CDN without logging in to OBS.
Description
Description of the connector.
Package Current Configuration
If this option is selected, the connector will be packed together with applications. For example, if an application package is released to the runtime environment, the current configuration is synchronized to the runtime environment by default. If this option is not selected, the connector will not be packaged and released to the runtime environment. In this case, you need to create the corresponding connector by referring to Managing Connectors in Applications.
This option is selected by default. You are advised not to select this option in information-sensitive scenarios.
Open Operation Log
If this parameter is selected, operation logs are recorded when users use connectors to upload, download, and view files.
Check Content Type
If this parameter is selected, the system checks whether the file content matches the file name extension type. Currently, only .bmp, .gif, .png, .jpg, .ico, .txt, .xml, and .html are supported.
Use secure connection
Set the region where the bucket resides and the bucket name. You can select multiple buckets. Bucket bing.testonly.1 is used as an example. Specify File Types and File Size (B).
Bucket
Set the region where the bucket resides and the bucket name. You can select multiple buckets. Bucket bing.testonly.1 is used as an example. Specify File Types and File Size (B).
- Region: Region where the created OBS bucket is located.
- Bucket Name: Set this parameter to the name of the bucket created in Prerequisites.
- File Types: Multiple file types can be configured. Use commas (,) to separate multiple file types, for example, txt,png. If this parameter is not set, all types are supported.
- File Size (B): If this parameter is set to 0 or left blank, the size of the file to be uploaded is not limited. The maximum value is 9,007,199,254,740,991, in bytes.
- Renderable Types: This parameter indicates whether to allow the browser to render files by file type.
If HTML and SVG rendering is allowed, it may allow execution of user-uploaded code, posing security risks.
- The value cannot exceed 64 characters, including the prefix namespace.
- Click Save.
- (Optional) Test whether objects can be stored in the bucket. In this test, only an object whose size is less than 1 MB can be uploaded, and only .txt files are supported.
- On the connector details page, click
 in the row containing the bucket.
 - Upload a file.
- Click the name of the uploaded file to download it.
- On the connector details page, click
Calling a Connector Using a Flow
After an OBS connector is created, it can be called by flows to connect to OBS. You can also call the connector in a script to connect to OBS. For details, see Uploading and Recognizing ID Card Images with a Connector.
- Create an empty flow by referring to Creating a Blank Flow.
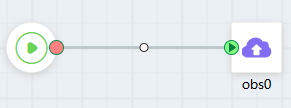
- On the flow design page, choose Connector > Storage, and drag the OBS diagram element to the canvas. Figure 2 Dragging the OBS diagram element to the canvas

- Select the OBS diagram element, click
 , and set basic information. Figure 3 Setting basic information
Table 2 Basic information parameters of the OBS diagram element Parameter
Description
Label
Name of the OBS diagram element displayed in the system.
Name
Unique ID of the OBS diagram element in the system. The ID cannot be the same as that of other diagram elements. The naming requirements are as follows:
- Enter up to 80 characters.
- Start with a letter and can contain only letters, digits, and underscores (_). It cannot end with an underscore (_).
Connector
Select the target connector from the drop-down list, that is, the connector created in Creating an OBS connector.
- Click
 and set parameters for calling OBS. Figure 4 Configuring OBS
Table 3 Action parameters of the OBS diagram element Parameter
Description
Action
Options:- view_object_obs: used to check the storage objects.
- put_object_obs: used to store objects in the system to OBS buckets. Preset This example uses this action to upload a file to OBS.
- get_endpoint_obs: used to obtain the prefix of the object storage address. The prefix plus the path of the uploaded object is the full path of the accessed object.
Input Parameters
Customized parameters set when the connector is defined.- If Target is set to object, set the object name in Source.
- If Target is set to data, configure object data in Source.
- If Target is set to bucket, configure the bucket in Source.
- If Target is set to acl, configure the access control permission for the object file in Source. For example, private, public-read, public-read-write, and default (same as the bucket permission).
Output Parameters
Set Source to result and Target to receive the payment result. You must define a structure variable of an empty instance to receive the payment result.
- Connect the start diagram element to the OBS diagram element. Figure 5 Connecting diagram elements
- Click the blank area of the flow designer, select
 , and set the flow output parameters.
 Use the output parameters of the OBS diagram element as the output parameters of the entire flow.
- Click
 to save the flow.
 - Click
 to activate the flow.
 - On OBS, view the list of objects stored in the bucket. You can see that the objects are stored.
- Click
 to activate the flow.
Feedback
Was this page helpful?
Provide feedbackThank you very much for your feedback. We will continue working to improve the documentation.See the reply and handling status in My Cloud VOC.
For any further questions, feel free to contact us through the chatbot.
Chatbot


