Updated on 2025-08-26 GMT+08:00

Logging In to the Application Designer

Once your instance is ready, log in to the application designer to start application development.

Logging In to the Application Designer

  1. Go to the Huawei Cloud Astro Zero console.
  2. On the homepage, click Access Homepage. The application development page is displayed.

    If the system shows a message indicating that you do not have the developer permission, contact the administrator to add it, see How Do I Grant Developer Permissions to a Subuser After Authorization Fails?
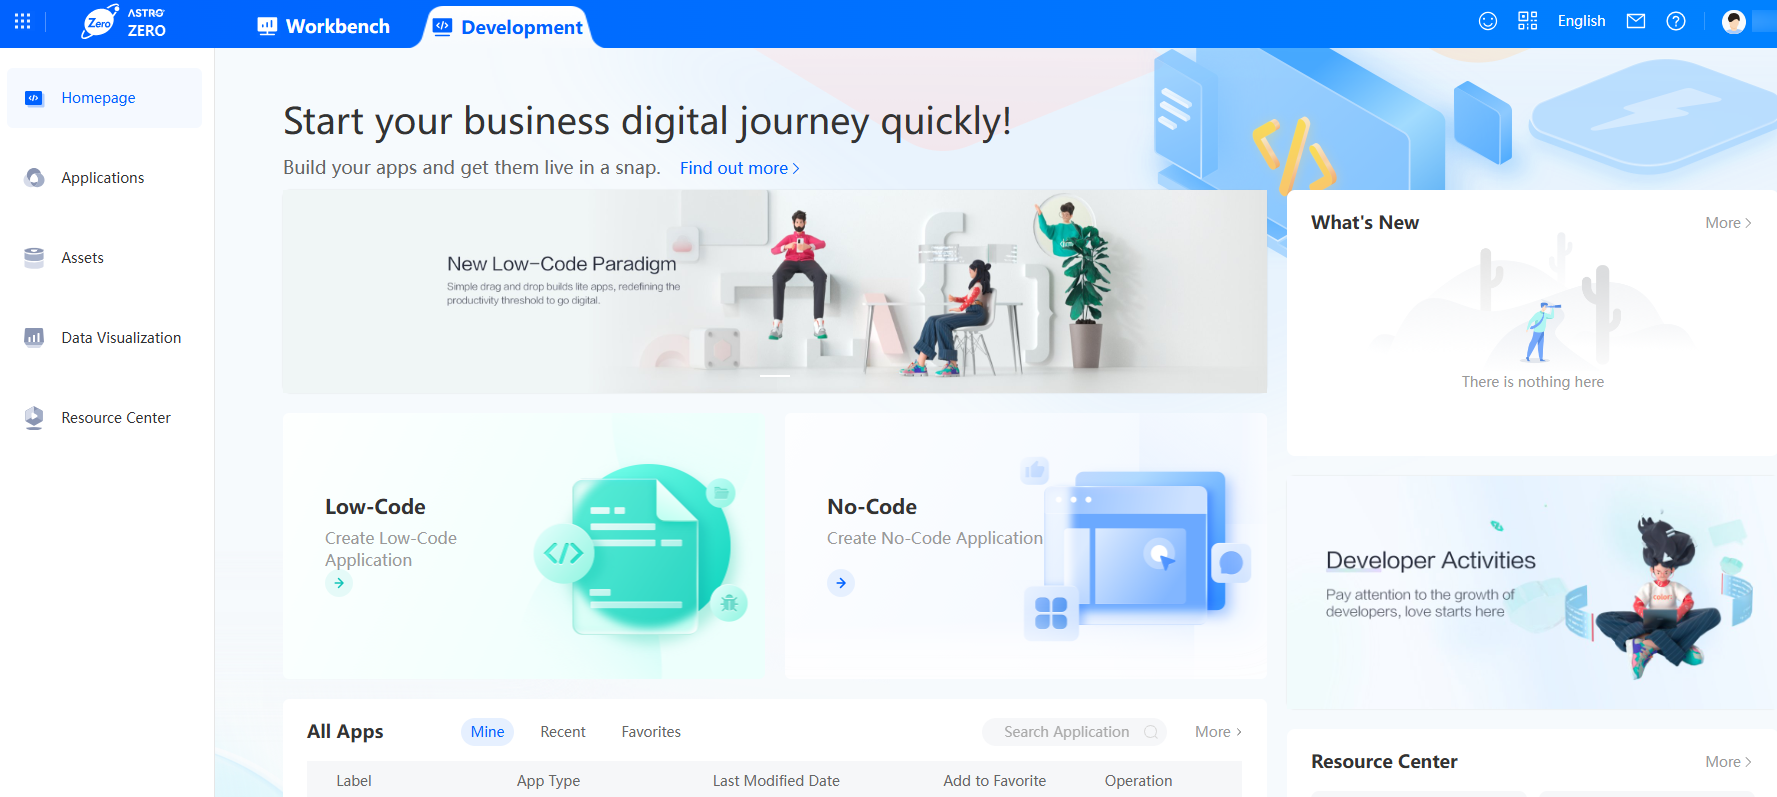
    Figure 1 Application development page
    Table 1 Application development page

    Function

    Description

    Homepage

    On this page, you can quickly build multiple types of applications.

    • All Apps displays the applications that are recently created, accessed, and added to favorites by the current user.
    • What's New displays notices and upgrade information.

    Applications

    Allows you to create no-code and low-code applications and manage all created applications.

    Assets

    Allows you to manage all assets, including reusable BOs and native services developed in traditional languages.

    Visualized Data

    Allows you to access the Huawei Cloud Astro Canvas console. Huawei Cloud Astro Canvas is a visual page creation service provided by Huawei Cloud Astro. It offers abundant widgets, flexible data access, multiple construction functions, and multi-screen adaptation. Developers can quickly create and publish professional large screens. For details, see What Is Huawei Cloud Astro Canvas.

    Evaluation

    Click this icon to rate your satisfaction with the service.

    Chinese

    Click to switch the system language.

    Message Center

    Access the Huawei Cloud message center, a platform for efficient customer communication. Users can receive and manage notifications here to prevent information loss.

    Help Center

    Access the Huawei Cloud Astro Zero help document for systematic learning.

    Username

    Displays the current login account name. Click the account name to access menus for viewing system version information, privacy statement, and service statement.

  3. In the navigation pane, click Applications.

    Figure 2 Application management page
    Click Edit of a low-code application in the application list to access the application designer. If you create a low-code application for the first time, go to 4 to 7.
    Figure 3 Editing a low-code application

  4. Click Low-Code or .

    Figure 4 Creating a low-code application

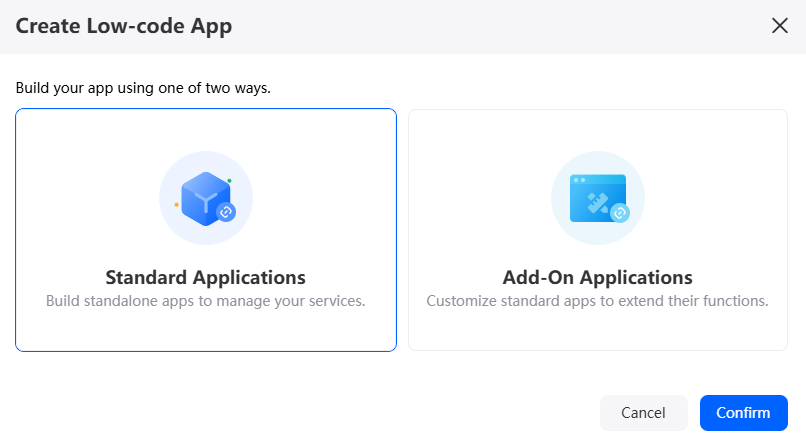
  5. Select an application type and click the confirm button.

    Figure 5 Selecting an application type
  6. Define a dedicated namespace before creating your first application.

    Figure 6 Information
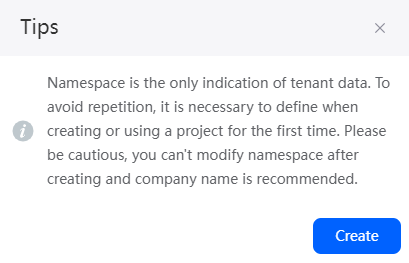
    In the displayed dialog box, click the create button, enter a namespace (for example, CNAME), and click Create. The system returns to the application development page. Perform 4 and 5 again.

    • Data can be packaged and shared between tenants. To avoid duplicate names of data (such as objects, applications, and flows), define a namespace before creating an application. The namespace of each tenant is unique, and only one namespace can be created by each tenant.
    • Once a namespace is created, it cannot be modified or deleted. Before creating a namespace, confirm related information. You are advised to use the abbreviation of the company or team as the namespace.
    Figure 7 Creating a namespace
    Table 2 Parameters for creating a namespace

    Parameter

    Description

    Namespace

    Name of the namespace to be created, which cannot be modified or deleted after being set. The naming requirements are as follows:

    • Enter up to 15 characters.
    • Start with a letter and can contain only letters, digits, and underscores (_). Avoid using two underscores (_) in a row or ending with an underscore (_).

    The system automatically adds the namespace before the name of an application or application element (such as an object, script, flow, or page) that you create. For example, if your namespace is CNAME, the names of all applications and application elements (such as objects, scripts, and pages) that you create later will start with CNAME__.

  7. Enter a label and name of the application, and click the create button. The application designer is displayed.

    Figure 8 Creating a blank application
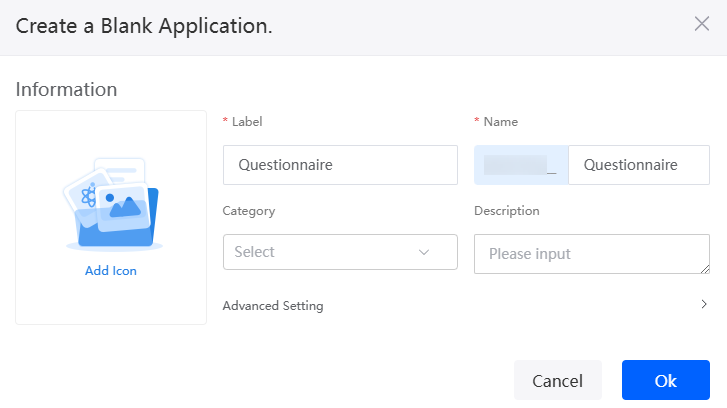
    Table 3 Parameters for creating a blank application

    Parameter

    Description

    Add Icon

    Click Add Icon to add an icon for the new application.

    Label

    Label of the application to be created. The value contains a maximum of 80 characters. A label uniquely identifies an application in the system and cannot be modified after being created.

    Name

    Name of the new application. After you enter the label value and click the text box of this parameter, the system automatically generates an application name and adds the Namespace__ before the name. The naming requirements are as follows:

    • The value cannot exceed 31 characters, including the prefix namespace.

      To prevent duplicate data names among different tenants, each tenant must define a unique namespace when first creating an application. A tenant can create only one namespace. After being created, the namespace cannot be modified.

    • Start with a letter and can contain only letters, digits, and underscores (_). It cannot end with an underscore (_).

    Category

    Category to which the new application belongs. After the category is set, you can filter applications or BOs in the project list and library list by category.

    Description

    Enter the description of the application.

    Value: 1–255 characters.

    Advanced Setting > Runtime Version

    Runtime version that the developed asset packages depend on. If this version is inconsistent with the offline version, incompatibility issues may occur.

Understanding the Application Designer
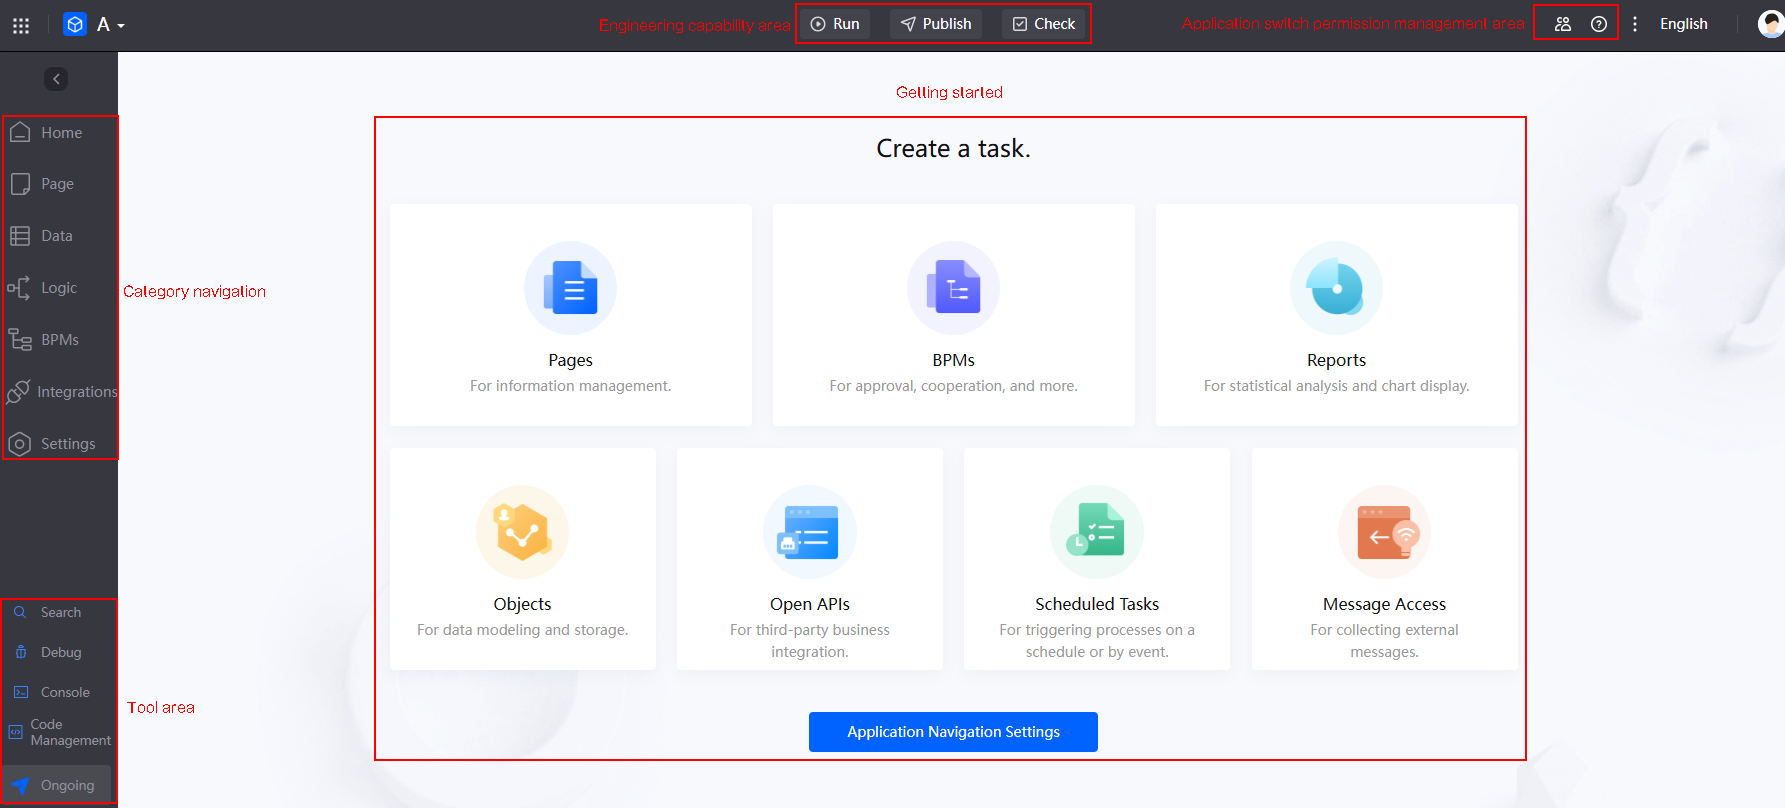
Figure 9 Application designer
Table 4 Functions of the application designer

Area

Description

  • Homepage: Returns to the homepage of the application development page. That is Development > Homepage.
  • Tenants > Console: Returns the console.
  • Environments > Environment Configuration: Environment configuration entry, which provides the functions of managing, configuring, deploying, and running applications.
  • Environments > Configuration Center: Configuration center, which simplifies the application configuration process and helps application administrators quickly manage permissions and configure application resources.

Engineering capability area

In this area, you can run applications, deploy applications in one click, release applications, and check application compatibility.

  • Run > Run Now: You can preview the application that is being developed in the current development environment.
  • Run > Run in a local sandbox: You can run an application in the local sandbox and perform joint debugging with the local system.

    This function is restricted. To use it, submit a service ticket.

  • Publish > One-click deployment: You can deploy applications to the production environment or sandbox environment with one click, including packaging, installation, and running. For details, see Releasing and Deploying Applications Quickly.
  • Publish > Release Version: You can release a new version of an application. By releasing a version, you can upgrade an application. Subsequent development will be performed on the new version.
  • Publish > Generate Installation Package: You can generate an installation package when installing or upgrading an application for the first time. For details, see Releasing and Deploying the Installation Package or Patch Package of Applications Developed on Huawei Cloud Astro Zero.
  • Publish > Generate Patch Package: You can generate a patch package when rectifying application problems. For details, see Releasing and Deploying the Installation Package or Patch Package of Applications Developed on Huawei Cloud Astro Zero.
  • Publish > Generate Mobile App: Select this packaging mode for generating applications intended for mobile device installation. Before selecting this packaging mode, ensure that the applet mode is enabled. For details, see Releasing the Developed Application as a Mobile Applet.
  • Publish > Packaging Settings: You can set application packaging parameters. These settings will be used when you release or package applications.
  • Check: Application compilation check, which checks whether resources in an application are correctly configured or enabled. If an error message is displayed, the application can be released only after the error is solved.

Application switch permission management area

In this area, you can perform collaborative development and switch between light and dark modes.

  • : Applications are developed by different teams. Each team has the corresponding permissions to check, develop, and manage the applications they work on.
    • Click and click Add Developer under Management.
    • Click Add next to Added Users and select the users for collaborative development.
    • Click Next, set permissions for the added user, and click Confirm.

      View App: allows you to access and view elements in an application through the application designer.

      Edit App: allows you to edit application information, settings, and elements within the application.

      Delete App: allows you to delete an application from the environment.

      Manage Version: allows you to manage application versions, including releasing, switching, and deleting versions.

      Build Package: allows you to package, install, and deploy applications.

      Manage App: allows you to manage application developers and security levels.

  • : You can access the Huawei Cloud Astro Zero help document for systematic learning.
  • : You can switch the application designer to light or dark mode and view system messages sent from Huawei Cloud Astro Zero to the Huawei account.

Navigation pane

In this area, you can choose Page, Data, Logic, BPMs, and Integrations.

  • Home: indicates the application development wizard page. You can quickly create project elements, such as pages, BPMs, scheduled tasks, reports, and data objects, and set application navigation.
  • Page: stores pages and reports. You can create standard pages, advanced pages, and reports. Choose More > Page Setting to set page properties, plug-ins, resources, and properties. For details, see Frontend Development.
  • Data: stores application objects, view objects, events, and structures. You can create objects, view objects, and events. Choose More > Picklists. The picklist of the application is displayed. For details, see Objects, Events, and Structures.
  • Logic: stores flows, scripts, and triggers. You can create flows, scripts, and triggers. Choose More > System Parameter to create or import system parameters. Or click Custom Error Codes to customize error codes. Click the template button to add a template scenario. After a template scenario is created, it can be used in flows. For details, see Scripts, Flows, and Triggers.
  • BPMs: stores business processes and scheduled tasks of the application. You can create business processes and scheduled tasks. For details, see BPMs and Scheduled Tasks.
  • Integrations
    • Connector: A connector is an integration tool. The platform encapsulates different types of connectors to connect to third-party services. With connectors, developers do not need to pay attention to the implementation code. They only need to configure the service address and authentication information to quickly integrate third-party systems in flows or scripts. For details, see Using Connectors to Interconnect with Cloud Services.
    • Message Access: When data needs to be obtained from external data sources, the data needs to be processed before being converted into internal events and sent to the Kafka or ROMA Connect. In the platform, the message access function can implement the preceding process. For details, see Integrating Message Data into Huawei Cloud Astro Zero Through the Data Access Function.
    • Open API: stores the custom public APIs of applications. You can encapsulate scripts and flows into custom REST APIs and publish them. After encapsulation, URLs are more standard for easy calling by third-party systems. For details, see Open APIs.
  • Settings: provides an entry for application settings, including application information, appearance, and theme management. For details, see Customizing Applications.

Tool area

The area provides developers with a suite of auxiliary tools, including search, debugging, command line access, and code management features.

  • Search: Enter keywords to search for the names or metadata of all resources under a tenant. Advanced search is available. You can search for resources by resource type (such as script and advanced page). To update search results in real time, click Update Search Index to update the index library. If the data volume is large, updating the library may take a long time. Then search for the keyword to refresh the search result. For example, if you want to view all resources associated with object A, you can use the object name as a keyword to search by content, or use the method name as a keyword to search for all scripts that contain a specific method. Then click a script in the search result. The description of the script and the key script code that contains the method are displayed. A maximum of 300 search results can be displayed.
  • Debug: indicates whether to enable log tracing. For details, see Viewing System Logs.
  • Console: Access the developer console and run some SQL commands to collect information for fault locating. For details, see Enabling Log Tracing.
  • Code Management: On the Unlock Resources tab page, you can release locks for resources. During development, you can lock elements to prevent multiple users from modifying the elements at the same time. If the lock fails to be released, you can manually release the lock.

Getting started

Starts with real-world use cases to guide developers step by step.