
Connecting MinIO for Object and Asset Storage
MinIO, an object storage API pre-configured in the system, can be directly used and customized. To store object or widget assets, you can connect your applications to MinIO.
Prerequisites
- You have obtained the access key ID and access key for MinIO.
- A bucket has been created on MinIO for storing objects.
Creating a MinIO Connector
- Log in to the application designer by referring to Logging In to the Application Designer.
- In the navigation pane, choose Integrations.
- Click Connector Instance under Connector.
- In the navigation pane, choose Storage > MINIO.
- In the right pane, click + and set the parameters. Figure 1 Setting basic information

Table 1 Parameters for creating a MinIO connector Parameter
Description
Name
Name of the new connector. The naming rules are as follows:
- The value cannot exceed 64 characters, including the prefix namespace.
To prevent duplicate data names among different tenants, each tenant must define a unique namespace when first creating an application. A tenant can create only one namespace. After being created, the namespace cannot be modified.
- Start with a letter and can contain only letters, digits, and underscores (_). Do not end with an underscore (_).
Access Key
Access key ID of MinIO, which needs to be obtained in advance.
Secret Key
Access key of MinIO, which needs to be obtained in advance.
CDN
Address of the CDN server. After you configure this parameter, you can access uploaded static resources through CDN without logging in to MinIO.
Description
Description of the connector.
Package Current Configuration
By default, this parameter is selected, which synchronizes the connector configuration to the target environment (for example, the runtime environment) during application packaging. For information-sensitive scenarios, it is advisable not to select this parameter. If you do not select it, you will need to reconfigure the connector in the target environment. For details, see Managing Connectors in Applications.
Open Operation Log
If this parameter is selected, operation logs are recorded when users use connectors to upload, download, and view files.
Check Content Type
If this parameter is selected, the system checks whether the file content matches the file name extension type. Currently, only .bmp, .gif, .png, .jpg, .ico, .txt, .xml, and .html are supported.
Bucket
Set the region and name of the bucket. You can add multiple buckets. Specify File Types and File Size (B).
- Region: Enter the region where the bucket resides.
- Bucket Name: name of the bucket to be created.
- File Types: Multiple file types can be configured. Use commas (,) to separate multiple file types, for example, txt,png. If this parameter is not set, all types are supported.
- File Size (B): If this parameter is set to 0 or left blank, the size of the file to be uploaded is not limited. The maximum value is 9007199254740991, in bytes.
- The value cannot exceed 64 characters, including the prefix namespace.
- (Optional) Test whether objects can be stored in the bucket. Only objects smaller than 1 MB can be uploaded.
- On the connector details page, click
 in the row containing the bucket.
 - Upload a file. Figure 2 Selecting objects
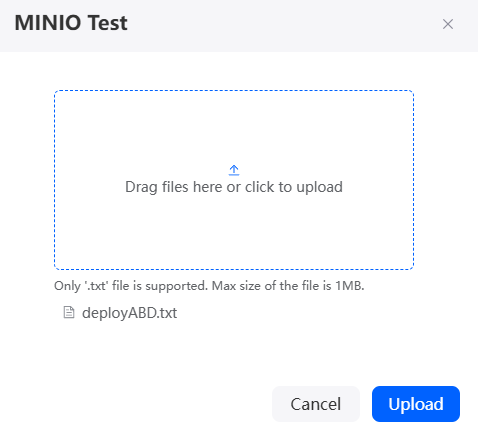
- Click the name of the uploaded file to download it.
- Open the downloaded file and check whether it is the same as the file you uploaded.
- On the connector details page, click
Calling a Connector Using a Flow
After the MinIO connector is created, it can be called by flows to connect to MinIO. You can also call the connector in a script to connect to MinIO.
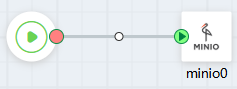
- Create an empty flow by referring to Creating a Blank Flow.
- On the flow design page, choose Connectors > Storage, and drag the minio diagram element to the canvas.
The minio diagram element is a storage API preset in the system for connecting to MinIO.
Figure 3 Dragging the minio diagram element to the canvas
- Click the diagram element, click
 , and set basic information. Figure 4 Setting basic information
Table 2 Parameters Parameter
Description
Label
Label of the diagram element, which is displayed on pages.
Name
Unique ID of the diagram element in the system. The ID cannot be the same as that of other diagram elements. The naming requirements are as follows:
- Enter up to 80 characters.
- Start with a letter and can contain only letters, digits, and underscores (_). It cannot end with an underscore (_).
Description
Enter the description of the diagram element in the text box.
Connector
Select the target connector from the drop-down list, that is, the connector created in Creating a MinIO Connector.
- Click
 and set parameters for calling MinIO. Figure 5 Configuring parameters
Table 3 Action parameters Parameter
Description
Action
Action preset by the system for the connector. Select an action based on service requirements.- view_object_minio: Check the storage objects.
- put_object_minio: Store objects in the system to MinIO buckets. This example shows how to store an object.
- get_endpoint_minio: used to obtain the prefix of the object storage address. The prefix plus the path of the uploaded object is the full path of the accessed object.
Input Parameters
Parameters that need to be configured when a flow calls a connector.- If Target is set to object, set the object name in Source.
- If Target is set to data, configure object data in Source.
- If Target is set to bucket, configure the bucket in Source. In the connector list, click the connector name to go to the details page and view the bucket information.
- If Target is set to acl, configure the access control permission for the object file in Source. For example, private, public-read, public-read-write, and default (same as the bucket permission).
Output Parameters
Set Source to result and Target to receive the payment result. You must define a structure variable of an empty instance to receive the payment result.
- Connect the start diagram element to the minio diagram element. Figure 6 Connecting diagram elements
- Click the blank area of the flow designer, select
 , and set the flow output parameters.
 Use the output parameters of the minio diagram element as the output parameters of the entire flow.
Figure 7 Setting output parameters
- Click
 to save the flow.
 - Click
 to activate the flow.
 - On MinIO, view the list of objects stored in the bucket. You can see that the objects are stored.
Feedback
Was this page helpful?
Provide feedbackThank you very much for your feedback. We will continue working to improve the documentation.See the reply and handling status in My Cloud VOC.
For any further questions, feel free to contact us through the chatbot.
Chatbot


