Quickly Migrating Servers in Batches
This section describes how to quickly migrate a group of servers by creating a migration plan and a migration workflow based on that plan.
Constraints
- Migration plans can be created only in the AP-Singapore and TR-Istanbul regions.
- Only one migration workflow can be created for a migration plan.
- A migration plan can only include source servers from the same platform.
- A server can only be included in one migration plan.
- A migration plan can include a maximum of 100 servers.
- Source servers in workflows created by the same user must have unique MAC addresses. Duplicate MAC addresses may cause network conflicts or task execution errors.
- You can migrate up to 150 servers at the same time. Any additional servers beyond this limit will have their workflows paused at the initial step and stay in a pending state. Once other migrations complete, these workflows will automatically resume in the order they were created.
- If this is your first time to create a server migration workflow, you need to assign MgC the required permissions. For more information about the required permissions, see Agency Permissions.
Precautions
Before creating a server migration workflow, read and understand the precautions below.
|
Item |
Description |
|---|---|
|
Source download bandwidth |
Used to download SMS-Agent to source servers.
|
|
Migration bandwidth |
|
|
Available CPUs and memory |
|
|
OS compatibility |
For details, see Supported OSs. |
|
Server migration statements |
For details about the important statements you need to understand before the migration, see What Are the Important Statements of SMS? |
|
Constraints |
For details about the notes and constraints for server migration, see Notes and Constraints. |
|
Billing |
For details about the costs that may be incurred during the migration, see Billing. |
|
Permissions configuration |
IAM is used for fine-grained permissions management. For details, see Permissions Management. |
|
Migration network and ports |
For details about the requirements for the migration network and ports, see How Do I Set Up a Secure Migration Network for Using SMS? |
|
Changes in server configurations before and after migration |
For details about the configurations that may change after the migration, see What Are the Differences Between the Source and Target Servers After the Migration? |
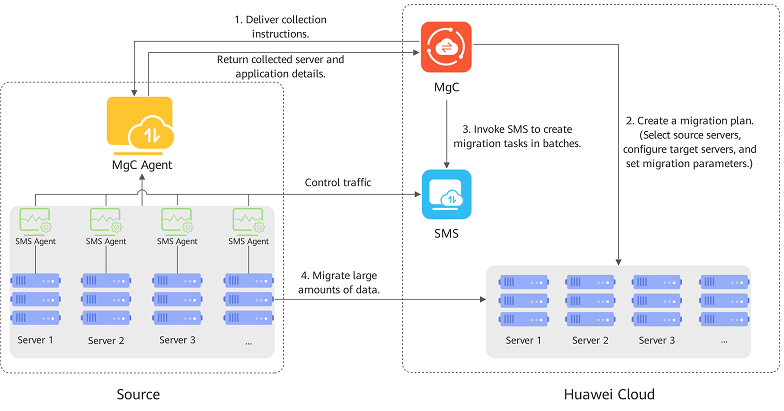
Migration Principles
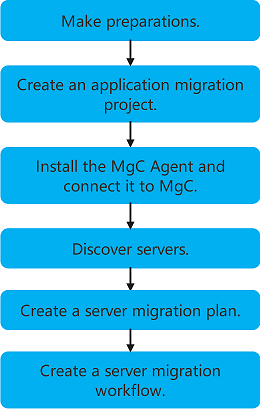
Operation Process
|
Step |
Description |
|---|---|
|
Sign up for a HUAWEI ID, enable Huawei Cloud services, complete real-name authentication, and obtain an AK/SK pair. |
|
|
Create a project to segregate and manage your migration resources. |
|
|
The MgC Agent is a tool used to discover resources and collect their details. It is also used for executing migration workflow tasks. |
|
|
Discover source servers and collect their details. |
|
|
Create a migration plan using the "Batch Server Migration" template to outline the servers to be migrated together and configure the target servers. After the migration plan is configured, you can create a server migration workflow based on that plan. |
Preparations
Before using MgC, prepare a HUAWEI ID or an IAM user that can access MgC. In addition, you need to enable Huawei Cloud services, complete real-name authentication, and obtain an access key.
Step 1: Create an Application Migration Project
- Sign in to the MgC console.
- In the navigation pane on the left, choose Settings.
- Under Migration Projects, click Create Project.
Figure 3 Creating a project

- In the Create Project dialog box, set Project Type to Application migration.

The project type cannot be changed after the project is created.
Figure 4 Setting the project type to application migration
- Enter a project name and click Create. After the project is created, you can view it in the project list.
Step 2: Install the MgC Agent and Connect it to MgC
- Install the MgC Agent on Windows. Log in to the MgC Agent console using the Huawei Cloud Access Key.
- Connect the MgC Agent to MgC.
Step 3: Discover Source Servers
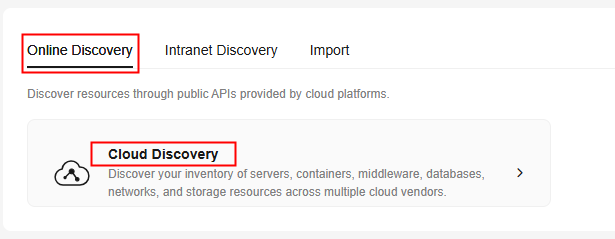
- Online Discovery: This method is recommended if your source servers run on a cloud platform, such as Alibaba Cloud, Huawei Cloud, AWS, Tencent Cloud, Google Cloud, or Azure.
- Intranet Discovery: This method is recommended if your source servers run in an on-premises or vCenter environment.
- Manual Addition: This method can be used in all scenarios.
The following describes how to perform an online discovery.
- Sign in to the MgC console. In the navigation pane, under Project, choose your application migration project from the drop-down list.
- In the navigation pane, choose Source Resources.
- Under Online Discovery, click Cloud Discovery.
Figure 5 Cloud platform discovery

- Configure the parameters based on Table 1 to create a discovery task.
Table 1 Parameters for creating a cloud discovery task Area
Parameter
Description
Task Settings
Source Platform
Select the source cloud platform. Currently, Alibaba Cloud, Huawei Cloud, AWS, Tencent Cloud, Google Cloud, and Azure are supported.
Collection Method
If you choose Credential, select the credential for accessing the source cloud platform. If the credential is not in the drop-down list, choose Add Credential to add it. For details, see Managing Credentials.
- If the source cloud platform is Alibaba Cloud, Huawei Cloud, AWS, or Tencent Cloud, select AK/SK for Authentication and enter the AK/SK pair of your source cloud account.
- If the source cloud platform is Google Cloud, select Configuration File for Authentication and upload the configuration file that contains your Google Cloud service account credentials. The file must be in JSON format and cannot exceed 4 KB. For details about how to obtain the configuration file, see Obtaining Google Cloud Credentials Configuration Files.
- If the source cloud platform is Azure, select ID/Secret for Authentication. To learn how to obtain Azure credentials, see How Do I Obtain Azure Credentials?
If you choose Agency, a cloud service agency is required to assign MgC the permissions required to access resources in your current account. For details about the agency permissions, see Cloud Discovery.
NOTE:This option is available only when Source Platform is set to Huawei Cloud.
If the Agency Status is Agency not created, click Create Agency. On the displayed page, click OK.
Region
Select the regions where your source resources are deployed.
Resource Type
Select Servers from the drop-down list.
Basic Information
Task Name
The default name format is <task type>-<current-time>. You can also specify a name.
Task Description (Optional)
Describe the task.
Application (Optional)
Select the application that you want to group the discovered resources into. If no applications are available, perform the following steps to create one:
- Click Create Application. Enter an application name and description.
- Configure Business Scenario and Environment, and set Region to the region that you want to migrate to.
- Click OK.
- Click Confirm. After the online discovery task is created, MgC starts discovering source resources.
- If the task succeeds, return to the Source Resources page and view the list of discovered source resources and their details.
- If the task fails, click the task name to view the data source that fails to be collected. Hover over to the collection status to view the failure cause.
Figure 6 Viewing the failure cause

Step 4: Create a Server Migration Plan
You can create a migration plan using the template provided by MgC. After that, you can create a server migration workflow based on that plan. For details, see Creating a Server Migration Plan.
Feedback
Was this page helpful?
Provide feedbackThank you very much for your feedback. We will continue working to improve the documentation.See the reply and handling status in My Cloud VOC.
For any further questions, feel free to contact us through the chatbot.
Chatbot


