
Creating an Issue Ticket and Sending Notifications to Shift Roles
COC provides three essential configuration capabilities: managing personnel, organizing shift schedules, and configuring notification rules. These capabilities automate and streamline O&M tasks on COC.
- Personnel Management: empowers you to centrally manage personnel on COC. You can manage users of the current tenant on the Personnel Management page. The basic user data on the Personnel Management page is synchronized from Identity and Access Management (IAM). The data is used by multiple basic functional modules, including those for creating to-do tasks, performing scheduled O&M tasks, managing notifications, and managing incidents.
- Shift Schedule Management: enables you to manage personnel centrally, from multiple dimensions, in different forms, or based on your other custom requirements. You can also create shift scenarios and roles and add members to the shift scenarios and assign roles to the members as required.
- Notification Management: lets you create notification instances with notification scenarios and matching rules. The system checks new O&M tickets against these rules and scenarios, identifies who should be notified, determines the notification content and delivery method, and then sends the notifications automatically.
The preceding three basic configuration capabilities can be widely used in core O&M phases such as incident ticket handling, issue ticket handling, O&M tasks owner assignment, reviews, and notification sending.
This section demonstrates the basic configuration capabilities using a typical scenario where issue tickets trigger automatic notifications to the relevant shift roles.
Operation Process
- Step 1: Synchronize Personnel Information: Synchronize users and basic information under the current Huawei Cloud account.
- Step 2: Create a Shift Schedule Task: Create a shift scenario and roles to manage personnel, and specify owners for shifts in incident, change, and issue handling scenarios.
- Step 3: Configure a Notification Rule: Create a notification rule. When a scenario is triggered, the system automatically sends the corresponding notification.
- Step 4: Create an Issue Ticket: Create an issue ticket to follow up the issue if you identify any defects or poor performance issues when using software products. You can configure notification rules in the Notification Management module to notify users of issue ticket statuses.
Preparations
- You have signed up for a HUAWEI ID and completed real-name authentication.
Before using COC, sign up for a HUAWEI ID, enable Huawei Cloud services, and complete real-name authentication.
If you have already enabled Huawei Cloud services and completed real-name authentication, skip this step.
- You have enabled COC.
Upon your first login, enable COC first.
If you have enabled COC, skip this step.
- You have purchased a Fault Management package. For details about the package, see Billing.
If you have purchased a package, skip this step.
Step 1: Synchronize Personnel Information
- Log in to COC.
- In the navigation pane, choose Basic Configurations > Personnel Management.
- Click Synchronize Engineer Info. Figure 1 Synchronizing personnel information

Step 2: Create a Shift Schedule Task
- In the navigation pane, choose Basic Configurations > Shift Schedule Management.
- On the shift schedule management page, click Create Schedule. Figure 2 Creating a shift schedule

- On the Create Schedule page, configure the shift scenario. Figure 3 Configuring a shift scenario
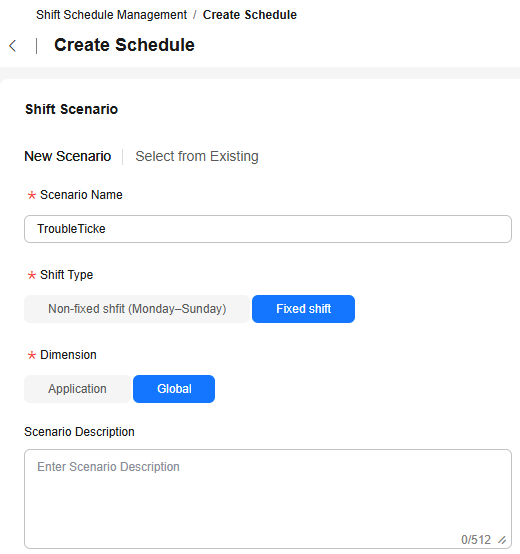
Table 1 Parameters for creating a scenario Parameter
Example Value
Description
Scenario Name
Issue Ticket Handling
Name of a customized shift scenario.
Shift Type
Fixed shift
Fixed shift: Personnel are managed by fixed shift. Personnel in each shift is assigned corresponding roles.
Dimension
Global
Global: The selected shift is globally used regardless of applications.
- Set shift roles and click OK. Figure 4 Setting parameters for a shift role
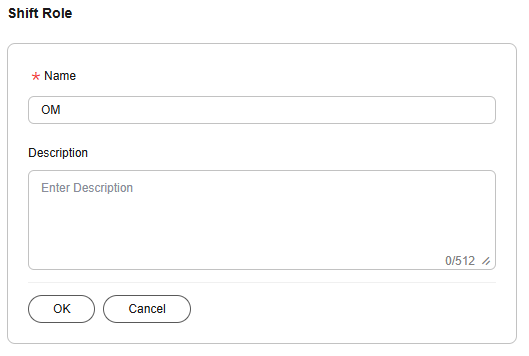
Table 2 Parameters for configuring a shift role Parameter
Example Value
Description
Name
OM
Name of a user-defined role.
- Click OK. The shift schedule is created.
- Click O&M Roles to return to the shift management page.
- On the displayed page, click Add Owner to add an owner to the shift schedule.
- Select one or more users from the drop-down list. Figure 5 Adding personnel

- Click OK. The shift owner is added.
Step 3: Configure a Notification Rule
You can create a notification rule. Once an incident, issue, or change ticket matches conditions in this rule, a notification is automatically sent.
- In the navigation pane, choose Basic Configurations > Notification Management.
- Click Create Notification in the upper right corner.
- Set the basic information about a notification rule.
The following table describes only the mandatory parameters. Retain the preset values for other parameters. For details about how to set the parameters, see Managing Notifications.
Table 3 Parameters for creating a notification Parameter
Example Value
Description
Name
Issue Ticket
Specify the notification name.
Type
Select Issue Notification.
The options are Incident Notification, Issue Notification, Change Notification, and Alarm Notification.
Template
Select Issue creation and Issue resubmission.
Select a notification template from the drop-down list. Multiple templates can be selected.
Notification content templates are preset by the system. The template list varies depending on the notification type. After a template is selected, the notification template details are displayed.
Recipient
Select Shift and select the shift scenario and shift role set in Step 2: Create a Shift Schedule Task from the drop-down list.
Select a value from the drop-down list box based on the configured shift scenario and role.
Method
Select Email.
You can select Select all, SMS, Phone Call, Lark, WeCom, DingTalk, or Email. Multiple options can be selected.
- Click OK. The notification rule is created.
Step 4: Create an Issue Ticket
If you identify any defects or poor performance issues during the software product operation, you can create an issue ticket to monitor the issue.
- In the navigation pane, choose Fault Management > Issues.
- Click Create Issue Ticket in the upper right corner.
- Set the basic information about the issue ticket.
The following table describes only the mandatory parameters. Retain the preset values for other parameters. For details about how to set the parameters, see Creating an Issue Ticket.
Table 4 Parameter description Parameter
Example Value
Description
Issue Title
Issue ticket_Notification
Customize the issue title.
Issue Description
-
Describe the issue and its impacts on the live network.
Enterprise Project
default
Select an enterprise project from the drop-down list.
Issue Source
Proactive O&M discovery
(Optional) The options are incident, alarms, WarRoom, and Proactive O&M discovery.
Issue Application
test
Select the issue application from the drop-down list.
Issue Level
Minor
The value can be Critical, Major, Minor, or Prompts.
- Critical: The system or application breaks down, stops, or suspends, causing data loss. Major functions are unavailable, or the module or related modules are abnormal.
- Major: Some of the system's major functions are unavailable, data cannot be saved, and certain minor functions are also affected. The fault is isolated to the module, resulting in failed functions or abnormal exits.
- Minor: Minor functions are only partially implemented but remain usable. For example, prompt messages may be inaccurate, the user interface may be poor, certain operations may take longer than expected, and some module features may not work correctly.
- Prompts: There are minor software defects that cause inconvenience or difficulties for operators, but they do not affect the system operation or the execution of functions.
Type of Issue
Maintainability
Select the issue type from the drop-down list.
Owner
Select Shift and select the shift scenario and shift role set in Step 2: Create a Shift Schedule Task from the drop-down list.
The value can be Shift or Individual.
Shift: Select a scenario and a role from the drop-down lists based on the configured values.
- Click OK. The issue ticket is created.
The ticket status is Not accepted, and the shift role will receive a notification for handling the ticket.
Figure 6 Notification for handling a ticket
Feedback
Was this page helpful?
Provide feedbackThank you very much for your feedback. We will continue working to improve the documentation.See the reply and handling status in My Cloud VOC.
For any further questions, feel free to contact us through the chatbot.
Chatbot


