
Using ServiceStage to Host Microservice Applications
ServiceStage is an application management and O&M platform that lets you deploy, roll out, monitor, and maintain applications all in one place. It supports technology stacks such as Java, PHP, Python, Node.js, Docker, and Tomcat, and supports microservice applications such as Apache ServiceComb Java Chassis (Java chassis) and Spring Cloud, making it easier to migrate enterprise applications to the cloud.
This example describes how to quickly create a microservice application based on the source code and ServiceComb (SpringMVC) framework to experience the ServiceStage functions.

ServiceStage provides demos in different languages based on GitHub. Experience the source code deployment function of the demo in a specific language on ServiceStage. For details, see How Do I Use the ServiceStage Source Code Deployment Function?
Procedure
Figure 1 shows the process of using ServiceStage to host microservice applications.
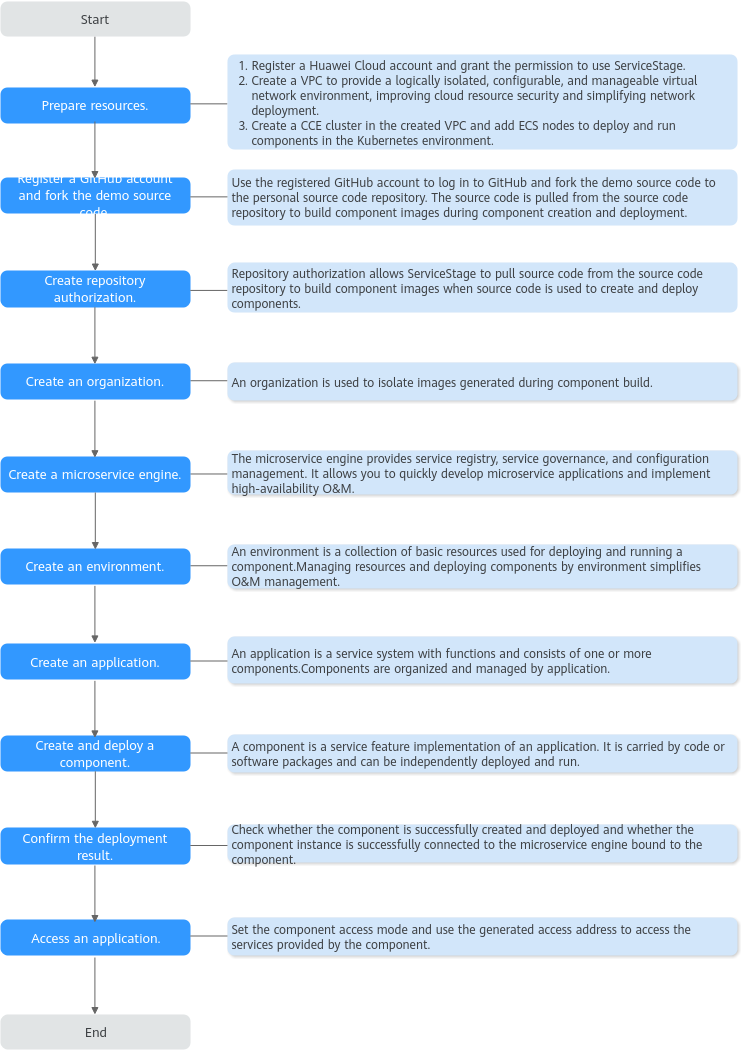
- I. Registering a GitHub Account and Forking the Demo Source Code
- II. Creating Repository Authorization
- III. Creating an Organization
- IV. Creating an Exclusive Microservice Engine
- V. Creating an Environment
- VI. Creating an Application
- VII. Creating and Deploying a Component
- VIII. Confirming the Deployment Result
- IX. Accessing the Application
Prerequisites
- You have registered a Huawei account and enabled Huawei Cloud services.
- The login account has the permission to use ServiceStage. For details, see Creating a User and Granting Permissions.
- You have created a VPC. For details, see Creating a VPC.
- You have created a CCE cluster. For details, see Buying a CCE Cluster.
- The CCE cluster is in a VPC that has been created.
- The cluster contains at least one ECS node with 4 vCPUs and 8 GB memory, and is bound to an EIP. For details, see Creating a Node.
I. Registering a GitHub Account and Forking the Demo Source Code
- Register a GitHub account.
- Log in to GitHub.
- Navigate to the demo source code repository.
- Fork the demo source code repository to your account. For details, see Forking a repository.
II. Creating Repository Authorization
- Log in to ServiceStage using a registered Huawei Cloud account.
- In the region list, select a region where ServiceStage is to be used, for example, AP-Singapore.
Figure 2 Selecting the service region

- In the navigation tree on the left, choose Continuous Delivery > Repository Authorization.
- Click Create Authorization. The page for creating repository authorization is displayed.
- Retain the default authorization name.
- Set Repository Authorization.
- Select GitHub.
- Select OAuth.
- Click Authenticate with OAuth.
- After reading the service statement, select I understand that the source code building function of the ServiceStage service collects the information above and agree to authorize the collection and use of the information.
- Click OK.
- Enter your GitHub account and password to log in to GitHub for identity authentication.
- In the displayed dialog box, click OK. You can view the created authorization in the repository authorization list.
III. Creating an Organization
- In the navigation tree on the left, choose Deployment Source Management > Organization Management.
- Click Create Organization. On the displayed page, specify Organization Name. For example, ss-org.
- Click OK.
You can view the created organization on the Organization Management page.
IV. Creating an Exclusive Microservice Engine

If the engine is created using an account with the minimum permission for creating engines, for example, cse:engine:create in the Fine-grained Permissions, the default VPC security group cse-engine-default-sg needs to be preset by the primary account. For details, see Creating a Microservice Engine.
- In the navigation tree on the left, choose Cloud Service Engine > Engines.
- Click Buy Exclusive Microservice Engine and set the parameters by referring to the following table.
Parameter
Description
Billing Mode
Select Pay-per-use.
Enterprise Project
default is selected by default.
Enterprise projects let you manage cloud resources and users by project.
It is available after you enable the enterprise project function.
Specifications
Retain the default value.
Engine Type
Select Cluster.
Name
Enter a microservice engine name, for example, cse-test.
AZ
Select an AZ for the microservice engine.
Network
Select a VPC and its subnets created in Prerequisites to provision logically isolated, configurable, and manageable virtual networks for your engine.
Security Authentication
Select Disable security authentication.
- Click Buy Now.
- Confirm the parameters. Click Submit.
It takes about 31 minutes to create an engine. After the microservice engine is created, its status is Available.
Figure 3 Creating a microservice engine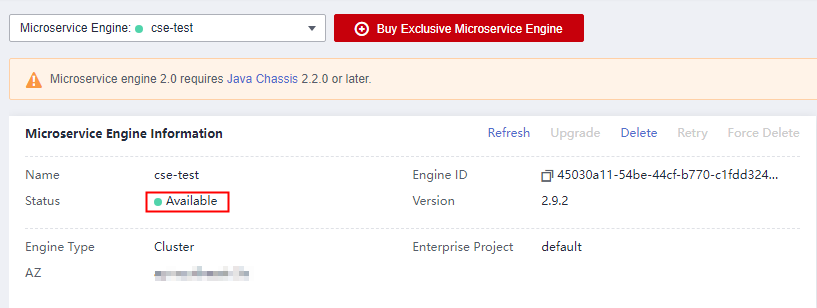
V. Creating an Environment
- Choose Environment Management > Create Environment. Then set required environment parameters by referring to the following table, and retain the default values for other parameters.
Parameter
Description
Environment
Enter an environment name, for example, env-test.
Enterprise Project
default is selected by default.
Enterprise projects let you manage cloud resources and users by project.
It is available after you enable the enterprise project function.
Environment Type
Select Kubernetes.
HA Environment
Select No.
VPC
Select the VPC prepared in Prerequisites.
The VPC cannot be modified after the environment is created.
Configuration Mode
Select Resource management.
Figure 4 Creating an environment
- Click Create Now.
- In the Resource area, choose Cloud Container Engine from Compute and click Bind now.
- In the dialog box that is displayed, select the CCE cluster created in Prerequisites and click OK.
- Choose ServiceComb Engines under Middleware and click Manage Resource.
- In the dialog box that is displayed, select the ServiceComb engine created in IV. Creating an Exclusive Microservice Engine and click OK.
VI. Creating an Application
- Click
 in the upper left corner to return to the Environment Management page.
Figure 5 Backing to Environment Management
in the upper left corner to return to the Environment Management page.
Figure 5 Backing to Environment Management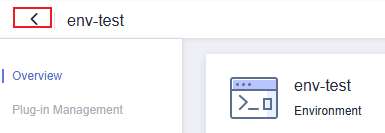
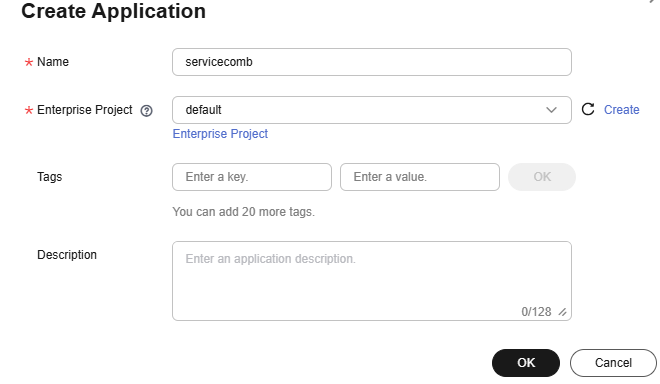
- Choose Application Management > Create Application and configure the application by referring to the following table.
Parameter
Description
Name
Enter an application name, for example, servicecomb.
Enterprise Project
default is selected by default.
Enterprise projects let you manage cloud resources and users by project.
It is available after you enable the enterprise project function.
- Click OK.
Figure 6 Creating an application
VII. Creating and Deploying a Component
- In the Operation column of the application (for example, servicecomb) created in VI. Creating an Application, choose More > Create Component.
Figure 7 Creating a component

- In the Basic Information area, set the following mandatory parameters. Retain the default values for other parameters.
Parameter
Description
Component Name
Enter a component name, for example, java-test.
Component Version
Enter 1.0.0.
Application
Select the application created in VI. Creating an Application, for example, servicecomb.
Environment
Select the environment created in V. Creating an Environment, for example, env-test.
Namespace
Select default to isolate component instances.
Figure 8 Setting the basic component information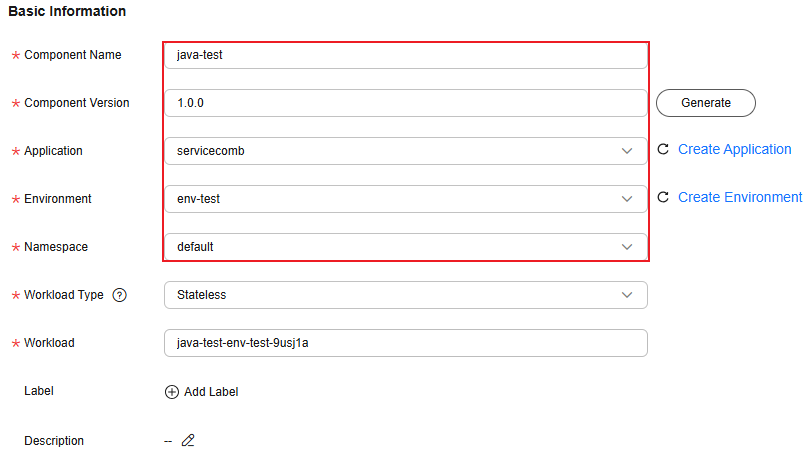
- In the Component Package area, set the following mandatory parameters. Retain the default values for other parameters.
- Stack: Select Java.
- Source Code/Software Package: Select Source code repository.
- Select GitHub.
- Authorization: Select the repository authorization created when II. Creating Repository Authorization.
- Username/Organization: Select the GitHub account created when I. Registering a GitHub Account and Forking the Demo Source Code.
- Repository: Select demo source code repository ServiceComb-SpringMVC forked when I. Registering a GitHub Account and Forking the Demo Source Code.
- Branch: Select master.
Figure 9 Setting the component source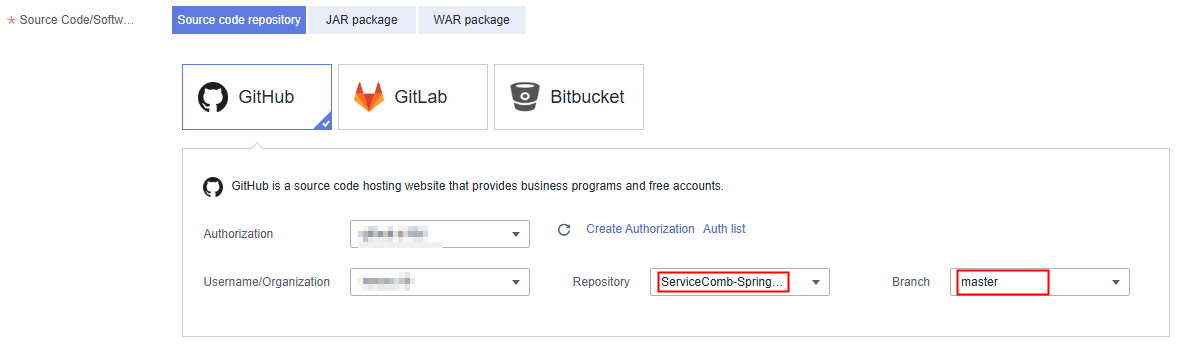
- In the Build Job area, set the following mandatory parameters. Retain the default values for other parameters.
Parameter
Description
Organization
Select the organization created in III. Creating an Organization, for example, ss-org.
An organization is used to manage images generated during component build.
Environment
Select Use current environment to use the CCE cluster in the deployment environment to which the component belongs to build an image.
In the current environment, masters and nodes in the CCE cluster must have the same CPU architecture. Otherwise, the component build fails.
Namespace
Select default to isolate build data.
Figure 10 Configuring build parameters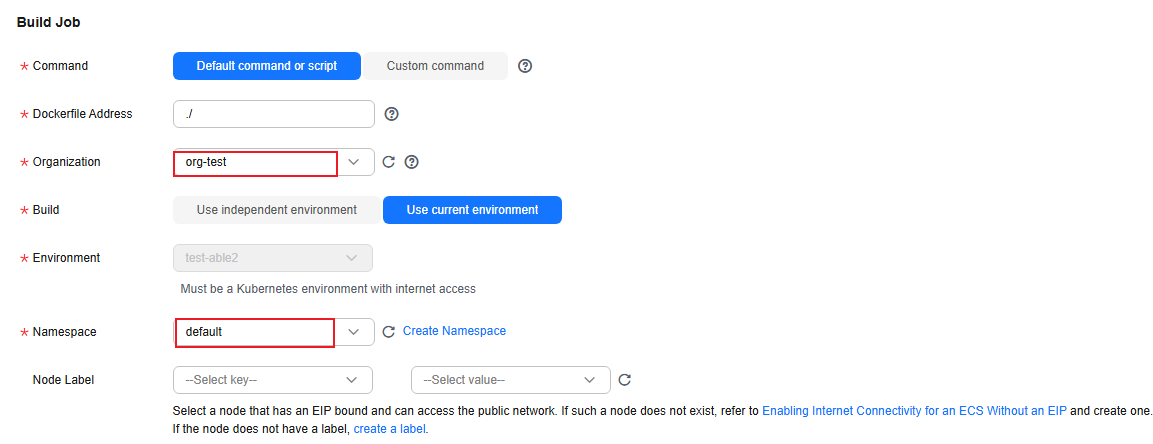
- Click Next.
- In the Resources area, set parameters by referring to the following table.
Parameter
Description
Resources
Deselect CPU and Memory, indicating that the resource usage is not limited.
Instances
Set this parameter to 1.
Figure 11 Setting component instance resources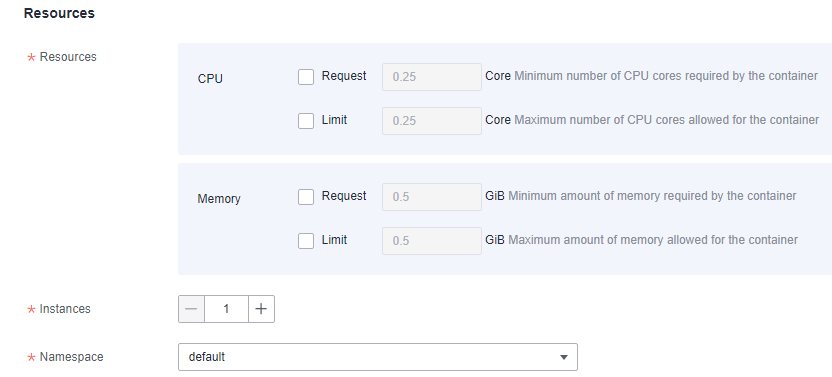
- Bind a microservice engine.
- Choose Cloud Service Settings > Microservice Engine.
- Click Bind Microservice Engine.
- Select the managed exclusive ServiceComb engine in the current environment.
- Click OK.
Figure 12 Binding a microservice engine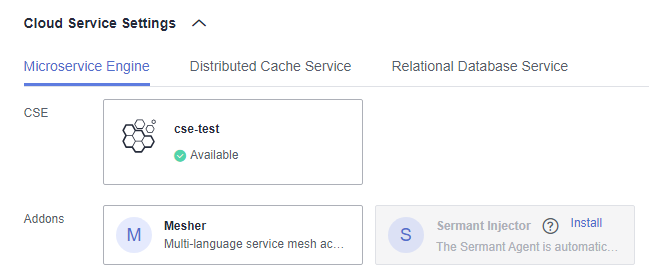
- Click Create and Deploy and wait until the component is deployed.
Figure 13 The component is deployed.

VIII. Confirming the Deployment Result
- Click
 in the upper left corner to return to the Component Management page.
Figure 14 Backing to Component Management
in the upper left corner to return to the Component Management page.
Figure 14 Backing to Component Management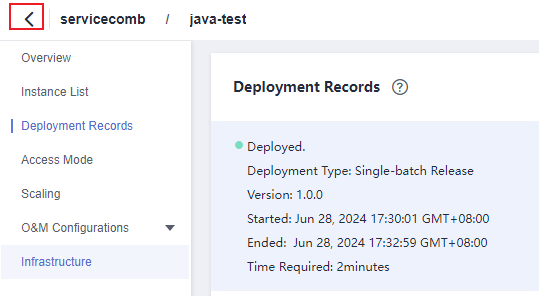
- Choose Cloud Service Engine > Microservice Catalog.
- Select a cloud service engine managed in V. Creating an Environment from the Microservice Engine drop-down list.

- Select springmvc from All applications.
If the servicecombspringmvc microservice exists and the number of microservice instances is 1, the component instance has been connected to the microservice engine.
Figure 15 Confirming the deployment result
IX. Accessing the Application
- Choose Application Management. The application list is displayed.
- Click the application created in VI. Creating an Application (for example, servicecomb). The Overview page is displayed.
- On the Component List tab, click the component created in VII. Creating and Deploying a Component (for example, java-test). The Overview page is displayed.
- Click Access Mode.
- Click Add Service in the TCP/UDP Route Configuration area and set parameters by referring to the following table.
Parameter
Description
Service Name
Retain the default setting.
Access Mode
Select Public network access.
Access Type
Select Elastic IP address.
Service Affinity
Retain the default value.
Port Mapping
- Protocol: Select TCP.
- Container Port: Enter 8080.
- Access Port: Select Automatically generated.
Figure 16 Setting the access mode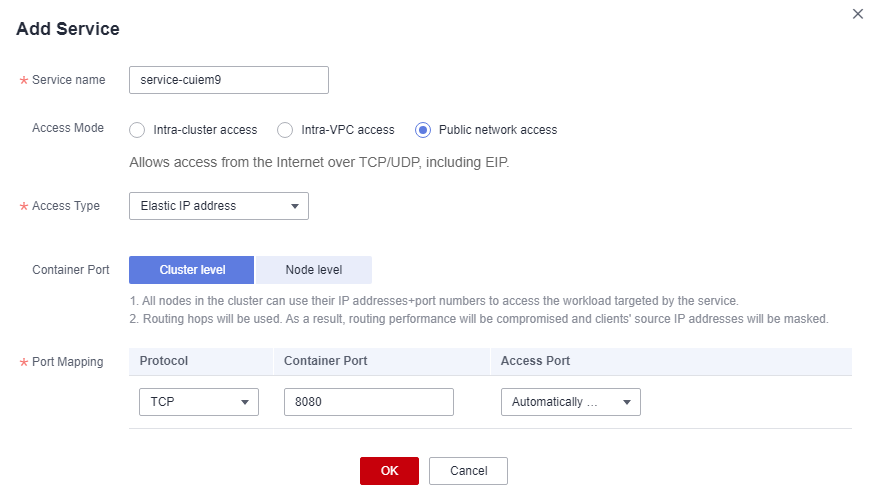
- Click OK.
- Click the access address in the Access Address column to access the application, as shown in Figure 17.
The following information is displayed:
{"message":"Not Found"} - Enter http://Access address generated in 6/rest/helloworld?name=ServiceStage in the address box of the browser to access the application again.
The following information is displayed:
"ServiceStage"

Feedback
Was this page helpful?
Provide feedbackThank you very much for your feedback. We will continue working to improve the documentation.See the reply and handling status in My Cloud VOC.
For any further questions, feel free to contact us through the chatbot.
Chatbot


