Help Center> Config> Getting Started
Updated on 2024-05-29 GMT+08:00

Getting Started

If you are new to Config, this section will help you quickly get familiar with main functions of this service. For more details about Config constrains, see Constraints and Limitations.

The following flowchart shows the operation process.

Figure 1 Getting started flowchart

Enabling the Resource Recorder

After the resource recorder is enabled, Config will notify you of any resource changes (creations, modifications, deletions, or relationship changes) and periodically store your notifications and resource snapshots.

  1. Log in to the management console.
  2. Click in the upper left corner. Under Management & Governance, click Config.
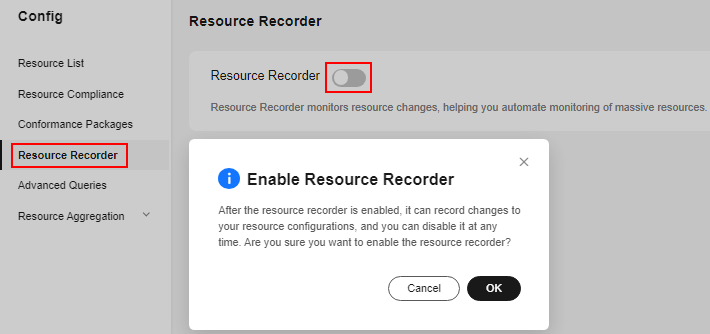
  3. In the left navigation, choose Resource Recorder.
  4. Toggle on the resource recorder. In the dialog box, click Yes.

    Figure 2 Enabling the resource recorder

  5. Select the monitoring scope.

    By default, the resource recorder records all supported resources. You can specify a resource scope for the resource recorder.

    Figure 3 Selecting the monitoring scope

  6. Specify an OBS bucket.

    Specify an OBS bucket to store notifications of resource changes and resource snapshots.

    • Select an OBS bucket from the current account:

      Click Your bucket. If the OBS bucket name has a prefix, you need to enter the prefix. If no OBS buckets are available of the current account, create one. For details about how to create an OBS bucket, see Object Storage Service User Guide.

    • Select an OBS bucket from another account:

      Select Other users' bucket, then configure Region ID and Bucket Name. If the OBS bucket name has a prefix, you need to enter the prefix. If you select a bucket from another account, you need required permissions granted by the account. For details, see Cross-Account Authorization.

    After you specify an OBS bucket, Config will write an empty file named ConfigWritabilityCheckFile to the OBS bucket to verify whether resources can be written to the OBS bucket.

    Figure 4 Specifying an OBS bucket

  7. Specify a data retention period.

    Select Seven years (2557 days) or select A custom period and enter a retention period from 30 days to 2557 days.

    The data retention period only applies to resource configuration data and snapshots reserved by Config. It will not affect your data storage with SMN or OBS.

    Config will delete data that has been reserved for a longer time than the specified retention period.

    Figure 5 Specifying a data retention period

  8. Select an SMN topic.

    Toggle on Topic, then select a region and an SMN topic for receiving notifications of resource changes.

    • Select a topic from the current account:

      Select Your topic, then select a region and an SMN topic. If no SMN topics are available, create one. For details about how to create an SMN topic, see Simple Message Notification User Guide.

    • Select a topic from another account.

      Select Topic under other account, then enter a topic URN. If you select a topic from another account, you need required permissions granted by the account. For details, see Cross-Account Authorization.

    After you create a topic, you must add subscriptions to the topic and confirm the subscriptions. For details, see Simple Message Notification User Guide.

    Figure 6 Selecting an SMN topic

  9. Grant permissions.

    • Quick granting: This option will automatically create an agency named rms_tracker_agency to grant the required permissions for the resource recorder to work properly. The agency contains permissions, including the SMN Administrator for sending notifications and the OBS OperateAccess permission for writing data into an OBS bucket. The agency created by quick granting doesn't contain KMS permissions, and the resource recorder is unable to store resource change notifications and snapshots to an OBS bucket that is encrypted using KMS. If you need to use an encrypted bucket, you can add the KMS Administrator permission to the agency or use custom authorization. For details, see Storing Resource Change Notifications and Resource Snapshots to an Encrypted OBS Bucket.
    • Custom granting: You can create an agency using IAM to customize authorization for RMS. The agency must include permissions for sending notifications using an SMN topic and for writing data into an OBS bucket. To store resource changes and snapshots to an OBS bucket that is encrypted using KMS, you need the KMS Administrator permission. For details, see Storing Resource Change Notifications and Resource Snapshots to an Encrypted OBS Bucket. For details about how to create an agency, see Identity and Access Management User Guide.

      This agency grants Config related SMN and OBS permissions that are required for sending resource change notifications using an SMN topic and storing resource snapshots into an OBS bucket.

      Figure 7 Grant permissions

  10. Click Save.
  11. In the displayed dialog box, click Yes.

Adding a Rule

  1. In the navigation pane on the left, choose Resource Compliance.
  2. In the middle of the page, click Add Rule. On the displayed Configure Basic Details page, select a policy, specify Rule Name and Description, and click Next.

    Figure 8 Configuring basic details

    For details about parameter settings, see Table 1.

    Table 1 Basic configuration parameters

    Parameter

    Description

    Policy Type

    Possible values are:

    • Built-in policy
    • Custom policy

    Built-in Policy

    Specifies the policy that has been developed for a service.

    You can use built-in policies to quickly add rules.

    For details, see Predefined Policies.

    Custom Policy

    Config allows you to create custom policies to add rules.

    For details, see Example Custom Policies.

    Rule Name

    By default, the predefined policy name is reused as the rule name. A rule name must be unique.

    The rule name can contain only digits, letters, underscores (_), and hyphens (-).

    Description

    By default, the rule description is the same as the selected predefined policy description. You can also customize the rule description.

    There are no restrictions on the rule description.

    FunctionGraph Function

    Specifies the URN of the FunctionGraph function in the custom policy.

    For details about how to create a FunctionGraph function, see Creating a FunctionGraph Function for a Config Custom Policy.

    This parameter is mandatory only when Policy Type is set to Custom policy.

    Grant Permissions

    This agency grants Config the read-only and call permissions of FunctionGraph. These permissions allow you to customize rules to query FunctionGraph or send events to FunctionGraph.

    This parameter is mandatory only when Policy Type is set to Custom policy.

    NOTE:
    • Quick granting: This option will automatically create an agency named rms_custom_policy_agency to grant the permissions required for the customized rule to work properly. The permissions include the read-only and call permissions for FunctionGraph.
    • Custom granting: This option allows you to create an agency and assign permissions in IAM. The permissions assigned must include the read-only and call permissions of FunctionGraph. For details about how to create an agency, see Identity and Access Management User Guide.

  3. On the displayed Configure Rule Parameters page, configure required parameters and click Next.

    Figure 9 Configure Rule Parameters

    For details about parameter settings, see Table 2.

    Table 2 Parameter descriptions

    Parameter

    Description

    Trigger Type

    Specifies the conditions under which rules are triggered.

    Possible values are:

    • Configuration change: The rule is triggered when a specific cloud resource is changed.
    • Periodic execution: The rule is triggered at a specific frequency.

    Filter Type

    Specifies the resources to be evaluated.

    Possible types are:

    • Specific resources: Resources of a specific type will be evaluated.
    • All resources: All resources from your account will be evaluated.

    This parameter is mandatory only when Trigger Type is set to Configuration change.

    Resource Scope

    If you set Filter Type to Specific resources, you need to specify a resource scope.

    • Service: Select the service the resource belongs to.
    • Resource type: Select the resource type of the corresponding service.
    • Region: Select the region where the resource is located.

    This parameter is mandatory only when Trigger Type is set to Configuration change.

    Filter Scope

    After you enable Filter Scope, you can filter resources by resource ID or tag.

    You can specify a specific resource for compliance evaluation.

    This parameter is mandatory only when Trigger Type is set to Configuration change.

    Execute Every

    Indicates how often a rule is triggered.

    This parameter is mandatory only when Trigger Type is set to Periodic execution.

    Configure Rule Parameters

    Specifies the parameter configuration for the built-in policy or custom policy you selected in step Configure Basic Details.

    For example, if you select policy required-tag-check and Keywords is tag, you need to specify a tag key and a tag value here. Then, resources that do not have this tag are non-compliant.

    Not all built-in policies have parameters to be configured. For example, if you select policy volumes-encrypted-check, you do not need to configure any rule parameters.

    You can set up to 10 rule parameters for a custom policy.

  4. On the Confirm page displayed, confirm the rule information and click Submit.

    Figure 10 Confirm

    After you add a rule, the first evaluation is automatically triggered immediately.

Viewing Evaluation Results

You can view all created rules and details of each rule on the Config console.

  1. Log in to the management console.
  2. Click in the upper left corner. Under Management & Governance, click Config.
  3. In the navigation pane on the left, choose Resource Compliance.
  4. On the Rules tab, view rules, rule status, and evaluation results.
  5. Click a rule name to go to the Rule Details page.

    The evaluation results are displayed on the left of the page, and the rule details on the right of the page.

    Figure 11 Rule details

    A rule may be in one of the following statuses:

    • Enabled: The rule is available.
    • Disabled: The rule is disabled.
    • Evaluating: The rule is evaluating resources.
    • Submitting: The rule is submitting an evaluation task to the associated FunctionGraph function.

    During the evaluation, the rule is in the Evaluating state. After the evaluation is complete, the rule status changes to Enabled, and then, you can view the evaluation results.

Advanced Queries

Advanced Queries allow you to use ResourceQL to query how your resources in one or more regions are configured.

Advanced Queries allows you to filter and check your Huawei Cloud resources using ResourceQL.

ResourceQL is part of the Structured Query Language (SQL) SELECT syntax. It can perform attribute-based query and aggregation on the current resource data. The query complexity varies. You can query resources by tag or resource identifier, or by using complex SQL statements. For example, you can query an ECS with a specified OS version.

You can use Advanced Queries to:

  • Manage inventory. For example, you can query ECSs with certain specifications.
  • Check security compliance of your resources. For example, you can query resources for which specific configuration attributes (EIP and encrypted EVS disks) have been enabled or disabled.
  • Optimize costs. For example, query EVS disks that are not attached to any ECS.

Resource Aggregator Overview

A resource aggregator enables you to aggregate resource configurations and compliance data from multiple accounts or an organization, so that you can centrally view or search for these resource data.

You can only view aggregated resources and their compliance data instead of modifying resource data. For example, you cannot use a resource aggregator to deploy rules or access snapshot files from a source account.

Conformance Package

A conformance package is a collection of rules. Config provides you with conformance packages to centrally create and manage rules, and query compliance data.